While studying articles on orientation, you may have come across the concept of “azimuth determination” more than once. This term can also be found in fiction and popular science literature, in manuals on astronomy and survival. In this article we will look at this concept and understand the basics of orientation.
From geography textbooks we know that azimuth on a map is the angle between the direction line to the object and the direction line to the north. Its calculation starts from the north direction clockwise.
What is magnetic and true azimuth in geography?
The angle located between the direction to the north and the one located at a specific point is azimuth. The northern direction is the one that is directed directly towards the North Pole. However, the path pointing north on the compass is, of course, only considered to be the direction pointing towards the magnetic pole. But this is not a geographical location at all. Therefore, speaking about the true pole, we are talking about the geographical one, which is directly related to the shape of our planet. Plus, it is also connected to the Earth’s rotation axis, which passes through 2 poles.
The magnetic pole is closely related to the magnetic field of our Earth, which has 2 poles. This field does not coincide with the true poles of the planet, just as the fields corresponding to them do not coincide with the meridians: neither true nor magnetic.
Magnetic and true azimuth
Having laid one or another direction between the meridians, which will directly touch the object of the selected area, then the angle between these meridians will turn out to be true azimuth, as well as magnetic, respectively. The difference that results between these azimuths is called magnetic declination. This declination can have several names, it all depends on which direction of the world it leans more towards.
- Leaning to the east means the declination is eastern
- Leaning to the west means the declination is western
Declination going to the east is indicated by a plus, but to the east by a minus.
Use with card
The compass is convenient to use together with a map of the area. It is important that the map displays the entire region where the hike is taking place, preferably with a small margin.
To get directions on the map, you need to do the following:
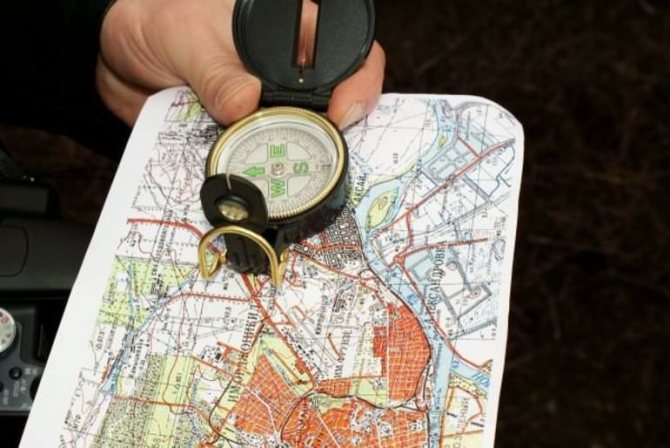
- Lay the map out on a flat surface, north facing up. Place the device on the top of the tablet, making sure there is nothing metal nearby.
- Draw on the map point A, the location of your current deployment, and point B, which you need to get to, and draw a line between them. Knowing the scale, use a ruler and calculate how many kilometers you plan to walk.
- Rotate the compass marking so that north coincides with north on the map, and position it above the drawn line. Look at the numbers and write down how many degrees the path deviated from the north direction. This will be the azimuth.
Align the arrow indicating the direction with the azimuth, remove the map and set off, holding the compass in front of you.
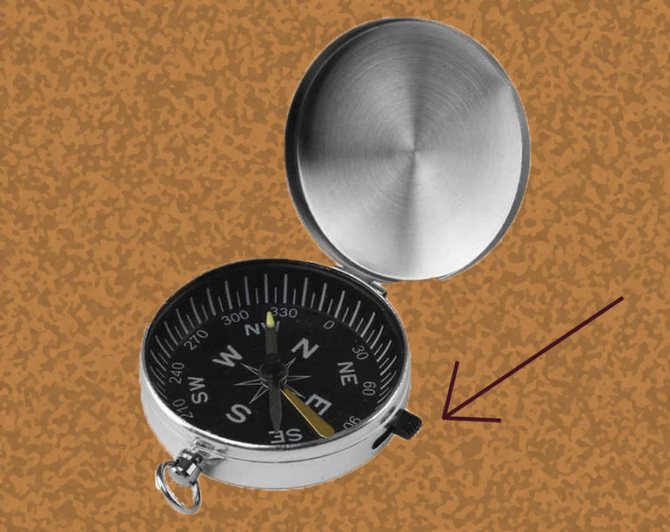
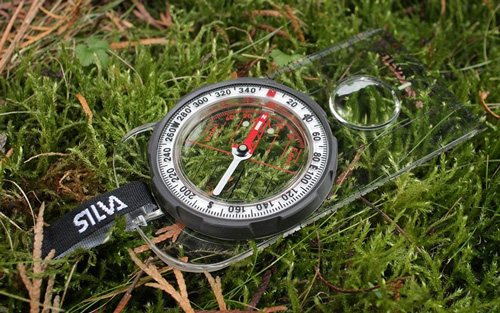
How to determine azimuth using a compass?
To learn how to correctly navigate in a particular area and get the necessary direction, you need to calculate the azimuth using a compass. This is done very simply:
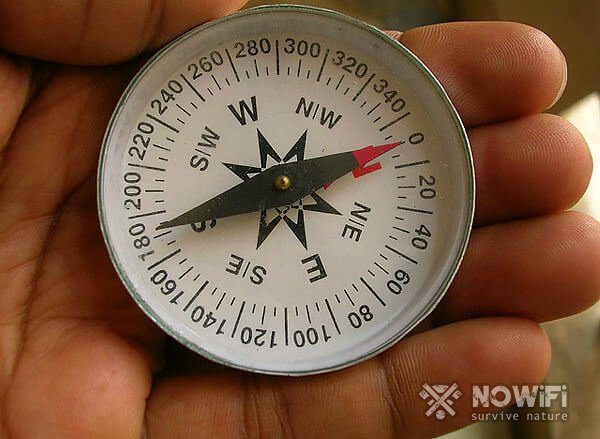
- Take the compass in your left palm and place it horizontally. Using your right hand, release the brake that holds the compass needle in place. Start rotating the compass so that the north tip of the arrow points to “0” on the scale. Then turn the ring with the sight so that the line of sight coincides with the distant object and with the one that is clearly visible. Count the required number of divisions of the magnetic azimuth for this particular element. Make a countdown from the indicator “0”, move as the hour hand moves until you get to the number that is opposite the viewfinder and its pointer.
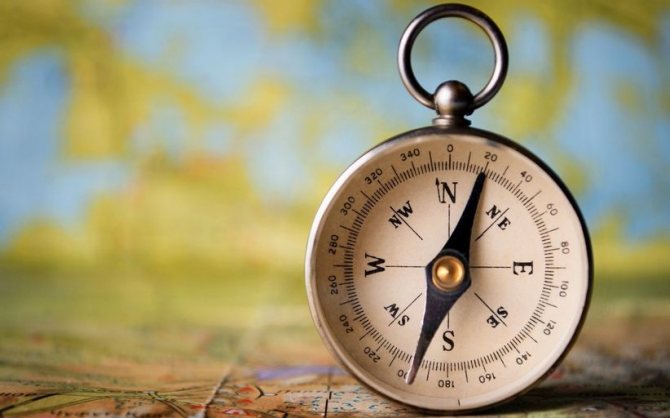
Azimuth by compass
- Align the visor pointer with the pointer on the specified object. Perform this manipulation several times: first look at the pointer of the viewfinder, then look at the object pointer, perform the process in reverse. Remember an important point: under no circumstances should the compass be brought close to your face, especially your eyes, as the accuracy of future azimuth measurements may deteriorate. Use a special compass, for example, Andrianov's compass. This way you will get more accurate results.
- If you will only move in the opposite direction from the selected object, then try to calculate the return azimuth. Direct azimuth readings are less than 180 degrees, 180 degrees are added. But, if these indicators are greater than this mark, then 180 degrees are subtracted.
- To determine the indicated direction using the old azimuth values, it is necessary to rotate the viewfinder ring: the viewfinder pointer is aligned with the indication located on the scale, which is equal to the previously specified azimuth value. After this, the brake of the arrow on the compass is removed, its body is rotated until the northern edge of the arrow points to the “0” number. The sight indicator will show the required course.
Navigation by compass
In practice, using a magnetic orientation device is not as difficult as it seems. The following instructions will help you master the skills:
- Determine the landmark in which direction to go and stand facing it.
- Place the compass strictly horizontally on your palm, holding it in front of you at chest level.
- Look where the red end of the arrow is pointing - north is in that direction.
- Turn the compass or turning ring so that this end of the arrow aligns with the zero point of the scale.
- Point the indicator arrow at your landmark and see which way to go. This process is called bearing, or determining azimuth.
Then you can walk in a given direction, periodically repeating this method of orienteering to check.
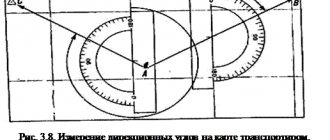
How to determine azimuth using a protractor from a topographic map?
The azimuth starts from 0 and moves clockwise to 360 degrees. That is, from the northern mark of the magnetic meridian to a given point.
If you need to move using a compass, you need to indicate the azimuth values on the map. This technique is used by aircraft and sea vessels that make long-distance flights or voyages. This method is also used by travelers during times of poor visibility, for example, at night, if there is no chance at all to move along a special landmark.
For the correct definition, take:
- Travel map
- Compass
- A simple pencil with a ruler
- Protractor
Azimuth with a protractor
Next, follow our instructions:
- Mark your own location on your map. Try to navigate by the signs that are on the map.
- Find a landmark where exactly you should go. Straight-line movement can be carried out exclusively by air or sea. There are truths and exceptions on land - this is the desert or steppe. As a rule, movement on the ground occurs along a broken path, taking into account all natural obstacles. Therefore, you will have to regularly adjust your azimuth while moving.
- Place a ruler on the route map so that your location and destination are on this ruler. Using a simple pencil, draw a stripe until it intersects the closest meridian. Attach the base of your own protractor to this strip. Draw the line, which is located in the central part, to the place where it intersects with the drawn strip - the direction should look towards the landmark. From the arc of the protractor where it intersects with that strip, take readings. Your azimuth is ready.
Avoiding obstacles
Don't panic when you have to deviate from the set course. If you know how to use a compass correctly, it will help you calmly get around any object and return to your chosen route. You will need to perform the following sequence of actions:

- Stop in front of the obstacle and take another bearing.
- Determine which side is more convenient to get around the obstacle. If the detour is on the right, add 90 degrees to the azimuth; if on the left, then subtract 90 degrees. Let's say the azimuth was 170. Then the new value will be 80 or 260 degrees.
- Move in a new direction, counting the number of steps until the obstacle is completed. Then turn around 180 degrees and walk the same number of steps in the opposite direction to return to your original path.
- Having returned to it, orient yourself again to the cardinal directions on the compass and continue moving along the azimuth corresponding to the figure on the map.
Of course, all these simple techniques require the development of a certain skill. To ensure confident use of the compass when hiking in unfamiliar terrain, you will have to practice several times in familiar terrain.
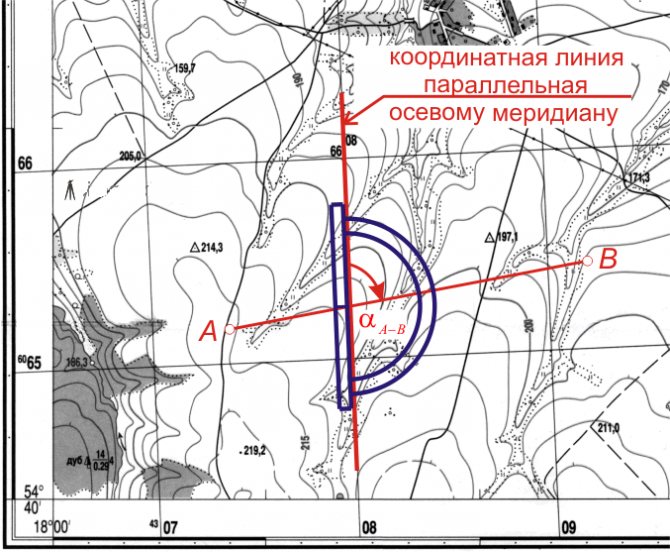
How to determine azimuth from the coordinates of two points?
Determining the coordinates located between one point and another point is very simple. Draw the meridian from the starting point. This meridian should be parallel to the eastern frame or the western frame on the paper. The azimuth is calculated relative to this meridian. Since drawing a meridian is not so easy, then first you need to determine the directional angle of the direction that you want to calculate.
To measure the directional angle of the resulting line, you need to draw a strip through the first point, which is parallel to the abscissa axis, and then measure the directional angle. You can also lay a strip to the place where it intersects with the coordinate strip. Where there is an intersection, you need to measure the directional angle.
Sides of the horizon. Azimuth
Our planet is huge, but we always see only a small part of it. In open spaces, be it a field or a seashore, you can see that somewhere far, far away the sky meets the earth. In the city this is not always noticeable, since our gaze always rests on some objects. The space visible to the eye is called the horizon (from the Greek word “horizon” - limiting), and the imaginary line limiting it is called the horizon line. Or, in other words, the horizon line is the visible line of contact between the earthly and celestial spheres.

If you move forward towards the horizon line, it will move away all the time. And it is simply impossible to reach it. On relatively flat terrain, a person sees 4-5 km around him, rising to a height of 100 meters, the horizon already expands to 36 km.
We will not get lost in an area that is familiar to us. Going to school, to friends, to the dacha, we quickly find our way there. We can easily explain to a visitor how to get to a theater or museum, or find the right street or house. At the same time, we use well-remembered objects (buildings, signs, even trees), as well as concepts such as “left”, “right”, “up”, “down”, “forward”, “back”. All these objects and concepts help us navigate the terrain. How can we understand in an unfamiliar area, for example, in the endless steppe or deep forest, where we are and in which direction we need to go? We can indicate the position of an object only relative to some other objects. In order to indicate the position of a point on the ground, it is necessary to have a reference system that would be constant and in reference to which we would be able to find the point at any time. Such a reference system is the system of sides of the horizon. It is tied to one point on the surface of the globe - the north magnetic pole, relative to which we determine the position of any point or object on the surface of the Earth.
First of all, it is important to remember that there are four main directions of the horizon: north
,
south
,
east
and
west
. The direction opposite to north is south. If we stand facing north, then at right angles to the north-south line, to the left there will be a direction to the west, to the right - to the east.
The sides of the horizon are abbreviated in capital letters: north - N
, south –
S
east
–
E
, west –
W. Between the main sides of the horizon there are intermediate ones: northwest ( NW
), northeast (
NE
), southeast (
SE
), southwest (
SW
).
Although we began to list from the north, the first direction that man learned to determine was the east. And really, what could be simpler? I saw where the sun rises - there is the east. On the opposite side to the east is the west. If you turn to face east, north will be on your left and south on your right. If the eastern direction is found, determining the remaining sides of the horizon is not difficult at all.
The sides of the horizon are also called rhumbs. Rumbus
– in marine terminology, 1/32 of a full circle or 11.25°, as well as one of the divisions of the compass card (divided into 32 parts) and, accordingly, one of the directions relative to north.
There are four main directions, we already know them: north, south, west, east. The directions dividing each quarter of the horizon in half are called quarter directions and have the following names: northeast, northwest, southeast, southwest. There are eight more intermediate points. Let's look at this in more detail. The direction between north and northeast is called north-northeast ( NNE
), between northeast and east - east-northeast (
ENE
), between east and southeast - east-southeast (
ESE
), between southeast and south - south-southeast (
SSE
).
The direction between north and northwest is called north-northwest ( NNW
), between the north-west and west - west-northwest (
WNW
), between the west and south-west - west-south-west (
WSW
), between the south-west and south - south-south-west (
SSW
).
The best cartographers of the past were the Dutch. For a long time, there has been a tradition of calling the directions in Dutch: north - north (N), south - south (S), east - east (O), west - west (W). That is why on some compasses the north direction is marked with the letter N, and the south direction with the letter S.
In the late 1980s, the designation for east O was replaced by E (from the English East ist).
But the Dutch were also excellent sailors. It was they who invented a special form of headdress for sailors and fishermen. This is a canvas hat that reliably covers the sailor’s neck and shoulders from wind and rain. They called this hat the sou'wester. Guys, try to answer the question: which wind direction particularly annoyed the Dutch sailors, judging by the name of the hat? That's right, the wind is from the south.
If we know the sides of the horizon, then we can easily determine our location. The ability to determine one’s location relative to the sides of the horizon and individual objects is called orientation.
By orienting ourselves, we answer the question: where is the object located? When orienting ourselves along the sides of the horizon, we use a system of rectangular coordinates, in which the directions indicate the sides of the horizon, and in it we denote the position of an object relative to others. For example, the school building is located in the southeast of the microdistrict, i.e. In the microdistrict, the building we are interested in is located in its southeastern part. The city is located in the north of the country, which means that in order to find the city we need, we must move across the country to its northern border. The windows face south - what we see from the window is further south than ourselves.
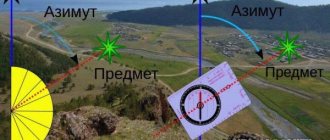
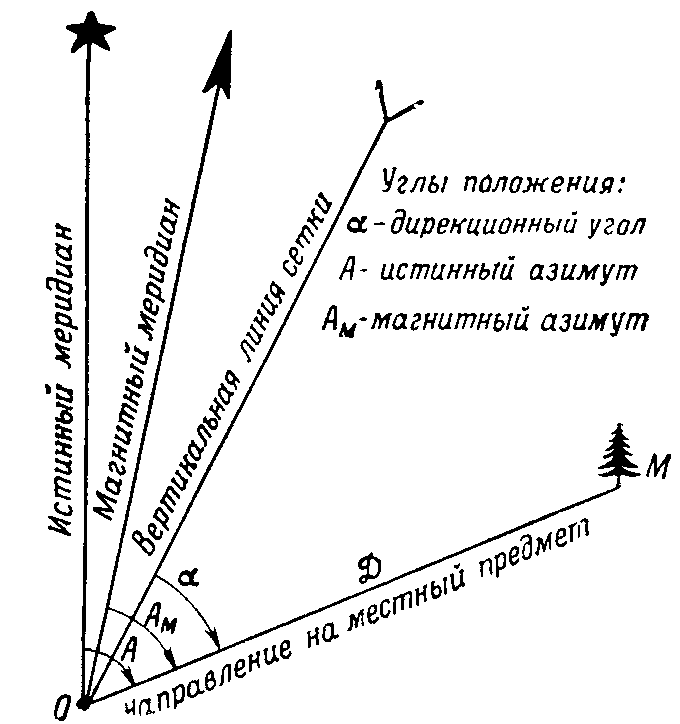
This is all clear, but how to determine the direction to the north at any moment? The direction north is determined on the ground using a compass - a device with a magnetized needle, the end of which always points in the direction of the north magnetic pole of the Earth. The angle between the direction of the magnetic compass needle to the north and the direction towards a given object is called azimuth
.
The azimuth value is measured in degrees and varies from 0 to 360°, counted clockwise from the north pointer. Azimuth has no direction. Knowing the azimuth, we can determine the position of the object relative to the sides of the horizon. The azimuth of the north is 0°, east – 90°, south – 180°, west – 270°. Where will the 360° azimuth be? Also in the north.
Let's try together to calculate the location of objects by azimuth. So an azimuth of 315° means that the object is in the northwest direction from the observer. And an azimuth of 160° means that the object is in the south-southeast direction from the observer.
And now vice versa: we will determine the azimuth by the side of the horizon. So the azimuth of the northeast is 45°, and the southwest is 225°.
You see, everything is quite easy and simple.
You can navigate the terrain in different ways, but with less accuracy: by the stars and the sun, as well as by local features: the crown of trees, the location of anthills, annual rings on stumps, and others.
Orientation of movement on the ground by azimuths: orientation angles
To orient a line means to calculate exactly where it is directed relative to the initial direction. For example, due to the meridians or abscissa axis.
- The angle that is calculated on a special scale in a clockwise direction is azimuth
- The angle that begins the calculation from the northern point to the final (specified) point is magnetic azimuth
- The angle located between the northern indicator of the meridian and the extreme (final) indicator is the directional angle
Orientation in the forest according to the cardinal directions without a map
There are situations when people can get lost in the forest, forest plantation and even in the field.
Extreme situations of this type happen unexpectedly, so it is unlikely that you will have a compass and map in your pocket.
In this situation, you should learn to determine the cardinal directions based on natural indicators that may surround a person in the forest.
Then you won't need maps or other auxiliary devices. To determine the sides of the horizon, it is enough to know several natural features.
How to navigate the cardinal directions in the forest:
- The direction of the world can be easily determined by the bark on the trees. The ideal option would be pine, birch, larch. On the north side the bark is always darker.
- Mushrooms that grow on the bark of trees indicate a northerly direction.
- The anthill is always located on the south side of the tree. On the south side the anthill is more sloping.
- On the southern side, grass rarely grows on mountains and similar hills; the slope is dry and smooth.
- If a person is well versed in the constellations, then one can navigate by the stars. Some can determine location and direction by looking at the moon.
- You can use the movement of migratory birds as a guide to the cardinal directions. It is worth knowing the peculiarities of bird migration.
There are other ways to determine cardinal directions without special equipment, but it is better to use simpler methods that have been proven over the years.