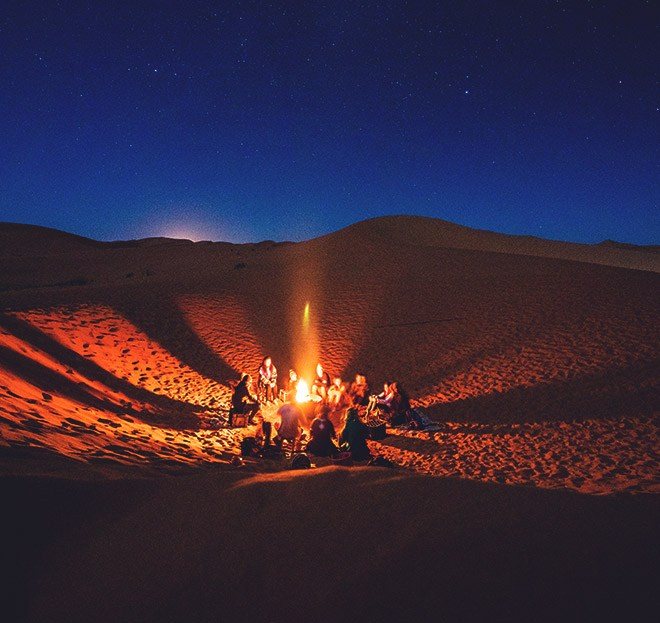
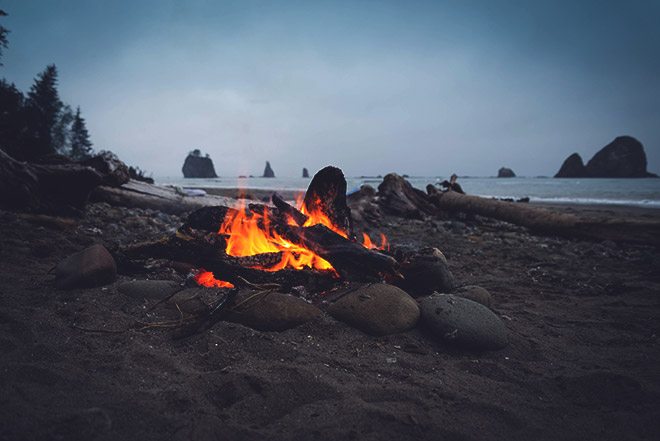
Knowledge of how to light a fire is very important in tourism, emergency survival situations, and can be useful for domestic and economic purposes. Fire is a source of heat. It will help boil water, dry clothes, cook food, illuminate the area, and give a signal. In nature, the flame of a fire protects a person from wild animals, scaring them away.
Rules for making a fire in the forest
Proper fire building has environmental implications in terms of fire safety. There are several general rules on how to properly light a fire:
- Choose the right place for a fire and a platform for lighting a fire.
- Carefully eliminate the fire.
- Observe the prohibitions (do not light a fire in places with signs, as well as during fire season).
- Immediately call the Ministry of Emergency Situations and forest protection in the event of a fire.
- Maintain the required safe distance from trees, bushes and tents.
- Do not place flammable liquids or materials near fire.
- Always keep a container of water and a broom of branches near the fire for extinguishing.
Fire safety when making fires
There are several specific rules for making fires in the forest, as well as monitoring the fire. Such a simple safety technique that tries to protect not only people, but also animals and plants. A burning fire should not be left unattended. Since the flame can rise and spread to something due to strong wind. Putting out the fire is a must if you are about to go to bed. Otherwise, you may simply get caught in the fire and get injured. And sparks can set fire to your clothes or the tent you're in. Fires must be lit at a distance of more than 10 meters from the shelter. The tent is set up from the back. In the mountains the wind blows differently, usually from the valley. Therefore, place it as close to the river as possible.
We recommend reading:
Sights of Venice
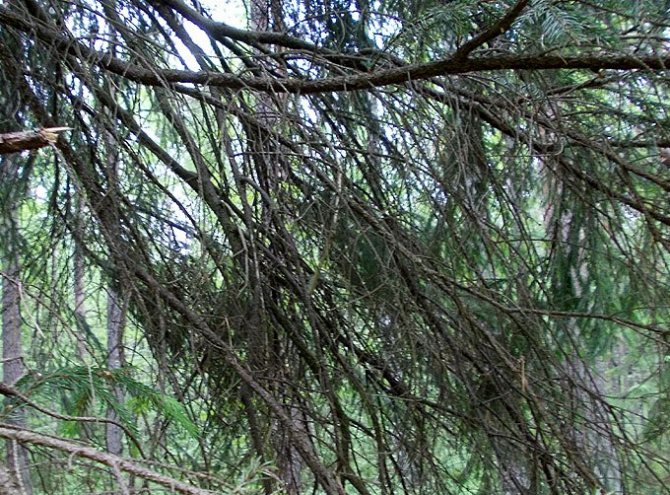
The rules do not recommend using fir branches for fires. Most often it is necessary to use birch bark. Pines and cedars create combustion well. Birch logs create a lot of sparks, but provide more heat. You must make a fire in coniferous areas no less than 15 meters from the trees.
Components for making fire
Combustion can be defined as the process of converting starting materials through redox reactions into combustion products, which is accompanied by the release of thermal energy.
Therefore, the first thing you need to light a fire is the starting materials - fuel.
Redox reactions occur due to oxygen. This means that the second thing necessary for fire is oxygen . A fire can only be lit where air access is provided.
For example, if you try to make a fire in the highlands, where there is much less oxygen than in the lowlands, it will burn weakly. Or, if you add too much fuel to a fire, it may go out because access to oxygen will be cut off.
The third thing you need is temperature. It is necessary to heat the first two components to a certain temperature in order for the physicochemical oxidation reaction (combustion) to start. Further, the reaction will be supported by the heat generated as a result of itself.
Types of fires and their use
When it comes to laying out and lighting a fire, the first question that arises is what purpose you need it for. This affects the choice of wood stacking technique and the choice of fuel.
| Smoke | Fiery | Zharova | |
| Purpose | 1. Getting rid of insects (midges, mosquitoes, etc.). 2. Sending a distress signal. Aimed at creating a large amount of smoke | 1. Lighting. 2. Scaring away wild animals. 3. Heating water and food. Aimed at creating a large flame | 1. Drying things. 2. Heating. 3. Cooking. Aimed at creating heat through coals and high temperature |
| How to make a fire | This type of fire is created by throwing into the fire:
Or smoke is formed when the fire produces little heat:
Therefore, the answer to the question that interests many: “how to make a fire without smoke” sounds simple - “do not do everything that is indicated in this paragraph.” | Special laying of firewood is required:
| Special laying of firewood is required:
|
"Well"
This type of fire is a quadrangular structure consisting of short, thick logs. Brushwood, small firewood, dry grass and other kindling are placed inside it. Slow-burning, such a fire leaves a lot of coals, which give a high temperature.
"Night" or "taiga"
You will need several long logs. They are laid strictly parallel or at a slight angle. There are several ways to stack logs. All types of fires in this group are distinguished by the fact that they use the principle of interaction between burning surfaces, between which there are narrow gaps. Thanks to them, a powerful vertical thrust arises, which prevents the heat from fading away. This group of fires does not require frequent replenishment of fuel - this is their advantage.
Fire in the pit
It is bred in a pit, the walls of which are covered with large logs. A fire is lit at the bottom using small branches.
This fire is windproof, camouflaged, and emits extremely high levels of heat, leaving behind embers that remain warm for a long time. It is a very safe type of fire, as it is difficult to transfer to surrounding bushes or trees.
Are there any downsides to a campfire? Yes, several small ones: the pit is not suitable for heating several people, because it almost does not radiate heat from the sides.
"Star"
Fire with low wood consumption and long burning time. For this technique, you create a heart of fire from small branches, bark, dry grass, and other flammable materials. Then take about 5-7 thick long logs. You fold their ends in such a way that the appearance of the structure resembles a star. As the wood burns, it moves closer to the center.
IMPORTANT: The fire must be large enough to ignite the ends of thick branches. It is better to pour a special ignition agent in the middle of the fire.
"Shalash"
The firewood is stacked on top of each other to form a cone. Place the kindling in the center (core). The disadvantage of this fire is that its upper part burns quite quickly. But the flame is concentrated and powerful.
IMPORTANT: When assembling, make sure you always leave gaps and the branches are not packed too tightly. Otherwise, it may happen that the fire does not receive enough oxygen and therefore goes out or produces a lot of smoke.
The soil on which the fire is located must first be cleared of leaves and branches so that the fire does not spread uncontrollably. At best, you place a ring of stones or a low earthen wall around the fire.
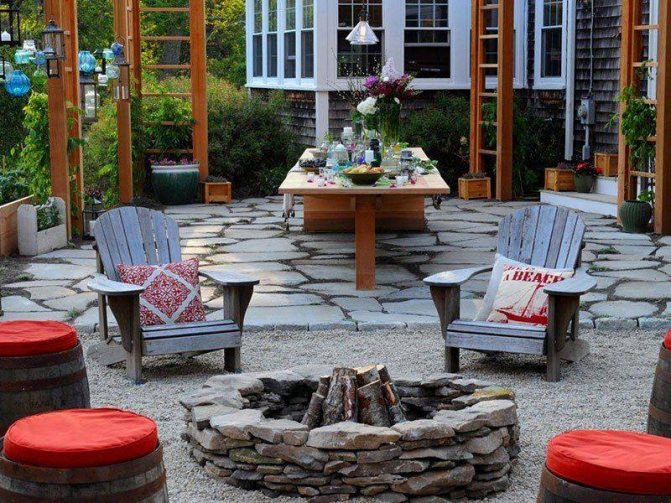
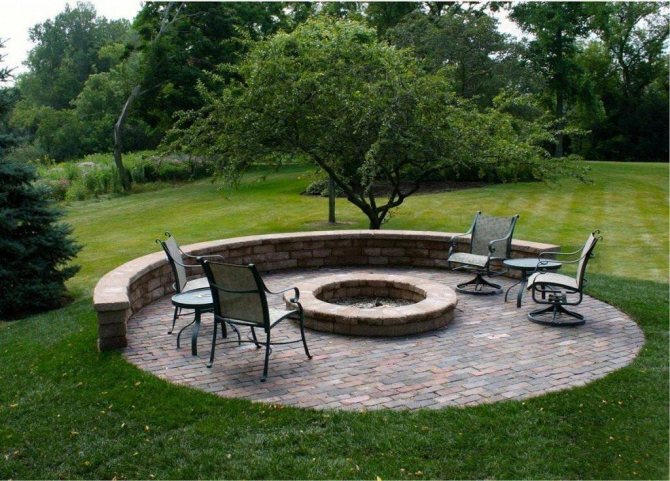
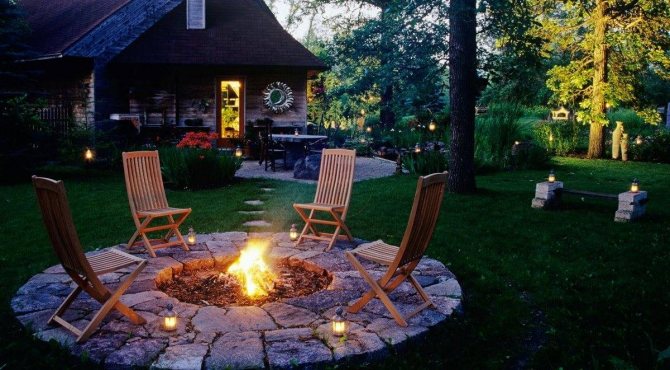
Variety of options for outdoor fireplaces
The outdoor fireplace, which until recently performed only a utilitarian function, has today turned into a fairly popular element of landscape design.
The unusual design of the courtyard area with a fireplace and the original shape of the fireplace itself can transform any area
The fireplace, which does not attract attention during the day, becomes a “zone of attraction” at dusk - a center around which the whole family gathers with pleasure. To make your vacation even more comfortable and enjoyable, an area with comfortable stationary seats and garden furniture is built around the fireplace.
The shape of the outdoor fireplace can be any, matching the overall style of the house. But from the point of view of ease of maintenance and access, most often the hearths are given a round shape.
An excellent technique for creating a picturesque place with a fire pit in the courtyard of a house would be the original covering of the site itself.
The area around the fire can be tiled, covered with gravel, or lined with stones. The choice of materials and design methods is determined only by the style of the site.
70e2b30d1d40fd20eb1f094bbda89af7.jpe ff912ec151afe4fbb4bb95e797b8d0fd.jpe 58d14ba199b993411be2181480241568.jpe
eec9664515e906bba2be8d354188933c.jpe
66f094b741f0a610252ab928ff13f156.jpe
One of the most convenient and interesting ways of zoning a site, when the area with a fire pit is located lower in relation to the adjacent areas of the yard
Setting up a cozy multi-level area on the site is not at all difficult. You just need to remove the layer of soil and level the surface.
Recessed fireplaces, which are located below the level of the site itself around the fireplace, look no less impressive.
Recessed fire pits are suitable for all types of backyards and a variety of styles. The only requirement for arranging a fireplace is not to deepen the fireplace too deep, since the natural combustion process can only be maintained by the flow of fresh air. To ensure the necessary air circulation, the firewood in the recessed hearth is stacked in a hut, leaving wide gaps between them and retreating a sufficient distance from the walls.
And so that you don’t have to carry firewood in your hands, you can make a convenient carrier for firewood. More about this: https://diz-cafe.com/tech/perenoska-dlya-drov-svoimi-rukami.html
We propose to consider a couple of options for arranging a fireplace, which, in addition to their direct functional significance, will act as an effective element of landscape design. A self-made outdoor fireplace will become a source of pride for its owner and a favorite resting place for the whole family on cool evenings.
Finding and preparing a place for a fire
Joking with fire is dangerous. It appears instantly, spreads with great speed and leaves behind only smoke and ash. Therefore, in order to avoid creating a fire hazard and other problems, it is necessary to correctly select and prepare a place for the future fire pit.
A fire cannot be lit:
- in thickets of dry grass;
- in places of old peat bogs;
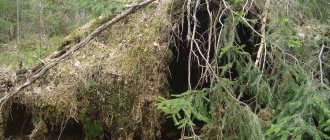
- in windfall areas;
- in places of spruce young growth;
- near the tent;
- under the trees;
- in areas where the law prohibits lighting fires (reserves, etc.).
Restrictions are also added during the fire danger period, during which it is prohibited to light a fire in the forest, near summer cottages and buildings.
A good place for a fire would be if it was located near a pond.
How to choose a place for a fire? It can be successfully placed near a pond, preferably on a rocky surface. There should be no bushes or hanging tree branches near the fire.
REFERENCE: The ideal place for a fire is the location of an old fire pit or trampled ground, cleared of dry grass and branches.
How to choose the right place for a fire
When choosing a place to make a fire , first of all, you need to be guided by safety rules . In order for the fire to be as safe as possible , you need to:
- thoroughly clean the fire site and the surrounding area from debris, dry branches and leaves;
- the fire should be made away from tall grass , bushes and trees;
- you need to build a fire at a distance of at least 5 meters from the tent to avoid a fire from a spark or a strong gust of wind;
- If the fire is made on soil with a high peat content , be sure to sprinkle it with a generous layer of sand . This is done in order to avoid the fire going into the peat and a full-scale fire, which is almost impossible to extinguish on your own;
Preparatory stage
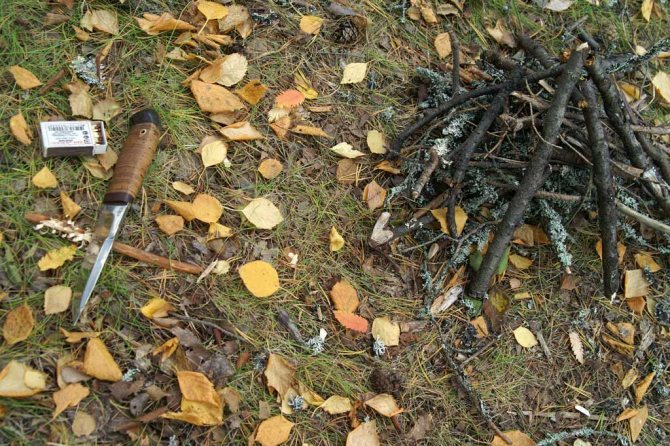
To make a fire in the forest, you first need to prepare everything you need for this. Primarily tinder and fuel.
Fuel
The correct selection of starting material is very important, as this is the base of your fire. The fuel must be dry, as moisture will make it difficult to start a fire and will also kill the flame and heat, replacing them with smoke. The fuel used is brushwood - dry fallen tree branches, and firewood - logs, sticks, logs, pieces of logs:
- birch;
- aspen;
- unrotten dead wood;
- alder;
- oak;
- hazel.
ATTENTION: It is better not to use resinous firewood, because it burns with caviar. Not only the surrounding area can catch fire, but also your tent with your belongings.
Harvesting brushwood and firewood
Only dry branches are suitable as brushwood, since living tree branches will not burn. The brushwood can be picked directly from the tree. It will be revealed by a crunch when a branch breaks off, dry peeling bark, or a lack of leaves. It can also be collected from the ground.
Firewood is obtained from dead wood - vertically standing dry trunks. They are felled with an ax or saw and chopped into logs.
Preparation of kindling (tinder)
REFERENCE: Tinder is a dry material that ignites with very little heat. This is a kind of wick for making fire. When the tinder is dry, all it takes is a spark to ignite it. We use fire tinder as fuel to ignite less flammable material such as wood. You can't just hold a match near a log and expect it to light.
How to make kindling for a fire? There are a number of sources of tinder, such as:
- Tree bark tinder (such as paper), cotton swabs, wool and fluff.
- Dry shavings that can be easily made using a pencil sharpener, knife or shavings from a stick.
- In snowy areas, fungus from trees is used.
- Dry grass, leaves.
Ignition means
Preparing firewood and kindling and stacking it in the right way is not enough to start a fire. It is necessary to create an ignition. For this purpose, ignition means are used. First, the kindling is set on fire, the flame from which is then transferred to the brushwood and firewood.
What kind of ignition products are there?
TOP 3 most famous and popular ignition products:
- Matches;
- Lighter;
- Flint.
Matches
There are many different types of matches:
- ignite on any hard surface;
- ignited on boxes;
- quick-burning and easily extinguished by a blow of wind;
- burning for a long time and in strong winds (even under water).
It is convenient to start a fire with matches in calm and clear weather. A lit match (or several) can be placed in the fire itself for kindling. However, in windy weather you will have to suffer.
Another disadvantage of matches is that they deteriorate from moisture. But there is a useful life hack : dip each match in wax or paraffin, and carefully pick it off with your fingernail before use. You can also protect the entire box by wrapping it in cellophane.
Lighters
There are also a lot of lighters on the market these days. There are expensive ones, there are cheap ones. There are those that run on gasoline, and there are those that run on gas, etc.
According to the mechanism of fire formation, lighters are more convenient and reliable than matches. One finger movement is enough. Lighters are not afraid of moisture, and some of them are not afraid of wind.
However, lighters can break. Also, lighters do not tolerate frost.
ATTENTION : We recommend having at least two lighters with you in case one of them breaks. It’s better to take a box of matches with you, in addition to a lighter.
Flint
Flint helps create fire by striking sparks. The simplest flint includes metal steel and flint. The flint is hit on the chair near the tinder. The resulting sparks ignite the kindling.
Flint is a complex method of making fire, so it is rarely used.
Flint is a complex method of making fire, so it is rarely used in cases where there are no matches or a lighter. One of the advantages of this product is its unpretentiousness: fire, water, snow, dirt and the like are not afraid of it.
Note! We talk in detail about the method of making fire using flint, what it consists of and how to make it in the article: “Flint: what it is, how to make it and how to choose it.”
Making a fire: features, general rules and nuances.
Making a fire is the most accessible and economical way to provide adequate hot food during camping conditions and effectively withstand low ambient temperatures. In addition to its main purpose, a fire will help protect against blood-sucking insects, provide a light source, give a signal and create a romantic atmosphere in order to win the affection of female representatives.
Despite the apparent simplicity and routine, starting a fire and further maintaining it in working condition, so to speak, under certain conditions and the absence of certain skills can turn into a serious problem. The purpose of this article is a detailed examination of the process of making a fire - “from scratch” until the moment when the sudden extinction of the fire can no longer be feared.
Before starting the review, I consider it necessary to make a small disclaimer. We will assume that to create a fire we have a sufficient number of dry matches or a well-filled gasoline lighter (such as a Zippo or “eternal match”). By the way, before heading into the bosom of nature, it is advisable to pack one or two boxes of matches in a sealed bag and put them in reserve. It will be very helpful in case of an unexpected downpour or a fatal swim in a pond.
So we have matches. In addition to these, the key to successfully starting a fire are three key points:
- Finding a suitable location.
- The presence of suitable kindling - the material that will give rise to our fire.
- Availability of suitable firewood or other material to be used as fuel.
Choosing a place to make a fire.
The choice of a place to make a fire is entirely determined by the purpose for which the fire is lit. However, there are some general principles. Following them will greatly facilitate and speed up the process of obtaining a stable flame. The fire is lit on a flat area with good air exchange, if possible devoid of vegetation. In winter, it is necessary to remove the snow cover to the ground over an area of at least 1 sq.m, otherwise the fire will sag, be filled with melt water and suffer from a lack of oxygen (carbon dioxide formed during the combustion process and does not support it, is heavier than air and flows into the melting recess). In addition, after clearing the site of snow, it is necessary to light a fire on a relatively dry base of pieces of bark or thick branches in order to protect the nascent fire from wasting energy on thawing the ground and, as a result, increased humidity (Fig. 1). A dry substrate is used not only in winter conditions, but also if the fire is lit on a damp substrate.
Rice. 1. Dry base for starting a fire. In this case, from pine logs.
In the presence of strong wind and (or) precipitation, it is better to make a fire in a shelter: under a fallen tree, uprooted stump, etc. In this case, two conditions must be met: good air exchange (draft) and no slope towards the center of the fire pit, so that the fire does not “suffocate” from the products of its own combustion and is not flooded with accumulating rain (melt) water. If there is a large amount of vegetation at the site of the future fire pit, especially dry or thick forest litter, the top layer of soil is removed to the depth of a sapper shovel over an area of at least 1 sq.m (Fig. 2). The excavated soil is cut into pieces and placed around the perimeter of the site with the vegetation facing down. This will prevent the fire from spreading beyond the fire pit and starting a forest fire.
Rice. 2. Removed soil at the site of the fire.
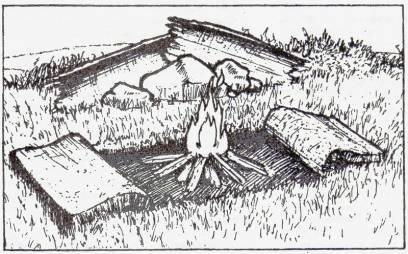
When parking for a long time, it is recommended to equip the fireplace with top and side awnings made of fire-resistant material (Fig. 3, 4). If necessary, instead of awnings, you can use structures from any available means: tourist rugs, spruce branches on a frame made of poles, etc. These measures will protect the fire from precipitation and strong winds, and will help create a heat concentration zone for effectively warming people and drying equipment.
Rice. 3. Upper awning for the fire.
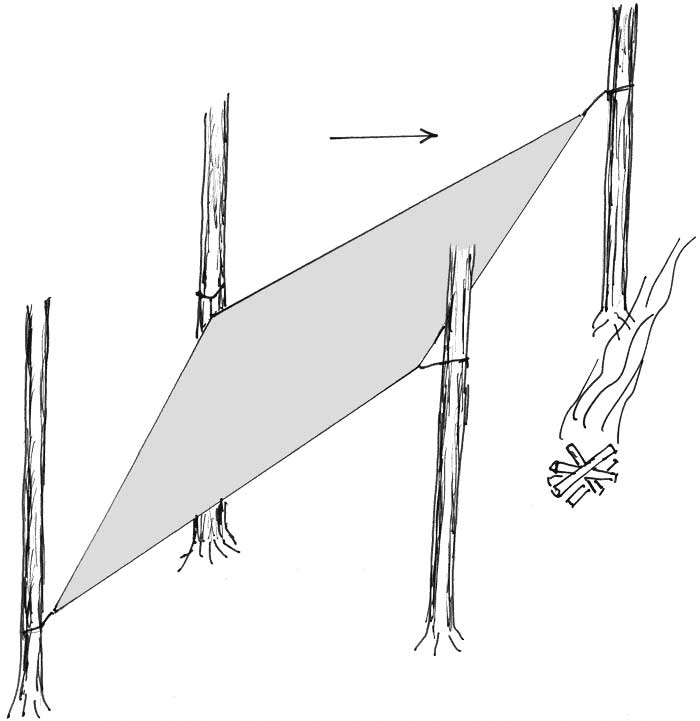
Rice. 4. Side awning for a fire. The arrow shows the direction of the wind.
Types and effective use of kindling.
Almost all travel guides unanimously believe that you should take kindling with you. This is understandable: when in the field, having ready-made kindling significantly saves time on searching for similar materials and starting a fire. Of all the recommended types of kindling included in the prudent tourist’s kit, I consider a 10-centimeter piece of thick paraffin candle to be the most suitable option. It is paraffin-wax that will spread in the summer heat and ruin the property adjacent to it. A paraffin candle is not afraid of moisture, allows you to effectively build a fire and can be used for a large number of other needs (for example, for hydrophobic treatment of shoes).
The second acceptable option is celluloid (old photographic and film film, ping-pong balls), but in cold weather it will crumble, and its combustion is too violent and fast to ignite wet wood. In principle, in an extreme situation, celluloid can be replaced with any plastic other than polyethylene: a piece of a tourist rug (polyurethane foam), disposable tableware (polypropylene or polystyrene). So, in my opinion, it is enough to limit yourself to having a good paraffin candle in your stash.
A supply is a supply, but it may turn out that the fire will have to be made with improvised means. In the conditions of the middle zone (let’s call it forests and forest-steppe), if you have certain skills and minimal tourist equipment (knife, ax), finding effective kindling for a fire will not be difficult. I will describe the kindling in order of decreasing availability, that is, from what you can get with your bare hands to what you have to use a knife, an ax, or even a saw.
1. Coarse dry grass from last year (weeds, Fig. 5). Universally available, extremely efficient kindling. The weeds are broken (or crushed) into small pieces 15-20 cm long, placed loosely in the center of the fire pit, and a hut made of thin dry branches is built on top (Fig. 6). The fire is ready with one match! True, there is one “but”. The efficiency of this type of kindling is reduced to almost zero in wet weather and during the winter thaw. And even in cold weather, weeds covered with a thin layer of frost will not light up immediately. So the use of this type of kindling is limited to hot summer days.

Rice. 5. Weeds.
Rice. 6. General layout of the kindling and the hut.
2. Small dry spruce or fir twigs (“spider web”, Fig. 7). The characteristics and efficiency are close to the previous type of kindling; accessibility is determined by the presence of spruce or fir within reach. Compared to weeds, wet “cobwebs” ignite much better; Its flammability is better even in winter. A “cobweb” is used in a similar way to weeds.
Rice. 7. “Cobweb”.
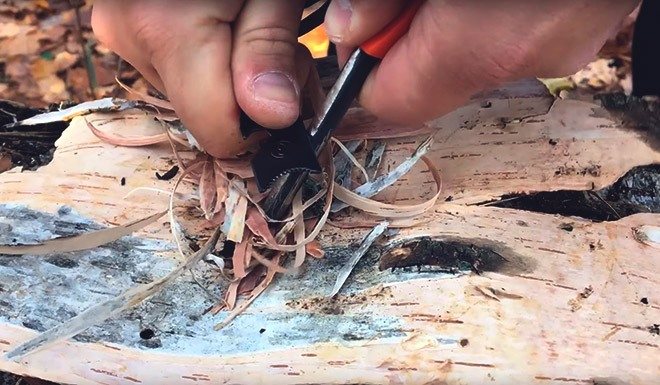
3. Birch bark (birch bark, Fig. 8). Birch bark is a real find for those who have set themselves the goal of making a fire. Burns perfectly in any form: damp, rotten, taken from a living tree. The availability of this type of kindling is determined by the presence of mature birch trees, which, thank God, are one of the most common trees in our conditions. You can extract birch bark either with your bare hands or using improvised means, but the best results are obtained by removing large layers with a knife. Two deep circular cuts are made on the tree trunk, the distance between which is determined by your desire. The annular cuts are connected perpendicularly, directed along the trunk. All that remains is to pick up the formed edge and tear off the birch bark in a layer (Fig. 9). Next, the birch bark is placed in a compact pile in the center of the fire pit, and a hut of thin dry branches is built on top. The fire is ready.
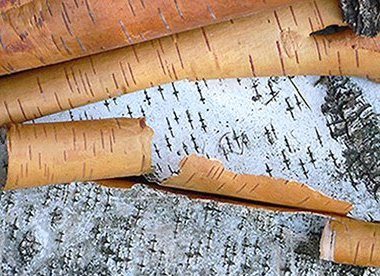
Rice. 8. Birch bark.
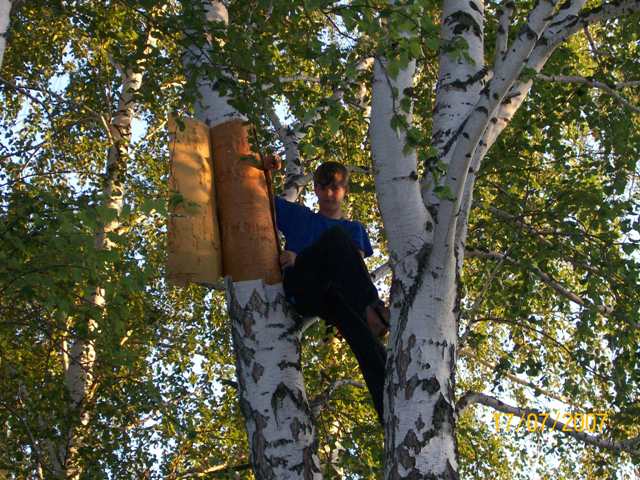
Rice. 9. Extraction of birch bark: removal by layer.
4. Bark of dead spruce (fir, Fig. 10). An exceptionally effective kindling at any time of the year and in any weather conditions, it ignites perfectly when wet. Large pieces of bark make excellent fire pits in wet conditions or in winter. Accessibility is determined by the presence of spruce and fir trees - trees are very common in the middle zone. The bark easily peels off in pieces of various sizes; you just need to pick it up with any available means. This is best done with a small hatchet. It should also be taken into account that the most tarred bark is located at the butt of the tree. The collected kindling is used, similarly to the previous ones, as the basis for a “hut”. In this case, the pieces of bark are arranged in a “pyramid”, and the branches of the hut must be thick enough, otherwise they will instantly burn out.
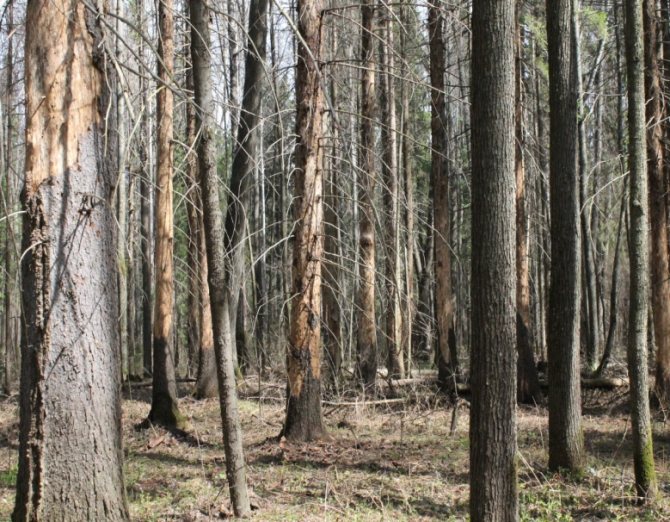
Rice. 10. Bark of a dead spruce. Due to the abnormal heat of 2010, a lot of such spruce trees appeared in Russian forests.
5. Resin deposits from coniferous trees. Everyone knows the specific feature of coniferous trees to heal damage with resin. Initially liquid and viscous, over time the resin hardens into a solid, opaque mass - this is exactly the “old” resin that is used as kindling. This type of kindling ignites when wet and is considered the best for use in winter, even in severe frosts. Its availability is determined by the presence of any coniferous tree - again, central Russia does not experience a shortage of them. The resin hardens in two forms: either in the form of nodules the size of a walnut to a fist (Fig. 11), or in the form of nodules that deeply permeate the bark and wood around large cracks (Fig. 12). We will need both. True, to extract the resin you will need a hatchet or a strong knife - both the nodules and the deposits are removed with a piece of the underlying bark and wood. Further use of kindling is similar to the previous ones - as the basis for a “hut”. The branches of the hut should be thick enough to avoid rapid burning.
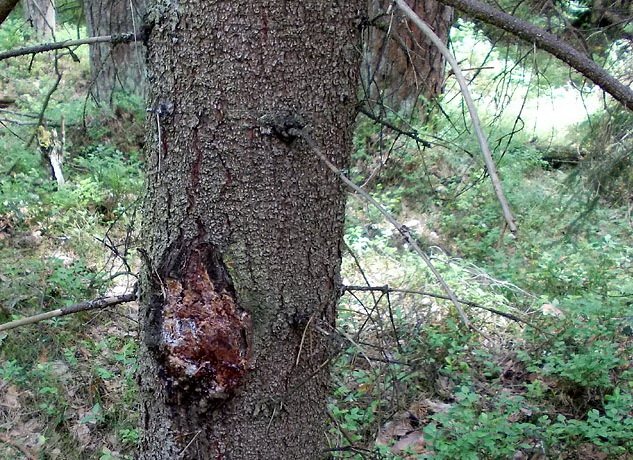
Rice. 11. Resin leakage in the form of a nodule.
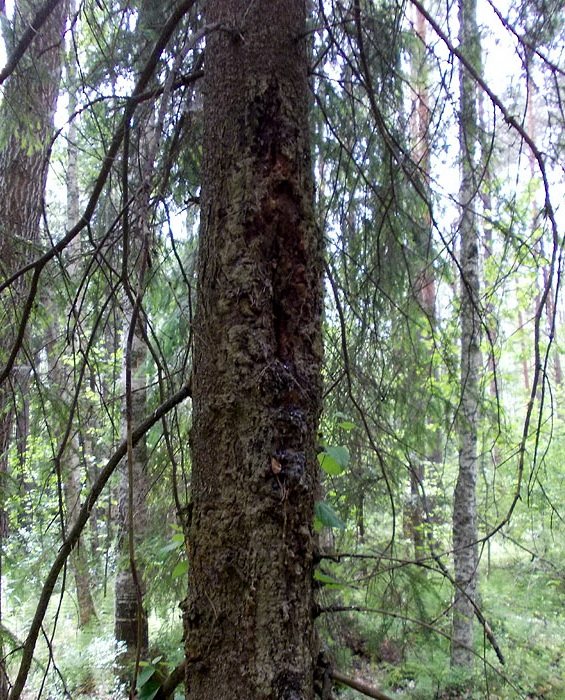
Rice. 12. Resin flow in the form of an influx along the edges of the crack.
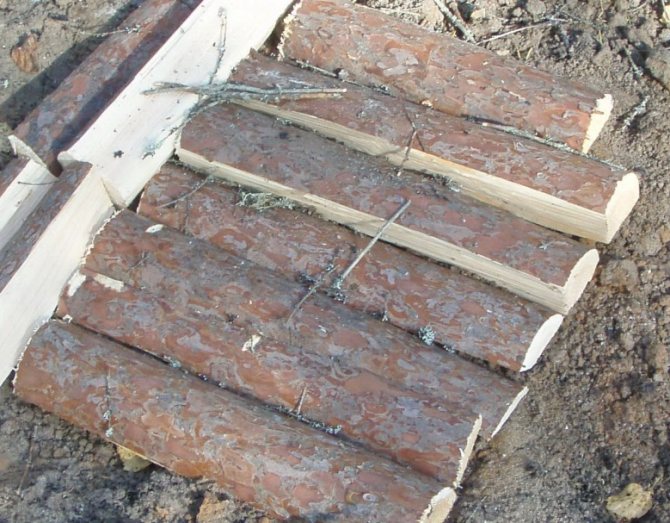
6. Dry heartwood of spruce, fir, and pine. Perhaps the most labor-intensive type of kindling to obtain and manufacture, the efficiency of which is significantly lower than resin, spruce bark and birch bark. Personally, I used it once - and then rather for the purpose of improving an additional skill. However, this method can be useful during heavy precipitation, especially rain, when there is no time to look for another type of kindling, but you want to dry yourself quickly by a hot fire. So, the availability of this method is determined by the presence of a nearby dead (precisely standing, not lying on the ground, dead) coniferous tree of sufficient thickness (about the size of an adult man’s thigh, no less), with an intact top.
A tree that is too thin can be soaked with water right down to the core, and trees without a top usually have a core that is already rotten and rotten. Trees standing in places with excessive moisture (lowlands, swamps), as well as larch, are not suitable for this purpose. These options will either be damp through or rotten. Having found a suitable tree, we cut it down, easier and faster - using a saw. Using a saw, we cut it into chocks and see that the core of these chocks is completely dry. We chop the selected block (or two) into 4 parts and use a sharp knife to cut out a sufficient amount of shavings and splinters from the core. Next, we construct a familiar “hut” from the resulting material, the basis of which will be a neat pile of shavings, and the walls will be splinters (Fig. 13). At first, the fire requires attention, protection from rain and regular addition of fuel (as it burns, the size of the firewood increases), but, once mature, it burns hot and is not afraid of precipitation.
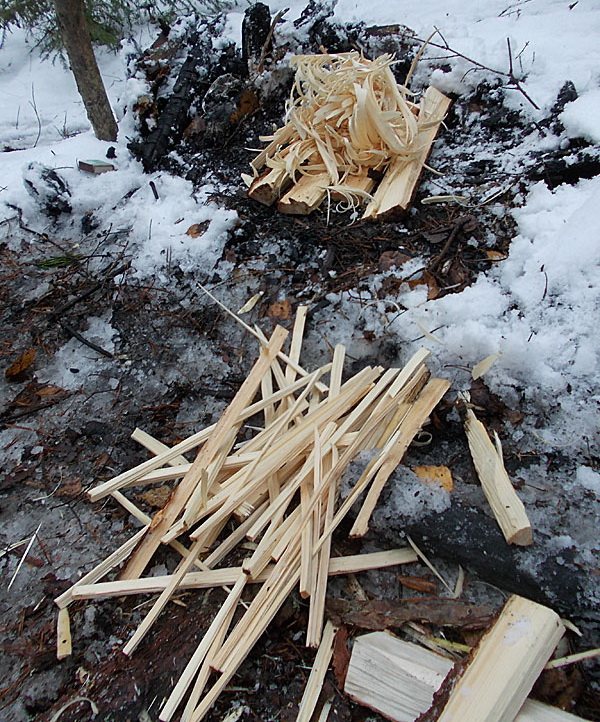
Rice. 13. Shavings and splinters from the dry core of a coniferous tree.
Choosing fuel for the fire.
So, we managed to make a fire. Now it is necessary to maintain it in working condition for a certain time. Firewood is most often used as fuel for a fire - parts of dried trees and shrubs, but in certain conditions a person is forced to use other types of combustible materials, such as peat and dung (dried droppings of herbivores). I will also touch on alternative fuels in this article, but first of all we will discuss a more common thing - firewood.
In general, the choice of quality and size of firewood is determined by two factors: their availability and the functional purpose of the fire. However, there are certain criteria according to which firewood can be divided into “bad” and “good”. It is from this simple and utilitarian classification that we will proceed in our further description. Let's start with the bad. “Bad” firewood does not produce a good, stable flame, burns difficult, and in extreme conditions (precipitation, frost) does not support combustion at all. However, this does not mean that they cannot be used for other purposes, such as producing large amounts of smoke or large coals. But this is another question, a secondary one. So what about “bad” firewood, which, figuratively speaking, cannot be used to cook porridge?
- Any firewood from deciduous trees in winter, in wet weather conditions, as well as from dead deciduous trees (i.e. lying on the ground). Such firewood will be saturated with moisture or rotten.
- Any firewood from trees standing in places with excessive moisture (lowlands, swamps). Definitely raw or rotten.
- Any firewood from deciduous trees standing without a top. As a rule, rotten.
- Firewood from willow and alder at any time of the year, firewood from larch in winter and in damp weather conditions. Such firewood is saturated with moisture and practically does not burn (smolder).
- Firewood from fruit and stone fruit trees: apple, cherry, plum, sloe, etc. They burn poorly, but produce a lot of large coals and aromatic smoke.
- Any firewood made from rotten, rotten wood. They burn poorly, produce little heat and a lot of smoke.
It will be a little more difficult to decide on “good” firewood. A bad one has one criterion - unsuitability for direct use. The concept of “good” is more multifaceted. There is good, and there is better. Every good thing has certain disadvantages that do not make it bad, but force it to take certain measures when using it. Therefore, the characteristics of “good” firewood will be expanded compared to “bad” ones. So, “good” firewood includes:
1. Firewood from coniferous trees (except for larch in winter and wet weather) at any time of the year, in almost any weather conditions and any condition. Even in the most rotten and damp coniferous dead wood you can find tarred areas that perfectly support combustion. In winter, in wet weather, coniferous firewood has no equal. Coniferous wood burns actively and produces a lot of heat. True, coniferous firewood also has some exceptions and disadvantages. For example, dead pine is heavily saturated with moisture and is suitable for a fire only after drying. In addition, coniferous firewood intensively “shoots” coals (especially spruce and fir), which can lead to damage to equipment, and produces a lot of greasy soot, which makes it difficult to wash dishes for cooking. 2. Firewood of certain deciduous species in the warm season, subject to dry weather. The general condition is that the trees must be dead (not dead), and also not have the above signs of “bad” firewood. 2.1. Birch. Burns well, gives a lot of heat, good hot coals, but smokes. 2.2. Poplar (aspen). Burns well without soot and produces a lot of heat. Produces few coals (burns out quickly). 2.3. Oak. Burns well without soot, produces a lot of heat and good hot coals. Labor-intensive to transport and cut (heavy, dense wood). 2.4. Elm. Burns well without soot and produces a lot of heat. Produces few coals (burns out quickly), is labor-intensive to cut (the wood is “sticky”). 2.5. Hazel (hazel). Burns well, produces a lot of heat and good hot coals, but does smoke. Characterized by low availability (it is difficult to find large enough dry specimens).
In real conditions, of course, no one sorts firewood in strict accordance with whether they are “bad” or “good.” As a rule, to maintain a fire, something that can be brought to the fire pit with the least energy consumption is used. In a well-heated fire, everything will burn, even living wood. Another thing is that the fire still needs to be brought to such a state. Of course, to get a good fire you need to use the best firewood. At the same time, firewood of worse quality is placed nearby for drying. At a certain stage, you can use rotten and damp firewood. There are many nuances here. To comprehend all the wisdom, practice is necessary. And the more often, the better.
In certain conditions, finding firewood for making a fire can be extremely problematic. For example, in some areas of forest-steppe or swampy areas. In this case, it is necessary to use alternative fuel sources. The most common of them are peat (Fig. 14) and dung (dry droppings of herbivores, Fig. 15). Peat and dung do not produce a strong flame; they smolder, however, providing quite a lot of heat. In addition, for rapid ignition of these types of fuel, a sufficiently high temperature is required, that is, a full-fledged, lit fire. As for peat, I have not had to use it as fuel for a fire. In addition, it is difficult to imagine where in natural conditions it is possible to obtain peat dry enough to burn, unless you mine and dry it yourself or use dumps from abandoned peat mines. But yours truly has cooked more than one dinner on dung.
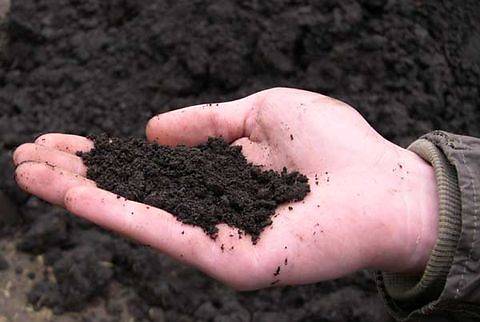
Rice. 14. Peat is a black earthy fibrous mass with a characteristic “toilet” odor. For use as an industrial fuel, peat is pressed into briquettes and dried.
It was in the spring, after the snow had melted, in a hilly steppe area almost devoid of tree vegetation. Weeds, of which there were a great abundance after the winter, were used as kindling and fuel, dry hazel (the reserves of which were exhausted in three days) and dry cow dung from the nearest pasture. The fire had to be kept economical and small. Under the nearest river cliff, I collected various flat pieces of marl and laid an improvised hearth around the fire. (Attention! Do not use sandstone for the fireplace - when heated, it splits and shoots no worse than slate). The efficiency of the fire has increased significantly, now every sliver of wood goes into use. In addition, the hearth protected the fire from the constant wind blowing.
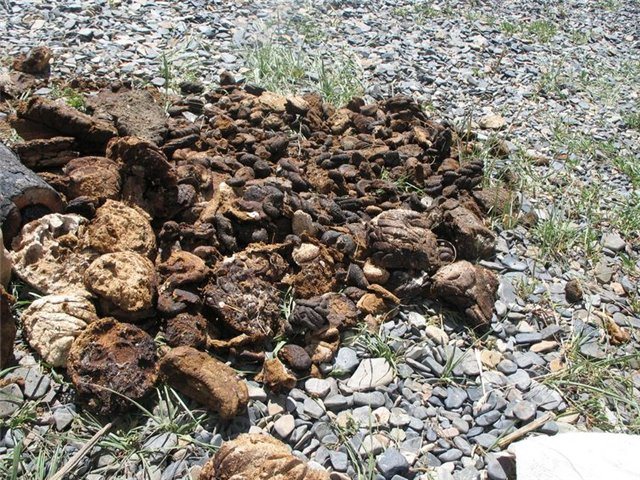
Rice. 15. Dung. To use it as fuel, just like peat, it is pressed into briquettes and dried. However, dry cow pellets that have compacted over the winter can be used without any additional processing.
That's probably all. To start. I hope this article will help you, dear readers, hone your theoretical knowledge and create an irresistible desire to get out into the forest and consolidate it in practice. Good luck and survival to everyone!
The article was written by A.D. Kolpakov as part of the competition.
Comments
+16 Passer-by 10.30.2014 21:09 For the ninth photo you should tear your head off.
Quote
Update list of comments RSS feed of comments for this entry
Add a comment
How to make a fire in rainy weather
Water extinguishes fire. However, in rainy weather, dampness and moisture dictate the need for a person to warm up near a heat source and drink hot tea. How to light a fire in the rain?
Making fire in inclement weather is possible if you follow a number of rules.
- It is better to choose a place for a fire under cover, for example, the entrance to a cave, an overhanging rock. Or you can create protection from droplets by extending a canopy over the fire at a safe distance.
- We create a wooden flooring. This is necessary so that the fire does not stand in a puddle or mud.
- Dry kindling and brushwood. Without this, the fire will not light up. You can look for dry tinder under natural shelters, in an anthill.
The fire itself can easily burn on damp wood. The main thing is to light it quickly.
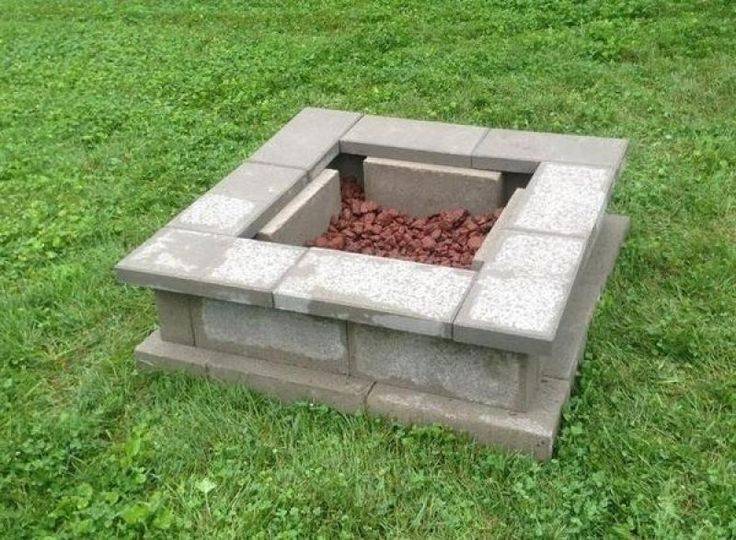
How to make a hearth out of blocks
You can assemble this option over the weekend. You don’t need to be an experienced mason, the main thing is to be careful and do everything in order. You should study well how to make a fireplace in the country with your own hands - instructions and photos of the construction will help you understand the process even better:
- Buy the necessary materials. You will need blocks for circular masonry; choose the option to create a ring with a diameter of 90 or 120 cm. Make the masonry mortar from a ready-made mixture to make it easier. The inside of the structure needs to be covered with a sheet of metal; you can buy a blank 2-3 mm thick and bend it yourself, or you can buy a ready-made ring for hearths.
- Dig a hole 40 cm deep. Make the diameter slightly larger than the future structure. For simplicity, you can make a simple drawing or sketch, but this is not necessary. Pour a 15 cm layer of gravel onto the bottom and compact it well. To make it compact better, first water it with water.
- Check the plane with a level. Align it if there are any distortions. Lay out the bottom row of blocks. If they do not fit well, you need to cut one or more elements. The joints should be approximately even around the entire circumference. Fill all the voids with the solution, carefully distribute it and remove excess.
- Lay the second row so that the vertical seams do not coincide. Apply the solution to the bottom row and to the sides of the blocks. Carefully place, level and check the plane with a level. Lay out 3 or 4 layers, so you can build a fire pit in your country house with your own hands in a few hours.
- Place a metal tab inside. Bend it yourself, make a 10 cm overlap at the connection so that heat and ash do not penetrate under the metal.
- To make the fireplace in the yard more beautiful, it is better to line it with heat-resistant material. Lay it on the outside and on the top end.
Important! Arrange the area around the fire pit at your own discretion. Provide everything necessary so that chairs do not stand on the ground, and firewood does not lie anywhere... You can make a fire pit with your own hands from brick in much the same way
The step-by-step algorithm is no different, except that on the street many summer residents make not an open hearth, but a closed one. In this case, you need to make a metal lid
You can make a fire pit with your own hands out of brick in much the same way. The step-by-step algorithm is no different, except that on the street many summer residents make not an open hearth, but a closed one. In this case, you need to make a metal lid.
6d62580f34ac3cc27dc74281842416bf.jpe 4a68a2d78fd032f04203053b18449845.jpe d1577fbf5866be40c71c6d4650452902.jpe 3d65e2f80cad05c156294 8cdb51ffe36.jpe 0535c39454e3e3460516ccc4937c5312.jpe 6444ed5c5b7c6593e627593ec1dfb285.jpe
1a1ce1b91146b73d84d4dfc4af6094a6.jpe
How to light a fire in windy weather
It is difficult to make a fire in windy weather, because until it flares up and spreads to thick logs, the wind will constantly extinguish it. What to do? How to make a fire in a strong wind?
Do not worry! There are several ways to start and maintain a fire in windy weather.
| Way | The essence of the method | What to use |
| Natural windbreak | protect the fire from the wind using natural means |
|
| Artificial windbreak | fence off the fire from the wind using improvised means |
|
| Special types of fire | We lay out a type of fire that can burn even in a strong wind. |
|
How to light a fire in the forest in winter
Making a fire in winter is more difficult than in summer. Low temperatures and snow create a number of problems. However, every problem has a solution.
| Problem | Solution |
| Search for dry kindling and fuel |
The best option is to stock up on homemade kindling or special ignition tools in advance. |
| Melting snow with fire |
|
The process itself and methods of starting a fire in winter have no special features and are carried out in the same way as in other seasons.
How to hide the place where the fire was burning?
Many people do not care about maintaining their camp site in the same condition as when they started organizing the camp. But this rule is a sign of good manners among tourists, and in some cases a necessity, for example, when the task is to hide the place where the camp was located.
To ensure that there is no fire left from the fire, you can:
- Make fires that do not leave a fire pit, for example, a Finnish candle or one of the options for a fire in a pit.
- Light a fire on a log deck or on a platform made of stones. After this, the cooled logs and stones can be hidden in dense thickets, or they can be left for others.
- Light a fire near a pond when the water level in it drops so that the rising water washes away traces of the fire.
- Light a fire in special camp stoves, wood chippers, or use burners and dry fuel with a special stand for it.
If it is necessary to hide the place where the fire burned after the fact, it can be covered with earth, covered with leaves, or the turf can be replaced with a similar one dug in another place.
Keeping the fire going
If it seems to you that the fire in the fire is starting to die out, take a stick (poker) and rub the wood and coals, moving them in a circle. You also need to fan the coals to provide a surge of oxygen. This can be done by blowing on the coals or waving a cardboard or similar object in front of them. If there are only hot coals left in the fire, and the firewood has burned out, you need to put some dry brushwood, and then add firewood.
IMPORTANT: Red, hot coals are a good sign. If you don't keep the fire going, it will go out.
What to do if a fire starts
If you make a mistake and a fire still occurs, don't waste a second. Immediately call the rescue number and report the location of the fire and begin extinguishing the fire:
- if there is a source of water near you, then immediately try to pour it on the fire;
- it is necessary to water all nearby plants, as this will help prevent the fire from spreading;
- you can make a broom from twigs and try to use it to sweep the edge of the fire on the sides, this is done by bending towards the flame, in this case the broom needs to be turned all the time;
- Next, you need to throw a damp and loose piece of earth on the fire, you can also try to fence off the fire site;
- if you manage to extinguish the fire, do not be lazy and report it to the forestry department;
- If you are unable to cope on your own, do not stop trying and wait for the rescue service.
We recommend reading:
Teriberka - a trip to the ends of the earth! - unusual excursions in Murmansk
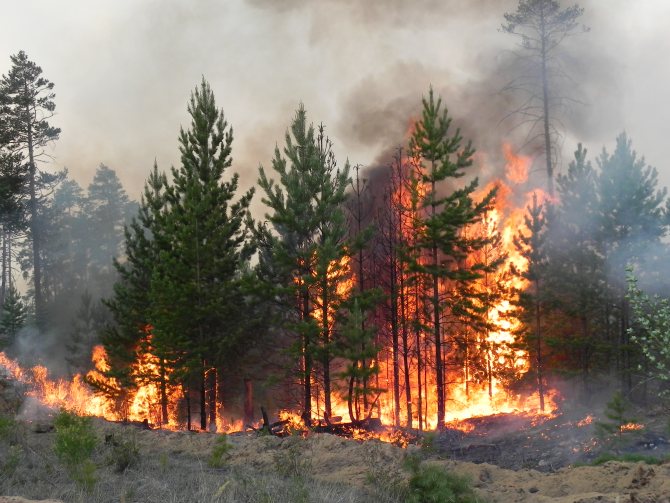
Follow all safety precautions when handling an open fire in a forest area. You can ideally and well relax in nature, do not harm it.
Putting out the fire
A very important action is to properly extinguish the fire. If this is not done, it can lead to such serious consequences as a forest fire.
How to put out a fire correctly in the warm season
| To fill with water | The most reliable way. However, lighting a fire in the same place will become impossible for a long time. |
| Spray each coal separately with water | The hard way. You need to stir and check every coal. There is a possibility of missing it and starting a fire. |
| Cover with earth | Need a shovel. And you need to make an effort to dig up the ground. |
| Cover with sand | Sand is difficult to find in the forest. But if there is sand nearby, then this is a good way to put out the fire. |
Putting out a fire in the cold season
The first and best option is to cover the fire with snow. However, there are snowless winters. At the same time, the water in the lake is under a layer of ice, and the ground is frozen and cannot be dug up. What to do? In such situations, you can move the remaining coals to the sides and wait until they go out completely. If you don’t have time to wait, you can take the remaining coals to a pond and put them on ice where people do not walk.
Equipment for the area around the fire
Making a fireplace is only half the battle; you also need to make a platform according to the rules, and equip it with everything you need for comfortable relaxation. For this:
- Cover the surface of the ground next to the fire with gravel, pebbles or lay out paving slabs. Slabs of all kinds look very unique, with which they lay out a beautiful pattern.
- Garden furniture is installed on these slabs and thereby creates a comfortable place in a natural environment. They install a circular bench or sofa near the fire, but it would be a good idea to arrange a roof. The bench is decorated with pillows and decorative rugs.
- If there are bricks or stones left from the construction of the fire pit, then lay out a supporting wall that will replace the backrest for the bench.
- A woodshed is set up not far from the site so that you don’t have to go far to get firewood. To maintain the overall style, it is decorated like a fire pit.
- From the dacha to the area with the fire, a path is made, the sides of which are equipped with lanterns. In the evening twilight, their light will bring romance.
- At most dachas, the fire pit is decorated in the shape of a sun with rays extending from it. A fire pit in the shape of a moon crater or designed like a fireplace looks excellent and entertaining. Garden figures are also installed on the site.