Since ancient times, making a bow with your own hands was considered an honorable occupation, as it required considerable skill and strength. This rope arc became the main lever of influence over entire eras. Having a formidable weapon capable of destroying any game or enemy tens of meters away, a person gained confidence in success during hunting and battle. This is how the first principles of long-range combat tactics were formed, which determined the course of development of the entire civilization. The fruits of these labors can be seen to this day. The legends of Artemis and Robin Hood, arrow-shaped rockets, tactical combat weapons, sports competitions - all these concepts grew out of a fairly primitive tool.
For centuries, people fought using only projectile weapons, and only relatively recently were they able to create gunpowder weapons. Wondering how to make the most powerful bow, man moved forward along the ladder of evolution, improving what he had. Thanks to this, dozens of varieties of throwing weapons arose in every corner of the world and in every era. In this article we will tell you how to make a bow with your own hands, and what materials this can be used from.
The importance of building your own hunting bow.
As you know, hunting is one of the most popular activities for people of all ages, races and backgrounds. If you want to know how to hunt, you must first become familiar with the tools of the trade. The most popular tools used for hunting are the bow and arrow. You may have dealt with such equipment in general and in sports stores, which may seem a little expensive.
Plus, even if you don't visit these stores, you may find yourself out in the wilderness or just in your backyard with a passion for creating your own hunting bow and arrow. The good news is that you can do this with relatively few dollars and a little free time on your hands.
Making a hunting bow
Making your own hunting bow is much easier than you might expect. You don't have to be an expert or craftsman to create a functional hunting bow that you can use for recreational and hunting purposes.
When you're starting out, you should consider the different types of wood that are:
- yew
- bamboo
- willow
- lemon
All of these woods are ideal for hunting bows, and you will want to make sure that the one you choose will be a yard long. It must be without coils or knots. It's a good idea to make sure the wood is dry, but not so dry that it reaches the point of cracking after it's bent. An important tool that you will need throughout the process is a sharp knife. Be sure to sharpen this razor before starting the project.
The first step in making a hunting bow is to start with the natural curve of the wood. All pieces of wood have this, but it may be easier to detect in some than in others. This is the most important part as you don't want to cut the wrong side. If you do this, the bow will break the first time you use it.
Once you have figured out the curve, you should cut the wood in the same way as a boomerang. The medium should be much larger than the ends of the club. For example, if the media is one inch thick, both ends should be close. in. To ensure the longevity of your bow, it is best to wrap a narrow strip of damp leather around the center and let it dry naturally. Because of this, the bow will gain additional strength and will also push arrows at a higher speed.
Once the shape has been cut out, you need to tie the string. For this purpose you can use various chains such as:
- hemp
- Fish line
- underwear
- nylon
- lavsan
- Kevlar
Once you have chosen the rope you want to use, waxing is required to add strength and protect it from normal wear and tear. You should then make a cut towards the ends of the arch and wrap the thread around both ends. The rope should have a tight appearance, not one that appears loose and flexible.
Size matters
The main goal of any bow maker is to achieve the highest possible arrow speed. The penetrating ability of the bow, firing range, and accuracy depend on this speed. The more the shooter pulls the bow string, the farther he moves it from the handle, the faster the arrow flies. However, two bows with the same string tension at the same distance can send an arrow at the target at completely different speeds.
In a physical sense, a bow is an energy accumulator. In the process of tension, it slowly accumulates the energy of the archer's hand, and then instantly splashes it out to accelerate the arrow. The speed of the arrow's flight is determined not so much by the tension force in the extreme position (in compound bows it is extremely small), but by the tension of the archer's hand during the entire tension process. A good bow draws heavily from the start and forces the archer to exert maximum energy from his arm throughout the drawing process. Unclenching, such a bow does not release the pressure on the arrow until the last moment. It is customary to talk about the dynamic curve of a bow: this is a graph of the dependence of the tension force on the distance of the string tension. The area under the curve is the energy of the bow.
Let's give a simple example: suppose that two bows 120 and 180 cm long are drawn with the same force over the same distance - say, 70 cm. An arrow will fly faster from a long bow. A 70cm draw will require more deformation from a small bow than from a large bow, so the small bow will be softer. Yes, approaching the tension limit, it will give the same force as the big one, but at the very beginning it will be noticeably easier to bend its thin shoulders. The dynamic curve of the large bow will be close to a straight line, while the graph of the small bow will “sag”. The total energy stored by the longbow will be greater. That is why the famous English longbows, as tall as a man, could hit a target at a distance of more than 100 m.
There is another argument in favor of the longbow. Any archer (we are talking about classic, not compound bows) is familiar with the feeling of a sharp increase in effort at the peak of tension, when it seems that the tree has reached the limit of flexibility and is about to crack. In such cases, novice archers often close their eyes for fear that the bow will break right in their hands. In fact, the tree is still very far from reaching its limit. The reason for the peak is the angle between the string and the end of the bow's limb. The bow bends easiest when the string pulls the shoulder at a right angle. The tighter the angle becomes, the less force is transferred from the archer's hand to the bow limb in the correct direction. When drawing a longbow, the shooter may not even get close to the right angle. Shooting from a short bow, he will most likely hit exactly this limit.
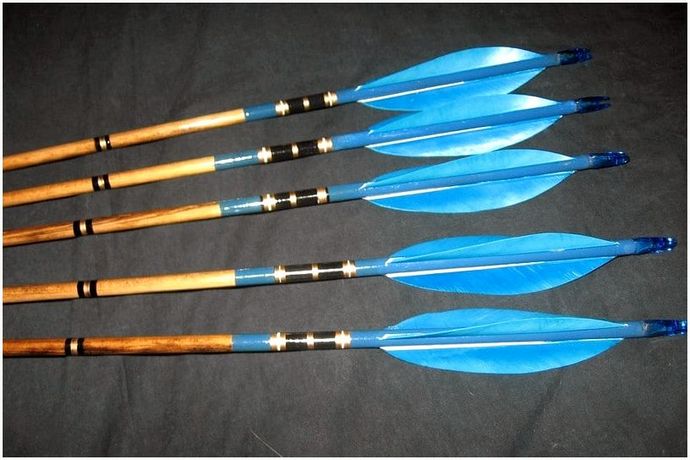
Hunting arrow
Is it like this or not? Well, it's called a hunting bow, so what happened to the boy? Our hunters' bow is nothing without arrows, so you need to make sure the arrows fit inside the bow. They should not be too long as they will break. The arrows can be long sticks since they have both ends, which makes them fly.
One end should be facing outwards, which will be equipped with a steel arrow. To ensure that your arrows have an optimal flight experience, you can always place a couple of feathers towards the end closest to you.
Building a Backyard Hunting Bow.
If you want to make your own backyard hunting bow, all you need is the following:
- machete
- Hand ax
- Draw a knife
- Rat Tail File
- Wood rasp
- Roulette
- Carpenter's Pencil
- Straight edge
- Bow
If you have the tools listed above, you can run the arc construction method. The above list is a simple list and if you have additional power tools that you are comfortable using, you can do it in any number of ways.
Here are the steps to make a hunting bow from the comfort of your backyard:
- First, you must choose a tree. Most scaffolding will work, but those with slippery walnut bark are best done fantastically the first time. The tree you choose should have a four-inch straight diameter with a couple of knots. You can then trim the tree and cut a straight section six feet long. You must leave this season for six months.
- After six months, you can peel the bark using an extraction knife. You should choose the side that is the straightest and cleanest to place the pencil bow. The design should be similar to the following: 4" handle section in the center and 68" long. For the walnut, you should leave the tip wide or make it "wide".
- The machete and ax should be used to cut down trees that are not needed. A wooden rasp can also be used to add flair to your work. Once the profile is cut, you should lose the limbs. They should be marked to be thicker than their full length. The handle section should be 2 inches thick. Again, an axe, machete and wooden rasp should be used to shape the limbs.
- Once the rough configuration is made, you should place the arched branch towards the floor and press the handle. One must look carefully to ensure that the limb is constantly bent. This process must be repeated on the opposite side.
- Finally, when both limbs are bent equally, you can use a rat file to cut notches towards the tips of both limbs. This is a knock. You have to attach the rope to both legs and look at it from the side. The limbs should bend evenly towards the nearest semicircle. If that's not what you see, then you'll need to scrape the wood off the tougher end. You should continue to do this until the limbs are bent evenly, like a semi-circle when they are twisted.
Other picnic crafts made from plastic pipes
Craftsmen willingly share photos of DIY plastic crafts on social networks. The products are not only aesthetic, but also practical.
For outdoor activities on a picnic, folding homemade furniture made from PVC pipes and fittings is suitable, which can be easily disassembled and placed in the trunk of a car. For relaxing in the shade in nature, you can also build and use:
- homemade stands for fishing rods or spinning rods;
- collapsible tents and marquees.
- small folding table.
Products made from scraps of plastic pipes are a broad topic for creativity. You can make collapsible structures, based on fittings and couplings, and solid ones, which are fastened with self-tapping screws, glue and bolts. White plastic makes beautiful crafts, but they can be given more personality using painting and wrapping, including decorating a homemade bow from PVC pipes.
How to make an arrow for a hunting bow.
Now that you have made your hunting bow, it's time to move on to the arrow, as a bow is not complete without an arrow! Making wooden arrows in the traditional style is an effective and simple procedure. Before modern arrows were put into practice, precision arrows were made using readily available materials.
Long ago, celebrities such as Robin Hood were found creating their own arrows from natural materials found in the growing forest. You can make wooden arrows by following the simple steps below with just basic tools, patience and a little time, resulting in amazing quivering homemade arrows.
Things you will need for this:
- rope
- Straight wooden branches 30" high
- knife
- feathers
First you should select and trim a young branch without knots or branches with a straight section of about 30". You then need to use the blade to create a point at the end of the arrow shaft. the other end of the arrow shaft with a knife, allowing the arrow to come into contact with the string, and finally you should cut three bird feathers in the center, following the tip. The shaft arrow is next to the notched end, they should be evenly distributed around the arrow with the chain.
Primacy of form over content
Increasing the length of the bow is not the only way to solve the obtuse angle problem. The ends of the bow arms can be bent away from the shooter. At the peak of tension, the string is still at an acute angle to these horns, while the main part of the shoulder has long ago formed an obtuse angle with it. Such a bow has a less sharp draw limit, allows you to store more energy and makes it easier to aim with a tight bowstring. It is called reverse curved, or recurved.
The ends of the recurve can be bent so that in a relaxed state the bowstring rests completely on them. They actually turn a relaxed bow into a shorter, stiffer bow by having a shorter limb. When drawing such a recurve, the archer puts a lot of effort at the very beginning. This allows you to store more energy. Then, when the string separates from the “horns” and begins to pull the shoulders at the very ends, the force drops somewhat. This decline is compensated by an increase in the elasticity of the already stressed tree. Closer to the limit, the “horns” smooth out the peak, maintaining an acute angle with the bowstring. If the ends of the arms of the recurve are bent smoothly, then the transition from the force of the “short” bow to the force of the “long” bow occurs gradually. If the “horns” bend sharply, then the transition occurs abruptly. In fairness, it is worth noting that a bow with soft, straight limb ends also has one advantage: unlike its more energetic counterparts, it vibrates less.
A longbow has one significant drawback: the accumulated energy is spent not only on accelerating the arrow, but also on the movement of its shoulders. At the moment of shooting, the arms develop such serious accelerations that even a slight increase in their mass can significantly affect the effectiveness of the bow. Masters pay attention to the distribution of mass along the length of the shoulder. For example, pyramidal arms are wide at the handle and taper evenly towards the ends. Therefore, the part that travels the greatest distance when fired has the least mass.
Making feathers for a hunting arrow.
Shaping arrows for a hunting bow is an important factor to consider as it helps the arrow stay in the right direction and move at top speed in the direction you are shooting. Feathers are used at the base of the arrow to rotate during flight; making it more accurate. If you can use bird feathers or have extra feathers, then you can use them. Alternatively, if you don't have them, you can use thick paper (cardstock) for this. You can also use plastic as an alternative to a paper card.
You need to take the material you are using and cut triangles out of it. Should a triangle have legs around one and one? "At one three-quarters of an inch (the legs refer to the triangle, the ones that are not opposite the right triangle.) You need to glue these triangles to the base of the arrow, taking the second longest side near the base about one inch from the bottom
The triangles should be evenly distributed along the edge of the arrow. You should then cut a small notch in the center of the base of the arch where the thread is located. Without this nickname it would be difficult to shoot an arrow.
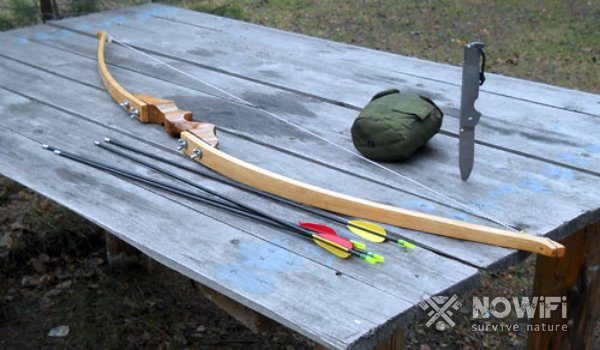
Follow this simple procedure and there is no reason why you can't become an expert at making a hunting bow. You know you've done it when your final creation looks like this:
DIY paper bow
Paper is shredded wood with the addition of clarifier. Therefore, in theory, something strong and dense can be made from it. How? You will need many A4 sheets (Figure 6).
This will be somewhat similar to a bow for DIY hunting, provided that your game is empty tin cans:
- Fold the sheets like an accordion, inserting them into each other, then gluing them together. Compress them each time, pressing firmly.
- After reaching a thickness of 2cm, the base can be considered ready.
- Use a rubber band as a string.
- For a larger specimen, you can experiment by thickening the base.
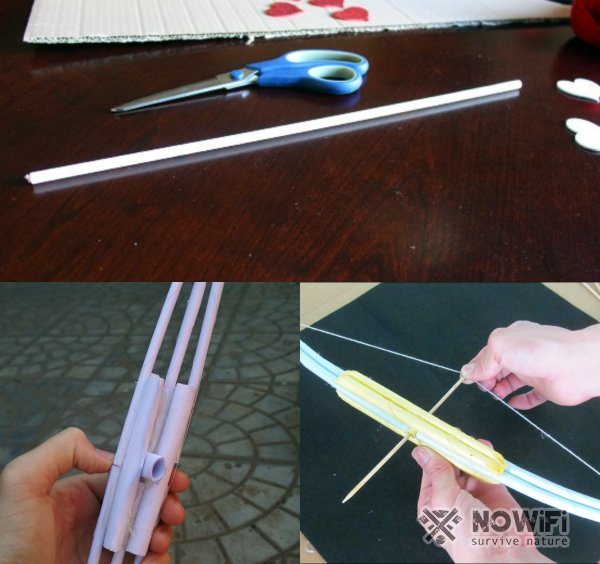
Figure 6. The paper construction is unlikely to be suitable for serious shooting.
An alternative option is to wrap the pencil in a sheet, folding the edges. Take out the pencil, attach a rubber band with glue to each edge and have fun.
Bottom line
Now that you know how to build your own hunting bow, it's time to get started. Of course, you need to put this practice into practice and get out there to really experience everything. Have a great hunting experience and encourage your family and friends who also love the sport to do the same!
Every hunter needs to make his equipment because if he can't make it or fix it, he won't be able to shoot for long. Although arrows, bows and target feathers can be brought to sporting goods stores, a true hunter must know how to make his own bow and arrow. The truth behind making your own bow and arrow is that you value it that way.
However, it takes many attempts to create a perfect bow and arrow, but you should know that practice makes perfect. A beginner may find that his first arcs will be failures, but he will soon shoot them! You will only realize true dedication and passion for hunting if you put the time and effort into creating this bow and arrow. If you have done this, you will also respect it more, not forgetting to mention that you feel like a real professional at the same time.
Fishing, hunting and trapping
arbalet-airgun
In theory, this review belongs in the “Survival” section, but its scope is still somewhat narrow, because when choosing a bow, you don’t have to focus only on factory products. Even in times of peace, so to speak, there are extreme travel, various emergency situations, and specific hobbies, after all. But a factory product is not always the best option.
Let's consider a banal situation: a long-distance hiking trip or even water tourism, but not on a comfortable ship, but on some kind of “Kazanka” or even an inflatable boat, kayak or raft.
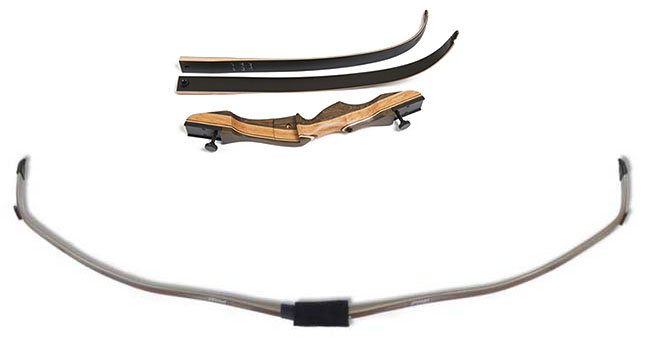
The compound bow disappears right away - the thing is large, awkward and very delicate, especially the body kit. True, many modern models allow complete disassembly. But subsequent assembly, adjustment and shooting will take up your precious hours of rest during the hike.
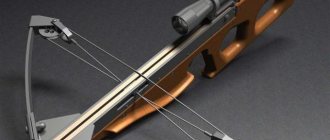
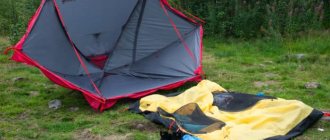
Now let's take the takedown (collapsible recurve) and traditional Asian bows. All of them are really very light, unpretentious and not bulky. “Asians” have also recently been made entirely from composites, carbon, etc., which implies insensitivity to weather conditions. As the current owner of the “Leopard II” and the former owner of the traditional “Korean”, I can confirm the unconditional leadership of the first, in the traveling version, of course. Why is clear from the photograph.
In a water tourism situation, you are guaranteed to either step on the lower beauty, or sit down in a big way, or drop the oar. It is also not very suitable for transportation on foot. By the way, even a disassembled “takedown”, with all its compactness and lightness, also takes up a certain place in the luggage, and it can easily be damaged. And if, say, the boat capsized...
So you're traveling without a bow. And without a tube full of factory arrows. But, like any sane person, they took at least a reasonable minimum of tools and accessories for the hike: a knife, a hatchet, rope, thread. Recently, adhesive tape and “second” glue have become deservedly popular. If you also have at least a piece of a hacksaw blade for metal or a file in a knife or multitool, that’s absolutely good. All this will be very useful to us.
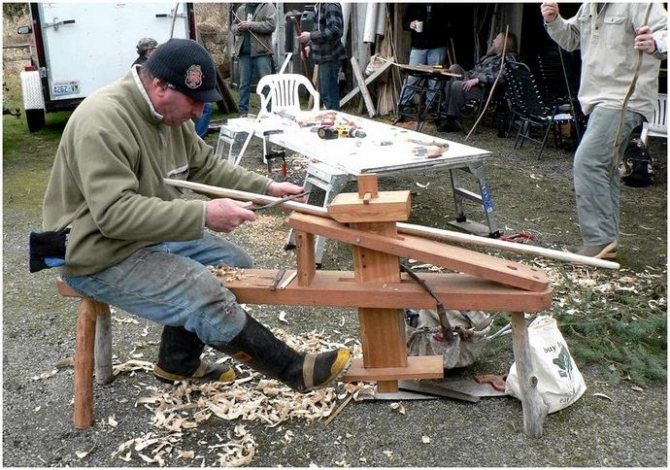
Now I will be forced to change my usual practice of posting “other people’s” articles exclusively in “Useful Links”. The review below fully describes, in my opinion, the most optimal technology for quickly making a homemade bow. In addition, its author is much better friends with photographic equipment. One minus: I was never able to find the original of this material indicating a specific author - I just don’t know who to refer to. If, fortunately, one turns up, I am guaranteed to provide all his data.
For now, I give this article in full. It will be followed by its own comments and additions. And one - right now: with a certain skill, such a bow can be made in half an hour. Even if you sit on it or it falls into the water, it will be offensive, but not fatal...
Instructions for making a survival bow
This instruction will help you make a working bow in a relatively short time so you can use it immediately in an emergency. It is carved from a sapling or tree branch.
This bow can be called a "quick" bow because it is made immediately after the tree or branch is cut down, rather than a year or more later when the tree has dried out (as regular bows are made). The advantage of this bow is that it can be used immediately after production. The downside is that it can break or crack during the drying process months after production. Despite this, a “fast” bow can become an effective weapon for a relatively long time.
Choosing a tree
The first step is choosing the right material. The best woods for making bows are yew, ash, black acacia, and hazel, although hard varieties (such as oak, maple, and beech) are also suitable.
You need to start making a “fast” bow by choosing a relatively straight section of a trunk or branch, without bends, side branches or twigs. This piece should be approximately 1.5 meters in length and 3.8-5 cm in diameter. Cut off a trunk or branch carefully so that there are no breaks or cracks in the tree. This will be the base of the bow.
We determine the back, stomach, shoulders and handle
Place the bow blank upright, hold it on top with your palm and press so that it bends slightly. The outer side of the bend is the back of the bow, and the inner side is the belly. Don't touch the back of the bow. The back bears the most stress, so any damage to it can ruin the bow completely. This is one of the most important points when making a bow.
From the middle of the bend, measure approximately 8 cm in both directions - this will be the area of the handle, which also almost does not need to be touched. The part of the bow above the grip is the upper limb, and below the grip is the lower limb.
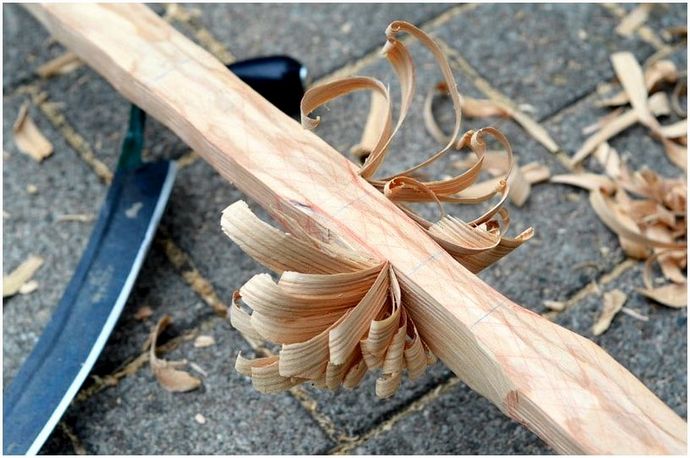
Shaping
Place the lower end of the bow against your leg and hold it from above, bending it just a few centimeters. See how the shoulders bend, which parts bend and which don't. Using a knife, start cutting the wood from the belly of the bow where they don't bend, leaving untouched the sections where they bend a lot. Remember - cut the tree only from the belly, do not touch the back of the bow. The goal of this action is to make the shoulders bend evenly in the shape of a parabola along their entire length.
Cut the tree slowly, checking often how the shoulders bend. The handle and ends should not bend at all or bend slightly. You can move on to the next step only when both shoulders cease to be rigid and bend evenly along the entire length - a thick workpiece will have to be planed for quite a long time, and a thin workpiece may only need to be corrected a little.
Notches for the bowstring
Now you can make small cuts on either side of each end, but be careful not to cut the back of the onion. Don't make them very deep - they are only there to hold the bowstring in place. Make loops at both ends of nylon thread, sinew or plant fiber thread, leaving such a length that there is 13-15 cm between the handle and the bowstring. Pull the bowstring; but don't pull it back just yet, the bow may break. Let's move on to the next step.
Alignment
Hang the bow by its handle horizontally on a tree branch. Now pull back the string slightly, watching how the shoulders bend. You must ensure that the shoulders bend not only well, but also absolutely equally, mirroring each other. This is also a very important point in making a bow.
If one limb bends less than the other, carefully cut more wood from the belly of the bow on the desired side until both limbs bend evenly. Recheck frequently by drawing the string and pulling it back a little further each time until you reach the draw length (to measure the draw length, imagine yourself holding the bow and pulling the string back to the upper jaw in the firing position - the distance between the handle and the jaw will be length of pull).
The alignment process is complete when both arms bend evenly and equally and the tension force (required to pull the string back all the way) is as much as you need. 10-15 kg is enough for hunting small game, 18-27 kg for large animals like deer.
To measure the tension, you can place a one and a half meter piece of a narrow board vertically on a household scale, then lay the bow horizontally with the handle on the board and pull the string all the way. The tension force can be seen on the scale.
Final processing
Onions can already be used for survival in the wild. Never make “dry” shots from a bow (do not pull or release the bowstring without an arrow). This may cause the bow to break. For final finishing, you can sand the belly and coat it with a light oil to prevent it from drying out too quickly. Many archers prefer to use linseed or tung oil for this purpose. To keep your bow in good condition, shoot it, oil it, and plan it if necessary. We hope these instructions help you!
Bow and arrows: comments and additions
Impressive, isn't it? But there is something to add to such a comprehensive work. Firstly, the manual “Bow and Arrows” by M. Zanegin, published by OSOAVIAKHIM back in 1935 -
Zanegin_M_Luk_i_strely
Well, a little from myself.
Bow tree
From my experience, I fully endorse acacia, maple and hickory as excellent choices. It’s just a pity that the tree species listed in the article do not grow everywhere. And not everyone can confidently distinguish beech and ash from other deciduous trees. But there is one more tree that is quite widespread, well known to everyone, and at the same time completely uncharacteristic of bow building. This is an ordinary spruce.
But there is one subtlety here. Pay attention to the lower branches. They are, as a rule, longer than all the others, and they only have needles at the ends. From the very beginning, they find themselves shaded and grow in length, trying to get out of this shadow. Thus, all other growth points are suppressed, and the side shoots are much weaker than those of the upper branches. This means that there are much fewer knots, that is, the main defects of any wood, and they are small. The only thing is that the needles at the end should be green, this indicates that the branch itself is alive.
With the exception of resinous secretions, a spruce branch is an excellent starting material for a homemade bow.
Bowstring
“You don’t go into the forest without a knife and a rope” - there is such an ancient rule. As for the latter, not every bowstring is suitable. Again, from experience, I recommend the widely used construction plumb line with a “Stayer” cord, known among professionals as a “lace”. It does not swell, does not rot, does not stretch, in a word, it fully meets all the requirements of camp life, including archery.
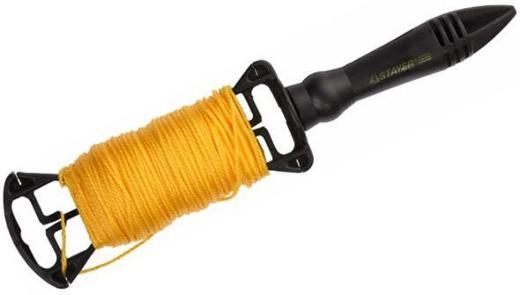
And it costs a penny - you are unlikely to take expensive Dacron with Fast-flights on a trip as a universal rope.
It is clear that the cord is folded 6-8 times, then loops are made at the ends, and when put on the bow, it is twisted 15-20 turns (for right-handers - clockwise, for left-handers - counterclockwise). For a practically disposable product, you can do without a protective winding.
An important addition: it is better to make a loop only from one end, and simply tie the other. This way you can adjust the “base” of the bow (the distance from the handle to the string). Shoot, just not “dry”, from it, lengthening/shortening the bowstring, and stop at its length, ensuring maximum shooting comfort with maximum force. Make sure there are no unpleasant vibrations; the bow should not be too sluggish and too twitchy or restive. Take a “base” of 15 centimeters as a basis, and dance from there. Then you can make a second loop, but you can completely do without it - let the knot always remain tied, remove the bowstring for periods of inactivity, and for storage and transportation you will use only one shoulder.
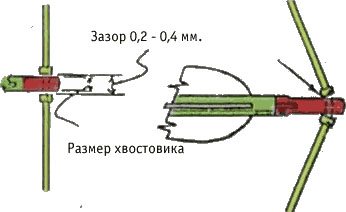
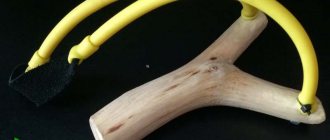
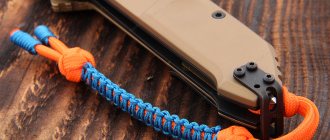
The so-called “socket” for the arrow (pictured) based on the results of zeroing (Google to the rescue!) is created using several turns of thread followed by gluing. Or even thin strips of adhesive tape (adhesive tape).
Arrows
This is perhaps the most difficult thing in our case. If the bow itself may look rather clumsy, then the requirements for shells for it are much stricter. To be honest, it is better to purchase both arrows and tips, even if they are the cheapest, but factory-made, in advance and store them in a drawing tube and a box with foam rubber. Nothing will happen to them (see “Arrows for a crossbow”).
I’ll say right away that in field conditions it is necessary to achieve their uniformity in spine (bending), texture, weight, etc. impossible. That is, they will fly differently. There can only be one way out. Don't chase quantity - make three or four more or less identical arrows and mark them. Then, after shooting, you will already know: “Yeah, this one with the coal longitudinal stripes moves a little to the left, and the one with the rings moves up.” With practice, you will be able to recognize them even by touch, at night, for example.
How to calculate the length of future arrows based on your own individual stretch is a topic for a completely different story. It is understood that these procedures, as well as the actual technique of shooting from traditional bows, have long been known to you. Otherwise, after considerable labor, you will get nothing more than a toy that shoots “in that direction.” In short, study and train in advance.
Now about the manufacturing process itself.
Quite good (and relatively straight) shafts are obtained from sanded shoots of rose hips, the same hazel tree. There is nothing particularly tricky there, everything is intuitive.
We used reeds/reeds extensively as children. In principle, workable shells were obtained. Difficulties will arise with the slot of the tang and when shooting from strong bows - the material is too fragile.
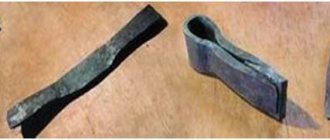
The third option is the so-called “hardened” arrows. Yes, yes, they are the ones from fairy tales and epics. The name comes from the word “to prick”. Simply put, you get the blanks for them by first cutting logs into boards with an ax, and then cutting the boards into more or less straight bars. Finish the latter with a knife, trying to achieve the best geometry and relatively uniform thickness of all products. Then it is advisable to smooth them as much as possible and sand them with the same sand.
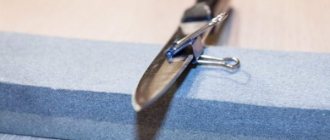
It is very difficult to make a normal slot in the shank (in the photo) without special tools such as a needle file. A centimeter-long central slot with a semicircular profile of the bottom is quite sufficient, preferably not cut, but sawn through and finally scorched, for example, with a hot nail.
As for the place for attaching the tip, this will depend on its type (more about them below) - either a slot, if it will be inserted, or a cone, if it has to be put on the arrow.
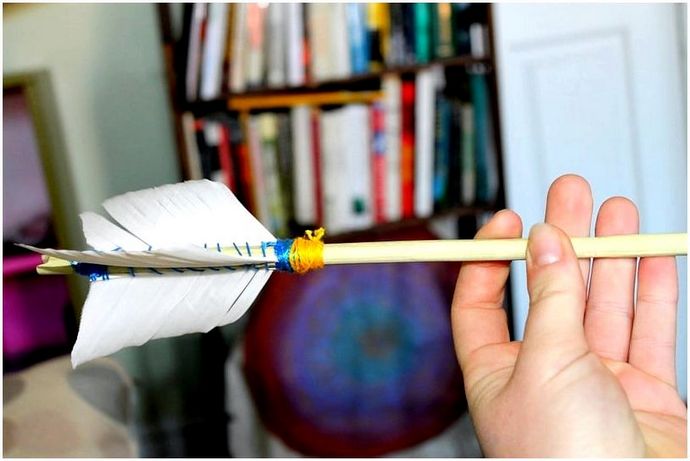
Plumage
Remember the main thing: the feathers on one arrow must come from one wing, left or right. Otherwise, it is clear that the feather is split with a knife along the shaft, wound with threads with an indentation from the heel and glued. It is difficult to reproduce the classic triple (at an angle of 120 degrees) plumage in the field, but it is quite possible to get by with double plumage, from below and from above.
The flight feathers of waterfowl, such as geese, are considered the best; crow feathers are not very popular. But here you will be lucky to find it.
Tips
The problem rivals the difficulty of making the shaft. The simplest and, by the way, practical option: purchase them, as well as insert bushings, in advance and take them with you. Otherwise, you will have to make it yourself from scrap materials.
Leave immediately the idea of flint tips - the art of its processing has become a thing of the past along with the Stone Age. We have three main options to choose from.
Tip from a tin can . Rectangles are cut out of a thick-walled (not beer) can, rolled into cones, the points are symmetrically flattened with the butt of a hatchet. With periodic fittings, the front end of the arrow is slightly ground down to a cone (a large chamfer is removed) so that the tips point strictly along its axis, then they sit on the glue. Tested over many years of children's shoots.
Bone tip . Tubular bones of animals and birds, including those already split lengthwise, can be found anywhere at the site of a feast of predators.
You may need to overcome your innate disgust, but the result is worth it - a durable, extremely sharp fragment with jagged edges will inflict terrible lacerations on the prey and ensure deep penetration into the flesh and rapid blood loss. If it hits “locally”, of course.
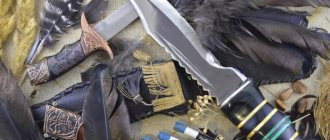
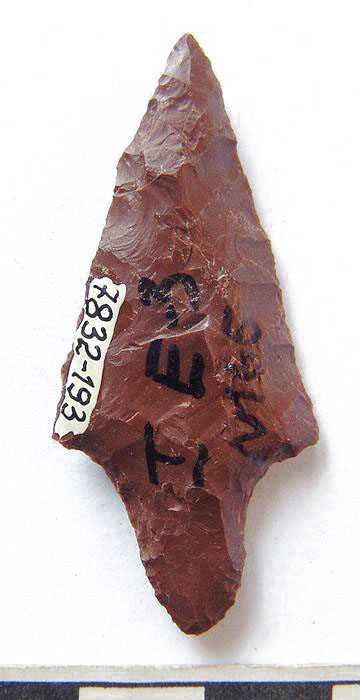
The tip is made from a piece of glass , an analogue of the hooligan “rose”. Broken alcohol bottles are even easier to find than feathers and bones. They are regularly exported even from Antarctica. To give it a characteristic triangular shape with an opposing “tail”, glass can be carefully chipped - it is much easier to work with than stone. Actually, we will get an analogue of the ancient flint product (pictured). The finished tip is inserted with a shank into the slot, wrapped with thread and glued. Wounds from it are also extremely dangerous.
All these products are essentially disposable. But we are not going to use them for sports, so the “one tip - one roe deer” arrangement looks very attractive.
Learning from Neanderthals
In the end, you can do without tips at all. I bring to your attention one instructive story that will add some optimism.
In 1979, a group of “necromancer” archaeologists dragged the carcass of an elephant that had died in the zoo into the basements of the Leningrad Zoological Institute of the USSR Academy of Sciences and began an absolutely amazing task. Based on the ancient stone tools of the “Heidelberg Man” and early Neanderthals at their disposal, modern copies were made and meticulously tested in practice. It turned out that the wonderful flint “knives” - flakes, which perfectly cut flesh, are not able to cope with the skin - so-called “choppers” are needed. And it is better to cut the tendons with special tools with notches found at ancient sites.
But we are interested in something else. No objects resembling arrowheads were found in the excavations - for hundreds of thousands of years they simply did not exist, they are a product of relatively recent times. Meanwhile, at the sites of our ancient ancestors, the skeletons of hundreds and thousands (!) of elephants, rhinoceroses and other similar animals are found (that is why scientists were so happy about the opportunity to practice on an elephant). How did they get them? The only suitable items were also petrified spears with fire-burnt tips. A logical question arose: what, this is a rhinoceros!?
One detail should be noted here. Archaeologists in general are very different from armchair humanities scholars who study souls with wonderful (and not so wonderful) impulses - from art historians and sociologists to lawyers and psychologists. It’s not for nothing that history students have archeology as one of their least favorite subjects; the ability to “do blah blah blah beautifully” and mechanically memorize dates won’t help here; real knowledge and skills are required. In addition, even during student field practice, archaeologists have to get acquainted with a kind of benevolent “hazing,” that is, work a fair amount with a shovel and scoop, moving tons of soil under the close supervision of senior comrades. In general, they are kind of proletarians of mental labor, having not only a head, but also properly sharpened hands.
Here the scientists also did not make a mistake, making copies of ancient weapons and having plenty of training with them on the unfortunate animal. I quote: “So, a wooden spear with a burnt tip at the end can be driven into the carcass of an elephant to a depth of 60-80 centimeters. With one blow." Q.E.D. Of course, an elephant carcass is very different from a powerful and aggressive beast, but modern people (even archaeologists!), to put it mildly, are physically inferior not only to Neanderthals, but also to our immediate great-grandfathers, the Cro-Magnons, whose average height was about 185 centimeters.
So, the first conclusion: an arrow with a burnt tip fired by a skilled archer from a strong bow is quite capable of hitting a fairly large animal. This is about optimism. The second conclusion, related to the notorious “survival”: if something happens, if you want to not only survive, but also live in safety and satiety, go, figuratively speaking, not to become an art critic, but to become an archaeologist. Learn to shoot, tie knots, work with a knife and an ax without delay. You might be late...