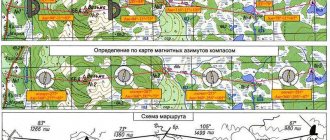
Determination of azimuths, directional angles and magnetic declinations
Working with topographic maps includes knowledge of calculations of directional angle, determination of true and magnetic azimuths, convergence of meridians and magnetic declinations.
In topography, there are 3 types of directions to objects: directional angle, true and magnetic azimuths
The directional angle is the angle α laid clockwise from 0° to 360° between the northern direction of the map coordinate grid and the direction to the object. Postponing the directional angle along the vertical coordinate grid allows you to quickly carry out calculations when working with a topographic map.
True azimuth , or geographic azimuth, is the angle A measured clockwise between the geographic meridian and the direction to the object. The difference between directional angle and true azimuth is the convergence of the meridians.
The convergence of meridians is the angle γ between the true meridian and the vertical line of the cartographic grid.
Magnetic azimuth is the angle A M laid clockwise between the magnetic meridian (the direction of the compass needle to North) and the direction to the object.
Directional angle, true azimuth and convergence of meridians on the map
Magnetic declination is the angle between the true meridian and the magnetic one. The eastern magnetic declination is considered positive, the western magnetic declination negative. The magnitude of magnetic declination in different places is different and does not change over time, therefore, topographic maps indicate not only the magnetic declination for the year the map was compiled, but also its annual change. On maps of scale 1:500,000 and 1:1,000,000, areas of magnetic anomalies and magnitudes of magnetic declination fluctuations are marked.
To determine the magnetic declination at the time of calculation, it is necessary to multiply the annual change in magnetic declination by the number of years that have passed since the topographic map was compiled and add the value indicated for the year of compilation.
An example of the designation on a map of magnetic declination and convergence of meridians
Transition from directional angle to magnetic azimuth and back. It is necessary to move from directional angle to magnetic azimuth, for example, when constructing a route along azimuths that takes into account magnetic declination, since on a topographic map all directions are constructed according to directional angles, which allows you to quickly work with the map, because directional angles are laid off from the vertical coordinate grid. Movement along azimuths on the ground involves the use of a compass and magnetic azimuths, which is why such a transition is necessary.
The transition from directional angle to magnetic azimuth is carried out according to the formula: A M = α - δ + γ and vice versa α = A M + δ - γ where: A M - magnetic azimuth α - directional angle δ - magnetic declination γ - convergence of meridians Example: Magnetic declination for 1982 is eastern, i.e. positive 10°15′. The year of calculation is 2011. The annual change in magnetic declination is also eastern 0°04′. The convergence of the meridians is western, therefore with a sign of minus 2°10′. It is necessary to convert the directional angle of 95°12′ into magnetic azimuth for use on the ground.
Scheme of transition from directional angle to magnetic azimuth
First, let's calculate the magnetic declination for 2011:
δ = 10°15′ + (0°04′ x 29) = 12°11′ Calculation of magnetic azimuth: A M = 95°12′ – 12°11′ + (-2°10′) = 80°51′ Preparation on the topographic map of the route for movement along magnetic azimuths 1) On the topographic map it is necessary to mark landmarks at turning points 2) Measure directional angles and the length of each straight section of movement 3) Convert directional angles into magnetic azimuths, and distances into pairs of steps if movement along azimuths will be carried out on foot. The data is plotted on a map, or a route diagram is drawn up.
Scheme of the route along azimuths How to move along azimuths?
At the starting point, using a compass, they measure the magnetic azimuth indicated on the map, in the direction of which they notice a distant landmark and move in this direction. Having reached the intended landmark, they check the magnetic azimuth with a compass, mark the next landmark and thus move to the next turning point, reaching which the whole process is repeated, but with a different magnetic azimuth. Orientation to intermediate landmarks between turning points allows you to maintain the direction along given magnetic azimuths. If, when drawing up a route along azimuths on a topographic map, an obstacle is encountered, then the detour azimuths of turning points and the distances between them are included in the diagram. If, while moving along azimuths, an unplanned obstacle is encountered on the ground, and it is visible to the end, then a landmark is marked on the opposite side, reaching which after walking around, the magnetic azimuth is checked and the movement continues. If the obstacle is not completely visible, then the detour is made according to the diagram below, and the distance of the segment BC is added to the total distance to the next turning point
.
Avoiding obstacles when moving in azimuths
Comments
+1 Katya 10/04/2016 10:32 Thank you!! Awesome site)) helped out!!
Quote
+10 Egor 02/02/2015 13:42 I didn’t understand anything, but I need to fix the monitor
Quote
-2 crm 09/11/2014 12:08 Yeah, I figured it out, we just have very small declinations, so there’s no visible error. The site is great, thank you!!!!
Quote
+1 Veniamin 09.10.2014 13:43 What a great site! Thank you!
Quote
-1 crm 03/14/2014 08:09 Tell me, isn’t it easier not to use directional angles, for example, we have a declination of 3 degrees to the west between the magnetic azimuth and the grid line. Why do such complex calculations? those. On the map, referring to the grid, I take the azimuth and make an adjustment of -3 degrees and thus go to the target. It seems that I was not mistaken...
Quote
+2 Misha 12/13/2013 12:48 Excellent site, thank you
Quote
-1 off 07/13/2013 12:44 The magnitude of magnetic declination in different places is different and does not change over time, therefore, topographic maps indicate not only the magnetic declination for the year the map was compiled, but also its annual change. Apparently “not” is superfluous here.
Quote
+3 denis123132131 05/28/2013 18:13 Awesome site
Quote
Update list of comments RSS feed of comments for this entry
Add a comment
Selecting landmarks and clarifying routes for movement in azimuths.
The selection of landmarks and clarification of routes is carried out on the map. The number of landmarks and the choice of route are determined depending on the nature of the terrain, tasks and conditions of the upcoming movement.
The main thing is to choose a route that would provide quick access to the designated point (object). Therefore, it is desirable that it does not have unnecessary turns, passes through areas most convenient for movement, and, if possible, avoids obstacles on the ground.
Selected landmarks are connected by straight lines. If they do not intersect the grid lines on the map, it is necessary to continue them until they intersect, so that the directional angles can be more easily determined. After this, the directional angle is determined on the map for each section of the route. Then, by introducing a direction correction, they convert it to magnetic azimuth, which is recorded on the map against the corresponding section of the route.
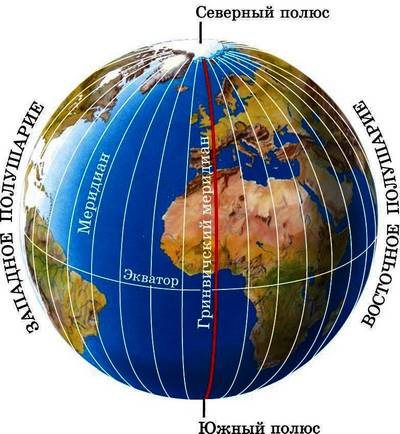
Meridians
Meridians are vertical lines, which are arcs of equal length, connecting the North Pole with the South Pole. The length of each meridian is approximately 20,000 km. And all meridians intersect with each other at two points: at the North and South Pole.
Since there are no Western or Eastern Poles on Earth, it was decided that the prime meridian line would pass through the famous Greenwich Royal Observatory, located in England, on the eastern outskirts of London.
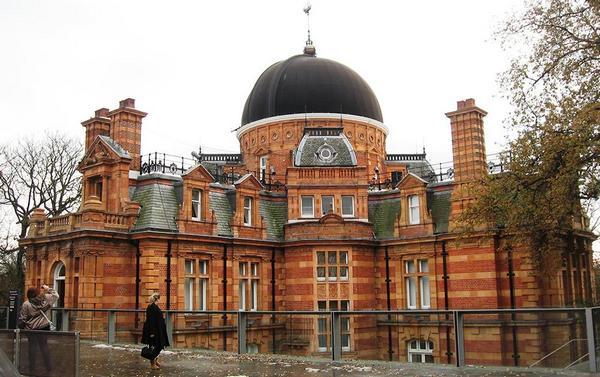
The same Greenwich Observatory through which the prime meridian passes.
To the right of the prime meridian (or Greenwich meridian) are the eastern meridians, reaching up to +180°. The western meridians extend to the left, also reaching -180°
The western and eastern longitudes of the meridians are designated as “W.” and "v.d."
What is called azimuth: types of angle and why it is needed
When becoming familiar with the basics of orientation and survival in unfamiliar terrain, a person inevitably encounters the concept of “azimuth.” A similar term is often found in scientific articles and fiction about travelers. What is azimuth called and what is it used for is the first thing worth learning, as this information can help you survive in a difficult situation.
Definition and scope
Most people know about the existence of the term from geography textbooks. Azimuth is the angle between the direction north and the line to a specific object. It is always calculated clockwise and applied:
- to choose the right landmark when moving in forests, mountains, sandy deserts or in poor visibility;
- when checking a map with a specific area or when orientation on paper is difficult;
- when conducting research and work related to geodesy;
- in the field of aviation, sea, river and air transportation - to plot the route of ships, airplanes and other aircraft.
The ability to determine the azimuth direction makes it easy to navigate using maps even in unfamiliar areas. A person can move freely and go to the desired point when moving through difficult territories. He can independently draw maps and determine his own location.
Main types of azimuths
Azimuth is measured in units such as degrees and can range from 0 to 360°. Here are the azimuths:
- magnetic;
- true;
- back.
Travelers often use magnetic azimuth for orientation, using a compass to determine it. It allows you to accurately find not only the north direction, but also the east and west, using the end of the arrow. True azimuth is calculated using a classic protractor, and the geographic pole is the reference point.
The values of magnetic and true azimuth in most cases do not coincide, but having a compass in hand, you can always get the required figure. To do this, it is enough to know the magnitude of the magnetic declination, which can be western or eastern.
In the first case, the compass needle will move north to the left, and to calculate the magnetic azimuth, the magnetic declination value is added to the true one. In the second option, movement is observed to the right - subtraction is performed.
Reverse azimuth is used to return to the starting point, and to construct a path, 180° is added to the existing angle.
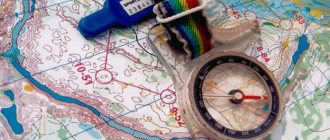
Compass calculation
Calculations are carried out using a special device and are based on the peculiarities of the movement of the magnetic needle. The resulting value allows you to determine in which cardinal direction the desired object is located:
- 0° - north;
- 90° - south;
- 180°—east;
- 270° - west.
Determining azimuth begins with the correct location of the compass. The zero value on the device dial must match the letter “C”. After this, it is necessary to rotate the sighting device and point the front sight exactly at the object, while controlling the immobility of the measuring device box.
The fixed value on the dial will be the azimuth of a specific object. Some models of compasses do not have a sighting device; in this case, a straight thin stick or match is used. The middle of a kind of instrument must pass through the center of the device: one of the ends is directed towards the object for which calculations are being carried out.
Identification by map
Preparation for movement through the territory is often carried out using topographic maps. It consists of preliminary determination of magnetic azimuths, distances between key landmarks and an approximate calculation of the time characteristics of the path.
Sequence of actions to calculate azimuth:
- choose a flat surface and lay out the card;
- Draw a thin vertical line from the starting point with a pencil;
- draw a straight line from the beginning and through the destination;
- use a protractor to measure the resulting angle;
- if necessary, adjust the value and convert it into a magnetic azimuth value.
In the absence of a protractor, a compass is used, and calculations are carried out on the basis of a graduated card.
When planning a route, it is important to take into account the obstacles encountered that make it impossible to move in a straight line - insurmountable ravines, swampy places, lakes and large buildings.
In such situations, so-called turning points are placed along the entire route, then they are connected. For each resulting segment, the azimuth is calculated, and a certain direction is maintained during movement.
Features of the tablet compass
A tablet compass is a box containing a magnetic needle part with a graduated scale inside. The flask is located on a platform made of transparent material with markings applied to it. To make reading maps easier, some models have a built-in magnifying glass. Azimuth determination process:
- overlaying a compass on the map surface;
- alignment of the edge of the measuring device with the route line;
- scrolling the flask to ensure parallelism of the lines on the bottom, the compass needle and the lines of longitude marked on the map;
- determining the directional angle and converting it to azimuth.
The tablet compass can be regular or liquid. In the second case, the flask contains a non-freezing substance, and the viscous consistency facilitates faster stabilization of the needle after the start of measurement or when making a sudden movement.
Orienteering rules
When plotting a route through the terrain, errors inevitably arise, the presence of which leads to errors in the intended path. An inaccuracy of just 5 degrees will result in a deviation of 100 meters for every kilometer. However, you can reduce the risk of errors:
- break the route into small segments, identifying landmarks for each;
- keep control over the distance traveled and always have information that allows you to return to the starting point, which is important when encountering obstacles;
- small obstacles must be overcome alternately on the right and left sides;
- look back to control the straightness of the path of movement, use natural and artificial objects such as rivers, roads, power lines for guidance.
Before starting movement, it is recommended to make calculations of the so-called emergency azimuth. A landmark can be a highway, a populated area or another object that can be reached if the main direction is lost, that is, when a person gets lost. The azimuth is calculated before setting off, and the resulting value is recorded. Errors may be related to:
- compass malfunction;
- error in determining magnetic declination;
- magnetic deviations.
The risk of error due to deviations increases when driving near objects with magnetic properties - power lines, railway tracks, in the range of another compass and mobile phone.
Today, many gadgets are equipped with special programs for determining landmarks, but experts do not classify them as reliable. They are capable of “failure” at any time in the event of a fall or an unforeseen situation, their charge may run out. The use of such devices is often difficult when diving underground, moving through tunnels or caves.
The sporting goods market today offers a wide variety of compasses models, differing in price, functionality and external design. Experts recommend giving preference to tablet options, as they ensure ease of working with the card.
The liquid principle of operation is considered optimal - such devices provide faster stabilization of the needle.
An additional advantage is the presence of backlighting, which will help orientation in the dark when using a flashlight is impossible or difficult.
The ability to correctly determine the azimuth and move along it is included in the basics of orientation. A compass, protractor and map can be used to calculate the value and plot the route. Experience and practice in using such tools will minimize the risk of getting lost even in unfamiliar areas.
Source: https://hendmeid24.ru/interesnoe/chto-nazyvaetsya-azimutom
Parallels
Parallels run along the horizontal of our globe (more precisely, not exactly a globe), they all have different diameters and not a single common point, hence their name - parallels, because as we know from geometry, parallel lines never intersect (but this is also not accurate ). The shortest diameter is the parallels located at the North and South Pole, and the longest is the parallel running through the center of the Earth, which we know as the equator.
The equator, the longest parallel, has a diameter of about 40,000 km. Due to its geographical position, it is equidistant from both the north and south poles; it is this pole that will divide the Earth into two conventional parts: the Northern and Southern Hemispheres.
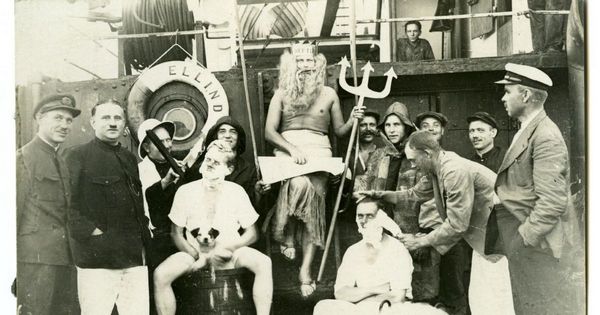
Ceremony for crossing the equator on a transatlantic ship.
Crossing Africa and South America, the equator is at 0°. Further from it in both directions there are other parallels with a periodicity of 10°. Parallels at the poles have a value of 90°. Only in the Northern Hemisphere they come with a “+” sign, and in the Southern Hemisphere with a “-” sign.
Parallels determine a geographic location by latitude, and on maps they are labeled as parallels of northern latitude (N) or southern latitude (S).
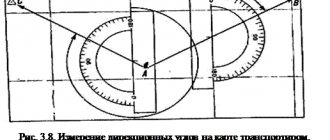
Measuring the directional angle on the map and converting it to magnetic azimuth.
The directional angle is measured clockwise using a protractor or a compass. It's done like this. Having placed the map with the route drawn on the table, they orient it as accurately as possible according to the compass, taking into account the direction correction. Then, without changing the orientation of the map, apply the compass to the first line of the route so that the North-South direction coincides with the drawn direction of the route. In this case, North should be directed in the direction of movement.
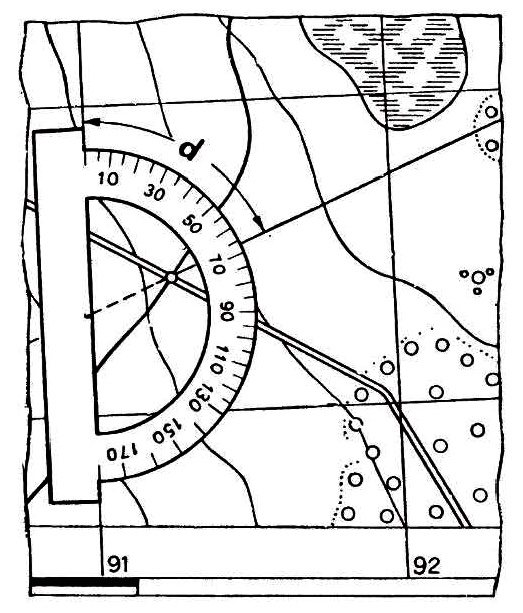
After the needle has calmed down, a reading is taken along the compass dial under its northern end. Subtracting the resulting number from 360 degrees, we obtain the magnetic azimuth of the desired direction. In the same way, the magnetic azimuths of all other sections of the route are determined sequentially. For our example, in the first section the magnetic azimuth is 360 340 = 20 degrees, and the azimuth of the second section will be 360 30 = 330 degrees.
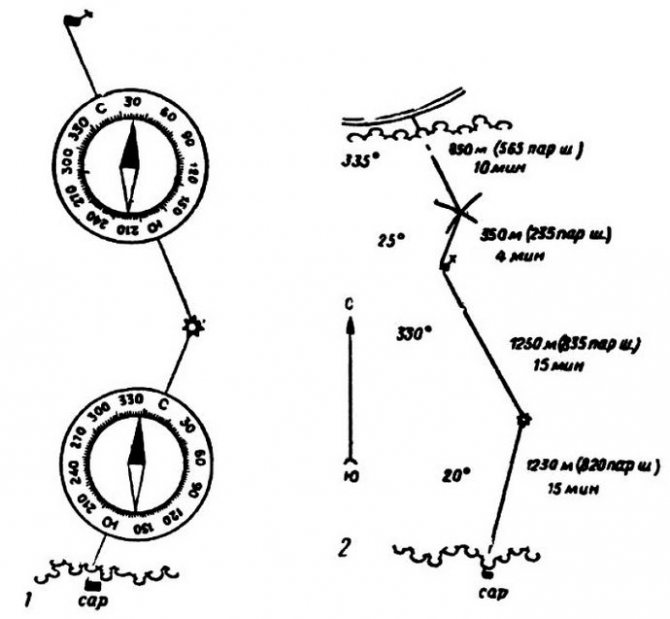
Having determined and recorded magnetic azimuths, measure the length of each section of the route from the map. At the same time, if the movement will be performed on foot, the meters are converted into pairs of steps or the time required to complete each section is calculated, for example, when skiing.
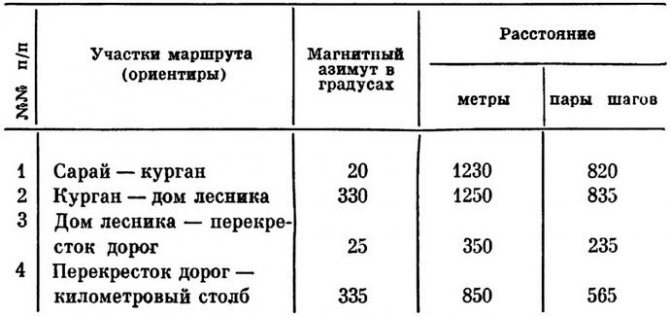
All this data is drawn up on the edge of a topographic map. If you don’t have a map with you on the trip, be sure to draw up as detailed a route diagram or a text table as possible.
Based on materials from the book “Map and Compass are My Friends.” Klimenko A.I.