Content
1. Safety Information 2. Features and Functions 3. Unpacking and Contents Check 4. Optional Accessories (Sold Separately) 5. Initial Assembly and Connection 5.1. Antenna installation 5.2. installing a belt clip 5.3. Connecting an external headset 5.4. Installing the battery 6. Charging the battery 7. Information about the battery 7.1. First use 7.2. Tips for using the battery 7.3. Extending battery life 7.4. Battery storage 8. Components and controls 8.1. General view of the radio station 8.2. Purpose of control keys 9. LCD screen 10. Working with the radio station 10.1. Switching on/off, volume control 10.2. Selecting a frequency or memory cell 10.3. Reception / transmission 10.4. Radio operating modes 11. Description of built-in functions 11.1. Squelch (SQL menu) 11.2. “VOX” function 11.3. Reverse function 11.4. ALARM function 11.5. 1750 Hz tone for access to repeaters 12. Menu, description of settings 12.1. Working with the menu 12.2. Description of menu items 13. CTCSS Tone Table 14. DCS Tone Table 15. Technical Specifications 15.1. General 15.2. Transmitter 15.3. Receiver 16. Possible malfunctions and solutions
SAFETY INFORMATION
The following precautions must be observed when operating, servicing, or repairing this device.
• Repair and maintenance of the Baofeng UV-5R radio must be carried out by qualified personnel in a specialized service center. • Do not make changes to the design of the radio! • Use chargers and batteries manufactured or certified as replacements by BAOFENG • Turn off the radio before entering areas where explosive or flammable substances are present. • Do not use walkie-talkies with a damaged antenna. If a damaged antenna touches parts of the body, there is a high risk of getting burned. • Do not charge the battery in an area where explosive or flammable substances are located. • To avoid electromagnetic interference or compatibility problems, turn off your radio in areas where you are required to do so, especially where there are signs reminding you to do so. • Turn off your radio before boarding an airplane. Any use of the radio must comply with airline regulations or crew instructions. • Turn off your radio before entering a blasting area. • For vehicles with airbags: Do not place Baofeng UV-5R radios in the airbag deployment area or directly on the airbag covers. • Do not expose the radio to direct sunlight or place it near a heat source. • When transmitting with the radio, hold it vertically at a distance of 3–4 cm from your face. Keep the antenna at least 4 cm away from your body.
Acceptable ranges
To know which limiting frequencies can be set in the settings, appropriate measurements were taken using a frequency meter and a GY561 wattmeter.
For VHF frequencies, with a lower limit of 128.8 MHz, the radio can output 7.7 W. As for the upper frequency limit, at 178.2 MHz the radio produces 5.8 W.
For the UHF range at a frequency of 400 MHz, the radio has a power of 3.9 W, and at 500.1 MHz - 3.6 W. When trying to enter large values, the radio produces zero power or even freezes. As for the reception mode, for the UHF and VHF bands it can be wider than for transmission and is within the limits that were defined above. On a note!
When expanding the range of the Baofeng UV-5R, remember that the power of the device is limited to 5 W (this is the value stated by the manufacturer).
FEATURES AND FUNCTIONS
• Dual-band handheld transceiver with LCD screen • Supports DTMF signals • High capacity Li-ion battery • FM radio receiver (65 MHz – 108 MHz) • Supports 105 subtones of “DCS - Digital Code Squelch” and 50 subtones “CTCSS (Continuous Tone-Coded Squelch System)” user configurable • VOX function voice activated mode • Alarm function (alarm) • 128 memory cells • Wideband / narrowband modulation • Adjustable transmitter power • Programmable display backlight color and time to turn it on • “Beep” function on the keyboard • Simultaneous reception of two different frequencies • Selectable frequency step: 2.5 / 5 / 6.25 / 10 / 12.5 / 25 / 50 kHz • OFFSET function (frequency shift for working with repeaters) • Battery Saving Function (SAVE) • Customizable transmission time limit (TOT function) • Three frequency scanning modes • “BCLO” (Busy Channel Lockout) function (prohibits transmission if a given frequency is already transmitting) • Built-in CTCSS subtone scanning function /DCS • Built-in LED flashlight • Radio programming via a special cable • Adjustable squelch threshold (from 0 to 9) • Simultaneous reception on different bands • End of transmission tone • Keyboard lock
UNPACKING AND CHECKING COMPLETENESS
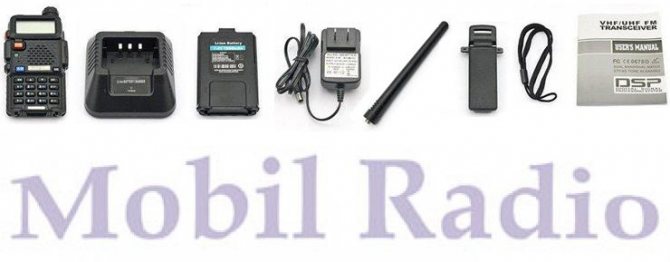
Carefully unpack the transceiver. Be sure to check the presence of all necessary components; if there are discrepancies, please notify the seller immediately.
From left to right are shown: 1. Radio station 2. Charging adapter of the “cup” type 3. Rechargeable battery 4. AC adapter for the charging cup 5. Antenna 6. Belt clip 7. Wrist lanyard 8. Instructions in Russian
.
INITIAL ASSEMBLY AND CONNECTION
5.1. ANTENNA INSTALLATION
To install the antenna, carefully screw it onto the thread, turning it clockwise until it stops.
Important!
Hold the antenna at the base, not the tip.
Important!
If you are using an external antenna, make sure its SWR (SWR, Standing Wave Ratio) is approximately equal to or less than 1.5:1, otherwise the transceiver's output stage may burn out.
Important!
During transmission, do not hold the antenna with your hand, as this reduces the quality and strength of the signal.
Important! Never (!) turn on transmission without an antenna, otherwise the output stage of the transmitter in the transceiver may burn out.
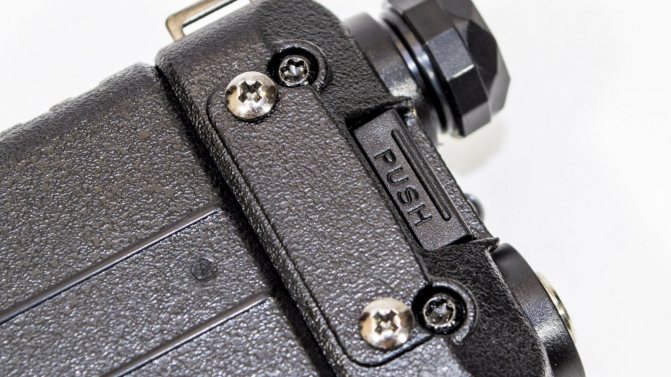
5.2. INSTALLING THE BELT CLIP
If necessary, install the radio's belt clip to the back of the case using the two screws included as shown in the image.
Important!
Do not use glue to secure the mounting screws. Solvents contained in the adhesive may damage the battery case.
5.3. CONNECTING AN EXTERNAL HEADSET
Connect an external headset to the “SP&MIC” connector of the device. When connecting, insert the plug perpendicular to the body of the Baofeng UV-5R radio, avoiding distortions. Do not turn on the transmission while connecting the headset.
5.4. INSTALLING AND REMOVAL OF THE BATTERY
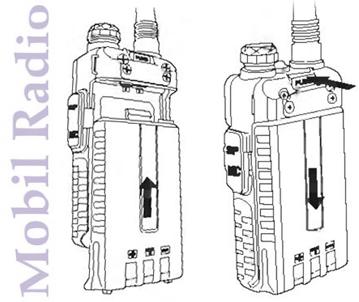
When installing the battery, make sure it is parallel to the aluminum chassis of the housing.
The bottom of the battery should be 1-2 cm below the bottom edge of the radio station's crop. Align the battery slots with the guides on the case and push the battery up until it clicks into place.
Be sure to turn off the device before removing the battery.
Press the battery latch (PUSH), slide it down 1-2 cm, then disconnect it from the case.
Programming the Baofeng UV-5R radio station
To connect Baofeng UV-5R radio, you will need a programming cable.
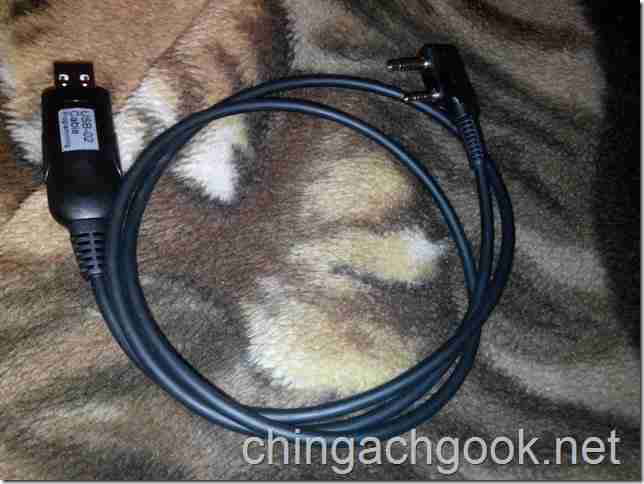
Before connecting the programming cable the Baofeng UV-5R radio station to the computer, you need to install drivers for it.
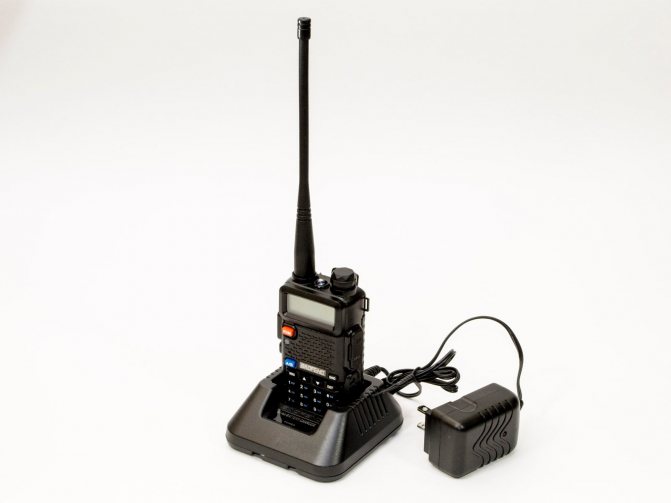
CHARGING THE BATTERY Baofeng UV-5R
Use only chargers recommended by the manufacturer.
The color of the LED on the charger indicates the charging process: Charging status Indication color Standby
(no load) Red flashing, green on Charging Red solid Fully charged Green solid Error Red flashing, green solid
Please follow the following charging order:
1. Plug the AC adapter into an AC outlet. 2. Connect the AC adapter to the charging cup. 3. Place the device with the battery or the battery separately into the charging cup. 4. Make sure that the battery contacts are in secure contact with the metal contacts of the charging cup. The red LED should light up. 5. After approximately 4.5 hours the green LED will light up. This means the battery is fully charged. Remove the battery from the charging cup.
Accessories for Baofeng UV-5R radio
| BL-5 AAAx6 | Battery box for 6 batteries or AAA batteries. Suitable for radios BF-UV5R, BF-UV5RB, BF-UV5RE, BF-UV5REPlus, TH-F8, TF-UV985 |
| BL-5L AAx6 | Enlarged battery box for 6 batteries or AA batteries. Suitable for radios BF-UV5R, BF-UV5RB, BF-UV5RE, BF-UV5REPlus, TH-F8, TF-UV985 |
| Car Adapter C9011A | Battery emulator with a plug into the cigarette lighter socket and a twisted cord. To power a radio in a car. Suitable for radios BF-UV5R, BF-UV5RB, BF-UV5RE, BF-UV5REPlus, TH-F8, TF-UV985 |
| BL-5 | Standard battery for Baofeng BF-UV5R radio station. Standard capacity 1800 mAh. |
| BL-5L | Battery for Baofeng BF-UV5R radio station. Increased capacity 3800 mAh. Complete with car charger (in the cigarette lighter socket). |
| Antenna Original UV5R | Standard antenna for Baofeng UV-5R radio station. Suitable for any dual band radios with SMA connector. |
| SRH805S | Short portable dual-band antenna 144/430 MHz. Maximum power 10 W, antenna length 45 mm. SMA-F Female connector. |
| NA-771 | Extended dual-band flexible antenna VHF / UHF 144 / 430MHz for Kenwood, Baofeng, etc. radios. SMA-F Female connector. Length 38 cm. |
| NA-772 | Extended dual-band flexible antenna VHF / UHF 144 / 430MHz for Kenwood, Baofeng, etc. radios. SMA-F Female connector. Swivel joint. Length 40 cm. |
| NA-773 | Telescopic dual-band antenna VHF / UHF 144 / 430MHz for radio stations Kenwood, Baofeng, etc. SMA-F Female connector. Length 13-42 cm. |
| NA-774 | Telescopic dual-band antenna VHF / UHF 144 / 430MHz for radio stations Kenwood, Baofeng, etc. SMA-F Female connector. Swivel joint. Length 13-42 cm. |
| UT-106UV | Car dual-band antenna on a magnetic base with a 3m cable and an SMA-F Female connector. Length 39 cm, magnet diameter 31 mm. Range UHF: 400 MHz -480 MHz + VHF: 136 -174 MHz. Gain 3.0dB / 2.15dB. |
| J1506A | Programmer for radio stations Baofeng, Kenwood. USB interface. |
| Cover-UV5R | Leather case for UV-5R radio. Shoulder strap included. |
| HS-44C H | Headset with transparent sound guide for Baofeng, Vector, Kenwood radio stations |
| ATN-26 | Laryngophone headset with transparent sound guide. The sound is removed from the throat. |
| Tangent UV-5R | Push-to-talk for radio stations Baofehg, Kenwood, Ajetrays, etc. |
| ASU UV-5R | Car charger for Baofeng radios. Connects to the charging “cup”. |
BATTERY INFORMATION
7.1. FIRST USE
New batteries are shipped from the factory fully discharged. The battery must be charged for 5 hours before first use. The maximum battery capacity is reached after three full charge/full discharge cycles. If you notice that the battery power has dropped, recharge it.
Warning!
To reduce the risk of injury, charge only batteries specified by the manufacturer. Other batteries may explode and cause personal injury or property damage. Do not throw the battery into fire. Dispose of the battery according to the laws and regulations in your country. Do not throw away the battery with household waste. NEVER attempt to disassemble the battery.
7.2. TIPS FOR USING THE BATTERY
1. Charge and store the battery at temperatures between 5 C and 40 C degrees. If the temperature is not maintained, the battery may leak or be damaged. 2. While charging, turn off the radio to ensure the battery is fully charged. 3. Do not unplug the AC adapter or remove the battery from the charging case while charging. 4. Never charge the battery if there are traces of moisture on it. Wipe it with a dry soft cloth before charging. 5. Batteries have a limited lifespan. When the operating time of the radio has noticeably decreased compared to normal time, the battery must be replaced with a new one.
7.3. EXTENDING BATTERY LIFE
1. Battery performance is significantly reduced at temperatures below 0C (zero) degrees. In cold weather, a spare battery may be required. If the battery does not work in cold conditions, it will still work at room temperature, so take your time to charge it.
2. Dirty and oxidized battery contacts may cause operation or charging failure. Before connecting the battery, wipe the contacts with a dry soft cloth.
7.4. BATTERY STORAGE
Fully charge the battery before long-term storage to avoid battery damage due to overdischarge. During storage, recharge the battery every 6 months to avoid over-discharging. Store your battery in a cool, dry place at room temperature to reduce self-discharge.
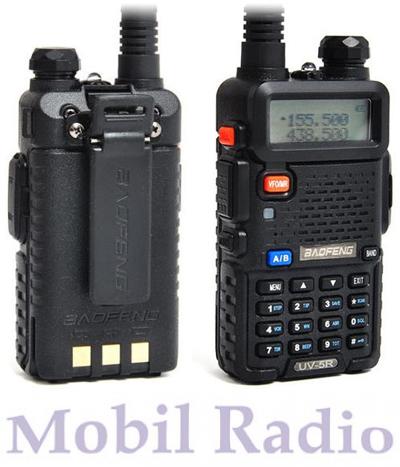
COMPONENTS AND CONTROLS Baofeng UV-5R
8.1. GENERAL VIEW OF THE RADIO STATION
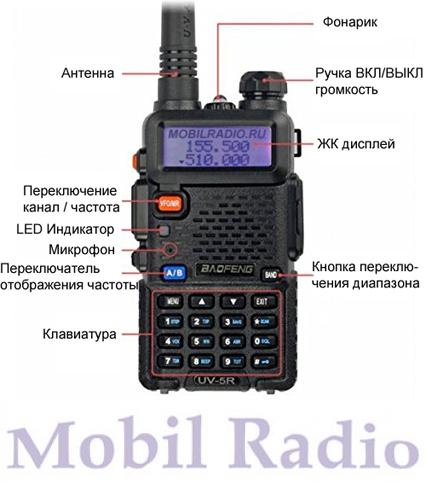
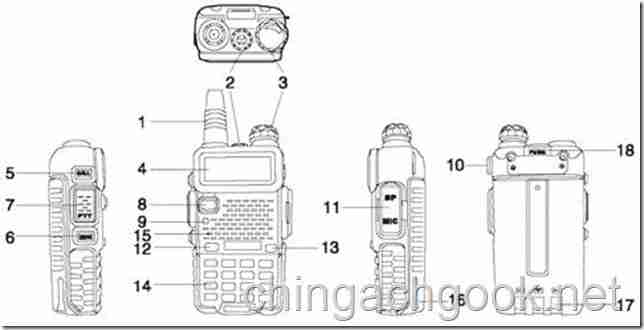
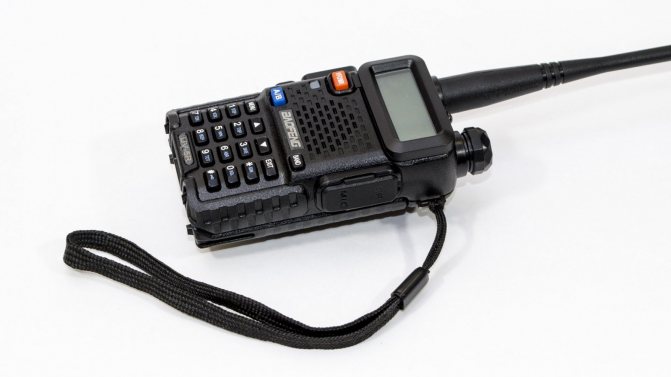
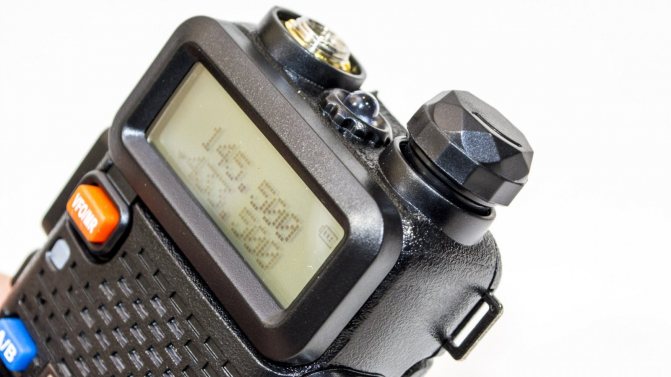
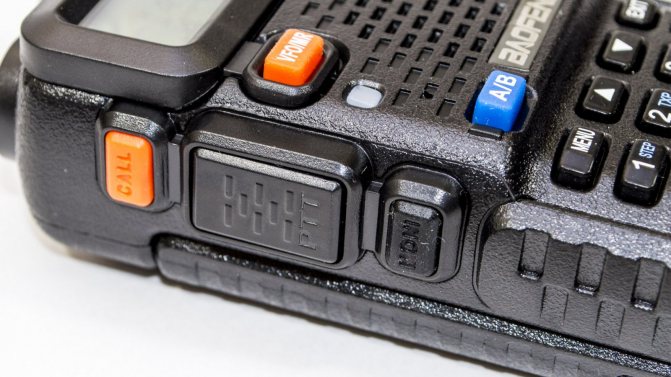
1. Antenna 2. Flashlight 3. Control knob (On/off, volume) 4. LCD screen 5. CALL button (radio, ALARM) 6. MONI button (flashlight, broadcast monitor (temporary shutdown)) 7. PTT button ( 8. VFO/MR button 9. LED indicator 10. Wrist loop 11. External headset jack 12. A/B (high/low receiver selection) 13. BAND (band selection) 14 Keyboard 15. Speaker/microphone 16. Battery 17. Battery contacts 18. Battery lock
8.2. ASSIGNMENT OF CONTROL KEYS
[PTT] (PUSH-TO-TALK)
Press and hold the key to transmit, release to receive.
[CALL]
Press the key to turn on FM radio mode. Press again to turn off FM radio.
Press and hold the key to enable the ALARM function. Press and hold the key again to turn off the ALARM function.
[MONI]
Press the key to turn on the flashlight. Press again - the flashlight will start blinking evenly (not in all versions of the device). Press again and the flashlight will turn off.
Press and hold the key to turn off the automatic squelch to listen to the frequency.
[VFO/MR]
Pressing the key switches the operating mode of the radio station: channel / frequency.
[A/B]
Press the key to select the active receiver (upper [A] or lower [B] on the screen).
[BAND]
Press the key to change the frequency range. In FM radio mode, the range switches between 65-75 MHz and 76-108 MHz.
Pressing this key at the time of transmission broadcasts a calling tone of 1750 Hz (for working with amateur radio repeaters).
[*SCAN]
Pressing once turns on/off the Reverse function. Holding for 2 seconds starts scanning. Pressing the key in FM radio mode starts searching for an FM station. Pressing a key in the CTCSS/DCS subtone selection menu starts scanning subtones.
[#]
Pressing the key switches the transmitter power: high/low. Holding for 2 seconds enables/disables the keypad lock.
[MENU]
The key is used to enter the menu, to enter the mode for selecting the values of a specific menu parameter, as well as confirming the change of the parameter.
[▲] and [▼]
Frequency mode: Pressing once changes the frequency of the active receiver up or down in specified steps (see STEP menu setting). Holding the key changes the frequency of the active channel with a given step continuously until the key is released.
Channel mode: Turn on the next/previous memory cell with a stored channel.
Menu mode: Go to next/previous setting. Changes the current setting to the next/previous value.
[NUMBER KEYPAD]
Frequency Mode: Used to manually enter the desired frequency of the selected channel.
Channel Mode: Used to enter the memory location number of the stored channel.
Menu Mode: Used to enter the option number. You can also set non-standard CTCSS subtone frequencies in the mode of changing the corresponding settings.
Purpose of Baofeng UV-5R controls
- Antenna
- LED flashlight
- Volume control with power switch
- LCD screen
- CALL button. A short press turns on/off the FM radio. Long press (more than 2 seconds) turns on Alarm mode.
- MONI button. A short press turns the flashlight on/off and switches its operating modes. Pressing and holding turns off the squelch.
- PTT button. Puts the radio into transmit mode.
- VFO/MR button. Switches the radio station to channel/frequency operating mode. Frequency Mode: Used to manually enter the desired frequency. Channel mode: Used to enter the memory location number of the stored channel.
- Led indicator. Lights up when a signal is detected on a frequency and in transmitting mode.
- Loop for attaching a lace.
- Connector for connecting a headset or programming cable.
- A/B button. Select lower or upper operating frequency on the screen.
- BAND button. Changing the frequency range 136-174/400-480 MHz in radio station mode and 65-75/78-108 MHz in FM radio mode. Pressing this key at the time of transmission broadcasts a calling tone of 1750 Hz (for working with amateur radio repeaters).
- Numeric keypad.
- Speaker/microphone.
- Battery.
- Battery contacts.
- Battery eject button.
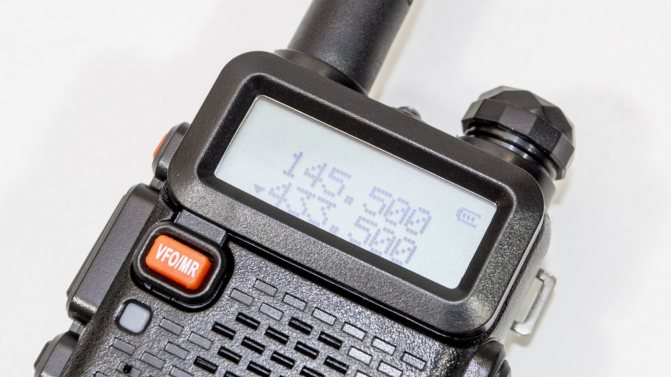
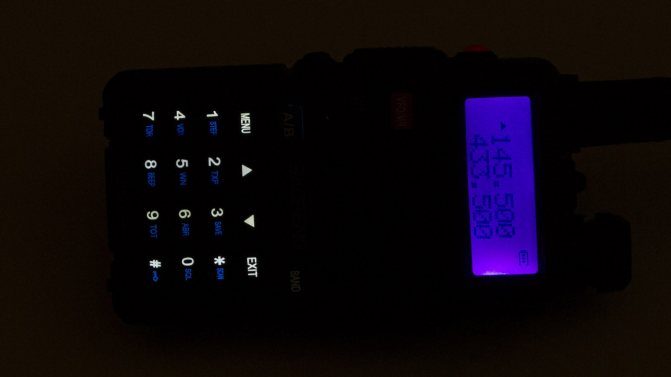
LIQUID CRYSTAL SCREEN
The image shows all segments of the LCD screen. Each segment lights up when a specific function is activated.

188
— Current channel, or frequency, or name
75/25
— Frequency substep, if you set the step to 6.25 kHz
ST
— “CTCSS” mode activated
DCS
— “DCS” mode activated
+/-
— Direction of frequency shift when working through a repeater
S
— Dual channel monitoring function activated
VOX
— PTT voice control function activated
R
— Frequency reverse enabled
N
— “Narrow” band selected
— Battery level
— Keypad lock enabled
L
— Operation at reduced power
[▲] [▼]
— Selected receiver indicator (upper [A]/lower [B])
145.125
— Main display, displays frequency, menu item name, menu setting value
— Signal level
5T2T DTMF
— Transmission of service DTMF signals on air is enabled
There are two main displays on the screen. Each scoreboard corresponds to its receiver: upper [A] or lower [B]. This allows you to set a separate frequency in each receiver and quickly switch between them using the [A/B] button. Also, each receiver can have its own settings for the frequency switching step, subtones, transmitter power, offset of the transmitting frequency from the receiving frequency, etc.
PREFACE
Press the key to turn on FM radio mode. Press again to turn off FM radio.
Press and hold the key to enable the ALARM function. Press and hold the key again to turn off the ALARM function.
Press the key to turn on the flashlight. Press again - the flashlight will start blinking evenly (not in all versions of the device). Press again and the flashlight will turn off.
Press and hold the key to turn off the squelch and listen to the frequency.
[VFO/MR
]
Pressing the key switches the operating mode of the radio station: channel / frequency.
Press the key to select the active receiver (upper [A] or lower [B] on the screen).
Press the key to change the frequency range. In FM radio mode, the range switches between 65-75 MHz and 76-108 MHz.
Pressing this key at the time of transmission broadcasts a calling tone of 1750 Hz (for working with amateur radio repeaters).
Pressing once turns on/off the Reverse function. Holding for 2 seconds starts scanning.
Pressing the key in FM radio mode starts searching for an FM station.
Pressing a key in the CTCSS/DCS subtone selection menu starts scanning subtones.
Pressing the key switches the transmitter power: high/low. Holding for 2 seconds enables/disables the keypad lock.
The key is used to enter the menu, to enter the mode for selecting the values of a certain menu parameter, as well as confirming the change of the parameter.
Frequency mode:
A single press changes the frequency of the active receiver up or down with a specified step (see the STEP menu setting).
Holding the key changes the frequency of the active channel with a given step continuously until the key is released.
Channel mode:
Turning on the next/previous memory cell with a saved channel.
Menu mode:
Move to next/previous setting.
Changes the current setting to the next/previous value.
Frequency mode:
Used to manually enter the desired frequency of the selected channel.
Channel mode:
Used to enter the number of the memory location with the saved channel.
Menu mode:
Used to enter the serial number of the option. You can also set non-standard CTCSS subtone frequencies in the mode of changing the corresponding settings.
Transfer mode:
Broadcasting of DTMF signals.
OPERATING THE RADIO STATION
10.1. ON/OFF, VOLUME CONTROL
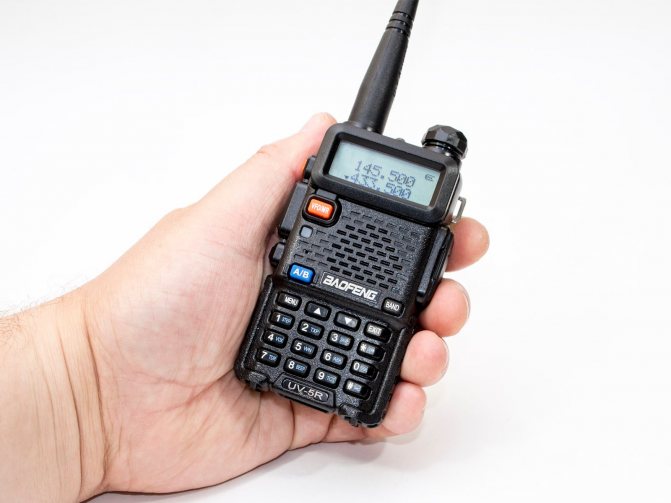
Make sure the antenna and battery are installed correctly and the battery is charged. Turn the control knob (3) clockwise to turn on the radio. Rotate the knob clockwise to increase the volume and counterclockwise to decrease the volume.
10.2. SELECTION OF FREQUENCY OR MEMORY CELL
[▲] and [▼] keys
are used to sequentially change the frequency with a given step or to select the next/previous memory cell. Also, in frequency mode, the frequency can be entered manually using the numeric keypad. If the entered value is incorrect, the channel will remain operating at the previous frequency. If the entered frequency does not coincide with the frequency that should be at a given step (menu, option No. 1 STEP), then the frequency in the channel will be set, with a given step, closest to the one entered manually. For example. The step is set to 6.25 kHz. You enter the frequency 446.005 MHz. The channel will automatically set the frequency to 446.00625 MHz, because at this step (6.25 kHz), 446.000 MHz and 446.00625 MHz are correct. If the entered frequency is correct and is in a different range from the current one, the range will automatically switch.
..
10.3. RECEPTION/TRANSMITTING
Turn on the radio station, adjust the volume (see paragraph 11.1). Activate the upper or lower receiver ([A/B] button), select the required frequency value at which the communication session will take place (see section 11.2). To broadcast a voice message, press and hold the [PTT] button while the message is being transmitted. When the message ends, release the button. Listen to the answer. When transmitting, the indicator (9) lights up red, when receiving - green, and when there is no signal, the indicator does not light up.
10.4. OPERATING MODES OF THE RADIO STATION
The Baofeng UV-5R radio has two main operating modes: 1) Channel, 2) Frequency. Modes are switched using the [VFO/MR]
.
In channel mode, frequencies previously stored in the device’s memory cells are used for transmission/reception. The main digital field displays the frequency/number/name of the channel (depending on menu settings No. 21,22), and on the right, in smaller numbers, the number of the selected memory cell is displayed. Along with the channel frequency, its settings are saved, such as: CTCSS or DCS subtones for transmission and reception, transmitter power, modulation, frequency shift (for working with a repeater). In total, the device has 127 memory cells. [▲] and [▼]
keys in this mode enable the next/previous memory cell.
In frequency mode, the transmitting/receiving frequency is set manually either using the numeric keys of the keyboard, or by repeatedly pressing the [▲] and [▼]
until the desired value is reached. In this case, the frequency changes to the value specified in menu item No. 1 (STEP). The main field on the screen displays the current frequency value.
Baofeng UV-5R radio menu
The radio station's menu contains 40 different items responsible for setting its operating modes.
- To activate the settings menu, press the [ MENU] key.
- Move to the required menu item using the [▼] and [▲] keys.
- [ key again .
- Select the required option value using the [▼] and [▲] keys.
- Save the setting by pressing the [MENU] key.
DESCRIPTION OF BUILT-IN FUNCTIONS
11.1. SQUELCH (SQL MENU)
The squelch turns off the speaker when there is no signal on the frequency. With the squelch threshold set correctly, you will hear only useful signals and this will significantly reduce power consumption. Recommended level 5.
11.2. VOX FUNCTION
When the VOX function (hands-free mode) is enabled, there is no need to press the PTT button to transmit. The transmission will be turned on automatically as soon as the microphone “hears” the voice. When the voice disappears, transmission will automatically stop and the device will switch to reception. Using the VOX menu, you can set the threshold voice volume level at which transmission will be activated.
11.3. REVERSE FUNCTION
When using frequency separation (menu, options No. 25, 26), it is possible to quickly swap the receiving frequency and transmitting frequency by turning on the Reverse
.
Press the [*SCAN]
R
appears on the screen .
11.4. ALARM FUNCTION
Allows you to broadcast special distress tones.
11.5. 1750 Hz TONE FOR ACCESS TO REPEATERS
For long-distance communications, amateur repeaters are used, which are activated after receiving a 1750 Hz tone signal. Press and hold the [PTT]
, then press the
[BAND]
to broadcast the 1750 Hz tone.
MENU, DESCRIPTION OF SETTINGS
12.1. WORKING WITH MENU
The radio station's menu contains 40 different items responsible for setting its operating modes.
1. To turn on the settings menu, press the key
Description0SQLNoise suppressor opening threshold. Possible values from 0 to 91 STEPFrequency change step in frequency mode when scanning or pressing keys [▲] and [▼]2TXPTransmitter power. Possible values: HIGH– large (about 4 watts),
LOW
– small (about 1 Watt). When the power is low, the screen displays “
L
". Can be switched using the key
[#]
on keyboard3SAVEEnergy saving mode. Displays the number of “sleep” cycles relative to “work” cycles: 1 :
1, 2
:
1, 3
:
1, 4
:
1. The higher the value, the longer the battery will last. Possible values:
OFF
,
1
,
2
,
3
,
4
. If enabled, then when a signal appears on the frequency at the beginning, half a second or a second (one or two words) may be lost4 VOXVoice controlled transmission. Sets the voice volume level at which transmission will begin. When turned on, the screen displays “ VOX
»5WNModulation type: broadband WIDE
(25 kHz), narrowband
NARR
(12.5 kHz). For narrowband modulation, the screen displays “
N
»6ABRScreen backlight operating time, seconds. Also the time after which the radio station will return to FM radio mode after being interrupted by receiving a signal on the operating frequency7 TDRReception of two frequencies, receivers A
And
B
, simultaneously. The receiver whose frequency was last received becomes active. When this function is enabled, the screen displays “
S
»8BEEPSound confirmation of keystrokes9TOTTemporary limitation of continuous transmission. Limits the time during which the radio station transmits continuously. Possible values: 15 – 600 sec10 R-DCSSets the DCS (digital) subtone for reception. The sound will be heard only if the partner is transmitting with the same subtone on the transmission. See paragraph 1411 R-CTCSSets the CTCSS (analog) subtone for reception. Similar to the previous one. See paragraph 1312 T-DCSSets the DCS (digital) subtone for transmission. The partner will hear the sound only if this subtone matches the one that is set for his reception. See paragraph 1413 T-CTCSSets the CTCSS (analog) subtone for transmission. The partner will hear the sound only if this subtone matches the one that is set for his reception. See paragraph 1314 VOICEVoice confirmation of key presses. OFF /ON
(in some versions
ENG
/
CHI
/
OFF
– Agnl/Kit/Off)15ANI-IDAutomatic identification by number. Displays a special ANI code that is programmed from a computer. Cannot be changed manually. This code is broadcast when the ALARM function is activated and in menu No. 32 AL-MOD
set value
CODE16DTMFSTThe audibility of DTMF tones when they are broadcast. OFF
– tones are not heard.
DT-ST
– only tones that are transmitted manually by pressing the keyboard are heard.
ANI-ST
– Only preset tones are heard.
DT+ANI
– all tones are heard17S-CODEA set of 15 pre-programmed 5-digit DTMF codes. One code from the set is selected. Broadcasting is carried out only if menu option No. 19 is enabled PTT-ID18SC-REVFrequency scanning method. TO
(time operation) – when a frequency with a transmitted signal is found, the scanner will stop at it for a few seconds, then continue scanning.
CO
(carrier operation) – scanning will continue as soon as the active signal disappears on the frequency.
S.E.
(search operation) – scanning will end as soon as a frequency with signal 19 is foundPTT-IDDetermines the moment of broadcasting the PTT-ID code (see menu No. 17). Values: OFF
– do not transmit;
BOT
transmit at the beginning of transmission;
EOT
– transmit at the end of the transmission;
BOTH
transmit at the beginning and end of the transmission. Recommended value OFF20 PTT-LTPTT-ID code transmission delay, in milliseconds. Values: 0 – 50
, requires the included value of item No. 1921MDF-AFormat for displaying channel data in channel operating mode (receiver A). CH –
channel number;
NAME –
channel name (programmed from the computer), if the name is not specified, the channel number is displayed;
FREQ
– channel frequency 22MDF-BFormat for displaying channel data in channel operating mode (receiver B). CH –
channel number;
NAME –
channel name (programmed from the computer), if the name is not specified, the channel number is displayed;
FREQ
– channel frequency 23BCLTransmission prohibition on a busy frequency. If someone is already transmitting a signal on the frequency at the moment, then by pressing the key [PTT]
the transceiver will emit a short “beep” signal and will not start transmitting. Values:
OFF/ON24AUTOLKAutomatic keypad lock. Values OFF
/
ON
. If enabled, the keyboard will be locked after 8 seconds of inactivity25 SFT-DThe direction of shift of the transmission frequency relative to the reception frequency (for working with repeaters). Only in frequency mode! Values: OFF
– no shift;
«+»
the transmitting frequency will be greater than the receiving frequency;
«-«
The transmitting frequency will be lower than the receiving frequency. Depending on the selected value, the + or – indicator lights up on the screen, respectively. Used in conjunction with menu item No. 26
OFFSET.26OFFSETThe value of the shift of the transmitting frequency from the receiving frequency (in Megahertz). Values: 00.000 – 69.990 MHz in 10 kHz steps. Used in conjunction with menu item No. 25 SFT-D27MEM-CHUsed to save a channel to a memory cell, or change the parameters of an already saved channel. Receiver parameters are saved in memory A
, specified in the frequency operating mode: frequency, modulation, subtones, offset, transmitter power, PTT-ID, BCL and S-CODE. To save a channel, you need to configure all its parameters, enter the menu, select option No. 27
MEM-CH
, press the button
MENU
select the number of the memory cell to save, confirm the selection with the button
MENU.
For an already saved channel, it is possible to change the transmission frequency and subtone parameters (to convert a simplex channel into a “repeater” channel or a “cross-band” channel). In this case, the transmission frequency is set in the receiver
A
, and subtones are adjusted in the menu. After this, saving is performed as described above28 DEL-CHRemoving channels from memory cells. The channel number is selected, deletion is confirmed by pressing the button MENU29WT-LEDScreen backlight color in standby mode. OFF
– off,
BLUE
- blue,
ORANGE
- orange,
PURPLE
– lilac30RX-LEDScreen backlight color in signal reception mode. OFF
– off,
BLUE
- blue,
ORANGE
- orange,
PURPLE
– lilac31TX-LEDScreen backlight color in signal transmission mode. OFF
– off,
BLUE
- blue,
ORANGE
- orange,
PURPLE
– lilac32AL-MODFunction operating mode "ALARM
«.
SITE –
the alarm signal is issued only to the transceiver speaker;
TONE –
the alarm signal is broadcast;
CODE
– the ANI code is broadcast (see menu option No. 15) and then “119” (911 vice versa?)33BANDSelecting a frequency range. In the frequency operating mode, it allows you to set the frequency range: VHF (136-174 MHz), UHF (400-480 MHz)34 TDR-ABIn the dual-frequency reception mode (see setting No. 7 TDR), receiver A or B is set, which will remain active after receiving a signal on either receiver. Possible values: OFF
,
A,B.
If you select
OFF
, then the receiver that received the last incoming signal will become active35S.T.E.Elimination of the short “shsh” sound at the end of a transmission. Values: OFF
/
ON
. Works on BAOFENG UV-5R (no information about other models). When releasing the button
[PTT]
a short 50 Hz tone is broadcast, which signals to other transceivers that the transmission has ended and the need to mute the sound. To work through a repeater, set this option to
OFF
(off)36RP-STEElimination of the short “shsh” sound at the end of a transmission when working through a repeater. Values: OFF
/
1
—
10
. Used in conjunction with menu No. 3737 RPT-RLRepeater end tone delay (x100 milliseconds). Values: OFF/ 1 – 10.
Recommended value is OFF. Used in conjunction with menu No. 3638 PONMSGInformation displayed on the screen when turned on. FULL
– all screen segments turn on for a short time.
MSG
– a text message (2 lines) is displayed, programmed from a computer39ROGEROn/off the “Roger” signal being broadcast at the end of the transmission40RESETReset to factory settings. VFO
– Reset menu settings to default values, set in receiver
A
And
B
default frequencies.
ALL
– reset menu settings, reset receiver frequencies
A
And
B
, as well as clearing all channels from memory cells
…
Baofeng UV-5R radio menu items
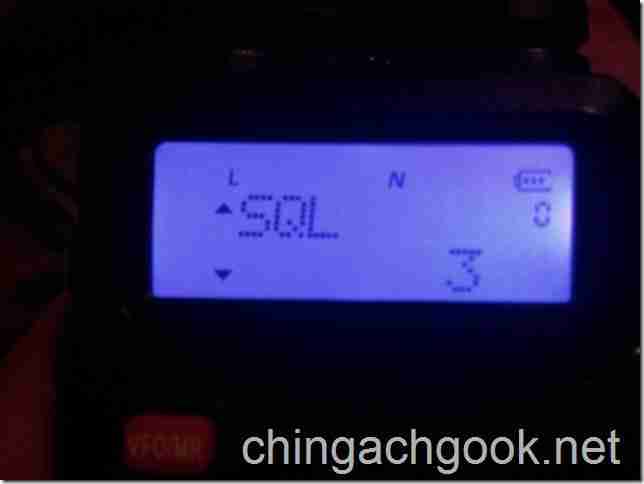
- SQL — Squelch opening threshold. Possible values are from 0 to 9 The squelch turns off the speaker when there is no signal on the frequency. With the squelch threshold set correctly, you will hear only useful signals and this will significantly reduce power consumption. Recommended level 5.
- STEP — Frequency change step in frequency mode when scanning or pressing the [▼] and [▲] keys.
- TXP — Transmitter power. Possible values: HIGH – large (about 4 Watt), LOW – small (about 1 Watt). L
is displayed on the screen . You can switch using the [#] key on your keyboard. - SAVE - Energy saving mode. Displays the number of “sleep” cycles relative to “work” cycles: 1:1, 2:1, 3:1, 4:1. The higher the value, the longer the battery will last. Possible values: OFF, 1, 2, 3, 4. If enabled, then when a signal appears on the frequency at the beginning, half a second or a second (one or two words) may be lost.
- VOX - voice at which the transmission will begin. When turned on, the screen displays “ VOX
” - WN - Modulation type: wideband WIDE (25 kHz), narrowband NARR (12.5 kHz). For narrowband modulation, “ N
” - ABR — Screen backlight operating time, seconds. Also the time after which the radio will return to FM radio mode after being interrupted by receiving a signal on the operating frequency.
- TDR - Receive two frequencies, receivers A and B, simultaneously. The receiver whose frequency was last received becomes active. S
appears on the screen . - BEEP - Sound confirmation of keystrokes.
- TOT—Temporary Restriction of Continuous Transmission. Limits the time during which the radio station transmits continuously. Possible values: 15 – 600 sec.
- R-DSC — Sets the DCS (digital) subtone for reception. The sound will be heard only if the partner is transmitting with the same subtone on the transmission.
- R-CTCS — Sets the CTCSS (analog) subtone for reception. Similar to the previous one.

- T-DCS — Sets the DCS (digital) subtone for transmission. The partner will hear the sound only if this subtone matches the one that is set for his reception.
- T-CTCS — Sets the CTCSS (analog) subtone for transmission. The partner will hear the sound only if this subtone matches the one that is set for his reception.
- VOICE - Voice confirmation of key presses. ENG/CHI/OFF – Angl/Kit/Off.
- ANI-ID - Automatic identification by number. Displays a special ANI code that is programmed from a computer. Cannot be changed manually. This code is broadcast when the ALARM function is activated and menu No. 32 AL-MOD is set to CODE.
- DTMFST — Audibility of DTMF tones when they are broadcast. OFF – tones are not heard. DT-ST – only tones that are transmitted manually by pressing the keyboard are heard. ANI-ST – only preset tones are heard. DT+ANI – all tones are heard
- S-CODE - A set of 15 pre-programmed 5-digit DTMF codes. One code from the set is selected. Broadcasting is carried out only if the PTT-ID menu option is enabled.
- SC-REV - Frequency scanning method. TO (time operation) – when a frequency with a transmitted signal is found, the scanner will stop on it for a few seconds, then continue scanning. CO (carrier operation) – scanning will continue as soon as the active signal disappears on the frequency. SE (search operation) – scanning will end as soon as a frequency with a signal is found.
- PTT-ID — Determines when the PTT-ID code is broadcast. Values: OFF – do not transmit; BOT – transmit at the beginning of transmission; EOT – transmit at the end of transmission; BOTH – transmit at the beginning and end of the transmission. Recommended value is OFF.
- PTT-LT — PTT-ID code transmission delay, in milliseconds. Values: 0 – 50, requires the included value of item No. 19.
- MDF-A - Format for displaying channel data in channel operating mode (receiver A). CH – channel number; NAME – channel name (programmed from a computer), if the name is not specified, the channel number is displayed; FREQ – channel frequency.
- MDF-B — Format for displaying channel data in channel operating mode (receiver B). CH – channel number; NAME – channel name (programmed from a computer), if the name is not specified, the channel number is displayed; FREQ – channel frequency
- BCL - Block transmission on a busy frequency. If someone is already transmitting a signal on the frequency at the moment, then when you press the [PTT] key, the transceiver will emit a short “beep” signal and will not start transmitting. Values: OFF / ON.
- AUTOLK - Automatic keypad locking. Values OFF / ON. If enabled, the keyboard will be locked after 8 seconds of inactivity.
- SFT-D — Direction of shift of the transmission frequency relative to the reception frequency (for working with repeaters). Only in frequency mode! Values: OFF – no shift; “+” the transmitting frequency will be higher than the receiving frequency; “-” the transmitting frequency will be lower than the receiving frequency. Depending on the selected value, the + or – indicator lights up on the screen, respectively. Used in conjunction with the OFFSET menu item.
- OFFSET — The value of the shift of the transmitting frequency from the receiving frequency (in MHz). Values: 00.000 – 69.990 MHz in 10 kHz steps. Used in conjunction with the SFT-D menu item
- MEM-CH - Used to save a channel to a memory cell, or change the parameters of an already saved channel. The parameters of receiver A, specified in the frequency operating mode, are stored in memory: frequency, modulation, subtones, offset, transmitter power, PTT-ID, BCL and S-CODE. To save a channel, you need to configure all its parameters, enter the menu, select the MEM-CH option, press the MENU button, select the number of the memory cell to save, confirm the selection with the MENU button. For an already saved channel, it is possible to change the transmission frequency and subtone parameters (to convert a simplex channel into a “repeater” channel or a “cross-band” channel). In this case, the transmission frequency is set in receiver A, and subtones are configured in the menu. After this, saving is performed as described above.
- DEL-CH - Deletes channels from memory cells. The channel number is selected and deletion is confirmed by pressing the MENU button.
- WT-LED — Screen backlight color in standby mode. OFF – off, BLUE – blue, ORANGE – orange, PURPLE – lilac.
- RX-LED - Screen backlight color in signal receiving mode. OFF – off, BLUE – blue, ORANGE – orange, PURPLE – lilac.
- TX-LED — Screen backlight color in signal transmission mode. OFF – off, BLUE – blue, ORANGE – orange, PURPLE – lilac
- AL-MOD — Operating mode of the “ALARM” function. SITE – the alarm signal is issued only to the transceiver speaker; TONE – alarm signal is broadcast; CODE – the ANI code is broadcast (see menu option No. 15) and then “119” (911 vice versa?).
- BAND - Select the frequency range. In the frequency operating mode, it allows you to set the frequency range: VHF (136-174 MHz), UHF (400-480 MHz).
- TDR-AB - In dual-frequency reception mode (see TDR setting), receiver A or B is set, which will remain active after receiving a signal on either receiver. Possible values: OFF, A, B. If you select OFF, the receiver that received the last incoming signal will become active
- STE - Eliminates the short “shsh” sound at the end of a transmission. Values: OFF / ON. When the [PTT] button is released, a short 50 Hz tone is emitted into the air, signaling to other transceivers that the transmission has ended and that they need to mute the sound. To work through a repeater, set this option to OFF.
- RP-STE - Eliminates the short “shsh” sound at the end of a transmission when working through a repeater. Values: OFF / 1 - 10. Used in conjunction with menu No. 37.
- RPT-RL — Repeater end tone delay (x100 milliseconds). Values: OFF/ 1 – 10. Recommended value is OFF. Used in conjunction with menu No. 36.
- PONMSG - Information displayed on the screen when turned on. FULL – All screen segments are turned on for a short time. MSG – text message displayed (2 lines), programmed from a computer
- ROGER — Turn on/off the “Roger” signal being broadcast on air at the end of the broadcast.
- RESET - Reset to factory settings. VFO – Reset menu settings to default values, set receiver A and B frequencies to default. ALL – reset menu settings, reset frequencies of receivers A and B, as well as clearing all channels from memory cells.
CTCSS TONE TABLE
| № | Frequency Hz) | № | Frequency Hz) | № | Frequency Hz) | № | Frequency Hz) |
| 1 | 33.0 | 17 | 71.9 | 33 | 123.0 | 49 | 183.5 |
| 2 | 35.4 | 18 | 74.4 | 34 | 127.3 | 50 | 186.2 |
| 3 | 36.6 | 19 | 77.0 | 35 | 131.8 | 51 | 189.9 |
| 4 | 37.9 | 20 | 79.7 | 36 | 136.5 | 52 | 192.8 |
| 5 | 39.6 | 21 | 82.5 | 37 | 141.3 | 53 | 196.6 |
| 6 | 44.4 | 22 | 85.4 | 38 | 146.2 | 54 | 199.5 |
| 7 | 47.5 | 23 | 88.5 | 39 | 151.4 | 55 | 203.5 |
| 8 | 49.2 | 24 | 91.5 | 40 | 156.7 | 56 | 206.5 |
| 9 | 51.2 | 25 | 94.8 | 41 | 159.8 | 57 | 210.7 |
| 10 | 53.0 | 26 | 97.4 | 42 | 162.2 | 58 | 218.1 |
| 11 | 54.9 | 27 | 100.0 | 43 | 165.5 | 59 | 225.7 |
| 12 | 56.8 | 28 | 103.5 | 44 | 167.9 | 60 | 229.1 |
| 13 | 58.8 | 29 | 107.2 | 45 | 171.3 | 61 | 233.6 |
| 14 | 63.0 | 30 | 110.9 | 46 | 173.8 | 62 | 241.8 |
| 15 | 67.0 | 31 | 114.8 | 47 | 177.3 | 63 | 250.3 |
| 16 | 69.4 | 32 | 118.8 | 48 | 179.9 | 64 | 254.1 |
DCS TONE CHART
No. Code No. Code No. Code No. Code No. Code 1 D023N 22 D131N 43 D251N 64 D371N 85 D532N 2 D025N 23 D132N 44 D252N 65 D411N 86 D546N 3 D026N 24 D134N 45 D255N 66 D412N 87 D5 65N 4 D031N 25 D143N 46 D261N 67 D413N 88 D606N 5 D032N 26 D145N 47 D263N 68 D423N 89 D612N 6 D036N 27 D152N 48 D265N 69 D431N 90 D624N 7 D043N 28 D155N 49 D266N 70 D432N 91 D627N 8 D047N 29 D156N 50 D271N 71 D445N 92 D631N 9 D051N 30 D162N 51 D274N 72 D446N 93 D632N 10 D053N 31 D165N 52 D306N 73 D452N 94 D645N 11 D054N 32 D172N 53 D311N 74 D454N 95 D654N 12 D065N 33 D174N 54 D315N 75 D455N 96 D662N 13 D 071N 34 D205N 55 D325N 76 D462N 97 D664N 14 D072N 35 D212N 56 D331N 77 D464N 98 D703N 15 D073N 36 D223N 57 D332N 78 D465N 99 D712N 16 D074N 37 D225N 58 D343N 79 D466N 100 D723N 17 D114N 38 D226N 59 D346N 80 D503N 101 D731N 1 8 D115N 39 D243N 60 D351N 81 D506N 102 D732N 19 D116N 40 D244N 61 D356N 82 D516N 103 D734N 20 D122N 41 D245N 62 D364N 83 D523N 104 D743N 21 D125N 42 D246N 63 D365N 84 D526N 105 D754N Code No. Code No. Code No. Code No. Code 106 D023I 127 D131I D251I D371I D532 I 107 D025I 128 D132I D252I D411I D546I 108 D026I 129 D134I D255I D412I D565I 109 D031I 130 D143I D261I D413I D606I 110 D032I 131 D145I D263I D423I D612I 111 D036I 132 D152I D265I D431I D624I 112 D043I 133 D155I D2 66I D432I D627I 113 D047I 134 D156I D271I D445I D631I 114 D051I 135 D162I D274I D446I D632I 115 D053I 136 D165I D306I D452I D645I 116 D054I 137 D172I D311I D454I D654I 117 D065I D174I D315I D455I D662I 118 D071I D205I D325I D462I D664I 119 D072I D212I D331I D464I D703I 120 D073I D223I D332I D465I D712I 121 D074I D225I D343I D466I D723I 122 D114I D226I D346I D503I D731I 123 D115I D243I D351I D506I D732I 124 D116I D244I D356I D516I D734I 125 D122I D245I D364I D523I D743I 126 D125I D246I D365I D526I D754I
SPECIFICATIONS
15.1. GENERAL CHARACTERISTICS
Frequency range: VHF: 136 MHz - 174 MHz (transmit/receive) UHF: 400 MHz - 520 MHz (transmit/receive) FM: 65 - 108 MHz (FM radio reception) Number of memory cells 127 Frequency stability 2.5 ppm Step change frequencies 2.5/5/6.25/10/12.5/25/50 kHz Antenna resistance 50 Ohm Operating temperature -20 C….+60 C Power Battery Li-Ion 7.4 V / 1800 mAh Current consumption in standby mode < 75 mA Current consumption in receive mode 380 mA Current consumption in transmit mode < 1.4 A Operating mode Simplex or half-duplex Duty cycle 03/03/54 min (direct / forward / waiting) Device dimensions 58mm x 110mm x 32mm Weight 130g (approx)
15.2. TRANSMITTER
Power 5 Watt / 1 Watt Modulation type Emission class 16KF F3E / 1 1KF F3E (W/N) Maximum deviation ≤ ±5 kHz / ≤ ±2.5 kHz (W/N) Spurious emissions < -60 dB
15.3. RECEIVER
Receiver sensitivity 0.2 µV (at 12 dB signal-to-noise ratio) Intermodulation selectivity 60 dB Audio output power 1000 mW Adjacent channel selectivity 65 / 60 dB
BAOFENG UV-5R portable radio review
Dear readers! I present to you a review of a budget radio station operating in the VHF/UHF bands – Baofeng UV-5R. Despite the fact that cellular communications have become universally accessible and cheap, radio stations do not lose their relevance.
The radio station is supplied in a package made of thick brown cardboard, there are several inscriptions in black, but in general the packaging can be called simple.
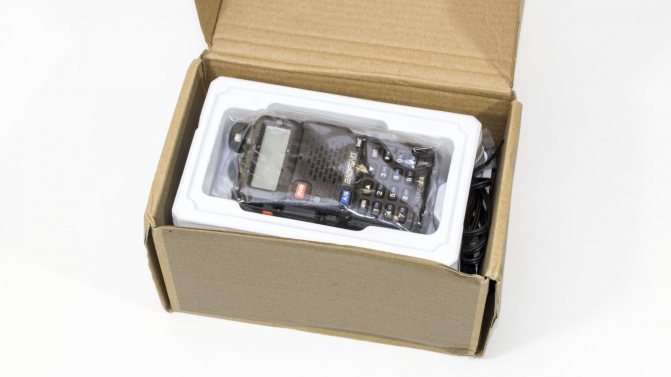
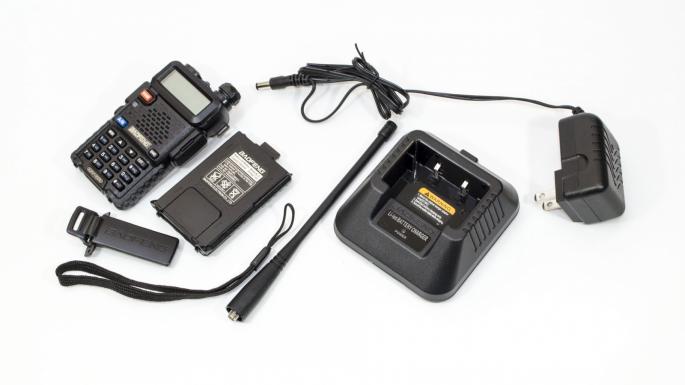
The package includes: radio station; battery; instructions in English; antenna; clip; hand strap; charging glass; power unit. But the headset was not included in this package.
The budget radio station BAOFENG UV-5R has proven itself well as a walkie-talkie for mushroom pickers and hunters. It operates simultaneously in two bands 136-174MHz and 400-520MHz. In addition, the walkie-talkie has a built-in FM receiver and with its help you can listen to the radio and, if necessary, can illuminate it with a built-in flashlight.
Bands BAOFENG UV-5R LPD (433.075 - 434.750 MHz) PMR446 (446.00625 - 446.09375 MHz) GMRS (462.5625 - 462.7250 MHz) FRS (462.5625 - 467.7125 MHz)
Technical characteristics of BAOFENG UV-5R Receiver sensitivity 0.2 μV Antenna resistance 50 Ohm Operating modes simplex or half-duplex Modulation type FM Sound output power 1W Li-Ion battery 1800 mA DC 7.4V Current consumption in standby mode < 75 mA Current consumption in receiving mode < 380 mA Current consumption in transmitting mode < 1.4A Average output power of the transmitter 4W/1W (switchable) Range with standard antenna (city 2-3 km, line of sight up to 10 km) Listening to two frequencies simultaneously Switchable noise suppressor for listening to weak signals Energy saving mode Sound signal when pressing buttons Voice reading of pressed buttons in English or Chinese 3 modes scanning by channels or frequencies Ability to connect a headset It is possible to change settings or the list of channels from a computer (if you have a programming cable) Supports frequency separation between the receiver and transmitter when working via repeaters Backlighting of the LCD display (3 colors) and VOX keyboard function of automatically turning on the transmission when a conversation starts FM radio receiver LED flashlight (3 modes: off, on, flashing) Operating temperature -20… +60 °C Antenna connector type: SMA Female
Technical capabilities of the BAOFENG UV-5R radio Range: FM: 65-108 MHz (reception) VHF: 136-174 MHz (reception/transmission) UHF: 400-480 MHz (reception/transmission) Number of channels 128 CTCSS codes (possibility of combining with any LPD radio station) DCS codes (expand the possibility of combination with other radio stations) Frequency grid step, kHz: 2.5/5/6.25/10/12.5/25KHz
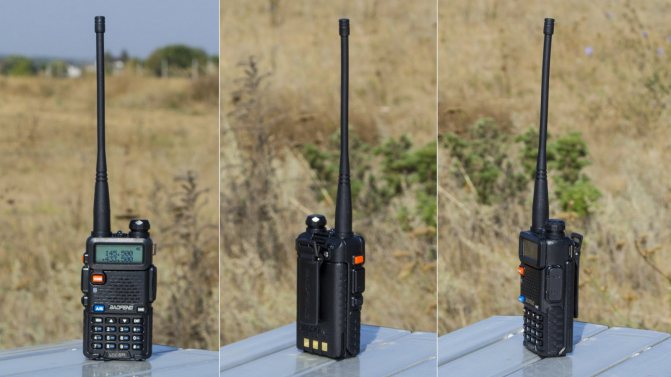
The weight of the radio with antenna and battery is 202g. The dimensions of the radio itself are 32.3.9x00x109.6mm.
The clip is attached to the case with two screws; installation is simple and should not cause any problems.
The antenna is removable and screwed to the antenna socket. Timing of the SMA connector. I want to warn you right away that I highly do not recommend turning on a radio station without an antenna; you can burn the output stage of the transmitter.

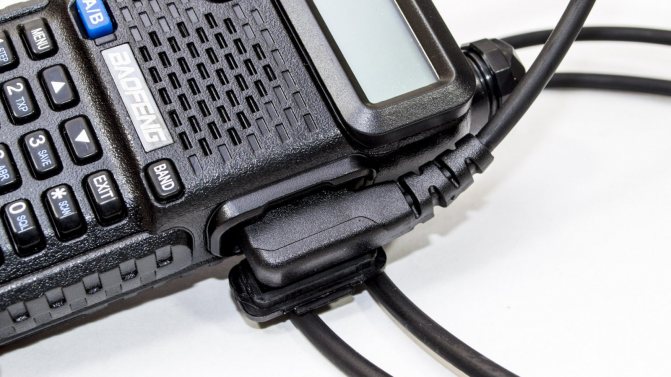
On the right, under the rubber plug, there are jacks for connecting a headset. Unfortunately, this package does not include a headset.
Ergonomics are a solid C; due to the angular body, it doesn’t fit very well in the hand. The miniature digital buttons on the front panel are so small that pressing them with the wide fingers of a man's hand is very inconvenient.
To display information, a small two-line display is used, on which, in addition to the frequency of two channels A and B, special symbols are displayed, such as the channel number, split or battery charge level.
There is a volume control on top, which also turns the radio on and off. Nearby you can see the white LED of an improvised flashlight.
Rubberized digital and service buttons. As I wrote above, they are small and very inconvenient. Above the buttons there is a speaker grille; on the left you can see a small hole that covers the microphone.
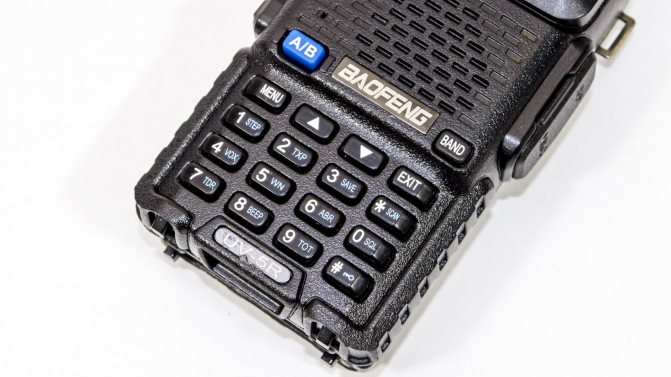
Main control buttons: VFO/MR (orange button) – switches the radio station modes: frequency or channel; A/B (blue button) – switches two operating frequencies or channels; CALL (orange button) – A short press turns on the FM receiver mode, a long press turns on the ALARM mode; PTT – switches on the radio station for transmission; MONI – Short press turns on the flashlight, long-term frequency listening mode with the noise suppressor turned off; BAND – Band selection. Link to Russian instructions for the BAOFENG UV-5R radio.
The radio has a built-in flashlight, which is activated by briefly pressing the MONI button. In fact, it’s difficult to call this LED a full-fledged flashlight, but in an emergency it can come in handy. It even has two operating modes, one press is a constant light, the second is a blinking mode.
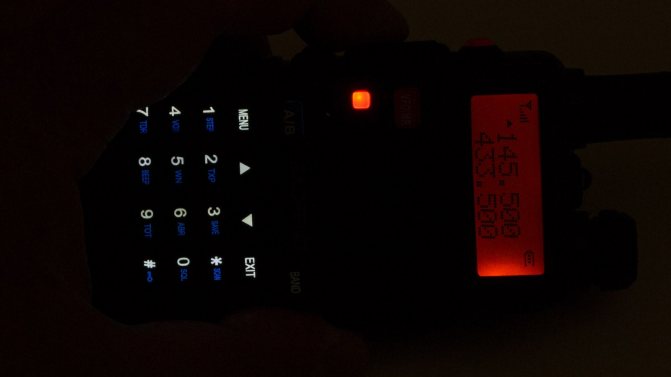
When an incoming signal is received and the noise suppressor is opened, the display changes color to dark blue; a bright green LED lights up on the left, which displays the reception/transmission operating modes in color.
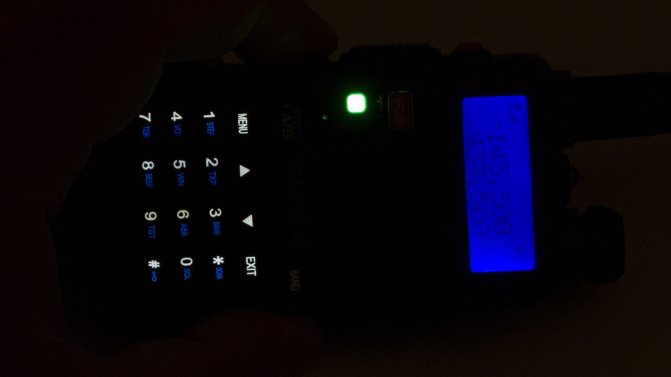
While transmitting, the display backlight changes to orange and the LED begins to glow orange. Color schemes for different operating modes can be changed in the radio settings.
I would like to make a small comparison of the BAOFENG UV-5R and BAOFENG UV-82 radios. The 82nd costs only $7 more, but at the same time has a number of huge advantages over the UV-5R. UV-82 is more ergonomic, fits better in the hand due to the elongated body, has more power - 7W and a battery with a declared capacity of 2800mAh. There are also differences in the case materials; the UV-82 uses more expensive plastic. In addition, the eighty-second has protection against dust and splashes; the 5R cannot boast of this.
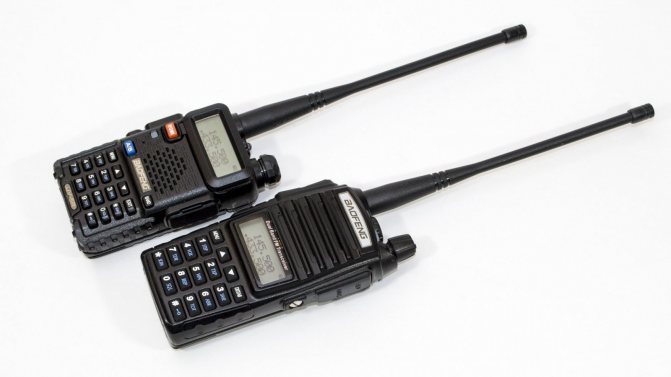
The large and comfortable rubberized keys on the more expensive radio model immediately catch your eye; they are also backlit. Driving the 82nd is much more convenient.
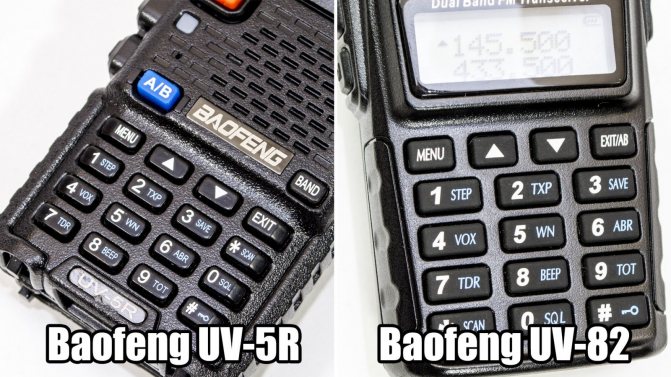
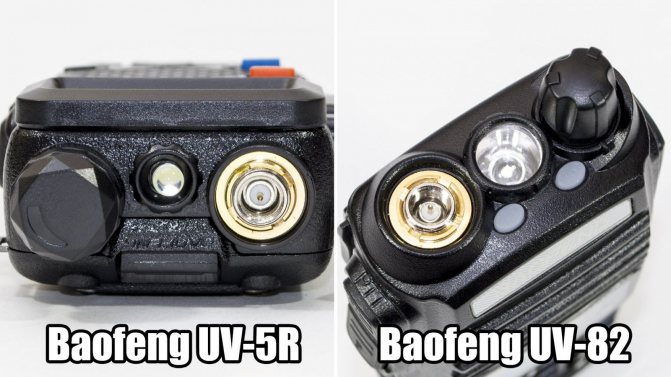
In the UV-82, all the main organs of the PTT/SK frame are hidden under protective rubber caps; in the five, there are ordinary plastic buttons that are not protected from moisture. And yes, the 82nd has two PTT keys - for the ability to quickly transmit on different frequencies.

A normal flashlight was installed on the UV-82, and not just an LED shining in different directions.
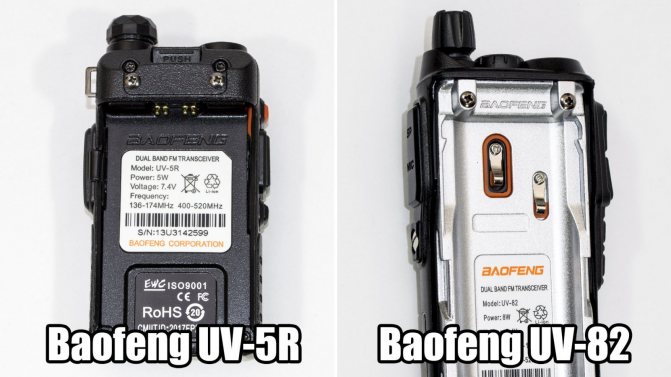
The battery mount and contact group in the BAOFENG UV-82 are more reliable than in the top five. Aluminum alloy is used in the chassis design elements of the 82nd, plastic is used in the 5th.
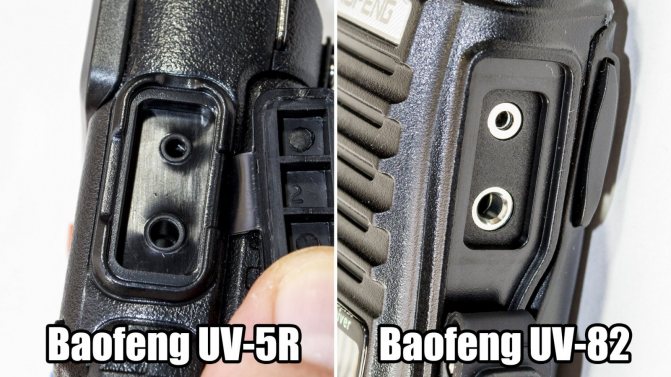
I will leave this photo without comment. I hope everything is clear.
Most BAOFENG radios have the ability to program frequency channels and the UV-5R is no exception. For programming we need a special cable. I used Retevis 2.
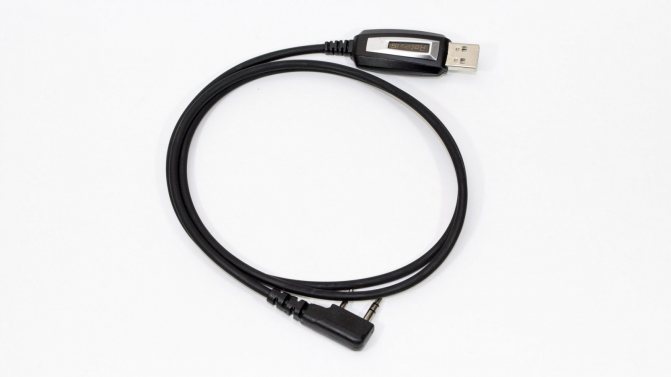
On one side of the cable there is a USB connector for connecting to a PC, on the other there are plugs that are inserted into sockets intended for connecting a headset.
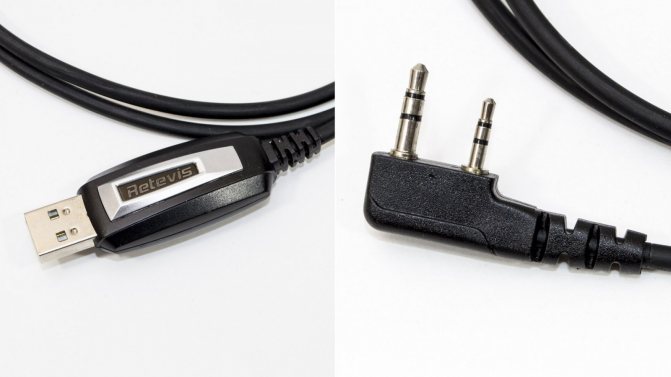
It will not be possible to connect incorrectly; the sockets and accompanying plugs have different diameters.
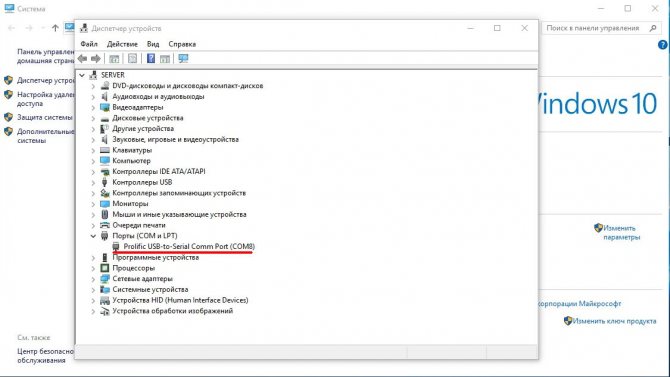
After connecting to the PC, the programming cable is determined by the system as – Prolific USB-to-Serial Comm Port. There is no need to install any drivers, everything works by default.
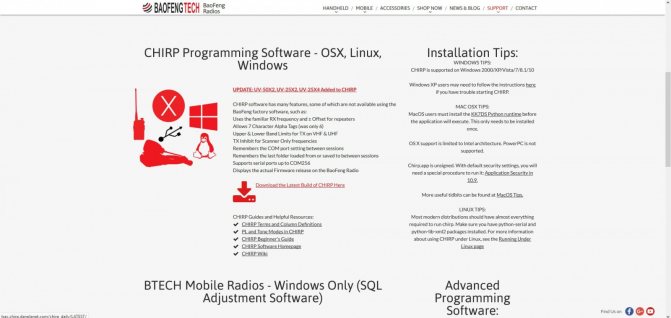
There are several programs for updating the frequency grid in the BAOFENG radio station. There is an official one, but it works quite unstable on Windows 10. I recommend using the CHIRP program. You can download it for free from the official website.
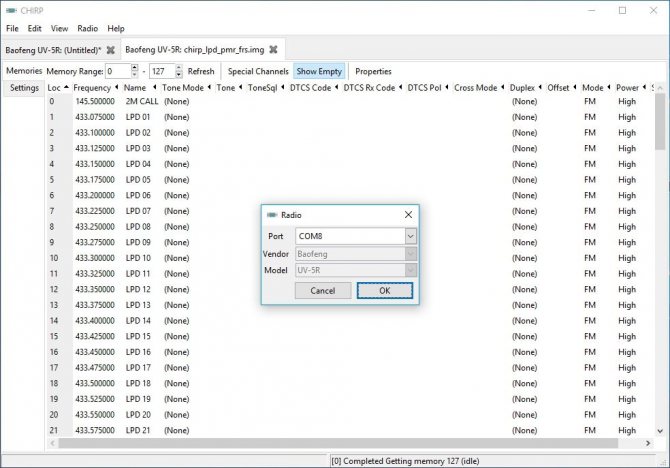
After installing and launching the program, select Radio -> Download From Radio from the menu
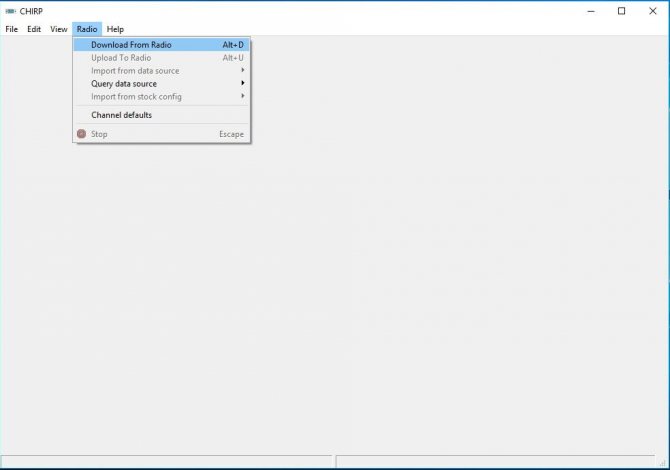
A small window will appear where we need to select the brand and model of our radio station. The COM port to which our programming cable is attached is detected automatically. Press the button – OK.

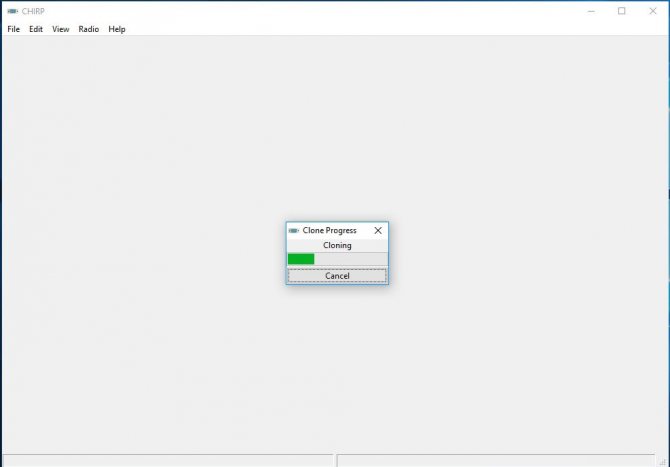
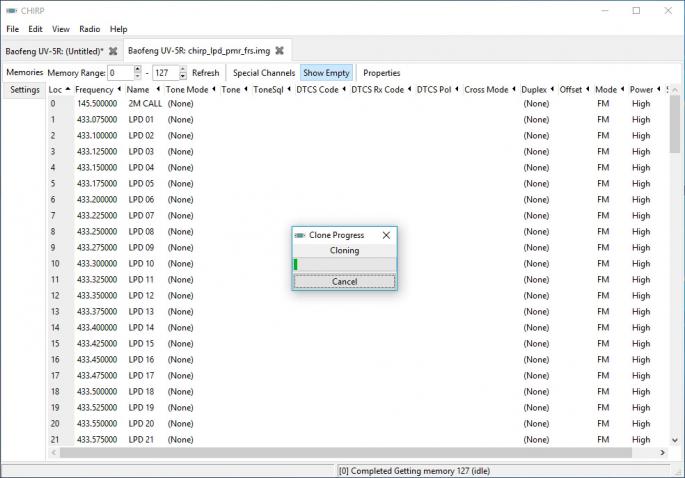
Information about the frequency grid is read from the radio station to the PC.
After all the information is loaded into the program, the data is presented in tabular form, the table fields can be edited and changes can be made, or the finished file can be imported into *.csv
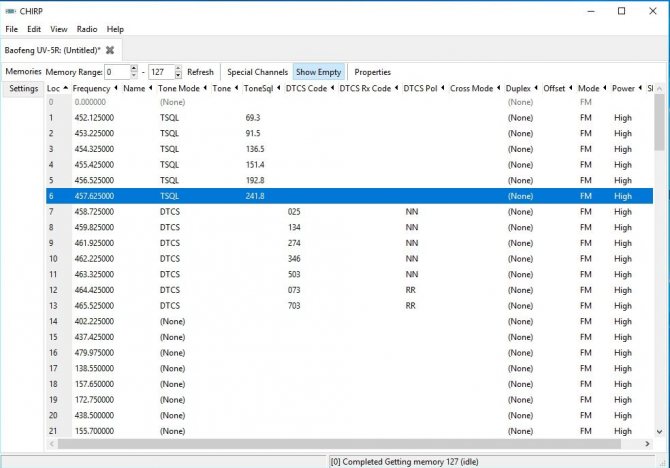
For example, you can download a ready-made LPD grid, which can be obtained from the Radio Scanner website. To upload changed or downloaded data back to the radio station Radio -> Upload To Radio. And click OK in the window that appears.
The data from the program will be recorded into the radio's memory.
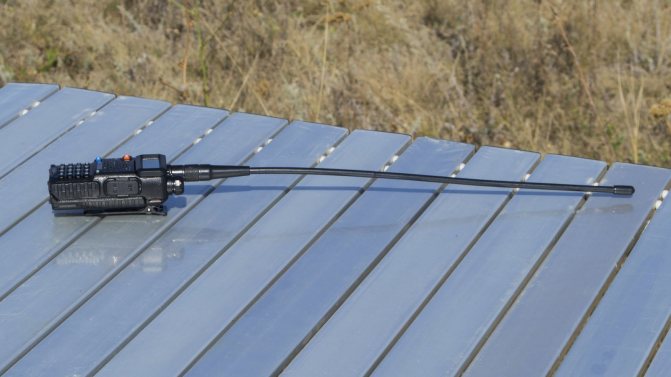
I would like to immediately add a few words about the extended antenna NAGOYA NA771 and its clones. In reality, it does not have any advantages over the standard antenna; it is not very well matched, especially for the two-meter amateur radio range (perhaps I came across a fake). The radio station with it looks very ridiculous, the antenna length is 380mm.
Late in the evening, on the calling channel of the two-meter amateur radio band, we managed to make a QSO with a local radio amateur from a neighboring area (about 5-6 km, broadcasting from the balcony of the 9th floor). I asked him to evaluate the quality and level of the UV-5R signal, and the answer was received - a good powerful signal with a lack of frequency deviation.
The BAOFENG brand can be considered a leader in the production of budget radio stations, UV-5R is the undoubted leader in terms of sales, but this particular radio station has both pros and cons.
Pros Budget. Not a bad price-quality ratio. Additional batteries and accessories are affordable and quite common. Long battery life. Lots of useful information on the net.
Cons Not very friendly user interface. Complex and confusing keyboard programming. Compared to other models from BAOFENG, it has lower quality materials and poor ergonomics. The built-in flashlight can hardly be called a flashlight.
Considering the price, the UV-5R can be called a successful model, unless you were holding in your hands another radio model from the same company, but which is only $7 more expensive. The communication range for an output power of 4W is quite decent, in urban areas up to 2-3 km, but I was able to establish communication on 433.500 MHz, being on the ground in almost the center of the city at a distance of about 25 km, however, the respondent had a multi-element directional antenna and a report it gave 4/7 (not audible at the noise limit). If you are just looking at buying a radio station and are strictly limited by budget, then feel free to buy the UV-5R. If it is possible to add a little finance for the purchase, it is better to add it.
POSSIBLE MALFUNCTIONS AND WAYS TO ELIMINATE THEM
| Malfunction | Possible cause/solution |
| The device does not turn on | The battery is low: charge/replace the battery. Battery installed incorrectly: Install battery correctly |
| Battery drains quickly | The battery is worn out: replace the battery with a new one. |
| The indicator is green (reception is in progress), but there is no sound from the speaker | Check the volume level. Check that the DCS and CTCSS subtones for reception are set correctly, as well as for other members of your group. |
| When transmitting, other group members cannot hear the messages being transmitted | Check that the DCS and CTCSS subtones for transmission are set correctly, as well as other members of your group. You are too far from each other, or your partner is in an area of poor signal reception. |
| In standby mode, the device transmits without pressing the PTT button | Check if the VOX function is enabled. Disable if necessary. |
Please note: In some regions there may be restrictions on the use of certain frequencies! Please review your local laws carefully. If necessary, register the transceiver (radio station) in the prescribed manner! The manufacturer and seller are not responsible for the use of the radio by the buyer for purposes other than its intended purpose or in violation of established standards!