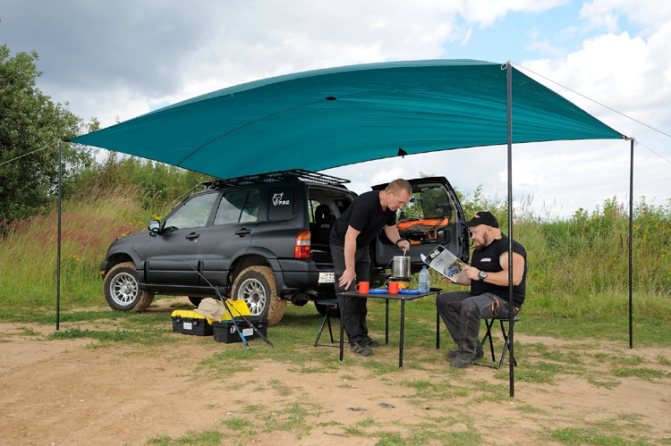
In the summer, it is impossible to live in a dacha without a gazebo or a tent. But since it takes quite a long time to build a gazebo, you can stop at building a convenient collapsible tent. It can be made from a variety of available materials in a few days. In summer, it will provide excellent protection from the sun if you decide to have a family picnic outside. And for the rest of the year, you can simply assemble it and store it in the garage, closet or pantry. You can easily make a tent with your own hands at minimal cost.
Preparing the foundation for the construction of a tent at the dacha
The base for the tent can be anything depending on the type of structure, its weight and other characteristics. There are certain rules:
- For a metal frame or racks made of durable plastic pipes, it is necessary to place 4 concrete slabs with holes in the center at the corners of the selected site. These disks will serve as the foundation of the structure. Metal or plastic pipes will then be inserted into these holes to form the frame of the tent.
- For a stationary or collapsible tent, the base can be made from ordinary paving slabs. It is easy to install, has a high degree of strength, and is resistant to mechanical stress. Even if you build a collapsible structure, the base will remain, and next season you can again install the tent in its original place.
- Natural stone is perfect for the foundation. It can be laid on cement mortar. Just like tiles, stone is a durable and reliable option for constructing a “floor” for a tent.
- The base can be made of wood, but unlike stone and tiles, it should not be laid on the ground, since this material is susceptible to various harmful effects (rotting, attack by bark beetles, mold growth). Therefore, it is better to lay such flooring on concrete or metal supports.
- If the posts will be dug into the ground, then you can purchase an inexpensive lawn covering that will act as a “floor” for the tent. Artificial grass can be rolled up and stored away for the winter.
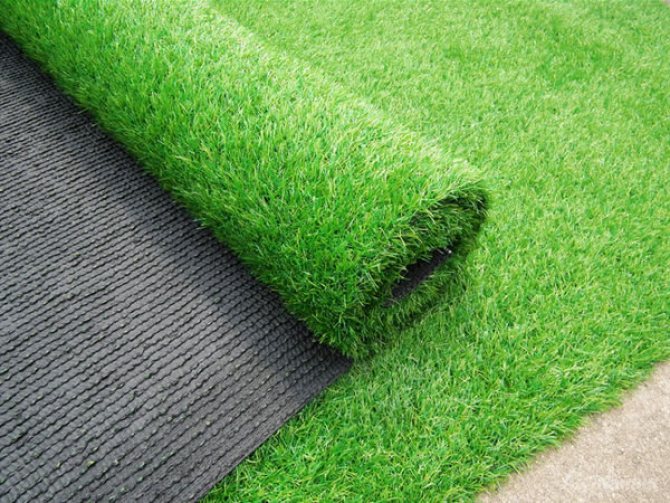
Artificial lawn for a summer house is an ideal base for a tent
How and with what to secure the tent on different surfaces
Depending on the type of tent and frame material, there are several ways to attach the structure:
- A tent with wooden supports can be installed on the ground in several ways: by concreting the posts, on a columnar or strip foundation, or on a base made of a similar material. You can also simply bury the racks in the ground, which is well compacted.
- The metal frame supports can be driven deep into the ground. The tent will be durable and stable due to its lightweight construction.
- If you plan to install the structure on an asphalt surface, then special “heels” can be welded to the legs of the metal frame, which will serve as additional supports. You can also install the tent on paving slabs, stone surfaces, etc. For more reliable fastening, the heels can be nailed to the asphalt surface with special dowels or anchors.
Required equipment
What we need to replace a tent with an awning:
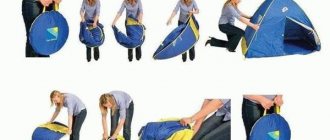
- Tent . For beginner tent users, a size of 3m×3m is usually recommended so that it is definitely enough. I have a one-person MLD Silnylon Pro Poncho raincoat (now called MLD Pro Rain Poncho) measuring 2.7 m x 165/135 cm (wider at the front than at the back). Quite enough, survived several rainy nights.
- Guys . A thin cord ~1–2 mm in diameter is recommended. 5–15 meters. I use 2x2m (front and back) + 4x1.5m (sides) = 10 meters.
- Racks . Trekking poles are often used. You can find a suitable stick in the forest near your overnight stay. You can use trees for installation. You can use poles from an old tent. You can buy separate lightweight racks made of carbon fiber or aluminum. You can use a paddle if you are on a boat trip. Even if you're on foot, you can still use a paddle!
- Pegs . Usually 6–8 pieces. 6 is enough for me.
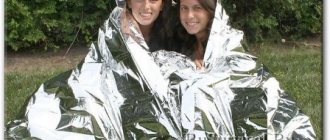
- Litter on the ground . Plastic film, large garbage bags, oilcloth, a piece of Tyvek or silicone, etc., a poncho (if you use a separate awning and a separate poncho), a rescue blanket. I have the last option, it weighs ~90 g. You can wrap yourself in a rescue blanket to keep warm, it is waterproof and will protect you from moisture from below. Recently in Nice I saw a homeless person sleeping on the sidewalk under a golden rescue blanket.
- Bivvy bag , also known as bivy or bivouack (if you need protection from wind and splashes, for example, with a small awning).
- Mosquito net if there are insects. It is often sewn into a bivouack.
A camping mat and sleeping bag are not included in the list as they are also needed in the tent. Of course, they are also needed when spending the night under a tent.
Video: how to assemble a pavilion tent
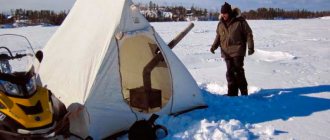
The tent is a lightweight and comfortable design, so it will be simply indispensable for a summer residence during the summer holidays. It can be installed in literally a few minutes, so it will not take up much space in a small summer cottage. After rest, the structure is quickly assembled and put away in the pantry. You can take a tent on a metal frame with you to a river or lake, on a hike or a long journey. And if you build it at your dacha and install comfortable furniture, as well as a barbecue or grill, you will be able to have a great rest with your friends and acquaintances.
Shape of awnings
- Rectangle . Example - Monk Flat Tarp from MLD (mountainlaurel designs). A popular setup is the half-pyramid.
- Trapezoid . An example is a tent with a positive name Lost from. A popular installation is a house.
- With a curved central seam (English: Catenary cut ridgeline, “Cat tarp”). They are hexagonal, for example, for installation above hammocks. A quadrangular example is Grace Tarp from MLD. A popular installation is a house. The more the awning is curved, the more difficult it is to achieve good tension in other types of installation. MLD Silnylon Pro Poncho is also a type of awning with a curved central seam.
- Hexagon . They are used mainly for spending the night under a hammock. Example - MLD Hammock Hexagon Tarp.
- Something non-standard . An example is MLD Trailstar.
Criterias of choice
A camping awning (not to be confused with a beach awning) differs in parameters: size, level of water resistance, colors that are more suitable for the situation, and other nuances. So, let's look at the mentioned category of tourist equipment in more detail, from different angles.
Water resistance
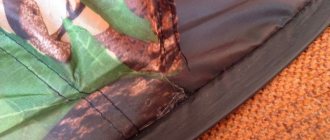
A tourist awning can be made of different materials, including hyper-waterproof ones. If the sides can still be mesh, then the roof must be dense. As a rule, awnings are made from durable synthetics: special tarpaulin, nylon, polyester, polyurethane and terpowling. More often, these materials are combined in one product. For wet areas, the densest areas are on the top and bottom, and for windy areas, on the sides.
The protective awning, which is taken on the road by “hikers” exploring any terrain except the desert, must have a “zest” - greater thickness and waterproofness (after all, the rain has not been canceled!). This technical characteristic is measured in millimeters of water. During the period when the rains are not prolonged or heavy (in some areas there is such grace even in the “off season”) 4,000 mm is enough. But in the regions of the Asian part of Russia (especially in the Far East and the West Siberian Basin) or in the North-Western District, even at the height of summer you will need a canopy with a water resistance of 6,000 to 10,000 mm. It is doubly relevant for fishermen - for obvious reasons, on the banks of reservoirs, the process of moisture condensation is active even in dry weather.
Features of awnings designed for locations located in rainy valleys and in the wide lowlands of temperate and northern latitudes are that they are the best waterproofing materials. What are millimeters of water? This is literally the height of water accumulation that the waterproofing surface can withstand. That is, even ordinary specimens could easily hold the resulting “pool” 40 cm deep!
Size
A tourist tent for a hike for 2 people (the most common option) is 2 by 2 meters, 3x3 or 3x5 meters. Their “business card” is the ability to serve as a warehouse for things and a location for chairs. However, there is also a much more modest variety - for example, a fishing tent. Single fishermen purchase a “cube” or “hemisphere” 1.5 by 1.5 meters. And for some, a space of 1 by 1 meter is enough (we are, of course, talking about a one-day fishing trip near the house, there is not enough luggage). Dozens of companies produce such temporary housing...
Choosing an awning for a small company (family) going on a multi-day trip, as a rule, forces you to buy a product measuring at least 4 by 2 meters (lots of things, barbecue, folding summer furniture). But a canopy for a large company is called “special”. It starts from a size of 4 by 6 meters (you can fit either 7 people or the largest SUV under such a colossus, leaving a “corridor” for backpacks on the side). But this is not the limit. There are protective spaces with an area of 36, 50, 64, 72 square meters. More often than not, they are loved not by tourists, but by those who want to organize a tiny summer cafe at the entrance to some nature reserve (that is, far from civilization). At the end of the season, the structure is easy to assemble and carry away. Such giants often offer Mitek Picnic Lux or Green Glade. A “dormitory” with screen windows can be “built” at any point along the route.
Color
A tourist tent must be quickly detected in a forest or field (or you will lose sight of it from a distance). It should not overheat in hot weather (that is, be relatively light) and at the same time not be easily soiled (a “light” tone is needed, but within reasonable limits). Based on this postulate, choosing an awning involves looking for shades that are not too dark, but also not close to white. Red, blue, green, dark yellow, brown - for the field. The same, but without green - for the forest. An awning for fishing often requires special color saturation, because this fishing in most cases is carried out in too dense (floodplain) thickets...
Nuances
A camping awning is often a frame structure (with posts). However, it is different. It has 4 forms:
- hemisphere (the wind flows around it, relieving even not very thick fabric from deformation);
- “yurt” (a space tapering upward, which saves material - the lightness of such a product is ensured, however, there is also a maxi-instance: a “tent” polygonal at the base);
- high “cube” (the most spacious alternative - combined with your mobile camp housing, it embodies a terrace, warehouse, garage, and sometimes an entire barbecue area);
- “rectangle” (a narrow but elongated area allows you to divide the area protected from the sun and rain into a number of tiny functional spaces, saving material).
And yet there is a 5th type - “roof”. It is more often called an “awning”. The material, with the help of cords threaded through grommets, is stretched between the trees, that is, such a structure simply does not have walls; this is the easiest option. Kayakers and wooden raft lovers use oars as internal supports... This type is very similar to a beach one, but much larger and stronger in material. Moreover, the category itself is divided into “flat” type and “gable” (water flows from the 2nd type).
But form isn't everything. The tourist products under study differ in their components. For example, the walls can be in the form of a mosquito net, curtains (like in a canopy - more on them at the end), as well as in the form of very dense opaque sidewalls (the model is ideal for windy conditions).
A fishing tent (“blanket”) often includes a terpowling floor that protects from moisture and night cold. As a result, in warm latitudes the fisherman will not need a tent to sleep. The lucky one just needs to remove the fishing rod in the dark and cover himself with a mosquito net wall.
Such products also differ in tailoring. Thick (the most expensive) canopies contain multiple stitches on all connecting nodes, heavy-duty threads and padded upper inserts.
The protective awning has not only mosquito net walls, but also thick curtains. Let us immediately warn you that such products are absolutely not suitable for windy weather - the curtains will be swayed by squalls, they may even end up being torn off... But on a quiet sunny day, romance is created. The “trick” is that such tents once served aristocrats and even kings.
Installation methods
The awning can be installed like this:
House (A-frame)
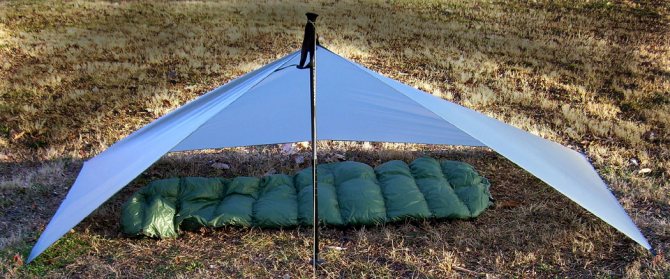
The photo shows a modification with the back part of the MLD Silnylon Pro Poncho awning poncho attached to the ground. Usually the back part almost symmetrically repeats the front, except that it is placed a little lower.
Poncho tent MLD ProPoncho and bivy Ptarmigan.
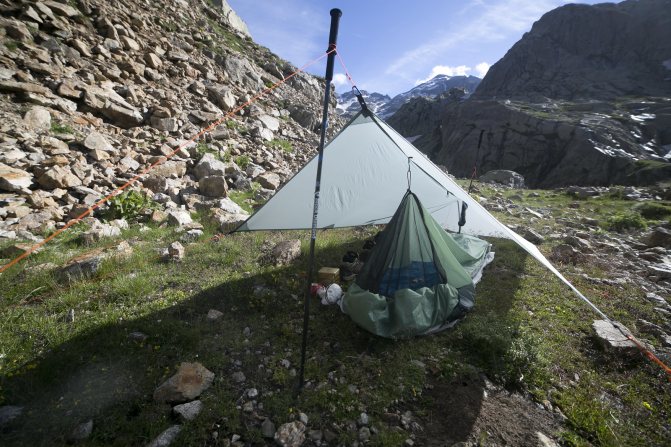
Also in the picture is the Ptarmigan bivy bag from TitaniumGoat. The bivy is attached to plastic loops on the inside of the awning (not every awning has these) using an elastic cord, which serves as a belt for the poncho-awning in poncho mode.
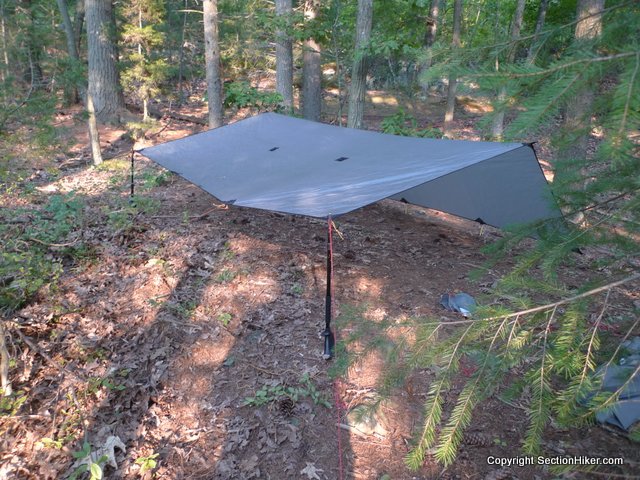
Canopy (Lean-to)
Pictured is the MLD Silnylon Pro Poncho.
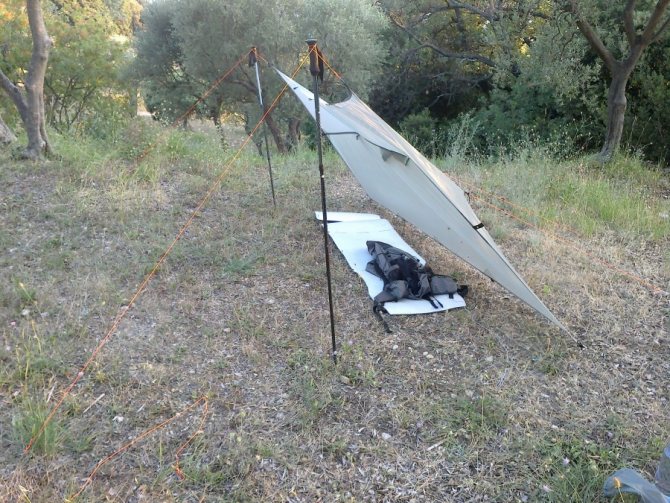
Half pyramid
Pictured is the MLD Monk Tarp rectangular awning, photo from mountainlaureldesigns.com.
Improvisations and modifications
Photo taken from here.
Non-standard installation.
Adviсe
- Don't buy anything! Use a tent awning. For example, my Camp Minima 2 SL tent weighs ~1.32 kg, of which almost half the weight is the inner tent, which you don’t need to take. If we add a bedding from a rescue blanket, we get the weight of the awning for two people 800 grams (with arcs, stakes and guys). It was with this option that I began my acquaintance with spending the night under a tent. Here's what it looked like (no arcs used in this setup):
A tent awning installed without poles or an inner tent.

- If you use a raincoat tent, then in raincoat mode, of course, guy ropes are not needed. In order not to tie the guy ropes to the awning every time during installation, you need to tie a loop about five centimeters long on each guy wire (for example, a figure eight or an Austrian guide. The latter reduces the strength of the rope somewhat less). And each time thread the loop into the fastening on the awning, and then the entire guy rope through the loop.
- For an even faster transition from raincoat mode to awning mode, you can use small carabiners. You can also attach the quickdraw to the carbine using a figure eight or an Austrian guide. By the way, it is convenient to wrap quickdraws around carabiners so that they do not get tangled during storage. The procedure is not the fastest, but useful. Carabiners also increase the service life of the quickdraw and the attachment points of the quickdraw - there is less friction.
- Silicone (siliconized nylon, a popular material for awnings) stretches a little after installation, especially in rain or simply high humidity. Getting out from under an awning in the rain to rearrange pegs is not the most pleasant experience. Therefore, I recommend a tent (stopping) knot. Decide for yourself where it is better to be located - near a peg or near an awning. If the latter, then you can adjust the length without leaving under the awning; the guy in this place does not come into contact with the ground, it gets less dirty, which is good for the clutch of the locking unit.
- Instead of a locking assembly, you can use guy rope regulators (also known as line-lok, clam cleat), lightweight plastic parts. You can buy it in Splav for 140 rubles. for 20 pieces.
- It would be nice to have a bedding with raised edges to stay dry during a flood.
- It is good to attach a bivi mosquito net or a separate mosquito net to the awning so that it does not lean close to the sleeper. Many awnings have special fastenings from the inside. For example, I use a cord for this, which I use to gird my raincoat in raincoat mode. Very convenient, even adjustable length is possible without any hassle.
- Almost all materials from which awnings are made are not very fond of UV radiation, so it is not recommended to leave them in the sun for a long time.
- Practice setting up an awning several times before going out in several options. Explore different methods: A-frame, lean-to, half-pyramid. Experiment!
- There are special metal rings in awnings at the places where guy ropes are attached for installing the tip of a trekking pole there. Don't be discouraged if your pole ends aren't the right shape: wrap the quickdraw around the handle of your trekking pole. Just two turns is usually enough.
- If you are using non-adjustable poles, apply several layers of electrical tape to create a stop at the desired height. For me, however, it slides down quite quickly.
Try sleeping under an awning instead of a tent. Just in case, take the entire tent with you for the first time. Use the inside as bedding. Place the awning on top on the original arches/stands or try using trekking/any other poles. Experiment and be happy!
When you climb into a tent, you escape from nature. From under the awning you can admire the starry sky or be incredibly close to the raging elements, which is very inspiring, if, of course, you remain dry and the awning is intact.