Many lovers of outdoor activities sometimes stay overnight in the forest. In this case, you can sleep in the cabin of a car, in a tent or in a sleeping bag. However, the best option would be to spend the night in a hut built from available materials. The fresh air with the pleasant smell of wood in good weather creates a comfortable atmosphere for sleeping in this simple structure. But many people have a question about how to make a hut. Instructions for the construction of this structure will be provided below. More on this below.
How to make a hut with your own hands?
First you need to choose a suitable place to build this temporary shelter. It cannot be installed in narrow gorges, on river banks, or at the bottom of canyons. Because floods, flash floods or sudden downpours may occur. The danger comes from creating a hut under rocks that overhang the site, as well as at the foot of steep mountains. When choosing a parking place, you need to take into account the cardinal directions. Let's consider the main location options.
- How to make a hut in a mountain forest. The specified attached-type structure is well suited for this area. This means that one of the walls or even two walls will be made of wood or stone - part of the rock. In this case, you should try to avoid precipitation. That is, do not place a hut in hollows with obvious traces of water flows. Because if it rains, a stream of water will flow down. Otherwise, the rules for installing this structure are the same as for a tent. The entrance to the hut should be on the side opposite the top. Grooves should be made around the perimeter to allow water to drain in case of rain.
- How to make a hut in a lowland forest? The answer to this question is quite simple. In a forest where there is a plain, it is possible to build a recessed, classic or attached hut. In this case, the place is chosen based on the weather. This is important. In cold weather without rain, you need to find a hole that will serve as a temporary shelter. In case of rainy weather, the specified structure is placed on an elevated place.
Interior arrangement of the hut
In addition, the hut should not only be invulnerable to rain, wind, and scorching sun outside, but also comfortable and warm inside. To do this, some improvements are made inside the constructed dwelling:
- The floor is lined with spruce branches, dry leaves, straw, and spruce branches. You can lay a mattress or blanket on top of a layer of such insulation.
- At the entrance to the hut you can hang a curtain - a piece of dense material. This will not only make it warmer, but will also block the path of mosquitoes, midges and other insects that interfere with rest. In summer, when the weather is hot, such a curtain is usually replaced with a lighter, breathable fabric.
- In order for the hut to have light inside, a portable LED flashlight, powered by batteries or connected to a battery, is hung under the ridge.
- In spacious dugouts used for long stays, small stoves, tables and benches are often installed; provide natural ventilation
Choosing a hut type
1. Classic hut. This type of structure is made in the form of a fire pit for cooking. In this case, two poles or branches are installed vertically. The third is laid on them horizontally. Dressing is done using improvised means: flexible twigs, grass stems, vines.
In this case, there are still several types of installation. For example, 2 poles or straight branches, cut with a knife, are installed to each other at an angle at the exit from the hut and the back wall with a distance of 2-2.5 meters. It's not hard to do. Then the main pole is laid horizontally on them. The next option is a wigwam. In this case, you can lay the poles in a circle at an angle to each other in the form of a fire pit, and also use a living growing tree as a support point for them.
2. Attached hut. This also includes the type in the form of a wigwam around a tree. In this case, there may also be a hut created on the basis of poles that rest on a rock in a mountainous area. The walls are made like the above classical structure.
3. Recessed hut. This type of building looks like a classic hollow or is something between a dugout and a hut. That is, when only the top (roof) is covered.
Options for huts for middle-aged children
All huts can be divided into three groups:
- free-standing structures (gable, single-slope, wigwams);
- attached-type shelters (single-pitched, wigwams);
- dugout huts located in a recess.
If you were building a temporary shelter in the forest, your choice of design would be determined by the type of terrain, weather conditions, and time of year. The family usually spends time at the dacha in the summer, so to build a simple shelter it is better to choose free-standing structures or attached ones.
Teenagers who vacation in villages with their grandparents love to build dugout huts. Children keep the location of the dugout hut in the vicinity of the village a secret, but vigilant adults should always know where and what their charges are doing, but not show it to them explicitly. For a dacha, the option of constructing a hut-dugout is not very suitable.
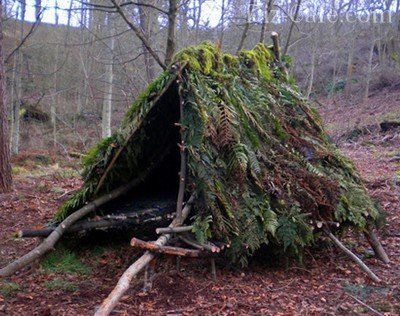
A forest hut, built by experienced travelers, will allow you to spend the night and wait out the bad weather. Simpler hut designs are suitable for a summer residence
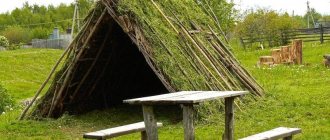
Option #1 – gable hut
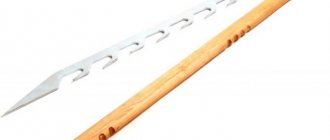
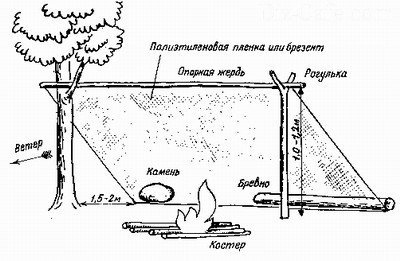
To erect the frame of a hut building, you will need two spears and a pole. The dimensions of the hut will depend on the size of these elements. The rods are driven vertically into the ground until they take a stable position. This will happen when a third of their length is in the ground. Then a pole is laid on them, and if necessary, the joints of the elements are additionally secured with ropes or wire.
If suitable spears are not found, then they are replaced with two thick poles driven into the ground at such a slope that their tops intersect at the required height from the surface. The intersection is secured using available means (wire or rope).
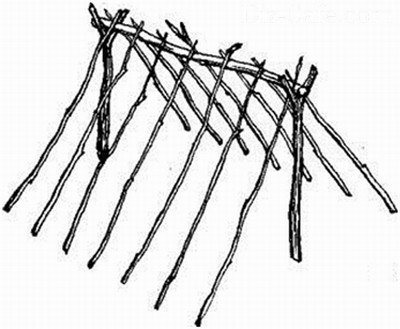
The frame diagram of a gable hut gives a clear understanding of its structure. Connections of frame elements should be strengthened with strong ropes
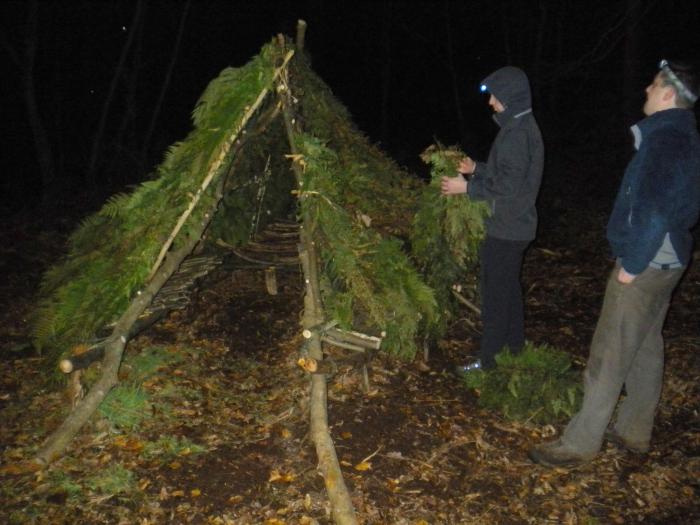
Next, you will need to select several poles (thick tree branches), which will serve as a support for laying natural roofing material (spruce paws, branches with leaves, ferns, reeds, hay or straw). The exact number of side poles (rafters) depends on the step of their installation. You can generally place them close to each other on a slope so that they form the sloping walls of the hut. In this case, there is no need to cover the walls with anything else.
Typically, the side poles are placed at a distance of 20 cm from each other. If desired, the frame is reinforced with transverse branches, which are attached to the side poles. Then spruce branches or other available material are laid on the resulting crate, and work begins from the very bottom. In this case, each subsequent row will partially cover the previous one, which will ultimately provide reliable protection of the interior of the hut from rainwater. The back wall of the hut is built in the same way, leaving only the entrance to the shelter open.
The main structural elements of a gable hut. Instead of one of the spears, a tree growing on a summer cottage can be used
In wild conditions, a fire is lit in front of the entrance and, using the installation of a heat shield, the heat from the live fire is directed towards the hut. There is no need to do this at the dacha, since the hut is usually used during the daytime. A resting place with a fireplace is set up by adults at the dacha for completely different purposes.
Recent Entries
6 unusual onion preparations for the winter: they definitely won’t rot 7 vegetables that are easy to grow right on the windowsill A neighbor in the country shared a recipe for beets in a jar, I’m sharing the recipe
Option #2 – lean-to hut
The construction of a lean-to hut is faster, because the amount of work is reduced significantly. Also, a supporting frame of the structure is installed from two slingshots and a long pole. Then perform all the steps described above to construct the wall of the hut. If you want to speed up the construction process, then replace the spruce branches with a tarpaulin or any water-repellent fabric. The covering material is secured from above to the frame structure using ropes, and from below the canvas is pressed with a log or stone.
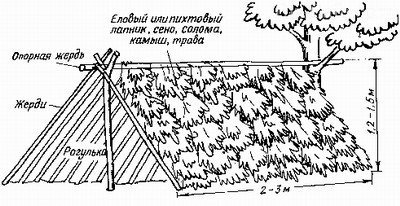
Schematic design of a lean-to hut using improvised means. A strong tree is also used as one of the supports.
Option #3 – wigwam hut
The hut, reminiscent of an Indian wigwam, is built very simply. Draw a circle out of the blue, the area of which is enough for children to play. Then, along the edge of the circle, dig a row of poles, the tops of which are connected at the top in the form of a bundle and securely fasten the connection with tape, rope or wire. At this point, the process of constructing the frame is considered complete.
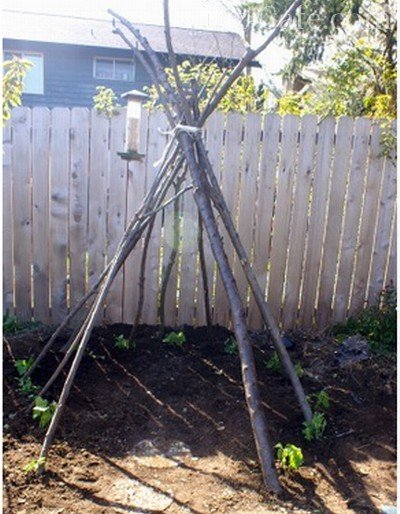
The frame of a wigwam hut at the dacha, erected in the spring so that the plants can have time to grow and entwine its support posts made of thick branches
All that remains is to make a shelter out of something. There are two ways to go here.
- Plant climbing plants near each supporting branch. Decorative beans are perfect for this purpose; they have delicate green leaves combined with red and white inflorescences. To ensure that the hut takes on a beautiful and finished look as quickly as possible, take care of growing seedlings of the selected plant in advance. If you plant perennials, then next year you won’t have to think about forming the walls of the hut. This path is very long.
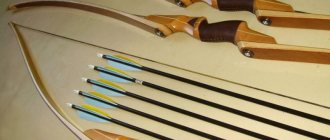
- You can speed up the construction of a wigwam hut by using brightly colored fabric as a covering material. If you don’t have such a colorful fabric, then take any plain fabric and paint it with waterproof paints together with your child. For a wigwam hut, the canvas is cut out in the form of a semicircle, the radius of which is equal to the length of the side support poles. In the center and along the rounded edge of the canvas, ties are sewn, which are attached directly to poles or to pegs stuck in the ground.
It is very inconvenient to cover a frame made of branches with a fabric cloth, so it is recommended to construct a frame structure from rigid PVC pipes.
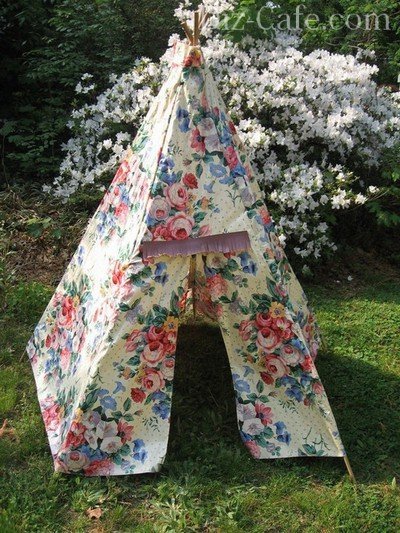
A hut made of bright fabric is a quick solution for those who do not have sufficient natural materials
Option #3 – sunflower wigwam
This hut will grow before the child's eyes. In this version of the hut, the frame supports are sunflowers, which are planted in the spring along a circle drawn on the ground, leaving space for the entrance to the future shelter. The space inside the resulting circle is left free. The tops of the grown plants are carefully tied with a wide rope so that it does not cut the stems of the sunflowers.
In this case, you don’t even need to think about covering material, because sunflower leaves do this role well. The “floor” in the hut is lined with scrap materials. It is better to purchase a travel mat for this purpose at a sporting goods store that does not get wet and does not allow the cold from the ground to pass through.
Option #4 – attached hut
During travel, attached lean-to huts are installed near trees or rocky ledges that serve as support for branches. On a summer cottage, such huts can also be erected near trees. A fence or wall of one of the country houses can serve as a reliable support for an attached hut. The advantages of this design include small savings in “building materials” and speed of work.
Main principles of construction
Before you make a hut with your own hands, you need to know the following:
- Location.
- Type of hut.
- The basis of this structure should be several poles with sharp ends, sunk into the ground. One of them is installed as a load-bearing ceiling beam.
- The poles of the hut walls are installed with a slope of 45-60 degrees. Except when one wall is vertical.
- The roof must be stitched with branches (poles) in several tiers parallel to the ground along the perimeter between the installed beam and the ground. Then it will be easier to lay the spruce branches or branches.
- When deciding how to make a hut, it is necessary to correctly lay the spruce branches on the base of the pole. In this case, it all depends on individual desire. This must be done so that the upper part of the lower spruce branches is laid under the corresponding side of the layer on top. This is done in the same way as when installing tiles. Then the raindrops will roll down freely.
- Instead of spruce branches, branches with large leaves will also be used, as well as polyethylene with a tarpaulin.
Construction of a hut in the forest
This case also has its own nuances. Experienced travelers know how to make a hut in the forest. In this case, you can build different types of shelter. The simplest option is considered to be a classic hut. Any lying tree is suitable for the construction of this structure. It will serve as a kind of frame for the hut. The branches of this tree will become a holding agent for those rods that create the roof. Before you make a hut, the photo of which is provided in the text, you should remember that before starting this process you need to make sure that the lying tree will not crush you. Next, you need to cut off with a knife or tear off with your hands the excess branches that are inside the structure. This is important to do for convenience. The resulting branches are folded so as to form a roof slope for the hut. The thickness of the laid layer determines whether raindrops will get inside the structure. With a lying tree, you can build either a single- or double-sloped hut, depending on the position in which it is located. A lean-to hut can easily be expanded to the second option indicated. Let's look at this in more detail next.
Gable hut
In this case there is also nothing complicated. You can use any available means in the form of spruce branches, reeds, hay, grass or straw. You need to start by preparing thin rods, a support pole and two strong flyers for the base of this structure. In this case, you need to have some skills. Install the flyers by vertically driving them firmly into the ground a third of the length so that they do not wobble. A strong horizontal pole is installed on top of them, on which thin rods are laid at an angle in the form of rafters. Then the material is laid on them from bottom to top. This must be done so that the top row overlaps the bottom. The back and side walls of the hut are covered in the same way. A fire with a heat shield is lit at the entrance to this building. In this case, it should be taken into account that the specified heat shield must be tilted towards the entrance.
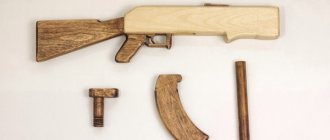
How to build huts with your own hands from branches?
Let's take a closer look at this process. Before making a hut from branches, you need to prepare:
- large knife or ax;
- tree branches;
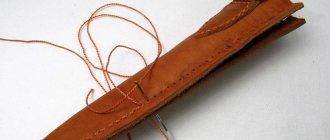
- strong rope;
- stakes made of thick branches.
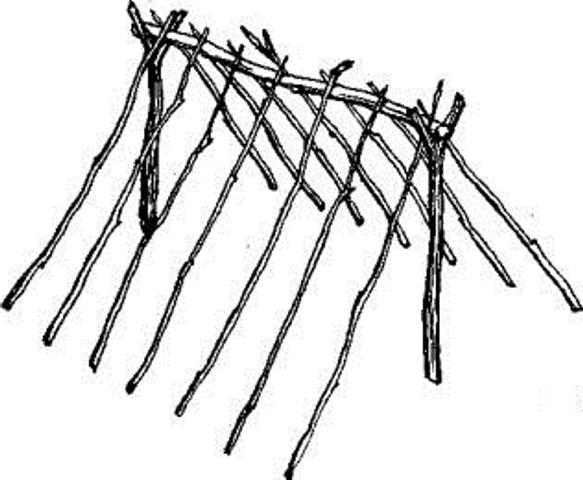
First you need to decide on the shape and materials of construction. The optimal option is considered to be a gable option, that is, in the form of a tent. To do this, you need to prepare 6 thick branches about a meter long with a diameter of 5-7 cm. Two of them should be slightly shorter. These branches will become the basis of the frame of the hut, serving as the back and front walls. After choosing a level place, stakes are installed, digging them into the ground in the form of two tripods, one opposite the other. The distance between the stakes will be the length of the hut. In this case, the tripods should face each other with one side of an imaginary triangle. Then thin twigs or rope are attached horizontally to the resulting empty walls. Also in this case you can use climbing plants. There are many of them in the southern regions of Russia. The vertical distance between the branches should be about 20 cm. These crossbars will be used to secure the sheathing branches.
Construction of a hut
The construction of a hut can be done without any tools. Naturally, a knife or an ax will not be superfluous, but when considering the topic of survival, we will lose these tools out of context. We need to know how to build a hut without additional devices.
All types of huts can be built using simple weaving techniques using branches or poles. To cover the walls, almost anything that is found in every forest is suitable - grass, fallen leaves, spruce branches or bark. Once you've assembled this, you can make your own roof to protect you from all kinds of weather.
You can build a shelter of any shape, any size, depending on its purpose and the number of people gathered to take refuge in it. But it is necessary to focus on the time of year, weather conditions and type of terrain.
Before you build a hut, you need to choose a suitable location. It is undesirable to build huts in low-lying areas, in gorges, at the foot of the mountains. In such places, sudden flooding, rockfall or avalanches may occur. It’s also better not to take risks at higher elevations; the shelter will be vulnerable to any wind direction.
It is best to build our shelter on a flat surface, surrounded by trees that will protect it from the wind. First you need to clear the chosen place from thorny branches, leaves, stones, etc. Then find several long sticks from which to make the base for the future hut. Place them around the perimeter and stick the ends into the ground.
The frame must hold tightly, so it will not be enough to simply tilt them towards each other. You also need to tie the frame sticks together. Any thing that can be used for this purpose is suitable for this: wire, rope, fishing line, or some kind of fabric, etc.
The top of the hut must be attached to the nearest tree. This will enhance the stability of our structure and prevent damage to the shelter, which is undesirable for us.
Our type of shelter can be made without tying its top to a tree. First you need to find a suitable strong tree with a thin trunk and attach the assembled frame sticks to it. The tree will play the role of a load-bearing support that can withstand any gust of wind.
The interior arrangement of the hut also requires careful attention. If you don’t have sleeping bags with you, you need to take care of the floor covering. Last year's foliage, branches with shoots or dry moss are suitable for flooring. From personal belongings, you can use unnecessary clothes, or a tarpaulin, if you took it specifically for building a hut.
At any time of the year, lighting a fire near a hut will be a mandatory attribute and condition. In cool months - to keep warm, and in warm months - to protect against mosquitoes and other insects. To protect the shelter from sparks, the designated area for the fire must be limited by stones.
After this, all that remains is to cover the shelter on all sides with large coniferous branches. You need to start doing this from the bottom of the hut, so that the upper branches cover those below. This will help rainfall flow down the roof.
The spruce branches will hold up better if they are laid with the branches up and the needles down. The thickness of the covering will determine whether you can reliably hide under the roof of the hut if it rains or snows.
If you find yourself in conditions where a strong wind is blowing, you will need to secure the hut around the perimeter. To do this, you need to prepare several guy ropes, attach them to the frame on different sides, at least 4 pieces, and tie them to pegs that are driven into the soil.
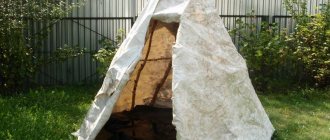
If there is a need to build a hut in winter, then it is better to build it in the shape of a pyramid. A hut of this shape will serve as good protection from cold winds.
In winter, it is difficult to stay in a hut for a long time without heat; in order to warm up, you will need to light a fire. Therefore, there should be a hole at the top of the hut through which smoke from the fire will escape. The outside walls must be covered with snow for better thermal insulation.
Advice
In general, nature itself suggests how to make a hut with your own hands in the forest. Properly laid branches will shield each other. The crown of the tree will provide shelter from the rain. Walls are also being built. In this case, you should take fluffy branches or spruce branches from coniferous trees. After this, you need to break them off so that a hook is formed at the broken end. It is needed to subsequently attach the branch to the crossbars. In this case, it is necessary to begin the construction of walls from the bottom side. This must be done in such a way that the upper branches overlap the lower ones. Then the raindrops will roll down. If you wish, you can line the floor with branches. As a result, the question of how to make a hut from branches can be resolved very simply.
Gable
A gable hut is more comfortable than a single-slope hut. It is made according to the same principle, only the poles are laid on both sides of the top crossbar. One side will serve as the entrance, and the other, completely covered with leaves or spruce branches, should be closed.
In order for the shelter to serve as a shelter from the rain, it is necessary that the thickness of its walls be at least 20–25 cm, and the angle of inclination of the poles should be at least 45 degrees relative to the ground.
If you took with you any protective material - film or tarpaulin - to build a shelter, then the shelter can be made using a ready-made covering. In this case, you will be under reliable protection from rain, snow and wind.
But if you need to provide warmth inside the hut, then you can use a combined roof - first fix the plant materials on the assembled frame, and cover the top with the awning you brought with you. This will improve the thermal insulation of the entire structure significantly, and precipitation will be prevented from entering the structure.
Any wood from which you will make the hut will do. It can be birch, aspen, rowan, etc.
In rainy weather, around the hut, it is better to make a small ditch into which water will flow. It is necessary to make a drainage channel from the ditch, through which sediments will be diverted away from the structure.
Construction of the specified structure for children on a tree
Many of the children thought about how to make a treehouse. In this case, everything is also quite simple and clear. With the right approach, you can build a treehouse for your children and grandchildren. If there are 2 trees standing next to each other on a summer cottage, then between them you will get a good structure. This will not require much time and building materials. Before you make a treehouse, you need to stock up on the following devices and tools:
- sheets of plywood: one with a thickness of 18-20 mm and two - 8-10 mm;
- bolts;
- timber with dimensions 50x150 mm and 50x100 mm;
- hacksaw or circular saw;
- galvanized nails;
- roofing felt;
- birch bark.
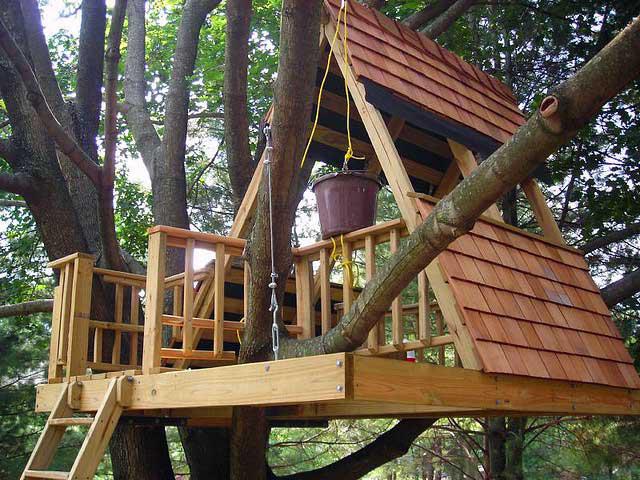
The construction of the hut should be based on 2 boards 50x150 mm. In this case, they are attached to two thick trees. There is nothing complicated in this regard. It is necessary that the diameters of the tree trunks be approximately 20 cm. Then the bottom of the hut with the side walls, as well as triangles for the brackets, are cut out of a sheet of plywood. This will require a lot of patience and scrupulousness. Next, triangular sidewalls are assembled from pre-prepared and sawn half-timber bars. After this, they are bolted together. This will be followed by the process of connecting the assembled triangular sidewalls with a ridge beam. Its cross-section should be 50x100 mm. After this, it is necessary to connect the indicated sidewalls with the two beams located below. Next, using brackets, attach the resulting frame to two support boards with a cross-section of 50x150 mm, which are already pre-fixed to the trees. Now you need to take the bottom, cut out of plywood. It is necessary to drill holes for nails. After this, you need to nail the bottom to the lower beams and joists with galvanized nails with large heads. Now we need to think about building a roof and hatch windows. The best solution in this case is a multi-layer roof. This will ensure reliability. In 1 layer, plywood with a sheet thickness of 8-10 mm is used. The second one can be made of roofing felt or glassine. And for the third layer, birch bark will be used.
Making a children's hut at home
Since many people do not have the constant opportunity to get out into nature, very often huts are made at home:
- For the ridge of the frame, use 4 dry bars 2-2.5 cm thick and a stick of the same diameter.
- To assemble the end walls, the bars are folded in the shape of a triangle and a hole equal to the diameter of the ridge is made using a drill at a distance of 3-4 cm from the ends.
- A round stick is passed through the hole in the crosshairs.
- The resulting frame is sheathed on three sides with fabric and cardboard.
- To make the hut stable, the elements of the rear wall in the lower part are fastened with another block.
- A retractable curtain is installed at the entrance.
The resulting hut fits perfectly not only in an open space, but also inside a children's room.
Since many people do not have the constant opportunity to get out into nature, very often huts are made at home