How to build a hut on a tree with your own hands?
Clear the area for building the house, remove debris and large weeds and thorns. Choose the right tree. When choosing a tree, rely on its stability and branching.
- Build a platform.
- Install additional supports, placing them on adjacent sides of the trunk
- Install a rectangular frame, which in the future will be the floor for the treehouse.
- Make a roof from branches with the largest number of leaves and lay the branches fastened together on beams prepared in advance for this.
- Arrange the entrance to the treehouse - it can be a ladder, wooden or rope.
- You can put hay or an armful of leaves down to soften the blow when falling from the stairs.
How to make a hut from branches?
- To build a hut, you first need to choose the right place, for example, a group of fallen trees, the south side of a hill, the inverted roots of large old trees.
- To build a hut in the forest without tools, you need to make a base - a hole or a small depression in the ground.
- After this, apply a frame of branches, preferably coniferous ones, but if there are none, then any will do.
- On top of the branches, you can put a large piece of cloth, film, oilcloth, and pour snow on them. This will create reliable protection from the cold.
- The next step in construction is the interior of the hut. To soften and warm the day of your home, you need to lay down spruce branches, dry grass, or hay.
- At night, the entrance to the hut must be covered with branches or hay to keep warm. Despite the fact that the hut is made of snow, it will be even warmer than in a wooden shelter.
Making buildings
While hiking, the question may arise about how to build a hut in the forest. Therefore, it is better to understand this matter as early as possible.
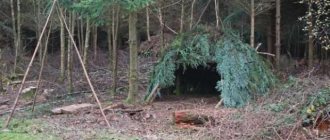
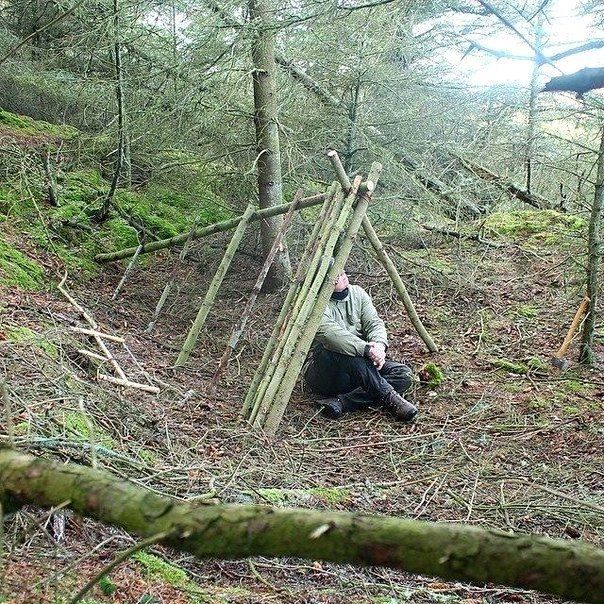
Each type of hut has certain assembly stages that should not be disturbed so that it does not fall apart too quickly. To begin with, you can try to assemble a lean-to structure, since this is the simplest structure that can be erected within a few hours.
Lean hut
For assembly, use various branches that can be found nearby. Usually such huts are built in the forest. What the assembly looks like:
- First you need to find a high, dry place. The structure should stand at a distance of several meters from a thick tree with strong branches.
- A strong pole approximately 2.5 m long should be cut down. It will be laid on the branches of the tree so that the height from the ground surface is about 1.5 m.
- Using strips of bark, roots or tape, it is necessary to tie the ramp poles, which will rest against the ground, to the made crossbar.
- The resulting frame should be tightly covered with thin branches, foliage, and then spruce branches.
- At the ends of the hut it is necessary to hammer the pegs well, and then lay the branches tightly.
- In order not to lie on the cold ground, you need to build a warm floor using spruce branches or ordinary grass. The insulation layer should be approximately 30 cm so that the person does not freeze.
This is interesting: Choosing the most interesting way to hunt wild boar in winter
To prevent it from being cold inside the canopy, it is necessary to light a fire near the entrance, behind which a reflector is installed - a fence made of stakes driven into the ground, as well as branches intertwined with each other. Thanks to this structure, heat will pass inside the structure.
Gable structure
This option can also be made during a forest hike. But it will require collecting a significant amount of available materials. First you need to select a suitable site and clear it of debris and stones. It is worth noting that you should never install a hut near anthills or animal burrows.
It is advisable to build a hut under large trees. If it starts to rain, they will serve as additional protection against moisture penetration. To make a frame, you need to find two straight sticks that have branches in their upper part. The lower ends need to be sharpened well, and then driven into the ground at a distance equal to the length of the building.
A long pole is installed on the resulting base, which can be tied using tape or threads that you have with you. You can also use tree bark or weave a rope from roots or grass. Poles made of thick branches are tied on both sides of the structure. They need to be fixed at the base with driven pegs. At the top, fixation is made using tape or tree bark.
The design will resemble the gable roof of an ordinary private house. This entire building needs to be very well covered with branches on all sides except for the entrance. At the final stage, it is necessary to cover the hut with straw. If the laying is dense enough, then even snow and rain will not get inside the structure, and therefore it will always be comfortable and dry there.
If there is such a possibility, then it is advisable to stretch a film or any tarpaulin over the structure. But it is worth noting that with this method you need to make fires very carefully, since any spark can lead to a fire. To prevent the hut from flooding during rain, it is necessary to make small ditches around the perimeter that will drain water to the side.
Winter hut in the ground
There are not only ground-based ones, but also types of huts that are located below ground level. Such a house will be warm not only in summer, but also in winter.
- First you need to choose a dry place that will be located away from large trees. It is best to make such structures on hills or hills.
- The pit needs to be dug so wide that several people can fit in it. Each person should have one meter of free space.
- The depth should be one and a half or two meters.
- It is better to keep the dug up soil close to the pit: it will also be useful for filling the roof of the dugout.
- On one side, you should dig an additional trench to enter the home.
- It is necessary to drive pegs along the walls. The distance between them and the walls should be equal to the thickness of the boards that will be used as cladding.
- The floor of the dugout should be very well insulated using leaves, boards or sawdust.
- To build a roof, you need to drive several support pillars along the central axis. Two of them will be located near the walls, the remaining ones will be in the center.
- The upper parts of the pillars are securely secured using a longitudinal pole.
- The resulting structure must be covered with earth.
- The entrance will be a previously dug trench adjacent to the pit. It is advisable to take care of steps or build a ladder from branches so that the ground does not collapse.
The entrance must be closed with a wooden shield. To prevent the structure from rotting due to weather conditions, it must be treated with a special solution.
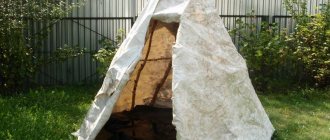
Indian wigwam
A wigwam is a circular hut. It can be built outdoors or inside your own yard to delight children. It is always fun for kids to play in such a children's hut.
It is necessary to build a cone or pyramidal shape from strong sticks. If the wigwam will be assembled in an open area, then the sticks must be driven into the ground. To do this you need to sharpen them very well.
If the hut is made of fabric, then first you need to make a cover that has ties with which everything will be attached to the base. It is worth noting that the cover should cover most of the structure.
This is interesting: What to do in case of anaphylactic shock - first aid for an allergy sufferer
There is no need to cover only the entrance to the structure. The “door” can be made from two curtains that cover the hut. A good, thick blanket should be placed on the floor to prevent the children from getting cold.
How to build a hut without tools?
To build a hut without tools, available materials in the form of dry branches, leaves and trees will be useful. For support, the easiest way is to take a tree fallen at an angle, but before construction, make sure that the tree is reliable so that it does not fall later under the weight of the load. Cover the top with branches of coniferous trees or alder, if nothing happens, with any other branches.
We recommend reading:
Flight delay compensation
Another option for building a lean-to hut with your own hands in the forest without tools (when only one part of the hut is closed) is possible by using a pole consisting of a strong long branch, which is inserted into the gap between the branches of two neighboring trees. After this, as in the previous version, large branches are placed on one side, and everything is sprinkled with leaves on top.

Hut
Firewood + old frames = unique house in Pennsylvania
Another example of a creative approach to housing construction is in the work of artists Nick Olsen and Lila Horwitz. This married couple is a shining example of how love and talent can perform real miracles. Young people left well-paid jobs to build their own nest in the mountains of West Virginia. They bought the material at a sale and it cost them only fifty dollars.
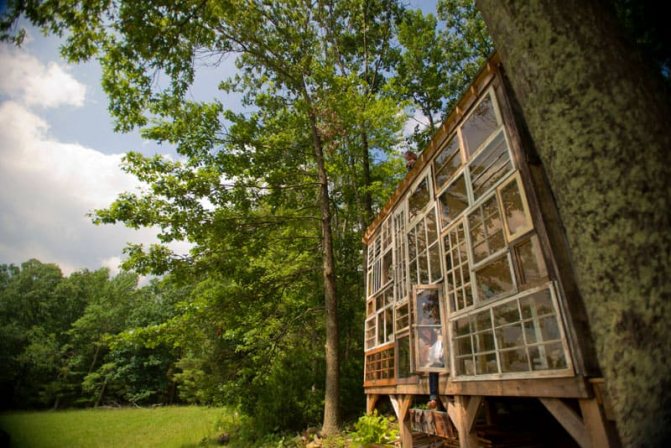
Old wooden frames became the main leitmotif of construction
They made the frame of the house from scrap lumber, and the facade from these same old frames. The house retains heat due to double glazed windows, which also act as sound insulation. Although, in the forest, sound insulation is not particularly relevant.
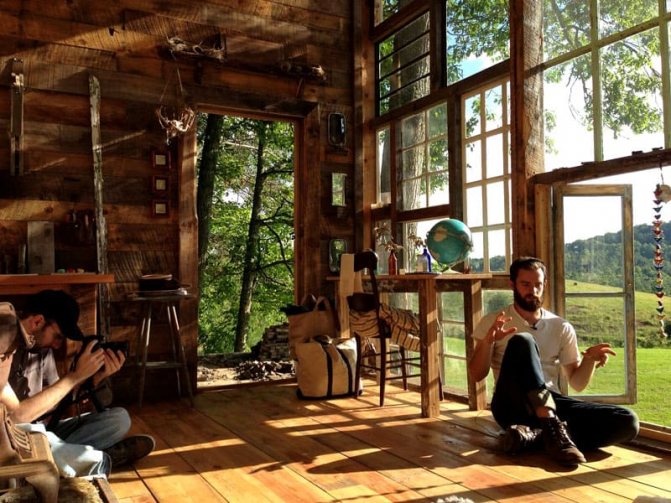
The structure of the house is striking in its practicality, there is nothing superfluous here, everything is subordinated to the spirit of minimalism
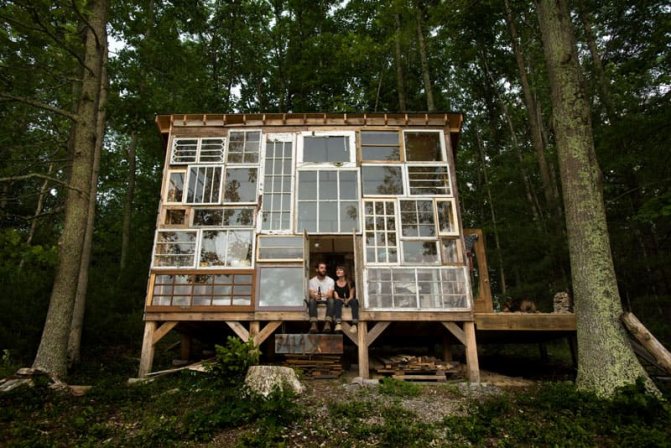
The lack of a protection system and strong walls does not bother the owners of this original property at all
How to build a hut from boards?
- First of all, you need to make a frame for the future hut from boards on the ground using two poles with spears at the ends.
- Now you can lay out the boards by burying one end of the board in the ground and attaching the other with nails to a horizontal pole. The result should be a figure similar to the roof of a house. The boards need to be laid as close to each other as possible, fastening them with slats.
- Next, we place one log on both sides inside the hut, and put boards on top, fastening them to the logs with nails.
- To decorate the front and back sides of the future house, we prepare triangular parts from tarpaulin, fabric, polyethylene and any other available material and attach them to the building. The hut is ready!
Hut
The easiest way to provide yourself with a temporary home in the forest is to build a hut. To construct it, you will need a knife, branches of a tree or bush, several relatively straight poles and bark to tie the branches together.
You should tie two poles in such a way that an inverted “V” is formed. It is worth making several such structures and digging them into the ground one after another, at a distance of 30-40 cm.
Use long poles to secure the structure from the sides and top. It is recommended to use 3-4 poles on each side, using tree bark as a rope. This is done to increase the rigidity of the structure so that it does not collapse during bad weather.
Using grass or bush branches, fill the cells of the structure formed by the poles and v-shaped parts of the structure. The cells should be filled as tightly as possible so that the wind does not blow into the gaps left.
Read: A clubfooted bear is walking through the forest, and tourists meet him... What to do?
Inside the hut, it is necessary to lay a thick layer of grass, leaves or spruce branches. This point is used not only for comfort, but also to prevent hypothermia. Sleeping on bare ground, even in a sleeping bag, is not a good idea.
Around the hut, you should dig a shallow ditch with drainage, this will help avoid flooding of the structure during rain.
Building a hut of this type takes several hours and is quite simple. An additional advantage is that you do not have to experience strong physical exertion.
Among the disadvantages, it is worth noting the unreliability of the structure, its fragility and the presence of drafts, no matter how tightly you try to close the cracks.
Construction of a hut at the dacha and in the village
The construction of a hut from boards in the country is not very different from the above method of building a hut on the ground. Also, first a frame is made, then the base or slopes are made using boards and logs, and to decorate the front side, triangle-shaped figures are cut out and attached to the building with nails , but there are some details.
So, when building a hut house, you should take care of its durability and versatility.
We recommend reading:
Sights of Venice
- It should protect from bad weather, heat and excessive sun; this can be done by finishing the inside of the house with a tarpaulin or plastic film, which will protect from rain, and in hot weather it can be removed and allowed to dry out.
- It is better to treat the boards with a special agent against parasites and destruction
- Anyone can build a hut at their dacha with their own hands, even if there are no boards or logs at hand; on your dacha plot you can build a hut from fabric and hoop.
- To make such a house, you will need a strong branch, to which a fabric-covered hoop of the required length is attached; several ropes are tied to the hoop and pulled in different directions, thereby expanding the space of the future hut.
- You can use dry grass, hay, leaves, branches as a roof, or leave it open.
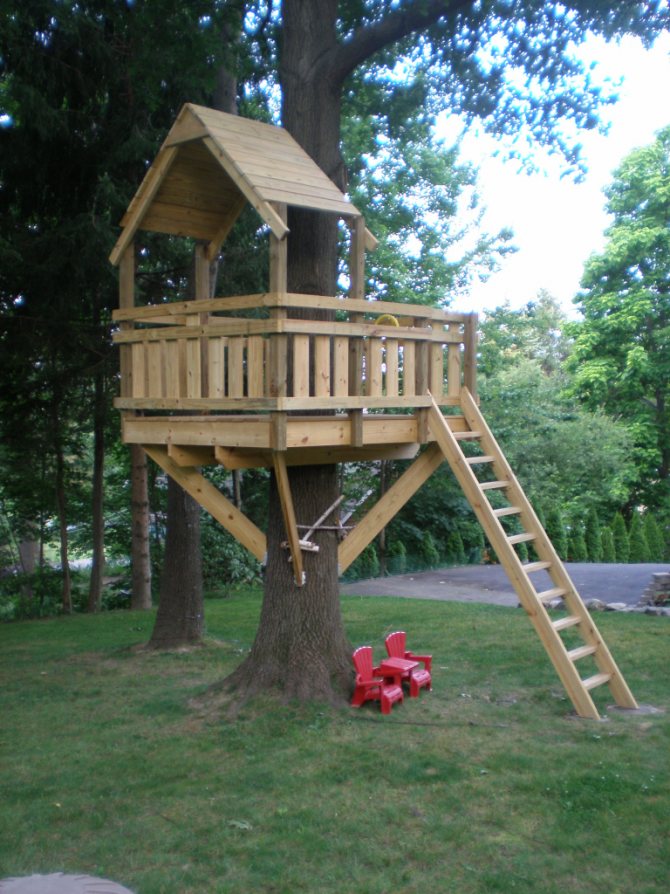
tree house plans for kids callforthedream treehouse on stilts – Cementicreativi.com
What is a hut
What is a hut. Have you ever spent the night in the forest? If so, then most likely in a tent. Try spending the night in a hut. This brings you much closer to nature. Here it is, around us, nothing separates us from nature, not even a thin synthetic tent. Only nature around.
Smells, sounds, rustles - here it is, everything is nearby. Quiet evening accompanied by the crackle of branches burning in the fire. Starry sky overhead. Shadow theater in the firelight. Dark pines or spruce trees stood like sentinels around. And the sharp, loud cry of a bird in the silence of the night...
A hut in the forest is a refuge for a tired soul. Here, in a hut, in silence, a person rests his soul, disconnects from the bustle of the city, and rethinks his life. All problems that recently seemed complex and urgent recede into the background, or even into the background, and become insignificant and unimportant.
Just you and nature. The rest goes away, disappears into the silence of the night forever. Look at the sky. Bright stars shine in the gaps between the tree crowns. In fact, they are not that small. They're just very far away. And our planet Earth is very small in this huge world. And our problems, what can we even talk about them! Enjoy the silence and nature.
This is what a hut in the forest is. And what it consists of is described very well by the explanatory dictionary of the Russian language. A hut is a temporary shelter with a base of poles covered with branches, bark, grass, skins, etc.
Construction of a hut in the city
Building a hut in the city with your own hands is most often limited by space, time and materials.
- We create a blank for the future hut from cardboard, cutting out two rectangles of a size that would be suitable for the size of the future hut.
- After this, we attach the blanks to the plastic pipes along the edges, and connect them together to give stability to the structure
- We throw a suitable blanket on top and tie it to the pipes with ropes, and put pillows inside the hut.
Making a hut with your own hands is not so difficult, the main thing is to find all the necessary tools, but sometimes you can build a hut without using additional materials.
Author of the publication
offline 2 years
Nika
7
I am interested in hiking and traveling, photography and videography. I have been going hiking since childhood. The whole family went and went - sometimes to the sea, then to the river, to the lake, to the forest. There was a time when we spent a whole month in the forest. We lived in tents and cooked over fires. This is probably why I am still drawn to the forest and, in general, to nature. I travel regularly. About three trips a year for 10-15 days and many 2 and 3 day hikes.
Comments: 0Publications: 668Registration: 10/23/2018
Nika Survival in the wild, Articles, Shelter
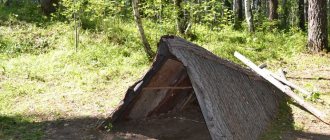
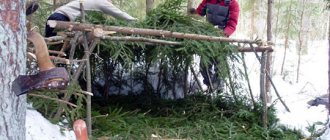
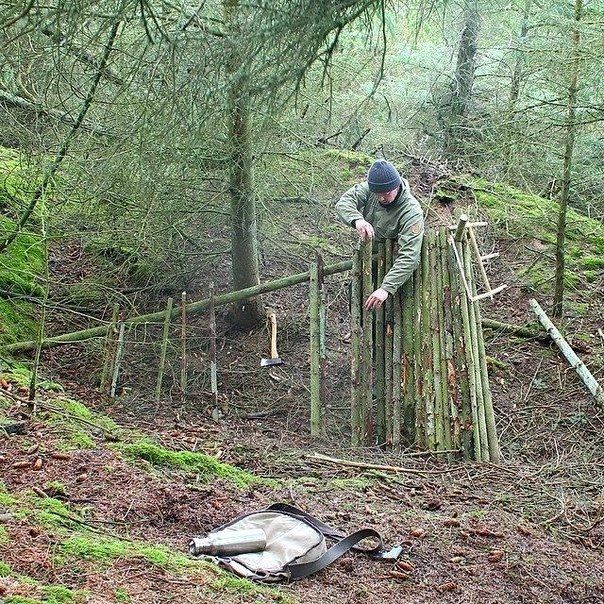
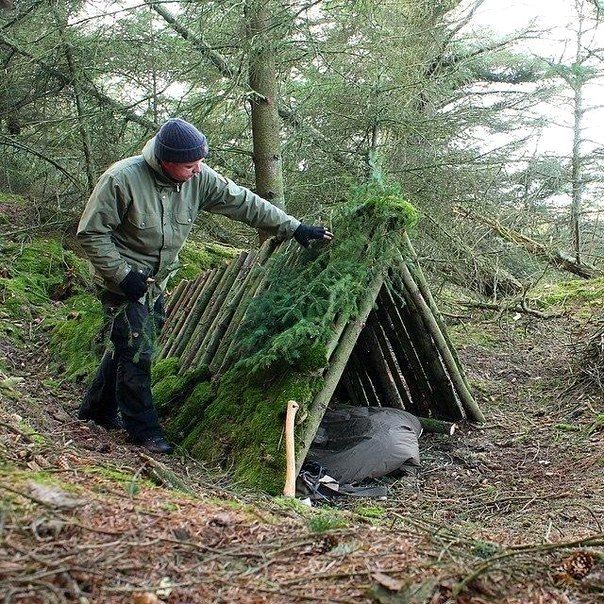
Hut made of poles, spruce branches and moss

Dear visitors of the site “Visiting Samodelkin”, from the master class presented by the author on building a hut in extreme conditions, you can easily learn how to build a temporary shelter in the forest.
Every self-respecting man should definitely know the “basics of survival in the wild.” How to build a home from scrap materials, make weapons and catch prey, with a minimum of tools, or no tools at all! To begin with, the author will tell us the intricacies of building a hut, for which poles will be required - they will be the basis of the frame, moss is a natural insulation, and spruce branches (branches of coniferous trees) are roofing material; the rope for tying the structure can be the bark of a young deciduous tree, or thin twigs " hazel"
And so, let's look at all stages of construction.
Materials
1. poles (tree trunks up to 10 cm) 2. moss 3. spruce branches (coniferous tree branches) 4. rope
Tools
1. ax 2. hacksaw 3. knife
The process of building a hut with your own hands.
And so, if you find yourself in an extreme situation, for example, you get lost in the forest, or you are a hunter, fisherman, tourist who decided to spend a weekend in the forest at one with nature, you simply need to build a temporary home. In the built shelter you can hide from bad weather, spend the night, relax and gain strength.
The best option is a hut, it is built quite quickly, from what you can find in the vicinity of your site. The first thing you need to do is find a long pole 3.5-4 m long and 2 smaller ones 1.5 m long, they will be the basis of the frame.
It is also important to choose in advance the optimal location for future construction, namely on a small hill, so that during heavy rain you will not be flooded.
You can also dig a shallow trench around the building to drain water, if, of course, you have a shovel in your hands, if not, then choose a higher ground!
The base of the hut is assembled in the shape of a triangle.
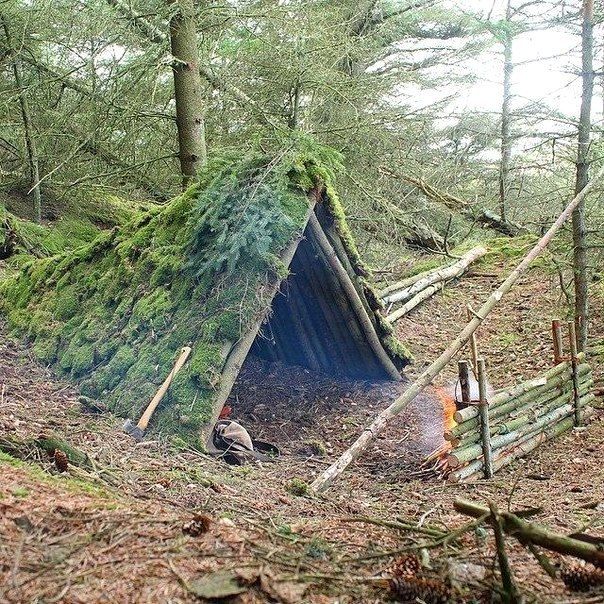
Next, the author places the sticks very tightly together - this is necessary in order to subsequently lay down the lumps of moss and it should lie flat, without falling into the cracks between the sticks.
That's about it this way.
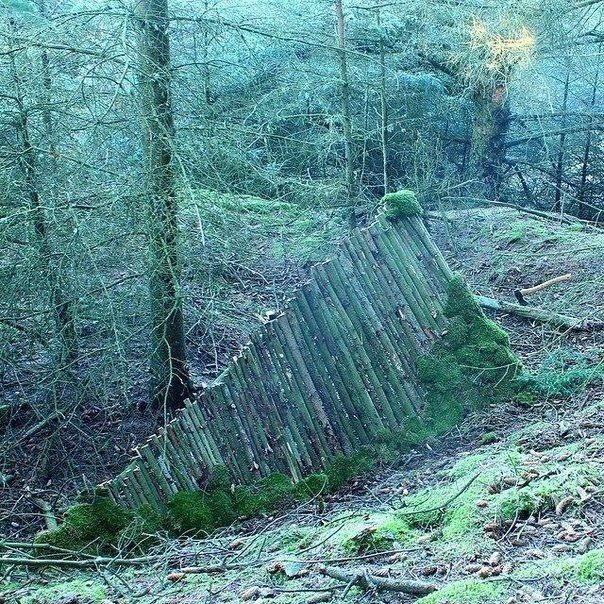
Then our tourist begins to insulate the walls with moss, as you know, moss is an excellent insulation and insulator, it is not for nothing that when building a wooden frame they use this natural material for laying between the logs.
Laying begins from the bottom up and from the back of the building itself.
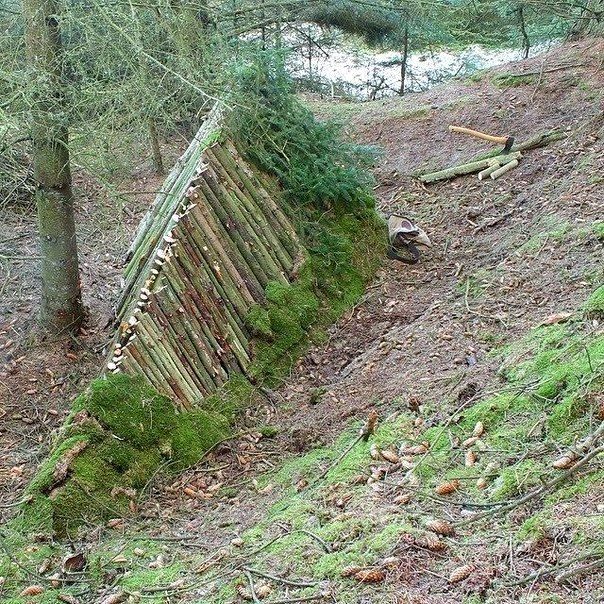
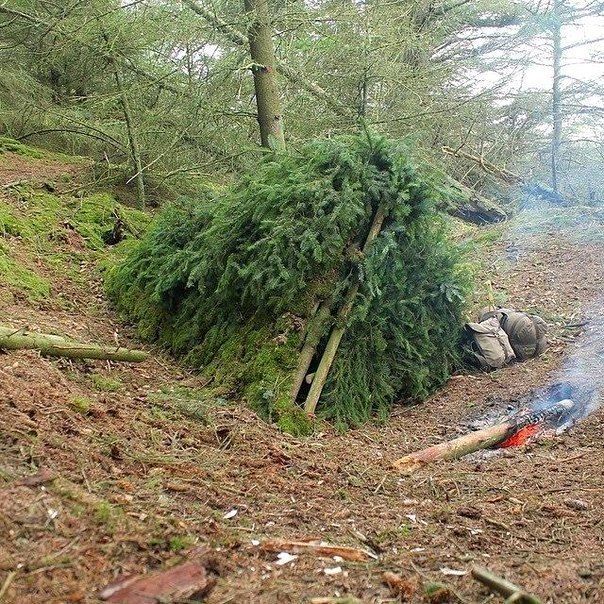
A covering in the form of spruce branches is laid on top of the moss, all according to the same principle from bottom to top. This way, precipitation that falls on the branches will drain away without getting inside the hut.
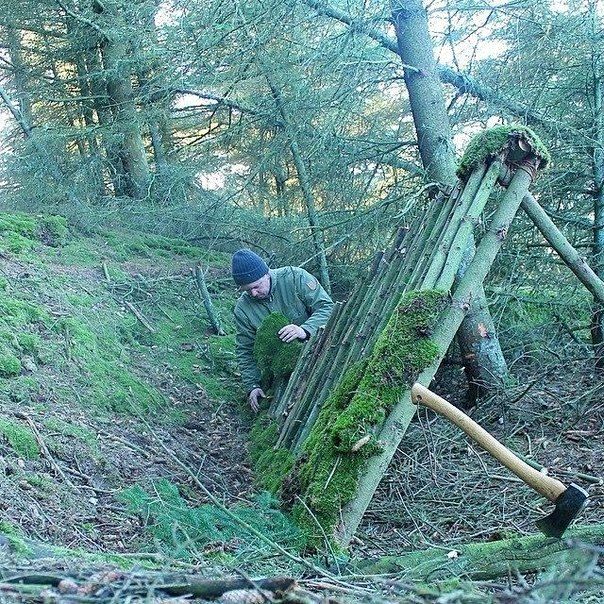
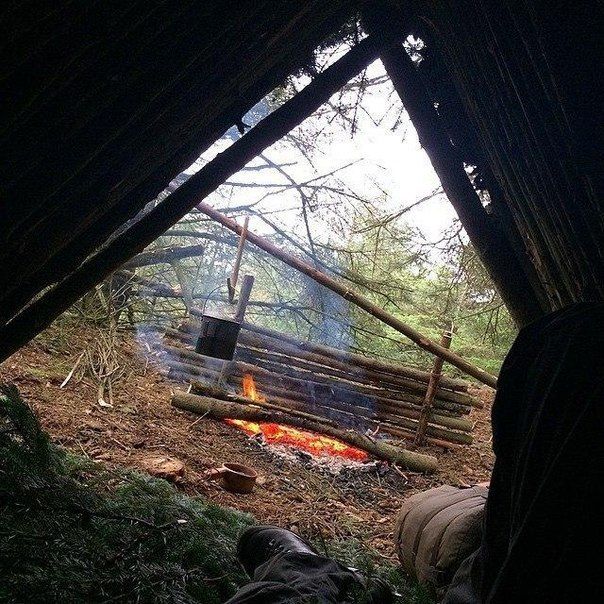
And so, the hut is ready, now you can make a fire. Attention! there is such a rule “first you need to build a house and then make a fire”, many of course do not follow, but still be careful and protect the forest from fire!
Inside the hut you should also make a flooring of sticks and pine branches, so that there is a layer between the cold earth and the person, or better yet, make a small canopy of poles and raise it a few centimeters from the ground. The author took the simplest path, threw the spruce branches into the hut and lay down like a bear to rest after the tedious construction.
Also, a door was subsequently made from the same sticks and spruce branches, which will still provide at least a little protection from uninvited guests and animals.
ATTENTION!
When making a fire, please be careful, because coniferous tree branches flare up very well, even in a damp state.
As you can see, there is nothing complicated in construction and anyone can do it, by the way, you can completely cope without a tool, which at a difficult moment may not be at hand.
This concludes the article. Thank you for your attention! Come visit more often, don't miss out on new items in the world of homemade products!
The article is presented for informational purposes only!
Source
Become the author of the site, publish your own articles, descriptions of homemade products and pay for the text. Read more here.
Yaranga
The main type of dwelling of the northeastern Paleo-Asian peoples (Chukchi, Koryaks and Eskimos) was the yaranga - portable among the Reindeer Koryaks and Chukchi and stationary among the Asian Eskimos and coastal Chukchi. A characteristic feature of the Chukchi-Eskimo yarangas, which distinguished them from the dwellings of other peoples of Siberia, was their two-chamber structure: the presence of canopies inside. Yaranga with a canopy is an amazing invention of the Koryaks and Chukchi, who literally called their home “real home.”
The yaranga of the reindeer Koryaks and Chukchi was a winter and summer dwelling. Its basis consisted of three poles from 3.5 to 5 meters high, connected at the top with a belt. Tripods made of two poles with a crossbar were installed around them, forming the skeleton of the walls. The basis of the roof was long poles tied to the crossbars. The top of the yaranga frame was covered with tires made of reindeer skins. From the outside, the tires were pressed down by vertically placed sleds so that they would remain in place in strong winds. The entrance to the yaranga was located on the northeastern or eastern - the vital, as the Chukchi and Koryaks believed, side. Inside the yaranga there was a canopy - a rectangular structure made of winter deer skins, suspended with the bottom up and the open part down. It was not only a sleeping area, but also a living space in cold weather. The temperature in the canopy, due to the heat of the human body, was high enough that even in cold weather it was possible to sleep here without clothes.
Since the beginning of the 18th century, the frame-type yaranga, borrowed from the Chukchi, has become widespread among the Asian Eskimos and coastal Chukchi - hunters of sea animals. The Eskimo yaranga was different from the reindeer herders' yaranga: it was larger, practically indestructible, and its walls were often lined with turf. Tires made from walrus skins were secured in strong winds with large stones suspended on ropes. Inside the dwelling there was a fur canopy made of deer skins, which served as a sleeping area and, in cold weather, a living space. It was heated and lit with the help of a fat lamp - a lamp made of stone or clay with seal oil and a wick made of moss. Food was prepared on it. The Evens of all areas of their habitat have long had two main types of housing: the Evenki conical tent and the so-called “Even yurt”, similar to the Chukchi-Koryak yaranga. In winter, reindeer skins were used as tires, in summer - rovduga or birch bark. The Evens, who lived on the coast of the Sea of Okhotsk, also used fish skin as material for tires.
The ancient traditional dwelling of the Asian Eskimos was a half-dugout with a frame made of bones, ribs and jaws of whales.
A large patriarchal family of up to 40 people lived in such a semi-dugout. Large half-dugouts were communal houses in which several families lived; meetings and holidays were held here. A semi-dugout of the same type, but with a wooden frame, was the main dwelling of the sedentary Koryaks - the inhabitants of the eastern and western coasts of Kamchatka. A special feature of the Koryak semi-dugout was a funnel-shaped bell made of tightly folded thin boards, which served as additional protection from snow drifts at the upper entrance to the dwelling.