Now the topic of building a bomb shelter is not as relevant as many years ago, but still, in order to protect yourself from disasters, it is worth thinking about building such a room. A DIY nuclear bunker will help save lives and give you the opportunity to sit out in a safe place until the situation improves. A man-made accident or natural disaster remains a pressing reason for construction, from which no one is immune. Before building a bomb shelter, it is necessary to determine its intended purpose and the period of stay in it.
Construction of a bunker will not require any special documents. However, if centralized communications pass under the site, then problems may arise, so you need to find out this in advance.
Types of bunkers and requirements for bomb shelters
Nuclear bunkers must meet certain safety requirements:
- Protect people from damaging factors.
- Situate in an area that is not flooded.
- Have several entrances or exits, an emergency exit in case of failure of the main one.
- Purify the air from all kinds of harmful additives using ventilation equipment.
- Provide sanitary and hygienic conditions for people.
A bunker as a shelter for a family is classified according to:
- Protective properties.
- Location (built-in and free-standing).
- Filtration and ventilation support (industrial and handicraft production).
- Construction time (pre-built or pre-fabricated).
- Duration of stay (short and long term).
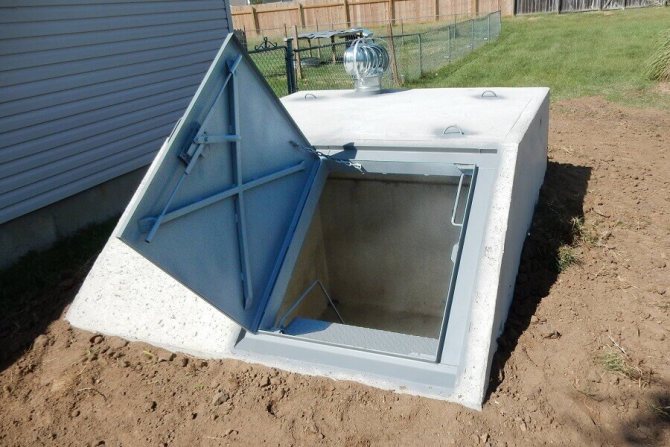
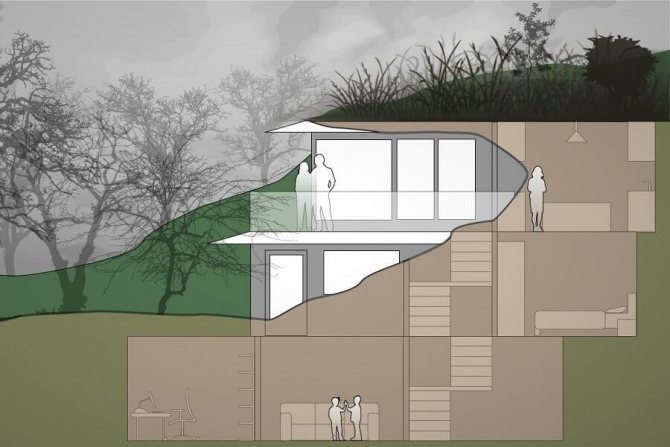
A short-term nuclear bunker is easy and quick to build. When building a simple shelter, energy and construction costs are saved several times. The bottom of the room is strengthened with stones or boards. A rational solution is to use a septic tank made of impact-resistant plastic, dug into the ground.
A nuclear bunker of this type will not require a serious heating system, since the concept does not provide for long-term stay. This design does not require complex engineering solutions. For a small room, natural ventilation is sufficient.
A preliminary drawing of the bunker will help you correctly formulate an action plan. This option is a simple solution that can be carried out at minimal cost.
Tools and Self Defense
It is difficult to overestimate the importance of a good knife in the wild. This is a versatile tool that can be used for digging holes, disposing of human waste, collecting edible tubers and digging fire pits. Hikers can use the knife to leave marks and signals in trees, mud or snow.

Another obvious use for a knife is as a weapon . In addition to self-defense, it can be used for hunting and food production. Reliable and well-designed knives can be used as an excellent alternative to an ax when splitting and cutting wood. Knives can also be used for tanning.
A small sapper shovel is also a great tool to have in your bush survival kit. Digging holes with such an object is incomparably more convenient than with a knife, and in skillful hands it becomes a dangerous weapon.
Important things that can help out in various situations are also:
- insulating tape;
- wire cutters;
- paracord;
- flashlight.
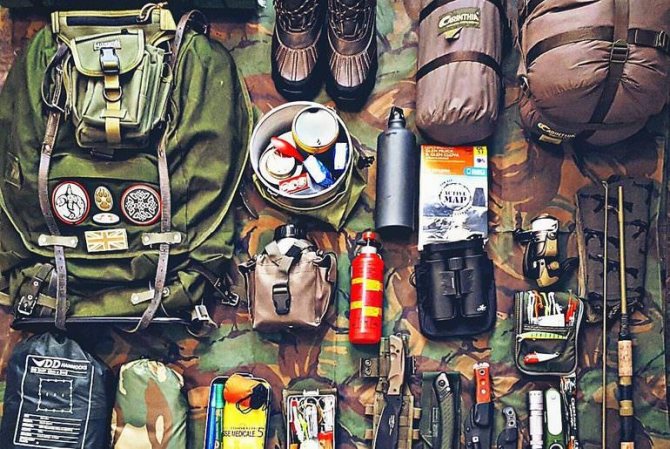
Bug spray is not considered a necessity in a prepper's kit , but annoying bites can negatively impact morale. Most people are familiar with diethyltoluamide sprays, but for wild conditions, a permethrin-based repellent is better. The substance can be sprayed onto clothing and equipment and will last up to 6 washes. Thanks to this, there is no need to reapply the product if it gets caught in the rain or in a river.
You can't rely solely on GPS in extreme conditions (although a good receiver certainly wouldn't hurt).
Just in case, you need to have road and topographic maps. They're lightweight and easy to pack, so there's no reason not to include them on your survival gear list.
Preparation for the construction of a bunker-bomb shelter
Nowadays, the construction of bunkers is rarely done, because the cost of construction is quite high. Therefore, if you have a plot of land, you can cope with this task yourself. To make a bomb shelter with your own hands, you need to invest in construction, purchase high-quality materials and other systems and structures to ensure safety and comfort. Before starting construction, you need to draw up an estimate, calculate construction costs and the cost of all necessary equipment.
Before construction begins, a diagram of the bunker is made and a location is selected. It is also worth knowing several mandatory factors that are taken into account when building a room:
- It is necessary to choose the right location for the bunker. There should be no pillars, bushes, trees or other structures nearby that could block the exit from the shelter in the event of a disaster.
- It is necessary to take into account the fact that the entrance to the premises is located as close as possible to the house, so that in case of an emergency you can immediately hide.
- Before starting construction of a bomb shelter, it is necessary to measure the groundwater level so that in the future it does not turn into a swimming pool. The depth of the pit should be half a meter above this level.
- It is important to measure the area correctly. The bunker diagram will help you calculate both its size and the number of square meters per person: for a short-term option, 3 m² per person is enough.
- It is strictly forbidden to build a bomb shelter with your own hands near gas and water supplies.
How to build a bunker? If you take into account the above factors, you can make your own bomb shelter that will last for many years.
structure
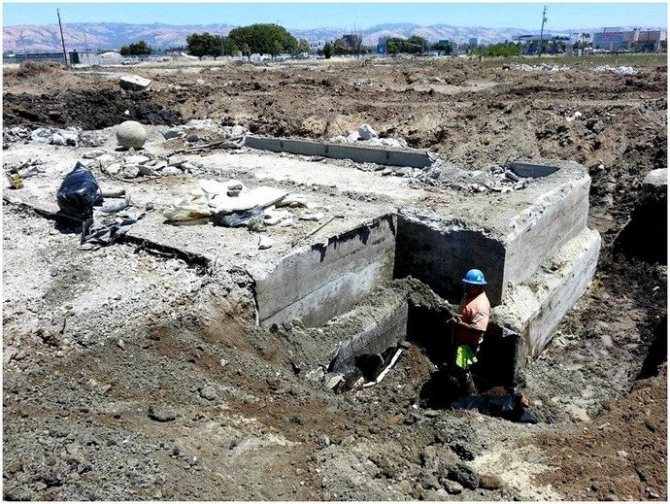
The structure can be built by yourself, but if you want to speed up the process and plan to build a smaller bin, you can buy a larger shipping box to suit the needs. You need to make sure that the hole you dig is large enough to fit the cage, and that it is not too large so that the ground collides. You can also request the structure as an assembly object and then simply place it in the hole, again making sure the hole is aligned and fits the structure.
Once again, you will need heavy equipment to place the box or its structure into the hole so that you can rent the equipment again as needed.
On the other hand, you can build the structure yourself, in which case you won't have to buy a box or request a facility to build it, which also means you'll save money on equipment rental costs upfront. I won't need it
If you are going to build the structure yourself, but it will mean that you will have to do more planning as the material used to build the bunker is very important. In order to get things straightened out, you must first learn some basics on how to build an underground bunker when it comes to the material used to create the structure for you.
Let's start with the fact that although wood construction is a true classic when choosing its design, you should know that wood will decompose if it is not treated first. There are other disadvantages to wood as a material for its structure: even if wood is processed continuously, wood structure is not suitable for underground construction, as toxins are gradually released into the soil, and this is nothing but good for bunker construction.
Wood is also not strong enough to support an underground structure and is not as durable as concrete.
Speaking of concrete, this material is perhaps the best option for its structure as it is cost-effective, durable and strong enough to withstand underground construction. Basically, you will get everything you need when collecting concrete for the material of the bunker structure. After choosing the material, you should first start by building the base of the floor and then move on to making the walls for your underground bunker.
Step-by-step construction of a bunker with your own hands
A long-stay nuclear bunker is built in the following stages :
- First, a pit is prepared, approximately 4 m deep, then wells are drilled. This is necessary so that the room does not depend on central heating.
- The sewage system of the bomb shelter is made at a level below the pit itself.
- An emergency exit is being thought out. A trench is dug from the pit, a pipe is laid there and filled with concrete.
- Two weeks after pouring concrete, when the foundation has hardened well, you can proceed to the construction of walls. During such work, it is worth remembering the laying of communications, water supply and sewage drainage.
- The issue of bunker arrangement is being resolved, energy supply and ventilation are taken into account.
- A roof is erected from floor slabs; dense polyethylene in two layers is used for waterproofing. If necessary, the bomb shelter is covered with earth.
This is interesting: often the emergency exit is disguised as an ordinary sewer hatch.
Recommended dimensions of a nuclear bunker for long stays:
- area – 12 m²;
- wall thickness – 25 cm;
- foundation slab thickness – 23 cm;
- Brick laying height is 2.2 m.
The long-term bunker type is suitable for those homeowners who take their safety more seriously. Here you can wait out not only bad weather, but also chemical attacks, and even a nuclear war.
The bunker drawing shapes the direction of the building. Next, the room is subject to a large amount of finishing work. Interior decoration, of course, is not so necessary and does not relate to safety. But before that, you should coat the floor and walls with waterproofing.
The completed bunker project will help you correctly calculate the openings for passage inside the room. The entrance is made of concrete rings or a metal tunnel, and the outside is covered with mastic for waterproofing.
ATTENTION!!!
This text does not claim to be 100% accurate and is not a call for vandalism. It reflects only the author’s observations made during walks around the city. There are a ton of exceptions to all the descriptions given here. I urge beginners not to rely solely on these descriptions, but to use them in conjunction with their experience and common sense! VS heating network
Option 1
What is this?
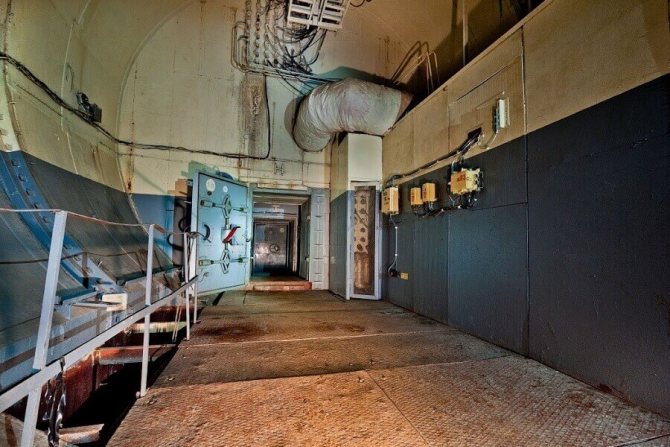
VSh heating networks. Usually they are not walk-through, although there are options when the VSh is simply placed on an open hatch.
What's below?
Usually at the bottom you will find a small tunnel, occasionally passable, with at least 2 hot pipes running through it. As an option, you can find a heat box - this is a small room with valves.
What's interesting?
In winter it’s good to drink beer there, and sometimes heating networks can go to more interesting objects.
What to be afraid of?
Perhaps the greatest danger is posed by homeless people. Pipes are also unsafe - they can burst. Therefore, it is not recommended to strike pipes. Occasionally, methane accumulation is possible in thermal tanks. Just in case, I warn you - do not pull the valves!
VS bomb shelter
Option 1
What is this?
The head of the bomb shelter. These are found everywhere in the courtyards of old areas.
What's below?
Usually, 90% of such heads are tightly covered with garbage, but in 10% of them there will be a narrow hole leading into a bomb shelter under the nearest house.
What's interesting?
Depends on the safety of the shelter itself - there may be only bare walls, or there may be a fully equipped bomber (read a book about civil defense)
What to be afraid of?
Be careful when descending - the hardware ladders have long since rotted! When you go down, don’t run into glass and other debris, and when you get into the shelter, make sure that it’s not being rented by some store for storage - there may be problems with the police.
VSh pipe-cable main
Option 1
What is this?
This is a ventilation shaft of a pipe-cable main. They come in different architectures, and are also divided into passable and blind based on the presence of a door. A pattern has been noticed that operates in 50% of cases - if a ventilation shaft of this configuration is painted gray, there is a cable underneath, if green, it is a heating system or a combined main.
THIS IS NOT A RULE, but an empirical observation - there are many exceptions!
What's below?
Below there will be a healthy passable tunnel with a couple of pipes on one side and a bunch of cables on the other.
What's interesting?
If you want to spend a lot of time moving forward, then walking along the TKK is for you! Sometimes you will come across panels, doors, and ventilation rooms. You can travel very far along such highways!
What to be afraid of?
Often, on the heads there is a simple alarm for opening - either a limit switch or a reed switch. If it’s not there, it’s too early to relax - you can find a motion sensor in the highway itself. It is also possible that you will meet with fitters making a scheduled round. Usually, this is not very scary, and you can break off/pay off.
VSh cable trunk
Option 1
What is this?
This is a cable trunk ventilation shaft. They also come in different architectures and are divided into passable and blind based on the presence of a door. Ventilation shafts of large heating networks can also have this configuration; quite often they are placed at the ends of a bypass - a short section of the heating network, usually a panel penetration, passing under a highway or railway.
What's below?
Below there will be a healthy passable tunnel with a bunch of cables on both sides. In the case of a bypass, the growth tunnel usually does not exceed 100-200 meters in length.
What's interesting?
In the case of a cable trunk, such a tunnel usually leads from the high-voltage substation to the consumer. The most interesting thing is when the consumer is the metro. (example: the well-known N***a). In the case of a heating network bypass, it is not of great interest, except perhaps for photo shooters))
What to be afraid of?
The doors usually have an opening alarm - either a limit switch or a reed switch. The presence of motion sensors in the highway itself has also not been canceled. Cables are dangerous because they may have damaged insulation. In metro cables, on one side of the insulators there is a bare “minus” bus - theoretically, its potential relative to the ground should be equal to zero, but cases of non-zero potential have been documented, so it can also pose a danger.
VS basement
Option 1 What is this?
This is the basement ventilation shaft. They range from the smallest to the largest, and are usually performed in the closet building
What's below?
A short (up to 5 m) tunnel into the basement of the house. The tunnel is usually blocked by dust collectors and fans
What's interesting?
In rare cases, the fan-heater itself looks beautiful (as at Moscow State University). The rest of the options are nothing interesting.
What to be afraid of?
Meetings with the inhabitants of the basement.
VS metro
Option 1
What is this?
This is the metro ventilation shaft
What's below?
Subway ventilation shafts, both deep and shallow, can be divided into 2 types according to their structure - ventilation shafts with and without an upper approach. In the first case, from the kiosk itself a staircase leads down to a depth of no more than 10-15 meters; further, in a rectangular tunnel, noise-attenuating partitions and ventilation units are located, behind them is the main shaft, leading to the depth of the stage. In the second case, the main trunk is placed coaxially with the kiosk, directly below it, so in case of a fall it will fly far. In this case, ventilation units are located at the stage level. There are often cases when ventilation units are installed at the level of the stage and in the presence of an upper approach to the mine. The inscription on the door usually consists of the letters “Вш” or “Ш”, a three or four-digit number and an optional letter index. The first digit of the number indicates the number of the branch that this shaft ventilates, the remaining digits are serial numbers. An optional letter index can inform about the features of the shaft - redundant, cable, without ventilation units, etc.
What's interesting?
Actually, the shaft opens into the metro tunnel.
What to be afraid of?
Each metro high school in Moscow has a system of security sensors installed for the intersection of beams and changes in internal volume.
Look for the metro entrance elsewhere. (I was looking for a similar topic here but didn’t find it and decided to write... if the topic was repeated, I apologize...)
Necessary supplies for bunker setup
As for the internal filling, it depends on the length of stay. But the most important thing:
- stock up on water (preferably 200-300 l);
- provide a source of electricity (as an option - a diesel or gasoline generator);
- install ventilation;
- make food reserves (the longer the shelf life, the better);
- Prepare a first aid kit with the necessary medications.
Fact: under proper storage conditions, high-quality rice does not spoil at all. The same goes for crackers.
Building a shelter for a family can require a lot of money and time. If you draw up a bunker design in advance, then the work will go faster. But in the event of an emergency, it will become a lifeline and help you escape from the elements or other adverse events. Working in stages, you can build a bomb shelter yourself without the help of specialists.
Bunker Greenbrien
0
Source:
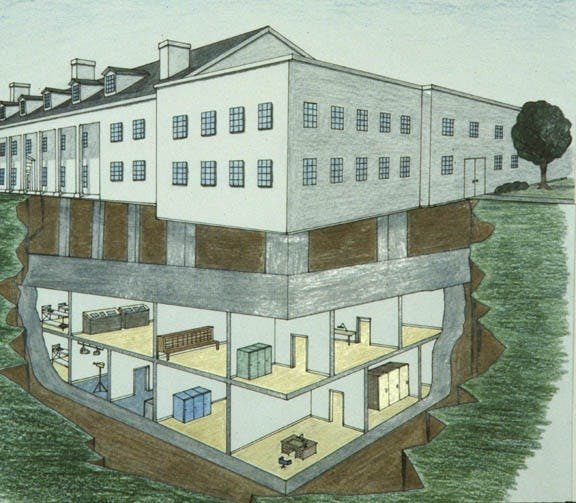
The Greenbrier bunker is located in Virginia. Its area is more than 11 thousand square meters, it is considered one of the largest bunkers in the world. The bunker has 53 rooms, 18 of them are suites with their own shower, toilet and small living room. Among other things, the bunker contains a large hospital with 12 beds, an intensive care unit and an operating room. 60 people are able to hold out here for about 2 months without going to the surface. The bunker is located under the hotel building, but until recently no one knew anything about it because it belonged to the government. But when the secret came out, the government immediately left it to the businessmen.
Doomsday Castle
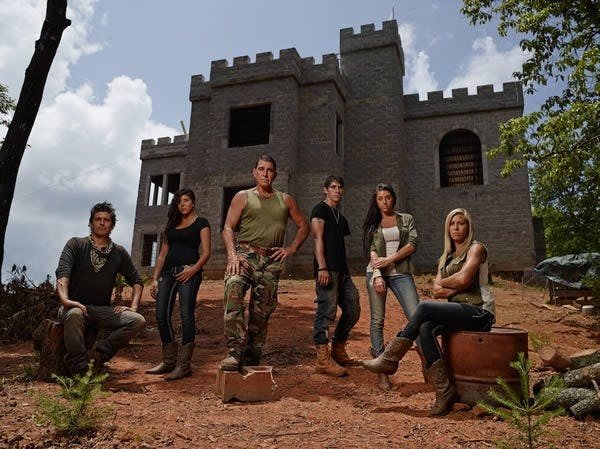
0
Source:
This is the family Doomsday Castle, owned by Bret Burns and his family. Burns began building the castle many years ago in anticipation of a global conflict, wanting to ensure the safety of his family when the Day of Judgment arrived. He not only built a building with very thick walls, but also created a real minefield around it, stuffed with booby traps. During these years, fortunately, no global cataclysm occurred, so Burns and his family managed not only to complete the construction of the castle, but also to properly strengthen it. The process of creating fortifications does not stop today.