What other winter tree should there be? Only snowy ones! If as a child you didn’t bring home a snowman with the words “Mom, let him stay with us, he’s so bored in the forest,” then one of your children will definitely do this. I really want to have in my apartment a piece of that white fairy tale that remains in the yard. At least a small snow tree made by yourself. This is quite real, and our master class will tell you how to make a fairy tale come true.
New Year's snow tree
You will need:
- white napkins;
- foil;
- tree branches;
- glue;
- scissors;
- wire.
Procedure
- Cut the napkins into strips approximately 6 cm wide and fold them in half along the long side.
- Place a strip of foil 2-3 cm wide with your own hands inside the strip of napkin.
- Fold the craft in half lengthwise and cut crosswise to a depth of 2-2.5 cm.
- Unfold the cut strips and, gluing the ends to the tops of the branches, wind them in a spiral. When you run out of tape, apply a bead of glue to the edge and attach the next one to it.
- To make a snow tree for your kindergarten, gather together several decorated branches and tie them together with wire.
- Mask the trunk with the same fringe strips.
Snowman made of threads
It's hard to imagine real winter without such a character as a snowman. He can become the main character for a winter craft for kindergarten. There can be several options for making snowmen:
- The first option involves using cotton pads and thread with a needle. First you need to take 5-6 disks and thread a thread in the middle. An alternative way would be to use a stapler. The main thing is to keep everything in the middle. Next, you should fluff the workpiece, but carefully so that it does not fall apart. Then, using scissors, the cotton ball is given a rounded shape. You need to make a pair of such balls, and then connect them together.
The blank is decorated with a plasticine carrot nose and eyes. Hands can be made from sticks. You can also put on a kind of hat for the snowman, the role of which will be played by the cap of a water bottle.
- The second option involves using threads, small balloons and PVA glue. One of the most important tasks here will be the correct selection of the size of the balls. One of them should be larger, and the second one should be slightly smaller. Additionally, you can take 4 very small balls.
Next, take a white thread, soak it in glue, and then you need to randomly wrap it around each ball. Then the workpieces are left alone for a while, since the PVA must dry completely. After the thread has hardened with glue, you need to pierce the ball and carefully remove the rubber residue. It is important that during this time the thread blank remains in its original shape.
As a result of the work done, you should get 6 balls of different diameters. The largest one will be the body of a snowman. The smaller one needs to be glued on top, it will be the head. Next, all that remains is to make the arms and legs from small balls. The snowman is decorated with a nose and eyes, which can be made from plasticine or polymer clay. Additionally, a knitted hat and scarf are put on the toy. It turns out to be a very interesting craft made from simple and affordable materials.
Christmas trees made of foamiran
Well, what would a Christmas village be without Christmas trees? Moreover, making it yourself is easy and quick.
You will need:
- green foamiran – 1 sheet;
- cardboard;
- beads;
- scissors, glue, ruler, pencil, stapler.
Work order
- Cut the foamiran sheet into strips 2 cm wide.
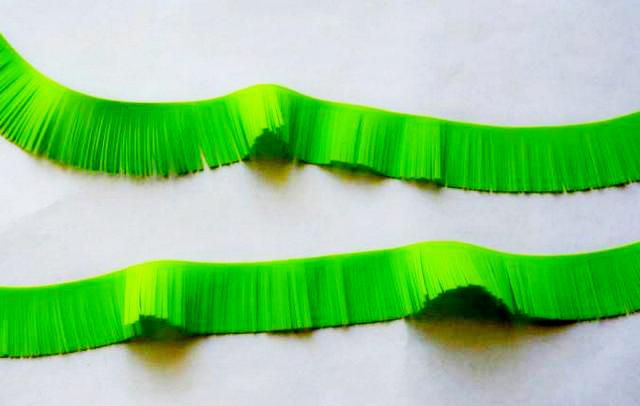
- Make a fringe without cutting the 4 mm strip to the edge.
INTERESTING: Easter bunny made of paper using origami technique
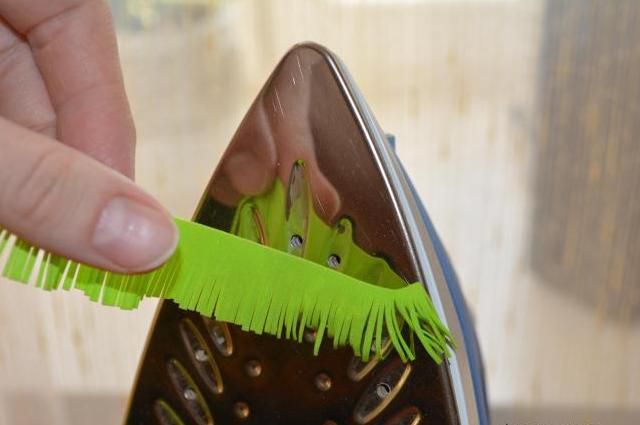
- Apply the strips to an iron heated to the “wool” setting so that the fringe curls a little.
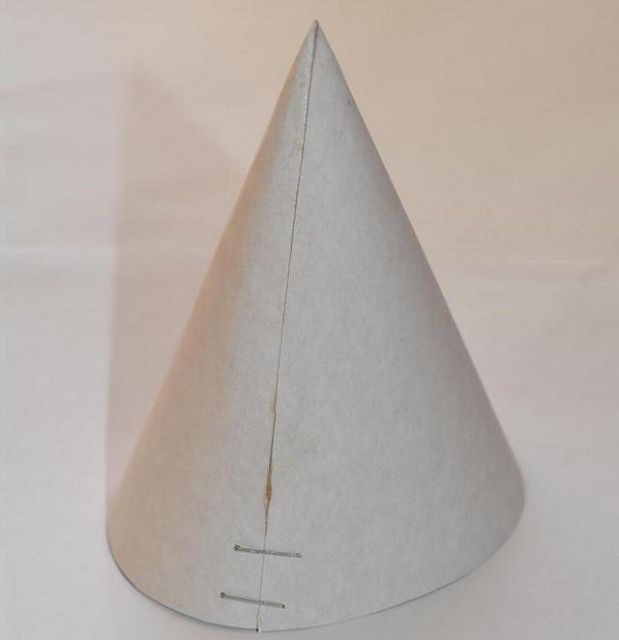
- Make a cone out of cardboard, securing the edges with staples.
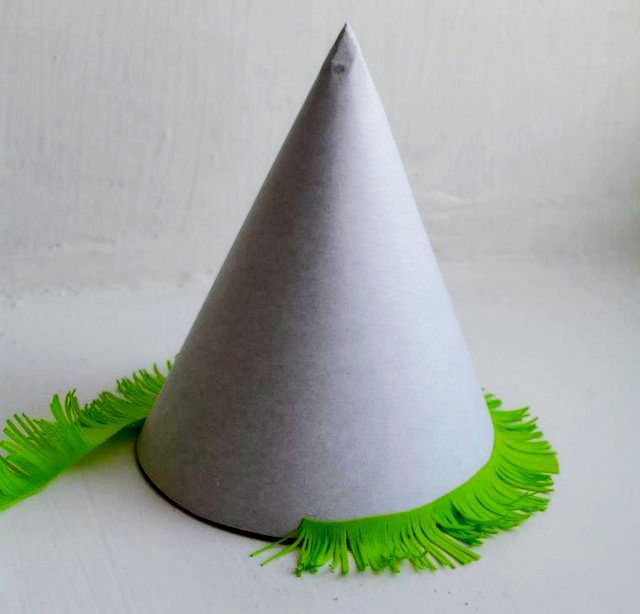
- Glue the first row of Christmas tree needles so that they protrude 1 cm beyond the edge of the cone.
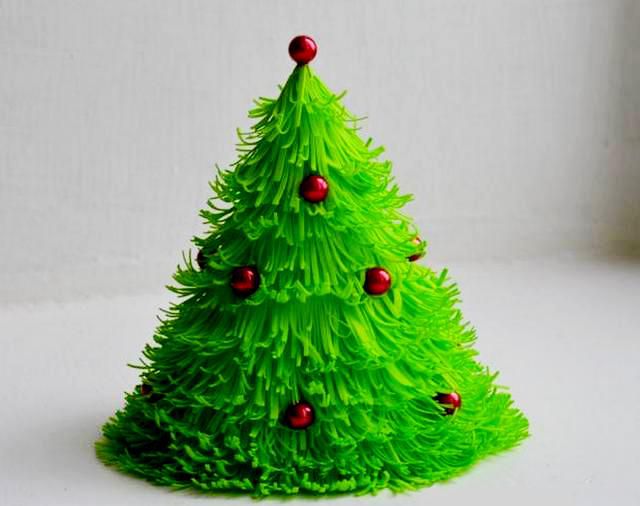
- Glue the strips in a spiral so that each next one is 1-1.5 cm higher than the previous one. Decorate the Christmas tree with beads.
Trees for winter crafts in kindergarten
Many parents use a fairly common theme, namely “Winter Forest”.
There can be quite a lot of options for its manufacture, depending on what material is chosen by the master. But the foundation is most often done in the same way. To do this, you need to make several cones out of paper and place them on a sheet of cardboard.
Next, the main thing is to process the workpieces correctly. To do this, you can take tinsel, cotton wool or thread. The cones are carefully wrapped with the necessary material. Then you can sprinkle them a little with glitter, and then fix them on cardboard. After that, pieces of cotton wool are laid out, which can also be made to shine. At this point, the “Winter Forest” craft can be considered complete.
To make winter trees, you can take other materials, for example, ear sticks or foamiran. If the craftsman has skills in working with beads, you can make a beautiful snow-covered tree. To do this, take beads and wire. The result is a very interesting option that is sure to impress everyone present at the exhibition. You can assemble a wonderful Christmas tree from long beads. It can be additionally decorated with large beads, which will serve as Christmas tree decorations.
To add variety to the winter forest, you can build a small house. Various materials are also suitable for this. An interesting solution would be to use ear sticks. They are quite comfortable to work with and the end result looks great. Another popular material for making houses is popsicle sticks. If a lot of them have accumulated over the summer, it’s worth building a house. This craft is easy to do. The sticks need to be glued together, and then the roof must be built. The top should be draped with cotton wool and sprinkled with glitter. Such a house in the forest will look just wonderful.
And a few more ideas
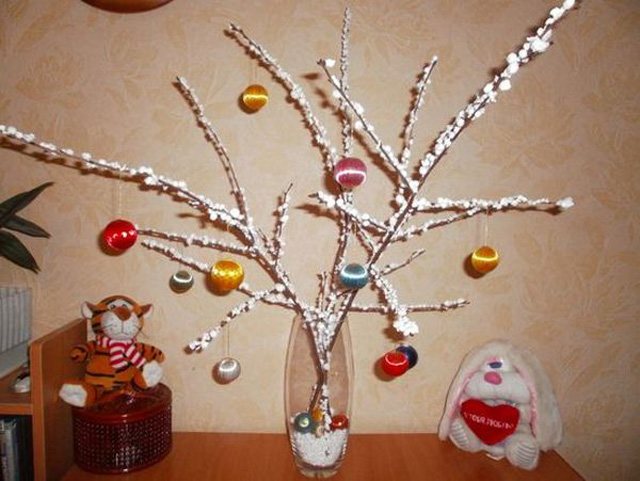
Amazingly beautiful trees are made from beads. But we won’t hold a master class for making them here. You can collect dry branches in the forest. So from these we will make a craft for children with our own hands.
Foam snow trees for kindergarten
- To make such a craft for children, you will need white foam and several branches. Crumble this lightweight material with your own hands or grate it.
- Tie the branches collected from the forest and make a tree out of them. Lubricate the branches with glue and sprinkle with crushed foam.
- Place the snow tree in a vase and hang a Christmas decoration on it. You can make a rigid base for the tree from a pot filled with plaster, for example.
Not just foam
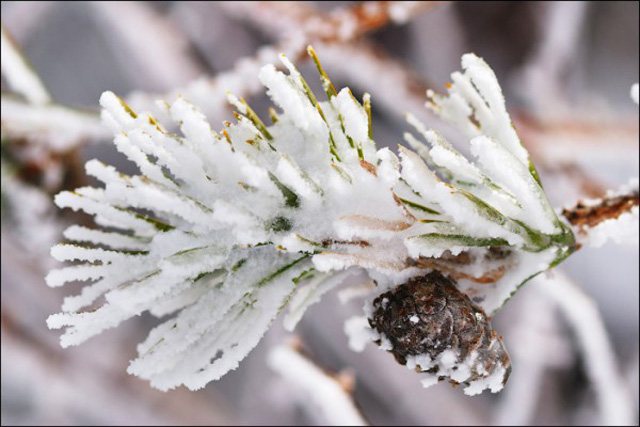
To make frost, take coarse rock salt and dissolve it in a ratio of 1 kg per 1.5 liters of water. Bring to a boil and dissolve completely. Dip dry and clean branches into hot brine and leave to cool for 5-6 hours. It is better to put it in the cold, but not in the frost. Remove the branches and hang them upside down for several hours. New Year's Eve. A fabulous tree sparkling with transparent crystals for a kindergarten is ready.
What to use for winter crafts in kindergarten?
It is somewhat easier to do this kind of work in the fall. The thing is that the gifts of nature during this period are quite generous. Therefore, you can use not only what has grown in the garden bed, but also those materials that simply lie under your feet, namely leaves, acorns and cones.
In winter everything is a little more complicated. In order to create an interesting winter composition, you have to take the materials that are at home. Most often, cotton wool, glitter, white paper, cardboard and beads are used to create miniature crafts on the theme of a winter fairy tale.
But this is not a complete list of what can be used for winter crafts in kindergarten. For example, a number of interesting logs come out of ordinary ear sticks. Don't forget about such interesting material as cotton pads. They can be used to make snowmen or snow-covered Christmas trees.
Don't forget about plastic bottles and toilet paper rolls.
From these materials you can make a lot of interesting crafts, including those related to winter themes. For example, it is unnecessary plastic bottles that become an excellent basis for cute penguins.
As the New Year approaches, many people think about such a convenient material as tinsel. It is also used to create winter-themed crafts.
As for the base, many parents use cardboard out of habit. But recently, more interesting options have begun to appear on sale. For example, we can mention foamiran. This is a convenient material that can become the basis for making various crafts, for example, a beautiful Christmas tree.
Final stage
How to cut a patterned snowflake for a miniature winter tree? In the middle of the workpiece you need to make a hole for the barrel. After which you can experiment, choose different models of snowflakes that are suitable for the chosen style of wood. They don't have to be the same.
You should start assembling the tree with the largest one, not forgetting to glue it in the right places. From the top of the tree it should be carefully moved down the trunk, turning slightly. If desired, you can curl the ends of the snowflake using a ruler. Although they also look great without this procedure.
The paper winter tree is ready. Create your own options and participate in school competitions.
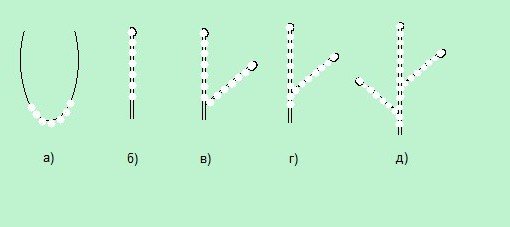
Creating branches
This is by far the most time consuming part of the entire process. By the way, if desired, you can use small beads instead of beads. A winter tree must stand in the snow, so, of course, it is better to create it from white sparkling beads. But matte ones will also look good in the final composition.
Further step-by-step instructions are as follows:
- We string the beads onto a cut piece of wire 50 cm long. It is from 1.5 to 2 cm long. We place it approximately in the middle (the figure under the letter “a”) and return one of the ends of the wire back, missing 1 outer bead. It will be the top of the first branch. We place everything in the same way in the middle of the wire (Figure “b”).
- Next, we again string beads measuring 1 cm onto one of the ends and return the wire again, passing the first bead (Figure “c”).
- We put 0.5 cm beads on both ends of the wire (pattern “d”).
- We repeat the same procedure on the second side of the future branch (Figure “e”).
- We continue to perform these actions alternately with one end and then with the other until the cut piece of wire runs out. At the same time, we maintain a chess order.
Candlesticks made from tree branches
Designer wooden candlesticks have a high price. At home, you can easily create a craft that will be unique and serve as a functional and decorative element. The design can be completed in several ways:
From thick branches. Making such a product will require a little time and effort. The process is as follows:
- Thick branches are selected. They are cut from both end sides at an even angle, checked for stability, dried, and, if necessary, varnished.
- A nail is driven in halfway in the middle of one of the cuts. The cap is bitten off with the help of pliers.
- A candle is directly placed on the remaining protruding pins.
From thin branches. In this case, the glass container is pasted over:
- Select a glass for work.
- Its length is measured. Using a knife or pruning shears, segments of approximately the same length corresponding to the measurements are cut from wooden blanks.
- Each element is lubricated with a special transparent glue, which is held on the glass and glued in a circle to the glass close to each other.
- A candle is placed in the middle of the product.