For an inexperienced person who does not understand fishing, it seems that attaching a float to a fishing line is a fairly easy task. But those who are seriously involved in and love fishing know firsthand that in this matter it is imperative to know some features on which successful fishing will depend.
Garmin echo sounders and navigators
Due to inexperience, beginners are often faced with the question: “How to properly attach a float to a fishing line?” The answer to this question is described in detail in this article.
Float mounting options
Anglers have two options for attaching floats to the fishing line:
- fixed (or voiceless);
- movable (or sliding).
The fixed fastening of the float is based on the fact that the float is connected to the fishing line “tightly”, i.e. it cannot move along it and constantly remain in one place. The movable connection of the float to the fishing line allows it to move freely.
How to catch more fish?
I have been active fishing for quite some time and have found many ways to improve the bite.
But the most effective was and remains the BITE ACTIVATOR. It attracts fish in cold and warm water with the help of pheromones included in the composition and stimulates their appetite. Suitable for both summer and winter fishing. MORE ABOUT THE ACTIVATOR HERE. PRESS!
Basic requirements for attaching a float to a fishing line
Depending on the purpose of fishing for a certain type of fish, you need to know at what depth it swims. If you are going to catch catfish, then the bait should sink when throwing gear to the very bottom of the reservoir.
During spawning, schools of herring can float on the surface, or they can go under the water column without reaching the bottom. Sometimes it is quite difficult to determine at what distance from the bait the float should be.
Fishermen practice two methods of attaching a float: sliding and fixed.
Fishermen put forward the following requirements for attaching a float to a fishing line:
- The float must be able to “travel” along the line to allow the bait to be lowered sufficiently when fishing, or to adjust the length of the lowering.
- It is necessary to fix the float to the fishing line so that it remains in one place while casting fishing gear, hooking, and pulling out fish. This is necessary so that he cannot move during the next cast, and the bait does not end up below or above the location of the fish in the water layers. Sometimes shifting the depth of the bait can greatly affect the intensity of bites.
General requirements
Before attaching to the fishing line, you need to select a reliable float. Choosing the right product will increase your chances of successful fishing.
Which float to choose
Choosing the right model provides a number of advantages when fishing:
- more accurate casting;
- stability of the float in strong winds and swaying water;
- visual clarity when observing the bite.
You should choose a model with good sensitivity, allowing you to notice even the slightest bite. Coloring plays an important role: fishing with a fishing rod involves long-term concentration of attention on the upper rod of the float. It is desirable that the color of the mast does not irritate the eyes and is visible from afar.
Another important aspect is size. For short-range casting, a small-sized model is suitable, and for long-distance casting it is better to use a product with a long keel.
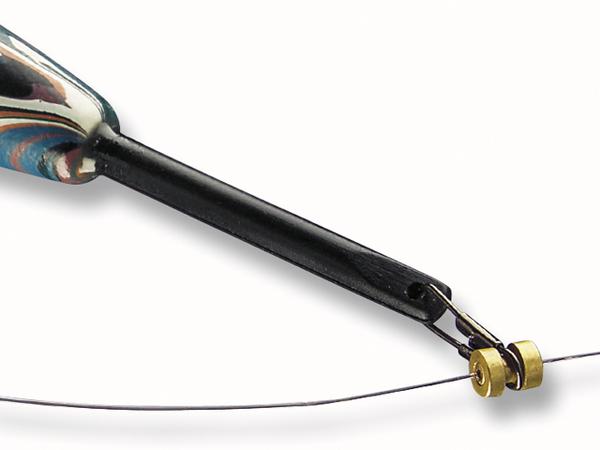
What materials and tools are used for fastening
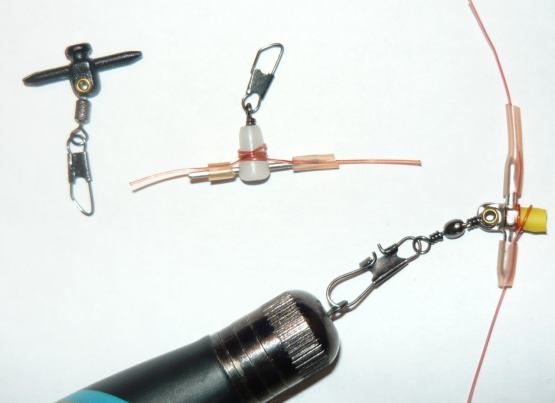
The float is attached to the fishing line using the following materials and tools:
- PVC tubes, cambrics, stoppers and other fasteners;
- various swivels with carabiners;
- thin copper wire;
- lead pellets;
- scissors, wire cutters, knife;
- pliers
The exact list depends on the type of installation. The number of fasteners is determined by the number of float attachment points.
Materials and tools
To attach the float to the fishing line yourself, you will definitely need to have:
- sharp knife;
- rubber tube;
- insulated wire;
- the float itself;
- fishing line
The float can be attached by following the following step-by-step instructions:
- A float with sharp ends on both sides is attached to the fishing line, threading them into centimeter-long rubber pieces that were previously put on the fishing line. The diameter of the rubber pieces should be such that when attached, they firmly press the fishing line to the ends of the float. This mount freely allows you to change the location of the float on the fishing line.
- The float has a metal ring and is attached through it with a loop of fishing line. It must be taken into account that the loop of a thin fishing line can become very tight and create a fixed fixation with the float.
- A float in the form of a goose feather must be inserted into a light tube of such diameter as to clamp the fishing line well.
- Pass the fishing line through a piece of insulation pulled from the wire. Attach a ring of flexible wire to the end of the float. Pass a piece of flexible wire through the ring and twist it so that you get two centimeter ends twisted into a single branching end. Insert these two ends into the insulation tube on the fishing line to fix the movement of the float. The ends of the wire must be blunted with needle files to avoid injury.
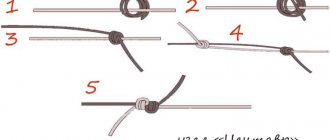
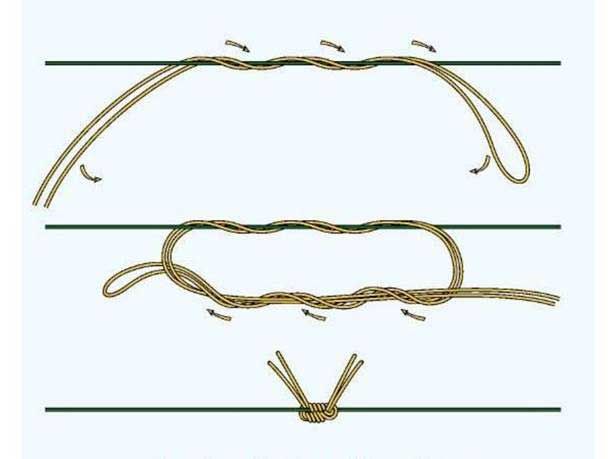
What are the stop knots?
The unit is a more technologically advanced element, which is also subject to adjustment. It can also be connected to already installed equipment. However, one point must be taken into account: between the knot and the eye of the float, you must put a bead with a very small hole. The line should pass through it easily, but the knot should stop.
In practice, three types of knitted stoppers have proven their success:
"Clinch"
To knit it, take a woolen thread or fishing line with the same diameter as the main one. The length of the segment should be approximately 20 centimeters. You can do more - it will be easier to tie a knot.
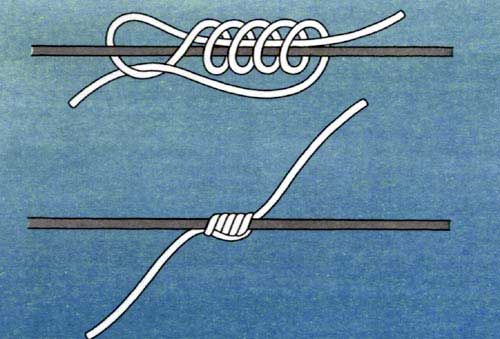
“Clinch” is a simple and reliable, time-tested stopper
Fold the piece in half, forming a small loop, put it on the fishing line and make 5-6 turns around it with one of the ends, holding the loop. Then we will pass this wrapped end into the loop, wet the structure and tighten the knot; after selecting the force for passing the fishing line through the stopper, we cut off the ends, leaving at least 2-3 centimeters. This length will allow you to freely pass through the rod guides. This principle also applies to other types of knitting.
"Duncan"
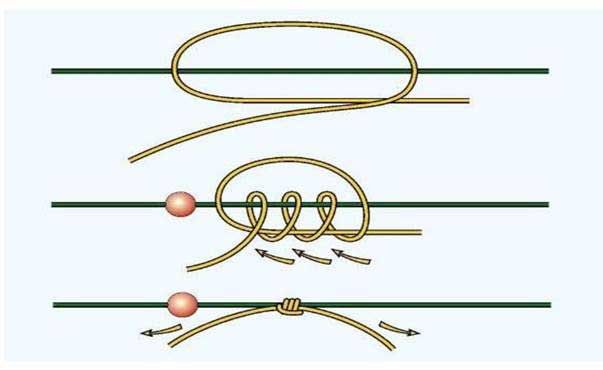
Duncan is more difficult to knit than Clinch, but the tied one holds a little better
The requirements for the material of the assembly are the same as for the previous version. Here we take a larger loop, apply it to the main fishing line, press it and make 5-6 turns inside the loop. Then we wet it and tighten it with the required force. Despite the simplicity of the scheme, this option is more complicated than the previous one, especially with soft threads. At the same time, some anglers prefer it.
"Kremkus"
This type of stopper appeared relatively recently and thin fishing lines and threads are used in its formation.
The Kremkus knot is thicker than the previous ones, but it holds the float better
It’s easy to knit: fold the piece in half, wrap it around the main line 4-5 times (select the number of turns), then weave the ends together the same number of times, moisten and tighten. With a successful selection of threads or fishing line, it holds better than the previous ones.
To summarize, we can say that the fisherman must choose the optimal one from the variety of ways to attach floats to fishing line. It is necessary to take into account the properties of the gear, the nature of the reservoir and, of course, the properties and habits of the intended trophy.
Number of points for attaching the float to the fishing line
Successful fishing depends on properly prepared gear. One of the most important factors is the location of the float on the line. The different positions of the float lie in the points at which the float is attached, of which there may be several.
Based on the number of fastenings, fly fishing rod floats are divided into three types:
- Sliding float, with two points of attachment to the fishing line;
- A blind float with two attachment points;
- Float with one fixed point of contact.
The line can be connected to the float by passing through its body, along the surface of the keel and through the tubes on the float.
Two-point mounting
A fixed or blind float mount, which has two attachment points to the fishing line, is used for the following types of float fishing rods:
- flywheel;
- Bolognese;
- trotting match.
The two attachment points of the float are called upper and lower. The lowest point is always on the keel of the float.
Fastening is carried out using cambrics strung on a fishing line, which can be made of PVC or silicone.
It should be noted that silicone cambrics last longer.
It is good to put three cambrics on the keel of the float. Place the first at the base of the keel, the second in the middle and the third at the bottom. This option provides a strong and reliable connection between the float and the fishing line and a spare middle cambric.
The lower one should protrude about 5 cm from the end of the keel.
The top mounting of the float can be done in two ways:
- by passing the fishing line through a passage ring made of stainless steel material;
- by pulling the fishing line into a metal spring mounted on the float antenna.
The conical float can be attached using one elongated cambric. The keel of this float is conical and therefore there is no need for a large number of cambrics. They will not be interchangeable.
How are these two line attachments different? The difference lies in the stability of the float and all fishing equipment. The sensitivity of the float increases when attached to a spring. When the line is pulled too hard, the ring breaks in and you have to insert it on the fly.
The sliding float can be attached to the fishing line in a two-point fashion by passing the fishing line through the rings on the antenna and keel.
Single point mounting
This is one of the ways to blindly attach to a fishing line.
Fishing in still water with a fishing rod allows you to use a single-point float attachment method. The shape of the float in this case resembles an “igloo”, i.e. it is very long with a specially weighted keel.
The method of attaching to one point is the same as for a fly fishing rod. This blind fastening method is widely known to every fisherman when a piece of copper wire and a cambric are used.
A small piece of wire is threaded through the bottom ring of the float and the ends are twisted. And then the twisted ends of the wire are inserted into the cambric, through which the fishing line is threaded.
This method has both advantages and disadvantages. The advantages are the quick, simple attachment of the float to the fishing line, and the easy ability to replace it with another one. A disadvantage may be that the twisted ends of the wire are not firmly secured in the cambric. In such a situation, the float may jump out when casting, especially if it is very heavy.
Blind installation method
As a rule, the choice of float mount depends on the depth of the fishing spot. Let's consider the most common - blind installation.
The blind method is the simplest way to mount a float. It is performed using ordinary cambrics, which must be selected according to the size of the keel. It is best to use silicone cambrics. The following condition must be met: the line must pass inside the float with little effort.
When using the blind installation method, the float itself will not move along the fishing line. But at the same time, adjusting the depth is easy.
There are two types of blind fasteners:
- at one point;
- at two points.
Fastening at one point is used for fishing in still water: ponds, reservoirs. When choosing such a mount, the float will not cling. The attachment point is at the bottom.
How to tie a float to a fishing line at one point? You will need a cambric and a small piece of wire. Insert the wire into the lower float ring. Twist both ends of it and insert it into a cambric in which either fishing line or monofilament is installed.
Fastening at two points is used in strong currents, for fishing “in the wire”. A float attached in this way is more reliable in operation. It maintains its position not only at the time of casting, but also during splashdown and playing with bait.
Important! For this kind of fishing, a line that is softer is best suited than for fishing in still water.
This type of fastening can be used when hunting predators: pike, pike-perch, perch. It is also used when the fishing depth does not allow the use of blind equipment. The main difference from a blind mount is the free movement of the float between the stoppers. This type of float mounting is used at a depth of more than three meters and long casts of more than 45-50 meters.
When throwing the bait, the float moves to the lower stop. In turn, the upper stopper is a limiter. Stoppers can be the following:
- thread;
- rubber;
- silicone;
- locking knots made of fishing line.
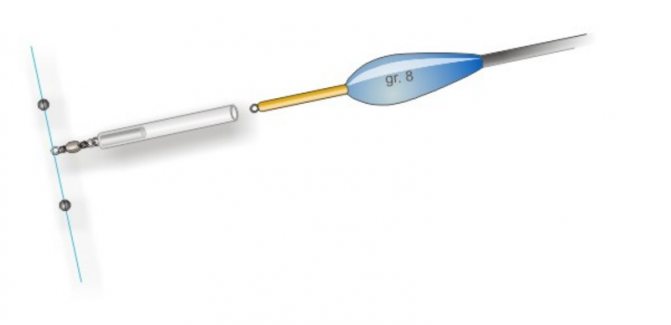
How to attach a float to a fishing line using the sliding installation method? At the very beginning, the monofilament thread is passed through the upper stopper. Next, a float is put on the fishing line and securely fixed. Next, the line needs to be passed through the lower stopper. And you're done!

Read more about the sliding float here.
Today we will consider such an interesting issue as attaching a float to a fishing line. It would seem, what’s so complicated here? But having carefully studied the designs of floats, methods of float fishing, and, as a result, various options for fastenings, we came to the conclusion that it was time to systematize them, especially since many methods of fastening are not very widely known even to experienced fishermen.
Well, here we go again, it’s much simpler, what’s new to say? But in order to speak the same language with the reader, we will still clarify what the float consists of. So, every self-respecting float has:
- Body or middle. This is the thickest part of the structure, from which the horns and legs protrude, that is, the rest of its elements.
- Antenna or upper part protruding from the body. Here it is interesting to argue about the chicken-egg theme. Was the radio antenna named after the float element or vice versa?
- The keel or lower rod protruding from the body.
However, some float models do not have these elements. There are many examples of this. For example, a plastic bubble for surface carp fishing has neither an antenna nor a keel, but there are models in the form of a tube, everything there is a solid antenna-body-keel, a special case of such a model is a goose feather.
Now about the fastenings. It’s good when there is a keel and an antenna, and a loop is glued into the body for passing the fishing line, then you can attach the float to at least three points. And there are models that only have this ring glued to the bottom of everything.
All methods of tying a float to a fishing line can be divided into two large categories:
- Blind mount. The float remains at one point during the entire fishing process; it can only be moved with a little effort.
- Sliding mount. The float moves along the line between the locking elements. The depth of the fishing spot is determined by the location of the upper stopper.
Blind fastening is used in a wide variety of equipment, for all types of float fishing. Fixation can be carried out at one, two or three points.
Sliding mounting is used when catching predators with live bait or when the depth of the place does not allow the use of a blind fixation option.
All blind fastenings of floats can in turn be divided into three groups.
- Cambric fastening.
- Ring fastening.
- Stopping a fishing line passed through the body.
If the antenna and keel on your float are thin enough, and there is no ring glued in, then attaching it is very simple. It is enough to put (not put on, this is not grammatically correct) the required number of cambrics on the fishing line, and then pull them onto the antenna, keel, or both.
If the lower rod is very long, sometimes two attachment points are made on it: the upper cambric should be placed directly under the body, and the lower one at the very end with a descent onto the fishing line. This is done to avoid overlap of the fishing line.
For models that have a short, thick antenna, a ring is glued into the body. Then the fastening is carried out differently. The fishing line is passed through this ring and fixed with cambrics at the bottom. Their number depends on the length of the lower float element.
Nowadays floats with one ring on the keel are very common. They occupy most of the float counter. But not all fishermen switching from Soviet-type floats to modern ones can understand the intricacies of installation.
There are various silicone adapter attachments on sale that fit onto the bottom of the float, thereby simplifying its attachment. Such designs, as well as the built-in ring, allow for blind installation at one point, for example, this is how match wagglers are attached.
Here are several other ways to firmly fix float models with a ring:
- The loop is inserted into the ring and thrown across the body. It does not require additional elements for installation, but in order to move the float, you will have to loosen the resulting loop each time.
- The fishing line is threaded into the ring of the float, and stoppers are placed on both sides: silicone or pellets. This method allows you to change the blind mount to a sliding mount, you just need to move the stoppers apart.
- If the ring turns out to be larger in diameter than the existing stoppers, you can first attach a small carabiner with a swivel to it, and then pass the fishing line through the ring of the swivel. This design will allow you to quickly change the float if necessary.
- A small bracket made of metal or plastic is inserted into the ring, the ends of which are placed in pieces of cambric. They must first be put on a fishing line. The factory float keel attachment works in the same way.
- A wire is inserted into the ring, twisted, which is then placed in a silicone rubber tube placed on a monofilament or braided line.
Some models are mounted by passing a fishing line through the body. Thus, for example, floats are often installed for winter fishing, although this method is also used when fishing in open water. The stopper in such models is long, which can combine the functions of both an antenna and a keel.
Sliding montages
Sliding mounting allows the floats to move freely along the rig from stopper to stopper. Depending on the model, the fishing line is passed through a ring or hole in the body of the float.
We suggest you read: How to catch catfish
Stoppers for sliding installation are used from different materials:
- Rubber. Silicone rubber beads are the best at absorbing shock and protecting floats. It is better to place several silicone tips in a row to prevent shifting.
- Plastic beads. They are easy to put on the fishing line and move freely along it. The bead attachment is secured with locking knots. To soften the blows, cambrics are placed in front of the beads.
- A thread. Special thread stoppers with beads are sold. Such stoppers often become loose and have to be constantly tightened.
- Lead pellets. In case of urgent need and the absence of other stoppers, you can use sinker pellets, clamping them above and below the float. In this case, it would be correct to use cambrics to soften the impacts of pellets on the fastening elements of the structure.
When using this or that stopper, you need to pay attention to how it will pass through the guides of your rod when casting.
It is no secret that such a variety of float installations is not accidental. It is dictated by the fishing conditions in a specific place and with specific gear:
- Fly fishing. This is a classic, well-known fishing method. A small float with a medium-length keel and a thick antenna is best. There are two attachment points: one is behind the ring protruding from the body, the second is the cambric in the lower part.
- Plug fishing. The difference from the fly tackle is only in the length of the upper part for better visualization.
- Bolognese tackle. It involves casting at different distances. It is better to equip such a fishing rod with a model with long masts, fastening at three points: to the top or through a ring in the body and two cambrics at the bottom.
- Wiring tackle. Fixation at two points: the bottom of the keel and the mast.
- Live bait fishing rod. Sliding installation with passing the vein through the body. This design will give the live bait more freedom of movement, and will also alert the predator less when biting.
- Match tackle. “Wagler” type models are used with fastening at one point, by a ring. It can be either blind, when fishing at shallow depths, or sliding, when fishing at sufficient depth.
- Winter fishing rod. They use blind fastenings with an antenna stopper when passing the fishing line through the body, or by fastening at one point by the ring or pin of the keel.
Attaching the float to the Bolognese tackle
The Bolognese fishing rod has a very long rod with many guides, unlike others.
It is used most often when fishing in rivers.
Thanks to a large supply of fishing line, this fishing rod makes it possible to fish at a remote distance.
If you plan to fish at depth, then the float must be used with a sliding mount.
A float with two rings is very suitable for a Bolognese fishing rod.
It will allow the line to pass freely and the bait to reach the desired depth.
Using a silicone stopper, the sliding of the float is controlled.
If the depth at the fishing spot is not very great, then a blind method of fixing the float will be used. It is installed by the fisherman in the desired position, ensuring a good bite.
Fastening methods for different types of fishing
The many types of float installation are due to the variety of fishing methods:
- Fly fishing. A classic type of fishing. The optimal shape of the float used is a thick mast, medium-length keel. Two-point fastening - cambric to the keel and behind the hull eye.
- Plug fishing. A shortened rig is used, designed for short and medium casts. Models with a long, clearly visible mast are good. Fastening - at two points.
- Fishing with live bait. A through float with a sliding mount is used. The line is passed through a hole in the housing.
- Match fishing. Heavy floats (wagglers) are used for long casts. Such models are attached at one point through the lower eyelet.
- Winter fishing. The floats are attached tightly through a fishing line passed through the body. Fixation is carried out by means of a long cambric, which acts as a mast.
Fastening the floats “tightly”
The most popular among fishermen for use as fishing gear is the choice of float rods. Thanks to ease of use, adjustment of the float and the depth of lowering the bait, a float fishing rod allows many fishermen to get away from “zero”. The correct selection of fishing equipment plays a big role for success in this matter.
Fastening the float “tightly” plays a particularly important role when fishing quickly. At the moment when a school of fish swims to the location of your bait, it is very important that it drops to the same depth with frequent casts.
Schools of fish constantly move from the shore to the middle of the river. Fish can swim both on the surface and in the water column. A float attached “tightly” during such fishing is a very important point on which the success of the entire fishing depends.
The fisherman controls the required depth of placement of the equipment by firmly attaching the float to the fishing line.
Blind fastening methods
Solid fastening methods, as we have already mentioned, are used mainly for reservoirs where there is no water flow.
There are only two methods of blind fastening. We have already described one in the method of attaching a float at one point.
The second, two-point fastening method involves using another cambric and thicker wire.
First, the cambrics are strung on a fishing line. Then a loop in the form of “Ω” is made from the wire, and a float is put on it.
The ends of the loop, with the float on it, are inserted into the cambrics on the fishing line.
This method allows you to quickly remove and change the float.
To prevent the float from running around, three turns of fishing line are made around the loop.
The simplicity of such blind fastenings, which do not require any additional equipment, allows the fisherman to carry them out anywhere.
Blind mounts are used most often on fly rods.
Stoppers for mounting a sliding float
All kinds of stoppers are made from the following materials:
- Rubber and silicone. Such stoppers well absorb the impacts of the float sliding between them. It is advisable to mount several rubber beads in a row at once to prevent the unit from shifting. Fishing stores sell rubber and silicone stoppers in the form of beads strung on wire. To move the bead onto the fishing line, you need to fold it in half, thread it through the loop on the wire and pull the stopper onto it.
- Plastic. Plastic stoppers are easy to put on and move along the line. It is better to fix them with locking knots. To soften the blows, it is advisable to install cambrics along the edges.
- Lead shot. If you don't have plastic or rubber beads on hand, lead pellets are suitable as stoppers. Considering the hardness of such material, for better shock absorption of the edges of the float, it is recommended to place cambrics in front of the lead stoppers.
If you don’t have a store-bought or homemade stopper at hand, fishermen use stopper knots. Their advantages are simplicity and speed of attachment, safety of deformation of the fishing line with the correct technology for tying a knot.
Sliding mount
In cases where the depth of the fishing spot reaches the length of the rod, the use of blind float equipment is impossible. The use of sliding floats is more acceptable in these places. The sliding rig depends on the rod length of the fishing rod.
The sliding mount allows the bait to move freely to any depth, especially during long casts. The movement of the fishing line is stopped only by the presence of stupors at the top and bottom. When casting, the float is located at the lower stop, and then moves to the upper one as the sinker with bait sinks.
You don’t have to set the lower stop position, but there is a high probability that when casting, the float will hit the sinker and knock it down.
Types of sliding floats
Typically, the shape of sliding floats resembles an inverted drop. There are many types of sliding floats.
We will look at some of their types:
- “Calm” is a long float tapering towards the keel. Very sensitive. It can be used at a depth of up to 3 m in calm weather.
- "Grace" - similar to "Calm", but with a larger diameter. Less sensitive than the previous float. Used on waves and reacts to a bite while the bait is diving. Recommended for beginners.
- “Maestro” has a shape like a truncated cone. Greater stability and maneuverability compared to the previous two. Sensitivity is low. Used in places where the depth is no more than 1.5 m.
- It is recommended to use “favorite”, “channel” and “consul” floats in fast currents. They are not suitable for calm conditions due to their low sensitivity.
Attaching a float for long casting on a fishing line
Often when going fishing, fishing enthusiasts adjust their fishing rods in advance to the depth of the reservoir known to them. But there are times when gear needs to be prepared in a new unknown place.
A sliding float is a very good option for long casting to a depth of up to six meters. But with a shallow reservoir of up to 3 meters, it would be better to use a blind mount.
The universal weight of the float for long casting is 12 g. You can use the methods described above for attaching the floats.