Table of application of knots and their strength
| Knot/Fortress | Knot/Fortress | Knot/Fortress | Knot/Fortress | Knot/Fortress | |
| Line to line (leash, braid) | Fisherman, waterman 75% | Grapevine, 80% | Centaurus, 85% | Nail, Albright, loop to loop, 90% | Surgical, weaver, clew, 70% |
| Fishing line with hook | Palomar, double palomar, blood, 80% | Uni knot, 75% | Sheet, 70% | Snud, regular leash, 95% | Sliding snood, loop, stupid leash 90% |
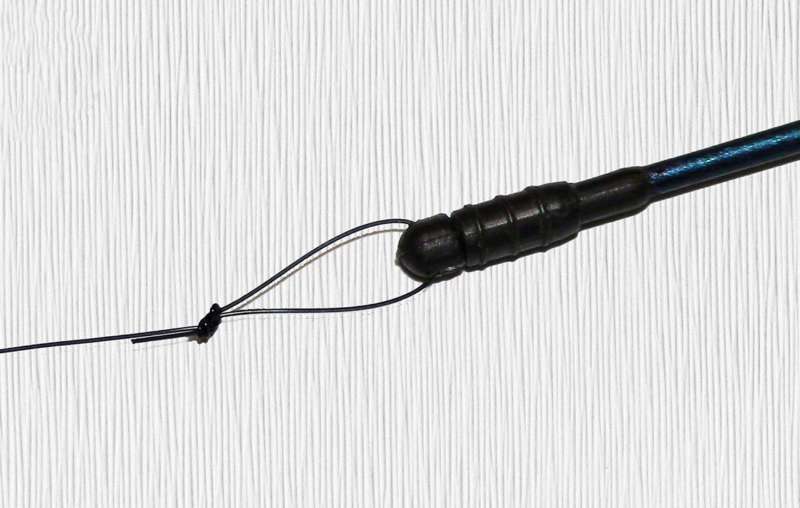
How to tie fishing line to fishing line
The simplest knot. You will need two fishing lines, preferably braids:
- lay side by side, one to one;
- make a loop up to 7 turns around the fishing line;
- shape into a knot, tighten;
- trim off unnecessary ends.
Thus, the main and auxiliary lines are connected, or fixed to each other.
Fisherman's knot
The best fishing line is braided. Monofilament slips a lot and you shouldn’t even experiment with it. For the bundle:
- align the ends of 2 braids;
- make a loop of 8-10 cm at the base of one fishing line, which is thinner;
- pass through the previous line around the circumference;
- twist up to 5-6 turns on a thread from a thin fishing line around the one that is thicker;
- tighten the connection or the place where the knot is formed;
- pull the end of each line one by one;
- fix the knot;
- trim off excess ends. The fishing knot is ready.
A more advanced fishing knot can be made from braided wire to avoid breaks:
- connect 2 fishing lines to each other;
- twist one around the other, forming a loop;
- with the fingers of one hand, take the 1st loop received;
- pull the free end up;
- skip the first loop behind the second;
- repeat the steps with another fishing line;
- Pull the loose ends and tighten the knot.
Vine
Suitable for tying two lines or tying a hook. It is considered a fairly strong knot, unlike, for example, a “fisherman’s” knot, but is not suitable for tying connections of 2 lines of different diameters. The knot will look weak. Only monofilament thread is suitable for use. Output strength is 80%. The number of turns must be made taking into account the thickness of the fishing line. The thinner it is, the more revolutions you need to perform, up to 8. Grapevine for tying two fishing lines. Installation:
- fold 2 fishing lines together;
- bend the end of 1 fishing line back;
- take the fold with your fingers to make a loop;
- pull one end to both lines;
- make 5 turns inside the resulting loop;
- take the ends of the fishing line with your hands on which the knot is made;
- pull in different directions;
- tighten into a single knot;
- the same must be done with the 2nd fishing line;
- pull the long ends of both knots;
- trim off excess edges. The “Grapevine” knot is usable.
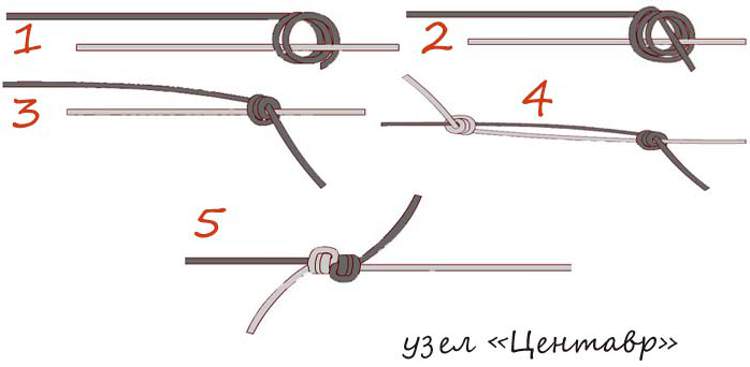
Centaurus
For tying a spinner, sinker, hook to braided or monofilament, regardless of diameter, Centaurus is the best universal knot. Tensile strength – 85%. Sequence of work:
- take a hook with a ring into which to thread the fishing line;
- pull the end of the main line to the hook, winding it 2-3 times around the main line;
- pull the short end;
- tighten the knot tightly.
This is the best and most durable knot among all known. You can make the following version of the knot with both monofilament and braid:
- take 2 fishing lines. You can use different diameters;
- wrap one around the other up to 5 times;
- First insert the wrapped thread inside the first fishing line;
- tie both ends of one thread;
- carry out similar actions with another fishing line;
- pull the long ends, tighten 2 knots;
- trim off excess. The Centaur node is ready.
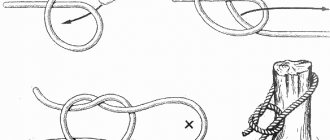
Nail
As a knot it is suitable for firmly tying two lines of different thicknesses. Braid is suitable. The output is a fairly compact unit. To make it you need:
- pick up any object in the form of a tube like a nail to obtain this node;
- place two lines parallel to each other;
- lean the pipe against the first line;
- wrap around up to 10 turns, thereby connecting the tube with the first fishing line;
- stretch along the tube;
- pull both ends of one thread to obtain the first knot;
- carry out the same actions with the second fishing line;
- pull the long ends;
- pull the nodes towards each other;
- trim off excess edges.
Scheme:
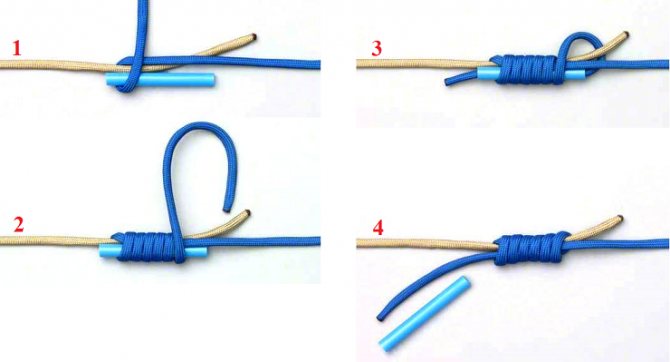
This is a good knot if you have braided lines of different diameters, and you can connect a fly fishing line in this way to an extension cord or to a leash. As an alternative, you can use a thick needle instead of a nail.
Water
This is a simple knot and beginners will quickly learn how to do it. You can use either braided or monofilament line. The knot is suitable for fishing in winter if the main line breaks:
- place the fishing line on the panel;
- take with both hands and turn clockwise to form a loop;
- holding the double end with one hand, thread the short end into the loop with the other hand;
- make a turn around both lines;
- tighten the knot by pulling the long ends in one direction and the short ends in the other;
- trim unnecessary edges to avoid tangling.
Scheme:
Surgical knot
This knot is more often used to attach a leash to a fishing line, rather than for the purpose of quickly securing two fishing lines. According to the principle of knitting, the knot is similar to the “water” knot. You can use braid or monofilament. At the break it will be up to 70%. Knitting sequence:
- Place 2 fishing lines parallel to each other;
- form a loop from both at once;
- skip the loop, making 2 turns around the circumference;
- moisten the resulting node;
- pull off.
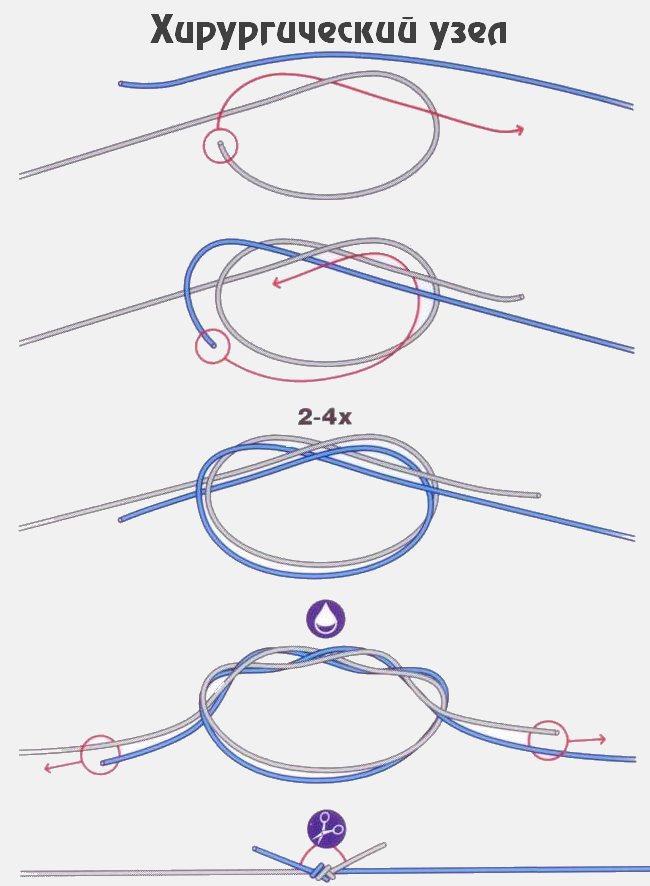
This is a quick, easy and reliable way to tie two lines together to connect them together.
weaver's knot
Also suitable for attaching a hook to a fishing line:
- thread the line through the hook or eye;
- make 1 turn with the tip of the thread around the axis;
- return to original place;
- tighten the knot.
Thin synthetic fishing line is not suitable for tying, although the knot is simple and quite strong. You can tie a hook to a shoulder blade in this way.
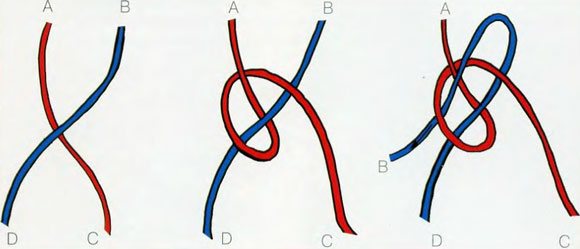
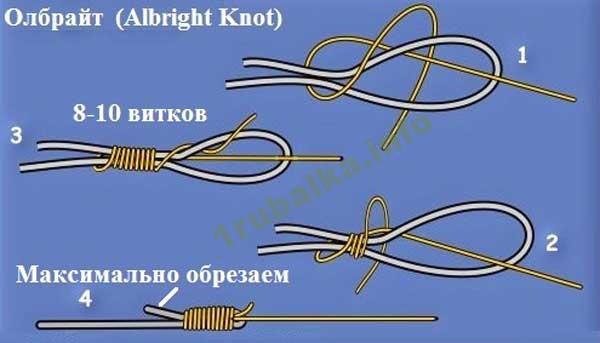
Albright node
Albright is more applicable when fishing with a spinning rod for the purpose of connecting fishing line and leash, also when it is necessary to obtain high sensitivity of the tackle for balancing. Albright is a fairly popular knot, done as follows:
- cross 2 fishing lines with each other;
- make a loop at the cross point;
- pass 1 end of the fishing line through the resulting loop;
- wrap around yourself and the loops up to 10 times;
- thread through a nearby loop;
- moisten the end of the fishing line with water to ensure a strong connection;
- tighten and trim the edges.
The strength of the knot is high even when made from thin fishing line. You can also lengthen the leash in this way.
Loop in loop
It is more of a connection than a node. Used with monofilament line.
- fold the thread in half;
- wrap the tip of the second thread around the resulting ring from the first thread several times;
- fix the loop by bringing the tip of the thread into 1 turn.
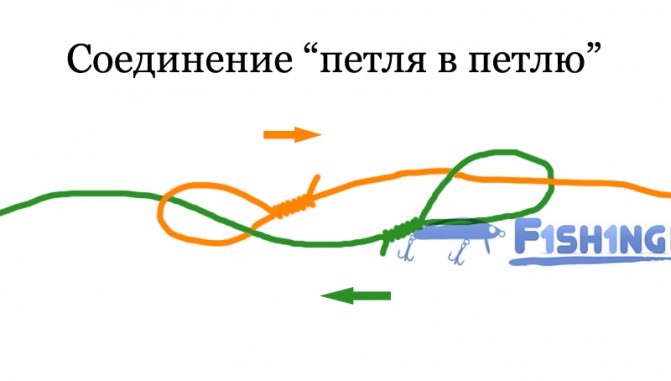
So fasten 2 monofilament fishing lines or attach a leash by inserting the tip of the thread into it.
Knots for connecting two lines
Below are ways to tie knots on fishing line.
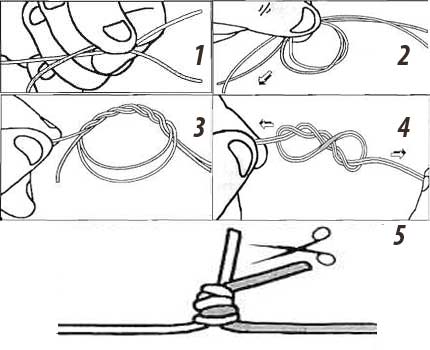
Marine surgical unit. With its help, you can tie up a broken fishing line in just a couple of seconds. To do this, you need to fold the two running ends and wrap them around the root ends several times, then bring them up, cross them (like laces on shoes) and, grabbing the root ends with your fingers, stretch them well to the sides. A simple and fairly strong knot is ready to perform its function.
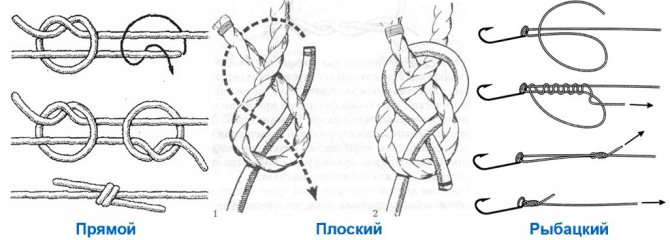
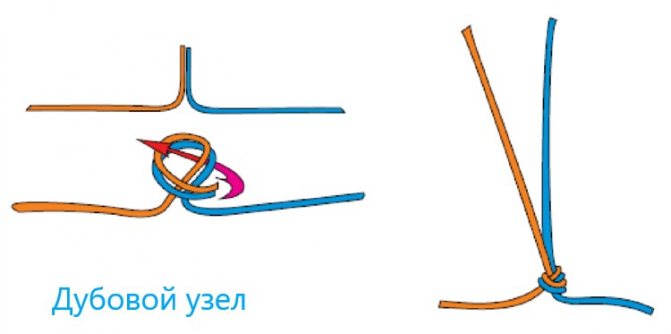
Oak knot. Knitted by folding the two ends, creating a loop and tightening a simple knot. In this case, it is important to step back from the edge at least 10 cm, otherwise the knot will “slip” when tightened. Then you can trim off the excess. You can tie it even faster than the previous one, but fishermen use it only in the most extreme cases. And not only because such a node is not very reliable. Its main disadvantage is its protruding ends, which in the water cling to everything possible. The only plus is the speed of tying.
Triple fisherman's knot. Suitable for connecting monofilaments of the same thickness or with a difference of up to 0.05 mm. This is done according to the same principle as the previous option. You need to fold and align both ends, step back a little from the edge, tie a simple knot, insert the ends into it two more times and tighten tightly. Both lines should be tightened simultaneously, without forming loops or voids. The excess is trimmed 2 cm from the knot.
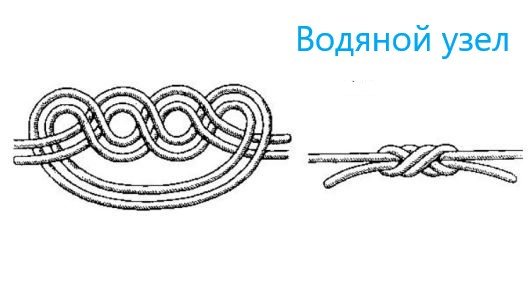
Water node. This connection is considered one of the most durable. To make it, you need to put the ends of two fishing lines towards each other (they should run parallel), take the running and root ends in your hands and tie them with a simple knot, with only two, three or even four turns. You shouldn't do more than four. This is quite enough, after tightening it is almost impossible to untie. The water knot is inconvenient because one end has to be pulled into a loop, so it is not suitable for connecting lines that are too long.
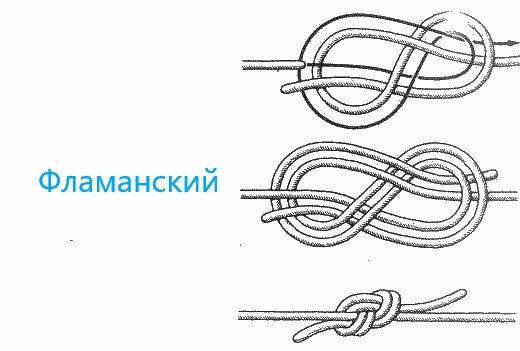
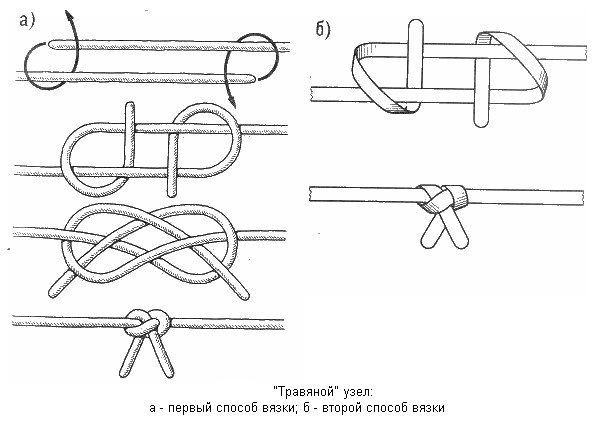
Flemish knot. This option has another name - counter eight. In fact, these are two figure eights, one for each end being tied. How to make them? First, one running end must take the shape of the number “8”, then the second one is wound towards it, and similar actions are carried out with it. The result should be a double eight. You should tighten it slowly, carefully, so that the figure eight retains its shape. Stretching the root ends to the sides will help strengthen the knot even more.
Herbal knot. Used to connect two fishing lines of the same diameter. Their ends must be placed parallel, each wrapped around the root end of the opposite fishing line and passed under its root end. Now all that remains is to tighten it and the knot is ready. It has several advantages, namely: it is easy to knit, it is easy to unravel if necessary, and it holds the load well.
Knots for diverting leash to fishing line
You cannot do without such knots if you need to tie a leash to a fishing line. Here are the best options:
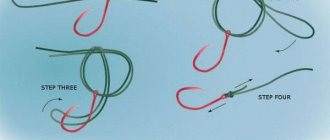
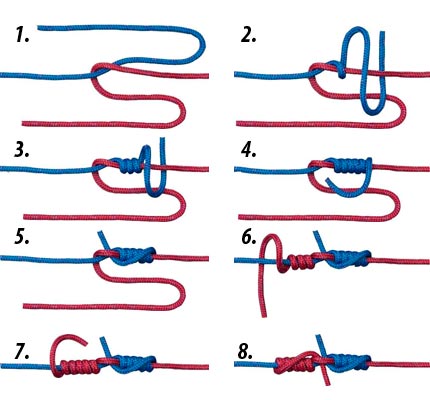
Bloody Knot
A universal bloody knot, simply irreplaceable if you need to tie hooks or a spatula when fishing with a spinning rod. You can use monofilament or braid, or in combination: braid and monofilament, just make 3 turns. The strength of the fishing line is maintained up to 75%, and if the fishing line is thin, then you need to make a larger number of turns (up to 7-8 times):
- take 2 fishing lines of the same diameter;
- pass the tip of the thread through the eye of the hook or around the shank;
- make a loop from the fishing line, holding it with your hands;
- make 5 revolutions around the forend with the free end;
- press the fishing line to it, while trying to ensure that there is no intersection of the turns with each other and they are located exactly 1 opposite the other;
- make a twist with your right hand;
- pull the free end of the thread into a coil;
- moisten and tighten the edges of both ends of the fishing line at once;
- if necessary, move the resulting knot to the eye or blade of the hook;
- Tighten well again.
To install a bloody knot, braided or monofilament is suitable. Tensile strength reaches 70%. The knot can be used to tie a leash to a bottom (float) fishing rod, and also to tie together two different fishing lines: braid and monofilament.
Fishing knots for shock leader
The knot for the shock leader must be reliable, but at the same time neat and small, because if such a fishing knot is large or with antennae, this will negatively affect the casting distance, and in the worst case, the knot can get caught on the guide ring and break the tackle . So, how to properly tie fishing knots to connect the shock leader to the main fishing line.
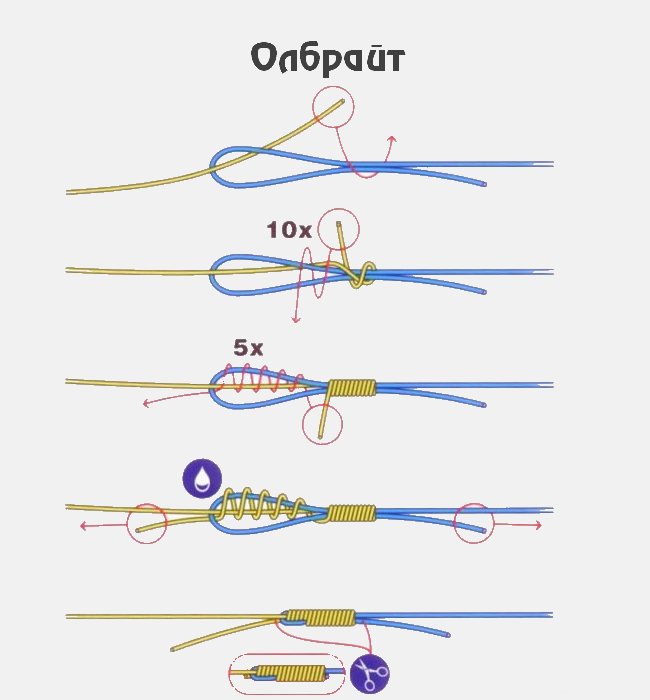
Albright node
The knot is designed for tying monofilament, braid or fluorocarbon
- We fold the shock leader fishing line in half, making a loop, then take the main fishing line and pass it into the resulting loop, usually it is enough to skip 15-20 cm of fishing line.
- Then we knit a loop from the inserted main fishing line and wrap the resulting three fishing lines with the free end of the main fishing line, making 8-10 turns. When making the winding, you must ensure that there are no overlaps on the turns.
- Then we thread the free end into a large loop.
- Now we begin to tighten the fishing knot, we do it slowly, first we pull the edge of the shock leader, after tightening the knot a little, we begin to pull the edge of the main fishing line. After slightly tightening the knot, we wet it with our mouth and slowly pull both lines, tightening the knot.
Tightening fishing knots when working with monofilament fishing line should never be done quickly, otherwise the fishing line may burn due to friction. Then we cut off the antennae, and we cut off the shock leader’s antennae, right under the edge of the turns of the main fishing line.
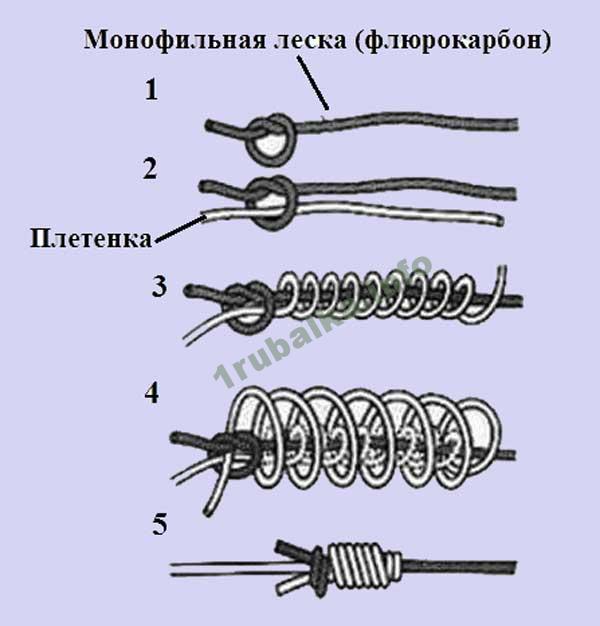
How to tie a carrot fishing knot
Most often used for tying monofilament (fluorocarbon) to braid. The Carrot knot is a bit similar to the Albright and is also designed for heavy overloads. True, unlike Albright, all the tails of the carrot stick out in the direction opposite to the casting, due to which the knot practically does not cling to them through the feeder rings Another advantage of the Carrot is that the diameter of the knot gradually increases in the direction of casting, which also facilitates better passage through the rings.
- We tie a small knot on the fishing line and leave it loose.
- Now we take the braid and thread it into the knot formed.
- Then, with the end of the braid inserted into the knot, we make 10 turns around the monofilament.
- We stop, and on top of the already made turns, we apply new ones, moving in the opposite direction. Then we push the end of our braid back into the loop.
- Now we begin tightening the fishing knot, wet it, then take the braided line in one hand, the shock leader in the second, and hold one of the tails with our teeth and begin to slowly tighten. By tightening in this way, we will get the strongest possible knot. At the end we cut the tails short.
So, let's continue to figure out how to knit fishing knots.
How to tie a leash to a cord or fishing line
To tie the leash to the main fishing line, the steps are simple and even a beginner can do it. But the result is a reliable and easy to untie knot. You can do it like a “surgical” one, tying it in a simple way, stepping back from the edge of the fishing line up to 25cm. Further:
- fold the end of the fishing line in half;
- pass through the resulting loop;
- tighten.
The folded end of the thread should form a loop. To attach the main line to the leash, you need to pass the free edge of the leash through the loop.
Loop in loop
It is made as follows:
- fold the main line in half;
- tie a regular knot at the fold to make a loop;
- at the end of the fishing line, trim off the excess ends;
- make the same loop on the leash;
- tighten the knot.
In the same way, you can tie a swivel, attach a fishing line to a leash using a carabiner, or simply thread the loops through the swivel ring. The device allows you to quickly change hooks as needed. A fishing line or fluorocarbon will do.
To perform a simpler and stronger version of a loop in a loop for the purpose of attaching leashes and other metal devices (hooks) you need:
- step back on the main line 8 cm from the edge;
- bend the measured size back;
- attach another thread so that you get 2 threads that do not intertwine;
- moisten the fishing line with water to make the connection stronger.
The result should be a loop of sufficient diameter so that your thumb can easily pass through.
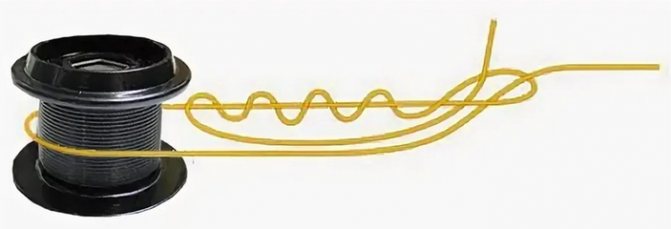
Knots for tying fishing line to reel
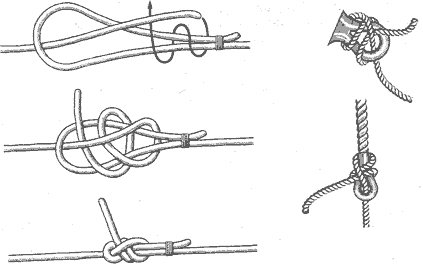
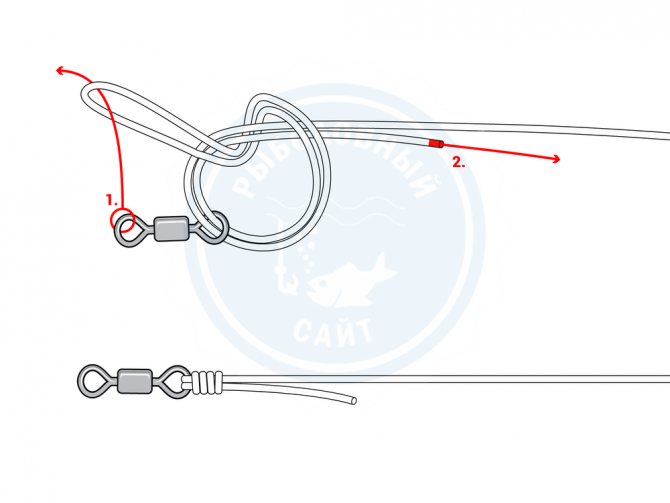
Arbor knot
The Arbor knot is the simplest and most reliable knot for tying fishing line to the reel spool. The knot has an ancient history; in old times it was used to tie the string to the bow. By design, the Arbor knot is self-tightening.
To tie line to the reel spool using an Arbor knot, follow these steps:
- Wrap the line around the reel spool, leaving a small end just enough to easily tie a knot.
- Wrap the free end of the line around the main line and tie a knot in it so that it slides along the main line
- Tie a knot at the free end of the fishing line, which will act as a stop knot and will not allow the first knot to come undone
- We wet the knot, carefully tighten it, cut off the excess end of the fishing line so that it does not interfere with winding the fishing line onto the spool
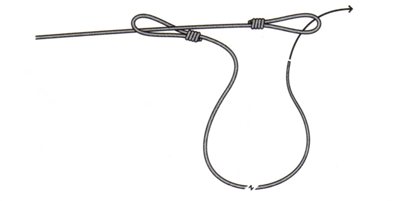
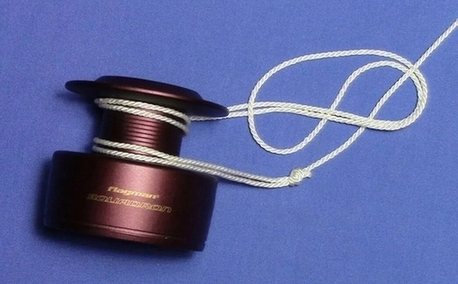
Attaching line to the reel spool using a loop
A simple and reliable way to tie line to a reel is to use a self-tightening loop. With this method of tying the line to the reel, the knot is tightened even tighter under load, does not turn, and can easily be removed from the spool if necessary.
To tie the line to the reel spool using a self-tightening loop, follow these steps:
- We make a small loop at the end of the fishing line, using a figure eight knot for this, tighten the knot tightly so that the knot is motionless
- We thread the main line through the resulting loop to form a large self-tightening loop
- We put a large self-tightening loop on the reel spool
- Rotate the reel handle to wind the line onto the spool
You may be interested in: Drop shot
If when you turn the reel handle the loop turns on the spool, remove it and put it on the other side.

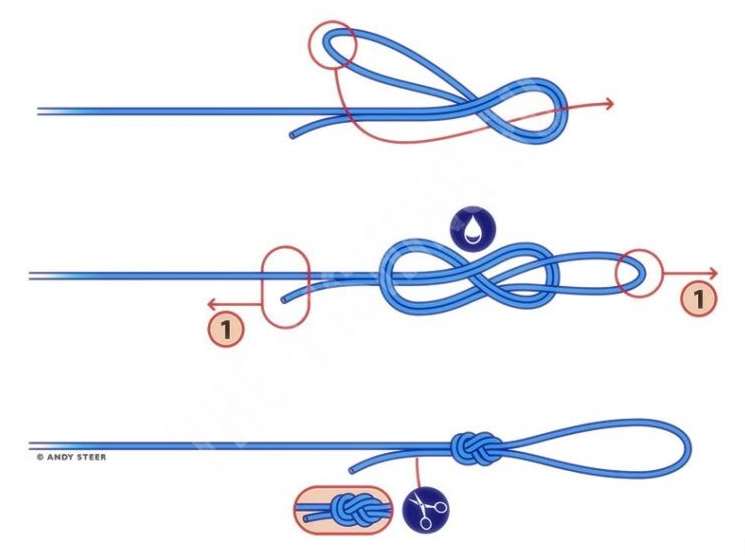
Tying the fishing line to the reel using a long loop is in many ways similar to the previous method with a self-tightening loop and is an improved version of it.
To tie the fishing line to the reel spool using a loop length, follow these steps:
- Make a loop about 15 cm long at the end of the fishing line using a figure eight knot, the knot should be motionless
- Thread the main line through the resulting long loop to create a large self-tightening loop.
- Place a large self-tightening loop on the reel spool
- Throw another round of loop over the spool and tighten the loop
- Rotate the reel handle to wind the line onto the spool
This method of tying fishing line to the reel spool has the same advantages as the previous option: it is tightened even tighter under load, does not turn, and can be easily removed from the spool if necessary.
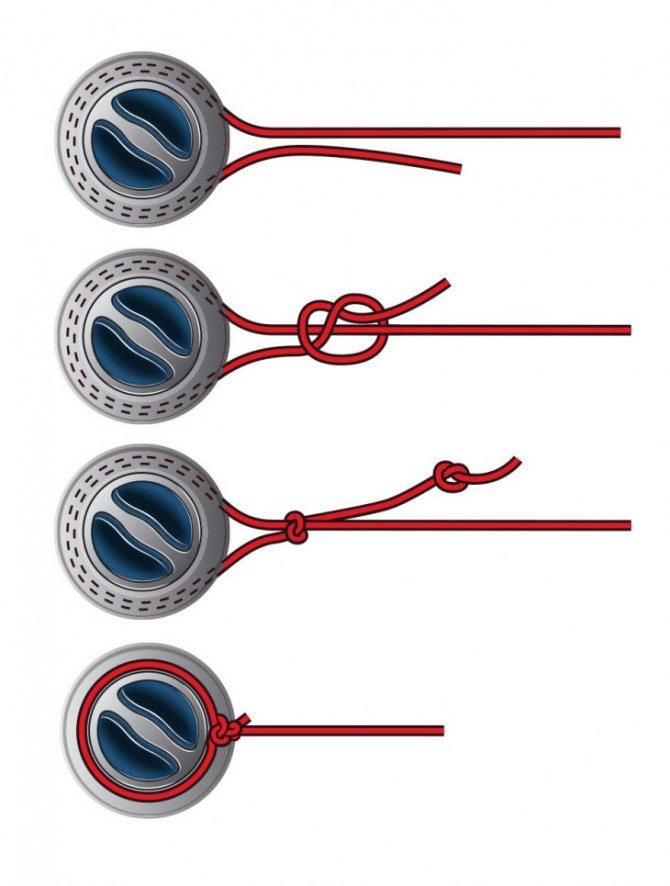
Spool Knot
The Spool Knot is used to tie line to the spool of a reel, somewhat reminiscent of the Clinch Knot.
To tie line to the reel spool using the Spool Knot, follow these steps:
- Wrap the end of the line around the spool
- At some distance from the spool, we bend the end of the line around the main line going to the spool
- We make 4-5 turns with the end of the line around the line coming from the spool
- Pass the end of the fishing line through the resulting loop
- Wet the line and tighten the knot
- We cut off the excess end of the fishing line, rotating the reel handle, and wind the fishing line onto the spool
The knot is self-tightening; the greater the load on the line, the stronger it is tightened on the spool.
How to tie a hook to a leash or line
For tying a hook to a fishing line or leash, the following knots are suitable: figure eight, bayonet, step, roller, salmon, tuna, blind. To get a simple version of the node you need:
- make a loop at the end of the fishing line and leash;
- pass the tip through the eye of the hook;
- throw around the circumference to obtain a blind loop.
Double palomar
Palomar is a well-known knot among fishermen for tying a hook or spoon to a fishing line. Braided thread is rough, so it is not suitable for knitting. Although sliding fishing line can be used if necessary, tied to a swivel, hooks or monofilament. For light knitting, it is better to use monofilament while maintaining the tensile strength of the fishing line up to 80%, and you should not use a thick thread, it is better to use a medium in diameter. For production:
- fold 2 threads parallel;
- tie a knot from the first braid;
- bend the tip parallel to the other thread;
- insert into the eye of the hook, holding the resulting loop;
- weave with leading braided thread;
- wrap around 3 times;
- insert the hook into the loop;
- wet the knot;
- tighten, trim the excess ends of the braided thread with scissors.
Uni knot
To knit this knot you need to practice a little:
- pull the braided line through the eye of the hook;
- make a loop;
- wrap the end of the braid around the main line 2-3 times;
- make a second loop;
- pass the end of the fishing line through the 2nd loop;
- make up to 7 turns around the double line;
- moisten the braid;
- trim off excess edges with scissors.
The Uni knot is best used when the fishing line is at least 60 cm long.
Shkotovy
The knot is designed for tying a hook and fishing line. Tying - step by step:
- thread the fishing line through the hook (eye);
- make 2 turns around the forend;
- moisten and tighten the ends.
In this simple way you can quickly attach a hook to a fishing line.
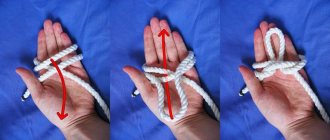
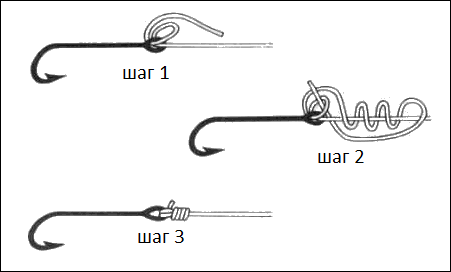
Knot Snood
Snood is a universal knot for tying a shoulder blade or hooks. Both braided and monofilament thread are suitable. The output strength reaches 95%. For knitting:
- take the hook with the sting of everyone with your left hand;
- make a loop;
- attach to the hook so that the tip moves towards the sting or pass through the ring;
- hold the edge of the loop near the ring of the shoulder blade with one hand;
- make turns with the other hand, winding it around the fore-end near the bend 2-3 times;
- throw a loop;
- Pull the long end of the line while holding the hook with your other hand.
Sliding snood
To tie this knot, there is no need to use the end of the fishing line; you can make a knot anywhere, which will become indispensable if you want to connect a hook, for example, with monofilament. Output strength. quite high. Moreover, additional fishing line can be used as fastening. So, for installation:
- take a piece of cord with one hand;
- with the other hand - a hook with the fore-end bent upward;
- make a loop from the cord, attaching it to the fore-end so that the tip points towards the sting;
- make 3 turns around the forend;
- attach working thread;
- make 2 more turns;
- tighten by pulling an additional loop;
- trim off excess ends.
Sliding snood
Loopy
To tie this knot, it is necessary to take into account that the main line must be tight. The method is suitable if the hook does not have an eye or for connecting the leash to the fishing line. The knot is quite reliable and the degree of strength will depend on the number of turns made around the main thread. For work:
- pull the end of the fishing line through the eye of the hook or ring of the leader
- place the loops along the ring, holding with the fingers of your left hand
- with your right hand, wind the free end up to 7 times
- thread the end of the fishing line into the resulting ring
- pull and tighten the knot.
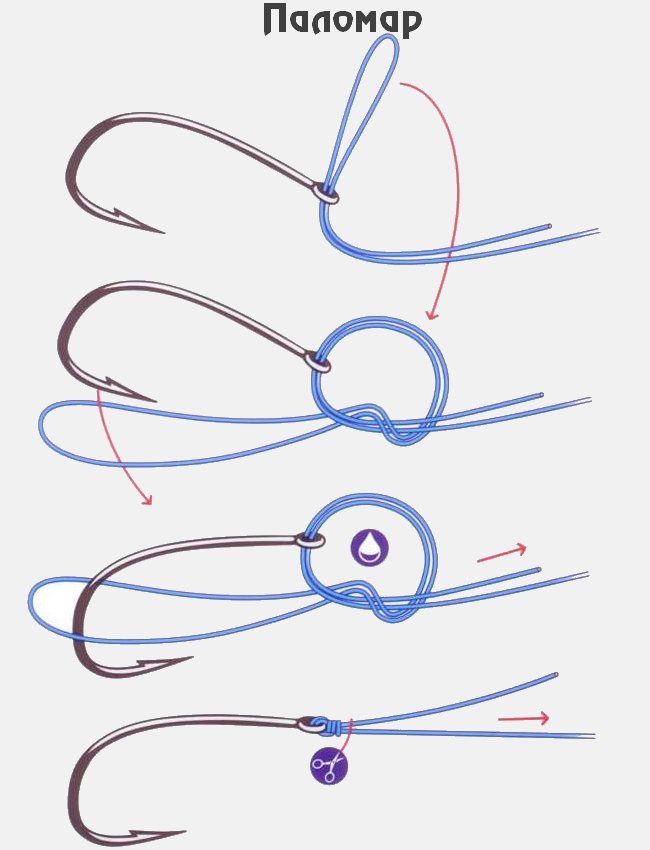
Palomar
This is the most famous knot among anglers and is best suited for monofilament. The braided thread, due to its roughness, will not tighten the knot tightly. Tensile strength – 80%. Thanks to Palomar, you can tie a hook to a fishing line or a spinner to a fishing line. So, for installation:
- fold the fishing line in half;
- pull the resulting loop into a ring of another fishing line folded in half;
- tie a ring around the circumference, making several turns;
- take the hook in your right hand, and both ends of the fishing line in your left hand;
- place the end of the loop over the shank of the hook;
- tighten the knot in this way;
- trim the ends. The Palomar knot is ready.
Blood
This is a simple knot for tying a hook, despite the terrible name, when sailors used to tie the knob in this way to a whip, which they used to beat slaves, leaving bloody marks on their backs. You can attach a sinker, jig, hooks, or spinner to the monofilament line. Tensile strength – 70%. If you have a monofilament thread with a cross-section of no more than 0.6 mm and a metal leash, you can use a locked blood knot. Tensile strength – 80%. For work:
- pass the line through the eye of the hook;
- wrap the tail around the circumference of the forearm up to 8 times;
- insert the tip of the thread through the resulting loop turns;
- make a knot, tighten;
- trim off excess ends.
Stupid leash
A monofilament thread or braid of average thickness of 0.2-0.3 mm is suitable. This leash is similar to a simple leash, but its name is not as stupid as it seems. The point is that the winding should be carried out not inside, but outside the monofilament. Eventually:
- insert the tip of the cord between the winding and the forend;
- tighten the knot and move it to the eye of the hook;
- trim off excess ponytails.
The silly leash is ready.
Regular leash
This is a good strong and versatile option for tying two thin monofilaments or fishing line to the eye of a hook or spatula. Tensile strength – up to 95%. If there is a bent ring on the hook you need:
- pass the fishing line through it, bringing it to a bend;
- turn towards the ring to form a loop;
- make 7 to 10 turns around the hook with the end of the main line;
- take the fishing line by the ends;
- pull in different directions;
- tighten the knot.
Knots for hooks, swivels, etc.
It's probably worth starting with knots that can be used to tie hooks (with an eye), swivels, etc., since they are the most common and most often used.
Palomar Knot
"Palomar" is probably the simplest and most universal knot. We can talk about its versatility forever, because it is suitable for swivels, eye hooks, spinners and wobblers, etc. It also feels good with fishing lines and braids of any type. The best knot in terms of ease of knitting/strength/reliability.
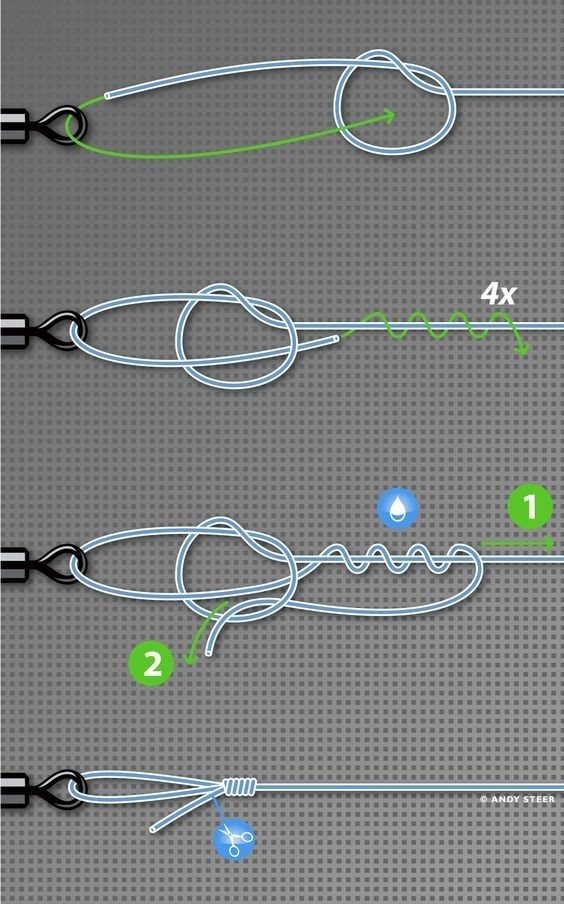
Grinner Knot
“Grinner” is another fairly popular knot that is used in the same vein. But most often for tying sinkers. For some anglers, the load-carrying capacity and strength of this knot have made it exclusively a sinker knot. Also, do not forget that due to the versatility of this knot, you can use it to tie the braid to the spool of the reel or even tie the fishing line together. It is perfect for all types of fishing line, but best for braid.
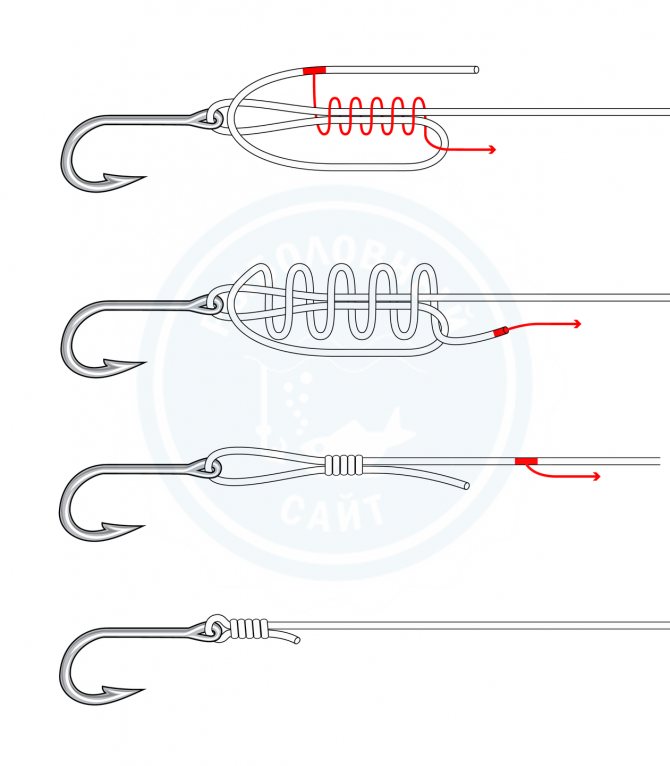
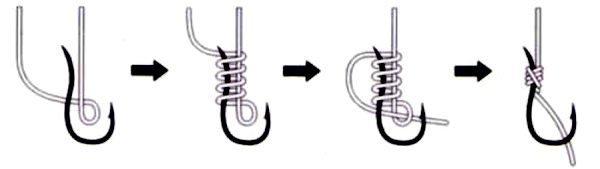
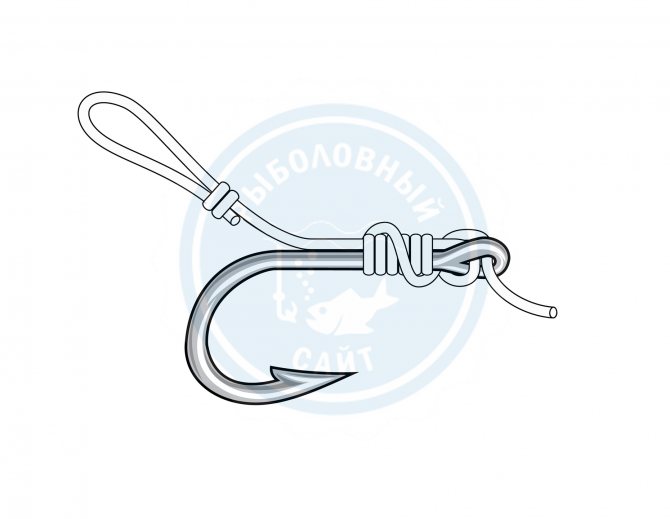
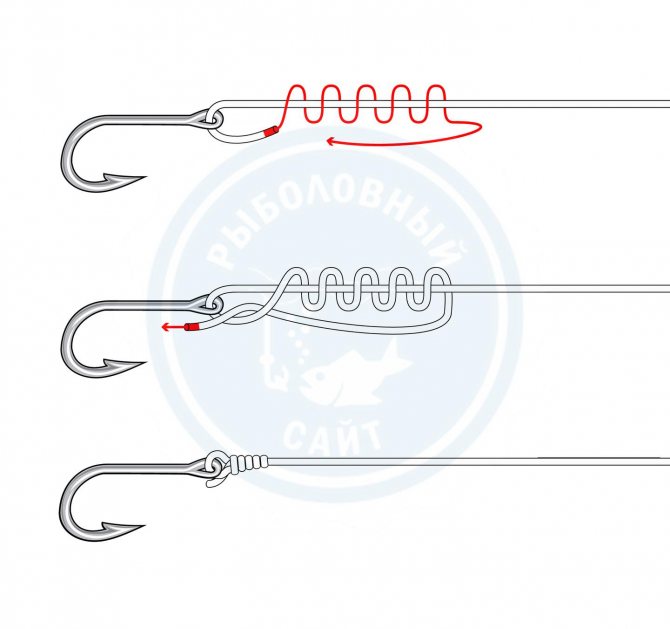
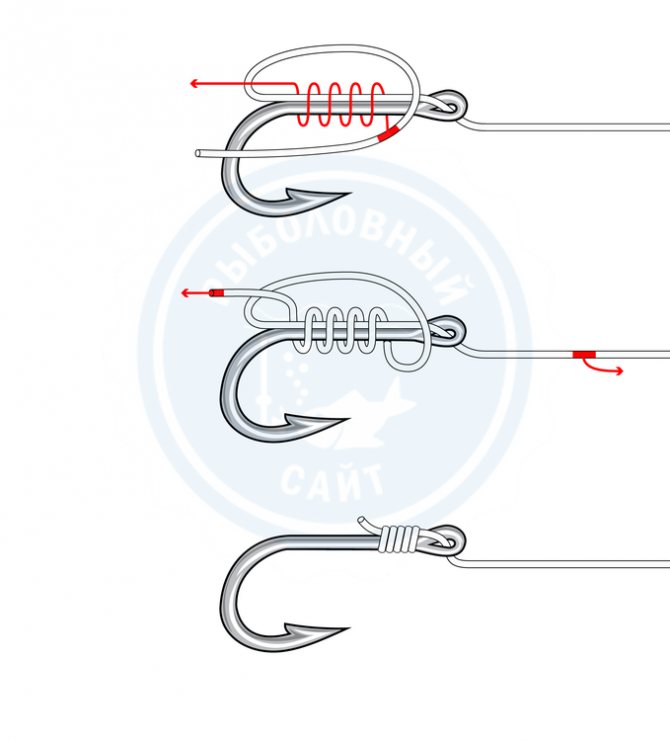
Snell knot or Snelling a Hook
"Snell" is an excellent and rather unique sea knot. It is unique, probably due to the fact that it is tied on the shank of the hook, just like knots for hooks with a spatula. And probably because it is not distinguished by its versatility like the previous ones, a purely knot for hooks. Yes, yes, it is also suitable for a hook with a spatula, but this is pointless, because... There are specialized units for these purposes.
Regarding the knitting technique, I would like to add that we recommend making a minimum of 5 turns, and not as in diagram 3. You can go up to 10, it won’t make it any worse.
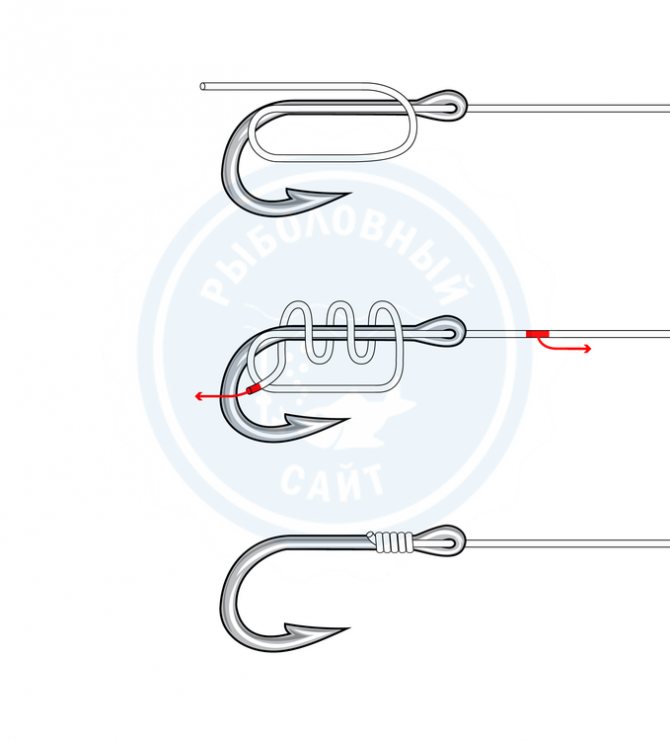
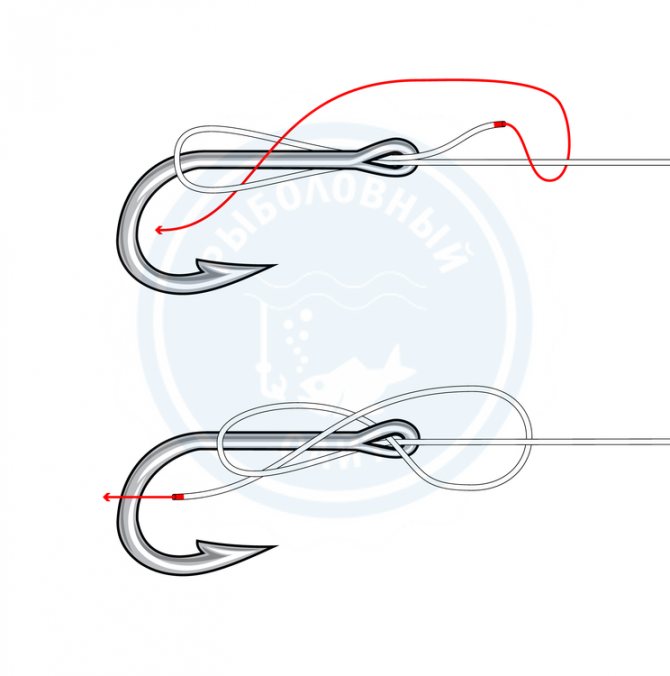
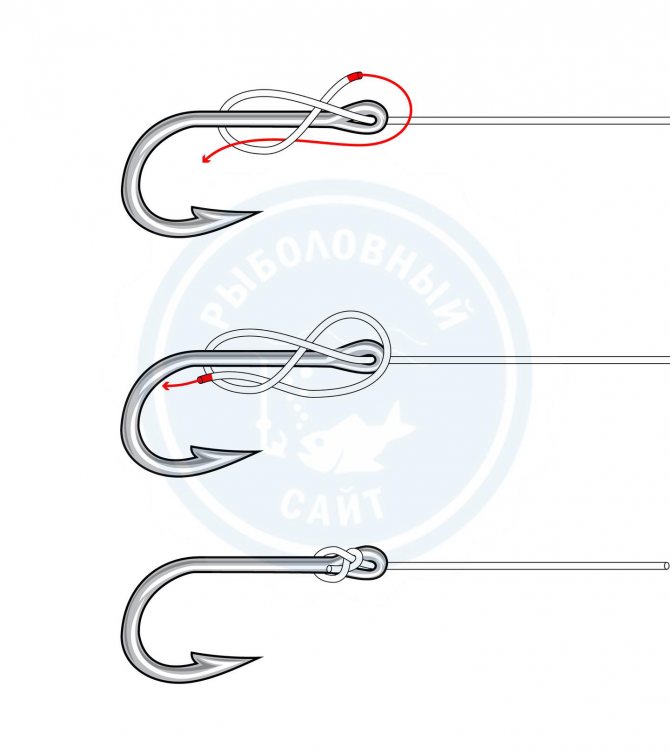
Figure Eight Knot
The “Figure Eight” is a well-known knot that is simply irreplaceable in mountaineering. But it also found its application in fishing. It’s easy to remember and quite memorable, a couple of repetitions and you’ll definitely remember it. Suitable for any type of fishing line. It contracts under tension. It was invented by the ancient Incas, but is still used today.
“Knotless Knot” or “Hair rig” for boilies (Knotless Knot)
A “knotless knot” is exactly what carp anglers can tie with their eyes closed under water and with just their little finger in a couple of seconds. The hair rig is truly popular and almost every fisherman knows it.
Since this is not such a simple knot in its execution, the rules for it are more serious. For example, it is not advisable to use fluorocab or only use it in conjunction with eye hooks. While knitting, it is better to moisten it with water so as not to damage the knot. You can also strengthen it with special glue for fishing line. And remember that such knots with turns around the shank of the hook should be smooth and without crosses or overlaps.
Clinch Knot
Marine, also known as the Clinch fishing knot. It is highly durable and relatively easy to knit; most fishermen probably use it, because in our opinion it is the best for this task.
It is also worth remembering that it is best to knit this knot with fishing line up to 0.4 mm, because with a thicker one, it will not be pulled together so tightly.
It is very versatile, suitable for absolutely everything: hooks, lines, feeders, flies, wobblers. As for hooks, it is better to use this line for small and medium hooks, and it is better to exclude very large hooks of sizes 3/0 and larger for this knot.
There are many varieties and variants of the Clinch knot, which we will definitely tell you about.
Canadian Eight Knot
An excellent analogue to the Figure Eight knot. This knot is best knitted on monofilament fishing line, and avoid braided line altogether. You can tie this knot very easily and quickly remember. By the way, if you want, you can untie it, which cannot be done with most knots.
Domhof Knot
The Domhof Knot is a strong knot used primarily in the Hinged Stiff Rig and Chod Rig.
We recommend using this knot only with medium-thick fishing line, excluding very thin fishing line. Due to the strong bend in the eye of the hook, the strength is greatly lost, but this drawback can be eliminated by using this knot for tying a hook with a blade.
How to tie a fishing line to a fishing rod
For tying fishing line to a fishing rod, a connector is the most profitable option, but you don’t need to choose from cheap models in stores. It is worth paying attention to the lock, which should not have easy movement. It takes some effort to move. Requirements for the nozzle - full compliance in size with the whip or the tip of the fishing rod, smooth surface, absence of burrs to avoid rapid chafing of the fishing line, fairly tight fit in the fishing rod or along the surface of the circle.
Using a connector or blind attachment
Stages of work:
- make a loop at one end of the fishing line, without tightening it too much;
- attach a hook or leash with a sinker to the other end of the fishing line;
- open the connector lock;
- loop the hook, pull the edge slightly;
- secure the resulting structure with a lock.
Use plastic connectors, but not too fragile ones that will break quickly. The most reliable are metal, but over time they become rusty from water. Although due to them you can quickly and easily change equipment.
Big book of knots. Fishing, hunting, sea, tourist, mountaineering, household, page 1
Valery Anatolyevich Demus
Big book of knots. Fishing, hunting, sea, tourist, mountaineering, household
© DepositPhotos.com / kotomiti, Zetor2010, stocksnapper, cover, 2014
© Book Club “Family Leisure Club”, edition in Russian, 2014
© Book Club “Family Leisure Club”, artistic design, 2014
© Book Club “Family Leisure Club” LLC, Belgorod, 2014
Introduction
Throughout its entire development, humanity has been accompanied by tools, the creation of which required numerous combinations of dissimilar objects. The easiest way, accessible to everyone and requiring a minimum amount of skills, is connections using ropes and knots. The first knots appeared several thousand years ago, and since then they have continued to be used as actively as before.
Today, humanity knows several hundred types of knot joints, which continue to be replenished with new decorative and utilitarian knots.
In this book we will consider only a small part of the knots, divided into groups according to the scope of application: marine, mountaineering, tourist, speleological, fishing, hunting, decorative and household. In addition, the book offers a small, highly specialized group of tie knots.
To simplify the description of the most frequently repeated actions in knitting patterns, the following nautical terms are used:
Closed loop (pin)
– a loop on a cable, the ends of which intersect each other (Fig. 1,
b
).
Root (root) end
- the end of the cable, which, as a rule, remains motionless when tying a knot.
Open loop
– a double-bent cable with ends that do not cross each other (Fig. 1,
a
).
Obnos
- a rope wrapping around an object, made in such a way that both ends do not intersect (Fig. 1,
c
).
Half knot
– a single overlap of two different ends of one cable or two ends of different cables.
Running end
- the loose, free end of the cable used to tie a knot.
Schlag
– a complete rotation of the gear around the object (Fig. 1,
d
).
Half bayonet
– carrying around an object with a cable, followed by crossing its ends at right angles (Fig. 1,
d
).
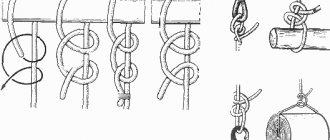
Rice. 1.
The main elements used when tying knots:
a
– open loop;
b
– closed loop;
c
– run-out;
g
– hose;
d
– half bayonet
A Brief History of Knots
It is difficult to establish the exact time of the appearance of the first wickerwork. Unfortunately, due to the fragility of materials, the knots used at the early stage of human development have hardly survived. But, according to anthropologists and archaeologists, the skills of weaving from grass, bark and leather among primitive people appeared long before the ability to use fire and the creation of primitive tools. Over time, these skills developed rapidly. The range of applications for such connections was wide: from making primitive baskets and traps, tying stone spearheads and axes to making the first boats. In parallel, there was a development of knots used for decoration, knots associated with the first primitive forms of religion. The oldest examples of rope were found in the Sinai Peninsula and date back about 20,000 years, but the oldest knots were discovered in Finland and date back to the Neolithic period.
During the Bronze and Early Iron Ages, man's ability to knit knot joints improved, and their development was not characteristic of any one area, but occurred everywhere where man lived.
A large number of finds, as well as drawings, sculptures, and legends indicate their widespread use in completely different fields of activity.
During excavations of the burials of the pharaohs, models of “ships of the dead” were discovered, on which, according to the beliefs of the ancient Egyptians, their rulers were supposed to travel to the afterlife. The planks that made up the hull of such a ship were tied together with ropes. And during a study in 1954 of the remains of the sailing ship of Pharaoh Cheops, which had a fairly developed rope rigging, a well-preserved complex arbor knot was found. Even the entrance to the tombs of the kings of Egypt was tied with a bleached knot. Another archaeological find discovered near the city of Vyborg dates back 5,000 years - a complex woven network with stone weights, on which remains of straight and bleached knots have been preserved. The ancient Inca tribes developed a highly effective knotted script, the quipu, based on a simple knot.
A significant amount of information about the types of knots and their application was provided by the study of the heritage of Ancient Greece and Rome. In the cultures of these peoples, knots performed not only utilitarian functions, but also reflected a religious and mystical idea of the structure of the world. It is worth recalling at least the famous “Odyssey” of Homer, in which he describes the bag of Aeolus with the winds enclosed in it, which was tied with a magic knot. The legendary Hercules, son of Zeus, having defeated the terrible Nemean lion, used its skin as armor, tying its front paws on his chest with a knot, later named after this ancient Greek hero. No less famous is another knot that appeared during that period - Gordiev. In the Phrygian temple of Zeus, located in Asia Minor, there was a cart with oxen, the yoke of which was tied with a complex knot. According to the oracle, the gods will give power over the world to the person who can untie it. For 400 years, no one was able to cope with this task, and only Alexander the Great solved it by cutting the legendary knot. In ancient Rome, nodal joints were so important that they were credited with medicinal properties. Pliny the Elder in his work “Natural History” describes in detail the healing properties of the Hercules knot and recommends its use for the treatment of wounds.
Rope knots became especially popular in the Middle Ages, which was facilitated by the development of navigation. The rapid development of trade and the desire to discover new rich and undeveloped territories required the creation of large sailing ships with complex rigging and a large number of components. For many years, until the advent of the steam engine, the navy became the basis for the accumulation and further development of units. The improvement of decorative and mystical knots also continued. If you carefully examine the architecture and fashion of the Renaissance period - richly embroidered clothes, beautiful lace weaving, numerous bracelets and necklaces and even heraldic signs - many of them are based on symmetrical decorative weaving.
When the New Age arrived, significant changes occurred in the development of nodes. The Industrial Revolution contributed to the emergence of a large number of fairly cheap metal fasteners. The horses were replaced by technology. In the fleet, it was not the sail that began to dominate, but the engine. New synthetic materials have appeared. All this changed the scope of use of hub connections and led to a reduction in their number. It would seem that the era of knots is becoming a thing of the past. However, interest in them did not fade away, but moved to a new level. Their decorative group began to develop at a faster pace. Utilitarian connections were mastered in new areas - sports (tourism and mountaineering are rapidly developing), speleology, fishing, rescue work, yachting. They continued to be used in traditional areas - cargo handling.
In the twentieth century, thanks to the development of the exact sciences, more attention began to be paid to the theory of knots and the systematization of knowledge about rope connections. Even the foundations of nausistics were formed (from the Slavic word nauz
- “knot”) - a science that studies knots, their classification, and methods of knitting. Experts study and classify not only joints, but also, with the help of modern physics and mathematics, they study the strength characteristics of joints, their “behavior” on new synthetic materials, and their dependence on the external environment and loads. In the 30s and 40s of the last century, several of the most complete illustrated codes were published, giving an idea of the variety of knots.