Advantages of using feeder fishing
The clear advantage of using such a connection is that the adhesion is quite strong, and the ends of the two connecting elements can be cut to the very base. For feeder fishing, reliability is perhaps the main indicator, since in addition to a leash with hooks and a load, a fairly heavy feeder takes part in fishing.
Another purpose of a surgical knot is to connect two fishing lines of different diameters in places where the gear is snagged or broken during fishing. You can quickly tie up a torn leash or pendant so that strength can be ensured only with the help of such adhesion of the elements.
But in reality, this rig is very similar to the “double runner”, since it is also performed taking into account two revolutions. The functional differences lie in the fact that when knitting it, you can choose the size of the fishing line for the leash, in accordance with the size of the fly.
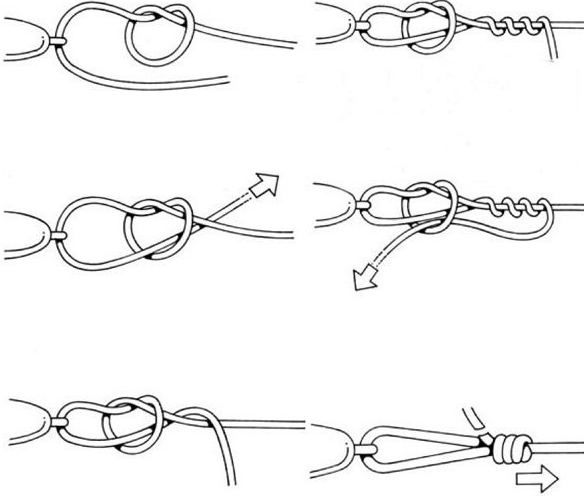
The weaving pattern and technology is as follows:
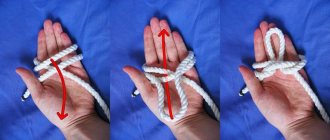
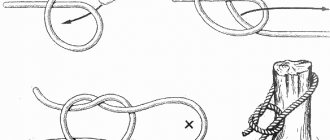
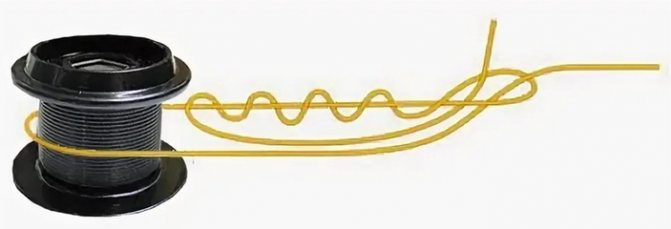
- Place the main line and leader together.
- Form a loop out of them and pass both ends through it.
Photo 1. We fold two fishing lines and form a loop.
Photo 2. We make another overlap of both lines.
In fishing, in addition to the double surgical knot, a triple knot is also used, which involves pulling the ends of the leash and leader through the loop a third time. However, such an element turns out to be bulky and wide, so it is intended only for thick fishing lines and massive gear for large fish.
Like every element of the connection of the feeder equipment, the surgical unit has its drawbacks. In this case, these are dimensions. During the tying process, the clutch gives a slight bend and slope of the main line at a slight angle.
In what cases is a surgical knot tied?
As a rule, when preparing fishing gear, synthetic cords and fishing lines are used, the ends of which must be tightly fixed. Knots in the rig are tied to secure a leash, feeder or fastener, as well as in cases where it is necessary to connect the two ends of the fishing line to each other.
Today, the following combinations of units are needed to prepare feeder gear:
- for leashes and hooks;
- for attachment to reels;
- surgical node;
- surgical loop.
For fishing on a feeder, traditional knots do not perform well enough.
Under the influence of significant loads, they do not hold the equipment well, so a surgical unit is preferable when installing such a structure. It has been noted that such gear fails only in 3-5% of a hundred, and only in those cases when it clings to an insurmountable obstacle at the bottom of the reservoir. This is interesting!
It is a known fact that sailors who use this clutch in practice call it a “surgical knot,” and doctors performing operations, on the contrary, consider it a naval invention. In addition, equipment using a surgical knot allows you to connect fishing lines of different diameters, use monofilament as the main one, and firmly connect it to the leash. Moreover, in addition to monofilament and carbon fishing line, the clutch can be knitted using ordinary braid.
If the expected load on the tackle during fishing may exceed 25-27 kg, the knot must be performed on a thick fishing line.
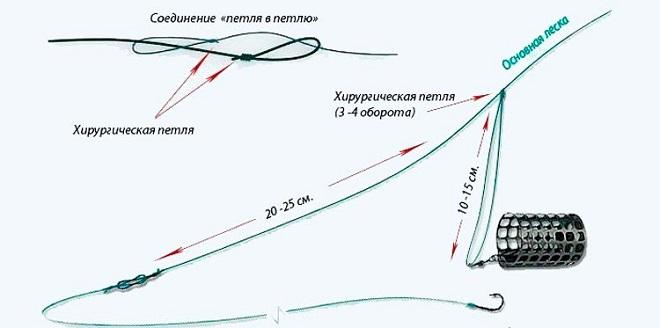
Knot based loop
This element of the tackle is knitted on the basis of a double running knot and is intended for connecting two loops, a leash or tying a feeding trough for complementary feeding. Using a loop allows you to give the bait a natural movement in the water.
Loop execution diagram:
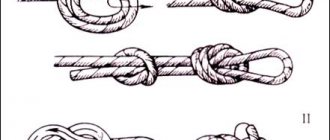
- Fold the fishing line in half and form a loop on it.
- Tie a simple knot without pulling it tightly.
- Thread the loop through the knot.
Photo 3. We form a knot on a fishing line folded in half.
The loop is tied in the same way as a knot, and is considered the strongest connecting element of the tackle.
Surgical loop – How to knit Fishing knots video
Fishing knot Surgical loop (Surgeon's Loop knot) for attaching leashes and sinkers using the loop-in-loop method video - How to knit “Fishing knots” you can watch online in good quality on our website. Enjoy watching!
Fishing knot A surgical loop, also called by fishermen an end loop or a leader loop. Due to its simplicity and exceptional strength, the Surgical Loop Fishing Knot is very popular among anglers. The surgical loop is suitable for knitting loops on both monofilament and braided lines.
To ensure that the Surgical Loop knot made of slippery braid does not “float”, instead of two turns it is better to make three or four turns of the loop. To learn the Fishing Knot Surgical Loop correctly, just watch this video. It has found wide application in fishing practice. In particular, when knitting non-tightening end loops on a fishing line, for connecting the leash to the main fishing line using the “loop to loop” method, etc.
Using a knot and a loop in various rigs
When fishing on a feeder, fishermen use equipment of various designs. The most common of them are asymmetrical and symmetrical loops and Gardner's loop. They have the same purpose and functionality, but there are significant differences in installation and method of fastening. And, when installing these structures with your own hands, you can use a surgical knot or loop in all of them.
Gardner's loop
Intended for fishing both on rivers with strong currents (bream or roach) and in still waters (crucian carp). When installing the equipment, it is necessary to knit three surgical loops:
- At the end of the rig, to connect it to the main line.
- In the middle (the loop is made large), for attaching a feeder with complementary foods.
- Leash loop. Knit 2-3 cm below the main line.
Symmetrical loop
Since the equipment is made quite sensitive and is intended for catching crucian carp in ponds and lakes, it is better to attach the swivel with a carabiner to a double piece of fishing line after twisting its ends. It is in this place, at a distance of 6-10 cm from the edge, that a surgical knot is made.
Asymmetrical loop
It is generally accepted that an asymmetrical loop when fishing on a feeder is intended only for sensitive fishing of small individuals. However, this is not quite true. The very purpose of the gear is based on the fact that the leash with bait is located in the same plane, and the feeder with bait goes to the side.
Most often, when installing an asymmetrical loop, monofilament is used, so a surgical knot for coupling the elements on it is suitable here like no other.
If you have various equipment for the feeder in your arsenal, and you are used to experimenting, changing them directly while fishing, use a surgical knot or loop when tying, ensuring high reliability of the equipment.
When determining the methods and methods of installing feeder equipment, and the use of certain knots and loops when tying, be sure to take into account the place in which the fishing will be done. All elements are tied and adjusted taking into account calm water or strong currents, the planned volume and weight of the fish.
Features of asymmetric design
With the growing popularity of feeder fishing, the number of options for mounting equipment is constantly increasing. The most common and catchy installation is rightfully considered an asymmetrical loop, which has proven itself in catching a wide variety of fish.
This installation cannot be called the simplest, but the effort spent on its manufacture will more than pay off during the fishing process. Some feeders do not fully understand the operating principle of such a design, so they prefer to fish with paternoster-type equipment that is easier to manufacture.
This approach greatly limits the angler’s capabilities, especially when fishing for wary fish in the current.
The principle of operation of this equipment is based on the difference in the length of the arm of the large loop in relation to the small ones, to which the leash and the main fishing line are attached. A swivel with a carbine is installed on the long arm of the main loop, to which the feeder will subsequently be attached.
The short arm is in a tense position during fishing, which ensures instant transmission of the bite to the tip of the feeder. It is better to knit this feeder equipment in the comfort of your home.
In feeder fishing, snags often occur, leading to equipment breakage, so the angler should immediately make several spare rigs. This design is best used in reservoirs with moderate currents, where it can fully reveal its capabilities.
Choosing a knitting line
You need to knit an asymmetrical loop on a separate piece of monofilament or fluorocarbon monofilament thread. The structure can be tied on a fishing line with a thickness of 0.22–0.3 mm. The thickness of the monofilament is selected taking into account how capricious the fish bite is.
The more careful the fish, the thinner the monofilament used for installation should be. At the same time, the fisherman should not get carried away with using lines that are too thin, since they are more susceptible to tangling.
Well-known feeder Alexey Fadeev recommends using only fluorocarbon monofilament for mating asymmetrical structures, as it has a number of advantages over monofilament:
- invisible in the water, which is important when fishing for wary fish;
- has virtually no “memory”, which has a positive effect on the sensitivity of the tackle and prevents overlaps during casting;
- has a low elongation coefficient, which also increases the sensitivity of the equipment;
- has high resistance to abrasive loads, which is very important, since sharp stones and shell rock are often present in the fishing area;
- practically does not lose its strength at the knot, which increases the reliability of the gear.
In addition, “fluorocarbon,” unlike monofilament fishing line, is not susceptible to the destructive effects of ultraviolet rays and does not lose its strength characteristics over time. According to the experience of Alexey Fadeev, equipment tied from fluorocarbon fishing line lasts 3-4 times longer than the “monofilament” version.
Additional items
The asymmetrical loop includes several additional elements, which include a swivel with a carabiner and a leash with a hook. Since during power casts of a heavy feeder the equipment experiences heavy loads, the choice of swivel should be approached very responsibly.
A low-quality swivel will quickly fail, which can result not only in the breakage of the entire equipment, but also in the loss of good fish.
In feeder fishing, medium-sized swivels and carbines made by trusted manufacturers are used. The length of the leash can be a determining factor on which both the quality and quantity of bites will depend.
A long leader better marks the bait in the current and gives it additional action, which in turn attracts fish. However, a bait actively moving in the water flow may not always arouse the fish’s interest and provoke it to bite. If underwater inhabitants are inactive, it makes sense to use short leashes that press the bait closer to the bottom and limit its movements.
The usual leash length when fishing with an asymmetrical rig is about 60–90 cm.
Since an asymmetrical design is usually used for catching passive fish, the size and weight of the hook should be minimal (within reasonable limits). In such equipment, hooks No. 20–16 are often used, which ensure natural behavior of the bait.
Installation of an asymmetrical loop
To quickly and correctly tie an asymmetrical loop, the fisherman will need to have some experience in knitting such rigs. Beginner feeders, after several unsuccessful attempts at making this installation, switch to the classic “paternoster”, without ever learning all the advantages of the asymmetrical design.
Meanwhile, if you approach the matter responsibly, you can quite quickly make several catchy rigs with your own hands.
The process of making an asymmetrical loop consists of several stages:
- A meter-long piece of fluorocarbon or monofilament fishing line is folded in half;
- A small loop with a diameter of 0.5–1 cm is knitted at the fold;
- Holding the loop with the index fingers of his right hand, the angler twists the free ends of the fishing line with the index fingers of his left hand at a distance of 5–7 cm above the loop;
- To fix the twist at a distance of 5–7 cm from the loop, a simple “grandmother’s” knot is knitted with the free ends threaded three times;
- A swivel with a carbine is put on one of the free ends of the fishing line;
- 30 cm above the twist, the free ends are tied in such a way that the section with the swivel has a horizontal hang of 2–3 cm;
- One of the ends remaining after knitting is cut off, and a small loop is formed on the other, to which the main monofilament will be attached.
If the loop is connected correctly, then overlapping of the equipment during casting is practically eliminated.
After the final stage of assembly, you should carefully check the reliability of all components, since the structure experiences serious loads not only during landing fish, but also when casting.
Some subtleties
Experience suggests the need to identify the main factors affecting the quality of the loop:
- Be sure to use a rigid fishing line, preferably fluorocarbon. The material is quite dense and resistant to abrasion;
- It is important to choose the correct twist length. If the length is excessively long, an overlap appears; if such conditions occur, it is worth tightening the knot to 6-8 cm;
- for passive fish, it is worth increasing the length of the leash, and when the bite becomes more active, the length can be reduced;
- Before casting, always check the freedom of movement of the feeder. If there are problems, it should be replaced.
An asymmetrical loop can be used for 2-4 active fishing trips, but each time it is better to check the reliability of the fastening and take spare gear. Due to the complexity of making a fishing loop, it is worth preparing several knots from home. It is better to carry loops in a special box or bag. Source: “intellifishing.ru; rybalka.guru"
Clinch Knot fishing
The clinch knitting method has several types. A simple (ordinary) “clinch” is used where special strength is not needed. For example, on a diverting leash for cargo. In case of a snag, it is better to tear it off altogether to avoid tearing the entire tackle. Knitting algorithm: thread the cord tip into the eyelet; turns around 3-5 times; is inserted into the resulting loop, but is pre-wetted and tightened. The excess cord is cut off. “Double clinch” – quite strong, used for cords.
In addition to the strength advantages, it should be noted that there are negative aspects:
• It should not be used with fishing line Ø from 0.4 millimeters. With a diameter larger than the specified one, it is not possible to tighten it tightly enough, which, in turn, will lead to the loss of the bait and trophy.
• It should not be used for braided cords with an even surface layer: when loaded, the knot will slip off.
Palomar ("palomar")
These are very reliable and lightweight knots for fishing, which are used for any fishing line and especially for braided cords.
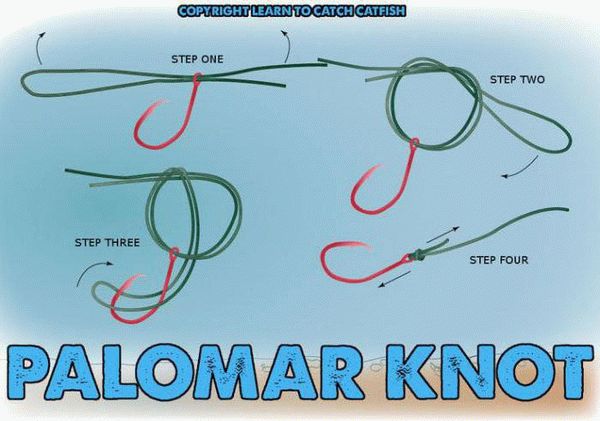
The knitting process is extremely easy: you need to fold the free tip in half and pull it through the eye of the hook, then pull the hook (swivel, bait) through the resulting loop and pull off the pre-moistened knot.
For braided fishing line (especially with a slippery surface), the “double palomar” is especially suitable. And the “triple palomar” is used to connect spoons, jig heads, sinkers, and feeders.
"Uni"
This is one of the strongest knots for attaching hooks and lures, as well as most lines and cords. In addition to this, Uni is an excellent replacement for the clinch, because it completely lacks the disadvantages of the latter:
- The free end of the fishing line is pulled through the hook ring, the latter is pressed against the main fishing line
- A small piece of double fishing line is left, the free end is turned to the hook ring and 6-7 turns are made around the double fishing line, after which it is pulled through the resulting loop.
- The pre-moistened knot is pulled down.
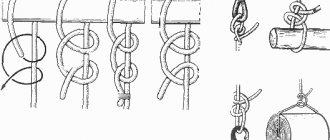
Knitting an “Improved Loop”
It has a very sonorous English name - Perfect Loop - given because of the increased reliability of the connection and ease of knitting. If you make such leash fishing knots correctly, you will get a straight line between the main and retracted fishing lines, which is very convenient.
- To knit, you need to pass the end under the fishing line so that the first loop is formed.
- Next, you need to repeat the operation, making the second loop in the same way.
- Then you need to pass the end of the fishing line through both loops.
- Then you need to thread the upper loop (the second one made) into the lower one (the first).
- And finally, you need to tighten the ends tightly - the knot is ready.
Non-Slip Loop
When it is necessary to give the bait extra freedom, this knot is most useful. It will provide a fixed loop that allows the bait to rotate easily, unlike the uni and clinch.
It is necessary to clarify that the Non-Slip Loop is an excellent replacement for the Rapala knot, popular among anglers, but it is not inferior in reliability and is much easier to tie, which is required by active fishing. Non-Slip Loop fishing knots are popular among anglers who already have some experience.
Gardner's loop is a type of paternoster
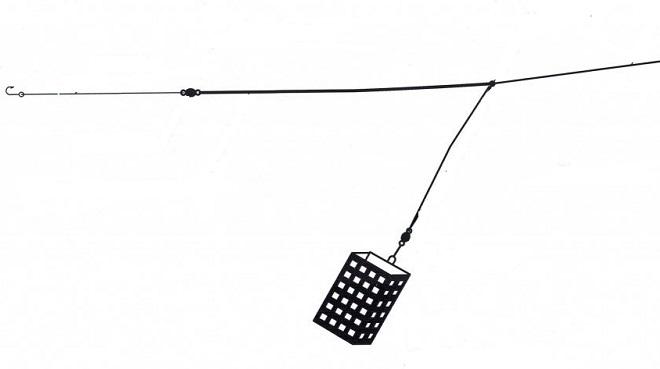
- The feeder equipment is a Gardner loop in terms of the mechanics of its operation - the same as a paternoster, or in our opinion - a blind feeder at the end of the fishing line and a retractable leash. It’s just that, unlike the bottom outlets we are used to, this equipment is more effective. A hook is made to the leash from a thick fishing line, the same one that is used as the main one.
- The length of the branch exceeds the length of the fishing line to the feeder and ends with a loop into which the leash is attached. In general, the leash together with the outlet turns out to be much longer than the distance from the point of its attachment to the base to the feeder. But, thanks to the thick, rigid and long lead, it does not get tangled when casting or reeling in the feeder.
- The Gardner paternoster for the feeder differs from the classic one only in that the outlet to the feeder is made on a loop. In the classic form, this shoulder is made from a weaker and thinner fishing line - specifically so that when hooked, the feeder comes off, and not the leash with the fish.
- According to legend, the famous fisherman Steve Gardner from England came up with this rig when he watched his wife while fishing for a long time could not tie a regular installation on a tap. In England, this editing is simply called “Loop”, which means “loop”. And already in our country this type of paternoster is called the Gardner loop.
Gardner's paternoster
Which is better, a Gardner's loop or a classic paternoster? In terms of operation, these are absolutely identical installations. The Gardner rig is easier to knit - one knot to form a loop. At the remaining end there is a loop for a leash. We don't need the function of tearing off the feeders. On the contrary, it’s better to let the fish come off when hooked than to tear off an expensive feeder. It’s just that the classic paternoster comes from England, from a time when feeders were not yet used, and losing a cheap sinker instead of a fish was considered normal there. Read more about paternoster feeder equipment.
Regular paternoster
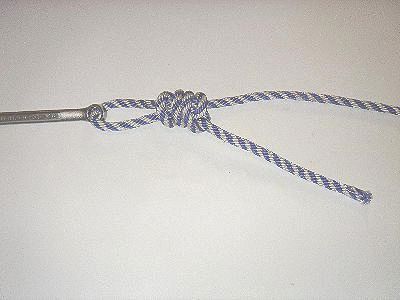
“Blood knot”
It also has the name “snake” and is a representative of durable fishing knots. Found an application when it is necessary to attach two fishing lines to each other, but preserve their strength properties. In fly fishing, it is used to tie a leash with a small diameter of fishing line, onto which the fly is then attached.
The main negative aspect of the “bloody” knot is the difficulty of tying it, so an inexperienced fisherman needs practice and endurance.
In order to knit it, you need to fold the loose ends about six to eight centimeters long. Then the end of one line is wrapped (4-6 times) around the other, then the end comes back and is threaded into the previously formed loop at the beginning of the wound.
The knots are tightened by pulling the free ends of the fishing line, and the excess length is cut off. Do not forget to pre-wet the material.
An additional advantage of the described knot: it can be used to tie fishing line with different diameters. However, it is necessary to remember: the smaller the diameter of the leash in relation to the diameter of the main line, the worse the performance of the described knot. The maximum ratio of the diameters of the tied lines should be two. For example, when fishing lines with Ø 0.2 and 0.4 are tied, then the strength characteristics of the knot are greatest. In the case of Ø 1.0 and 0.2, then there is a huge probability that the knot will be fragile. However, if such an option is extremely necessary, then it is necessary to double the too thin fishing line.
Instrumental method
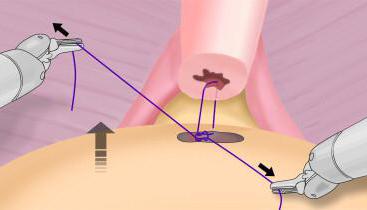
How to tie surgical knots using the instrumental method? The manipulation is performed in several successive stages. The long end of the thread, after stitching the fabrics, is fixed in the left hand, after which it is wound clockwise onto a needle holder held in the right hand.
By spreading the jaws of the instrument, grab the free end of the thread and pass it through the formed loop. The knot is tightened by moving it towards the tissues.
If additional fixation of the seams is necessary, the procedure is repeated, winding the thread around the needle holder, but in the opposite direction. To tie knots, you can use two tools.
Double Uni Knot
It is considered one of the best knots for fishing. Because thanks to simple knitting, even a novice fisherman can master it.
Fly fishing is characterized by its own characteristics. Double Uni Knots are ubiquitous among anglers for fishing (tying a thin fluorocarbon leader to thick line) and any other type of fishing where two lines need to be joined together.
For this purpose, it is necessary to fold the free ends of the fishing line and cord towards each other. Then wrap the tied cord three times with the free end of the fishing line, after which they are tightened. And then the same procedure is repeated with the cord. At the end, you get 2 knots: on the fishing line and on the cord. And at the end of the procedure, it is necessary to pull the fishing line and cord in opposite directions. This is how the knot is fixed. Excess length is removed.
Knots for tying fishing line to reel
Arbor knot
The Arbor knot is the simplest and most reliable knot for tying fishing line to the reel spool. The knot has an ancient history; in old times it was used to tie the string to the bow. By design, the Arbor knot is self-tightening.
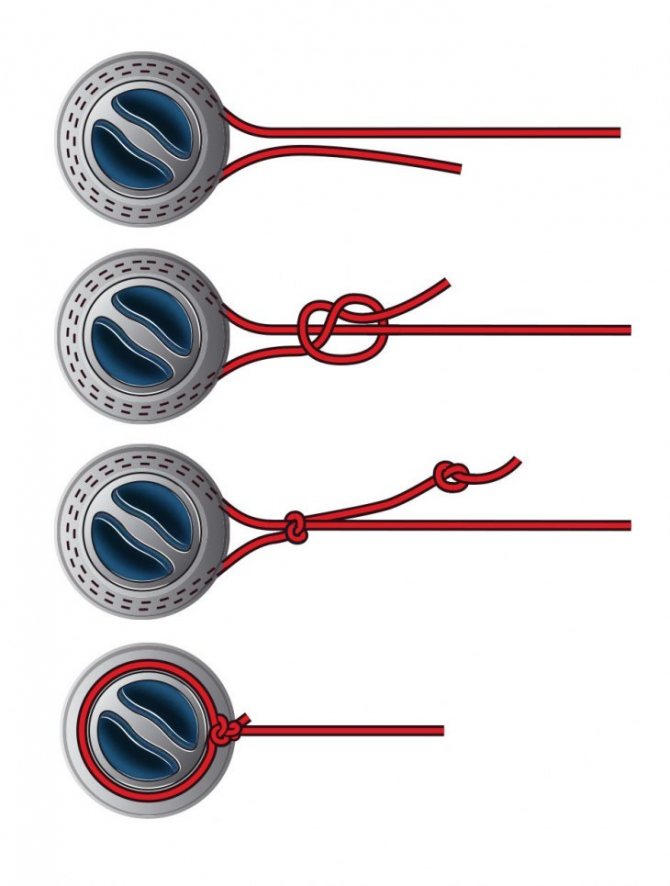
To tie line to the reel spool using an Arbor knot, follow these steps:
- Wrap the line around the reel spool, leaving a small end just enough to easily tie a knot.
- Wrap the free end of the line around the main line and tie a knot in it so that it slides along the main line
- Tie a knot at the free end of the fishing line, which will act as a stop knot and will not allow the first knot to come undone
- We wet the knot, carefully tighten it, cut off the excess end of the fishing line so that it does not interfere with winding the fishing line onto the spool
Attaching line to the reel spool using a loop
A simple and reliable way to tie line to a reel is to use a self-tightening loop. With this method of tying the line to the reel, the knot is tightened even tighter under load, does not turn, and can easily be removed from the spool if necessary.
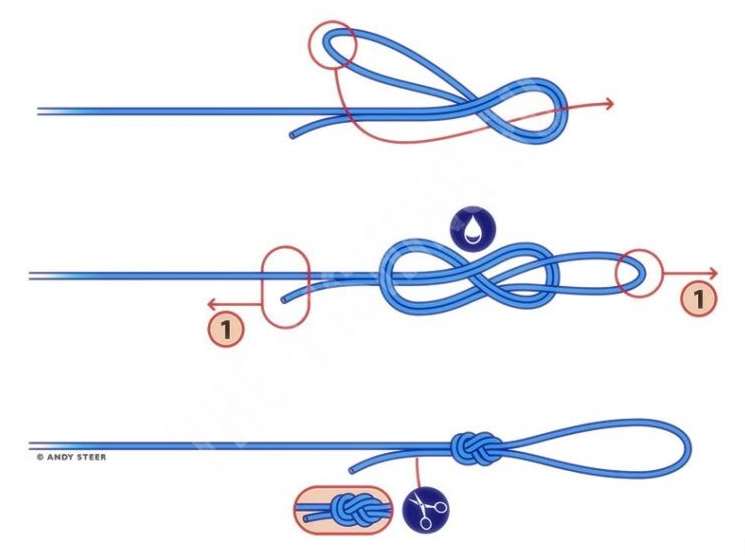
To tie the line to the reel spool using a self-tightening loop, follow these steps:
- We make a small loop at the end of the fishing line, using a figure eight knot for this, tighten the knot tightly so that the knot is motionless
- We thread the main line through the resulting loop to form a large self-tightening loop
- We put a large self-tightening loop on the reel spool
- Rotate the reel handle to wind the line onto the spool
You might be interested in: Mandula
If when you turn the reel handle the loop turns on the spool, remove it and put it on the other side.
Tying the fishing line to the reel using a long loop is in many ways similar to the previous method with a self-tightening loop and is an improved version of it.
To tie the fishing line to the reel spool using a loop length, follow these steps:
- Make a loop about 15 cm long at the end of the fishing line using a figure eight knot, the knot should be motionless
- Thread the main line through the resulting long loop to create a large self-tightening loop.
- Place a large self-tightening loop on the reel spool
- Throw another round of loop over the spool and tighten the loop
- Rotate the reel handle to wind the line onto the spool

This method of tying fishing line to the reel spool has the same advantages as the previous option: it is tightened even tighter under load, does not turn, and can be easily removed from the spool if necessary.
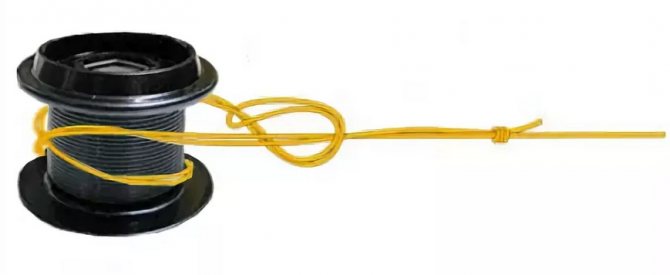
Spool Knot
The Spool Knot is used to tie line to the spool of a reel, somewhat reminiscent of the Clinch Knot.
To tie line to the reel spool using the Spool Knot, follow these steps:
- Wrap the end of the line around the spool
- At some distance from the spool, we bend the end of the line around the main line going to the spool
- We make 4-5 turns with the end of the line around the line coming from the spool
- Pass the end of the fishing line through the resulting loop
- Wet the line and tighten the knot
- We cut off the excess end of the fishing line, rotating the reel handle, and wind the fishing line onto the spool
The knot is self-tightening; the greater the load on the line, the stronger it is tightened on the spool.