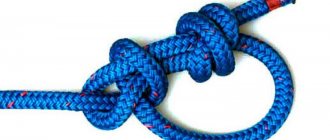
One of the main components in mountaineering is the Austrian guide. It is a loop in the middle or end of the rope, at an angle of 90 degrees to it, the ends are not exactly parallel. Thanks to a special knitting technique, it does not change shape even under heavy load and easily unravels after use. There are several varieties of the Austrian guide and different methods of fixation.
History of appearance
The node got its name at a time when tourists, athletes and researchers actively began to explore the European Alps. In fact, this method of knitting loops has long been used in maritime and fishing, as well as in everyday life. Today, the Austrian conductor is widely used in all areas of activity, including manufacturing, construction, tourism, fishing, hunting, navigation, livestock breeding and many others.
There are other generally accepted names for this method of knitting - Bergschaft, riding loop, middle conductor, third knot, Austrian grasping knot.
Sea knots. Non-tightening loops
|
|
|
|
|
|
|
|
|
|
|
|
|
|
|
|
|
|
|
|
In the picture: oak loop.
OAK LOOP. The simplest loop of all existing non-tightening loops. Knitted with a simple knot at the end of a cable folded in half. It is strong and safe, but greatly weakens the cable by bending it. Unlike an oak knot, it can be used on a synthetic cable. The only drawback is that it is very tight at the knitting point and is very difficult to untie.
In the picture: vein loop.
VEIN LOOP. If, when tying an oak loop with the running end folded in half, you make an additional hose, you will get a loop that will be easier to untie (here and even in the diagrams, a working loop is indicated with a cross).
In the picture: Flemish loop. FLEMISH LOOP. Knitted in a figure eight on a doubled rope, it is a strong and easily untangled loop at the end of the rope. The Flemish loop is suitable for tying - both on thick and thin cables. It almost does not weaken the strength of the cable.
Pictured: Honda.
HONDA. Archaeological finds indicate that this method of tying a loop is one of the oldest. Long before our era, people on different continents of the earth tied a string to a bow in this way. An additional knot at the end of the running cable serves as a stopper, which, when tensioned, does not allow it to break out of the loop of the knot. Honda is the American name for such a loop. It is still used to lasso cowboys in Mexico and the southern states of America.
In the picture: Eskimo loop.
Eskimo loop. The Eskimos used this loop to attach the string to the bow. Its full name: “Eskimo bow string knot.” It has an important property for this purpose: its size can be changed after the knot has already been tied. When pulled by the root end of the cable, the loop remains motionless.
In the picture: a perfect loop.
THE PERFECT LOOP. The knot with which this fixed loop is tied at the end of the cable is simple, reliable and does not slip even on the thinnest synthetic cable.
In the picture: a fishing loop.
FISHING LOOP. It is often called the “English loop” or “fishing ogon”. It can be tied either at the end or in the middle of the cable. When tightening, the knots need to be brought closer together. It is widely used instead of a sealed fire when the mooring cable breaks and in cases where it is necessary to securely fasten the cable to any object.
In the picture: Burlatsky loop.
BURLATSKAYA LOOP. English sailors call it a “harness loop” or a “pushkar knot.” Apparently, the sailors borrowed it from the artillerymen, who used this loop in cases where on steep mountain roads, off-road, in mud, they had to harness additional horses. This loop can be made either at the end of the cable or in the middle. The Burlatsky loop is designed to apply traction in any direction. It ties easily and holds securely. But before a load is applied to the loop, it should be tightened tightly by hand, since with a sharp pull it tends to turn over and slide along the cable for some time. Several loops tied in this way will allow you to rise to a height or descend from it.
In the picture: driving loop.
DRIVING LOOP. Like the burlatskaya, it is designed for traction in any direction and can be tied in the middle of the cable. It is knitted in a more complex way than the Burlatsky loop, but it is more durable and reliable.
In the picture: grass loop.
GRASS LOOP. Another type of non-tightening single loop. Its knitting should begin with a simple knot. It got its name from the name of the node to which it corresponds.
In the picture: gazebo knot.
SEAT UNIT. Its second name is “bowline” from the English term “bowline”, which means a tackle that pulls back the side luff of a straight lower sail. This tackle is tied to the luff of the sail with a bowline knot (The Bowline Knot), or simply a bowline.
It makes sense to dwell on this point in more detail. It is admired by those who deal with cables and knot tying. This is one of the oldest and most amazing knots ever invented by man. Archaeologists testify that the gazebo knot was known to the ancient Egyptians and Phoenicians 3000 years BC. In English marine technical literature it is often called the “King of Knots”. Not every sea knot can compare with it in the number of positive properties it possesses. Considering the scope of its application and excellent qualities, the gazebo knot is rightfully awarded the royal title in the huge dynasty of maritime and non-marine knots. In appearance, it is similar to a weaving knot, but its running end does not go into the loop of the other end, but into the loop of its root end.
The gazebo knot, despite its compactness, simultaneously contains elements of a simple knot, half-bayonet, weaving and straight knots. The elements of all these knots in a certain combination give the gazebo knot the right to be called universal. It is surprisingly easy to knit, even with strong traction it never tightens “tightly”, does not spoil the cable, never slides along the cable, does not unravel itself, and is easy to untie if necessary.
The main purpose of the gazebo knot is to tie a rope around a person as a means of insurance when climbing to a height or lowering overboard. A gazebo can be inserted into the non-tightening loop of this knot. A loop tied with a gazebo knot on the mooring line reliably serves as a firelight. This knot can be successfully used for tying two cables of any diameter or tying a thick plant cable with a steel one (in this case, the cables are connected with loops, and the knots are tied at their root ends). Of all the methods of connecting two cables made of different materials (for example, hemp and steel, propylene and manila), connecting using two gazebo knots with loops will be the most reliable. In addition, a reliable tightening loop can be made from a bower knot (see “Running Bowline”). It can be used for mooring and attaching the cable to the hook.
The gazebo knot can be safely used to temporarily shorten the cable or in cases where it is necessary to eliminate a worn-out piece of cable from work by tying the knot so that this piece falls on the loop.
There are many ways to tie a bow knot. Here is one of them - the simplest and most rational. In life, the ability to quickly tie a bow knot around your waist can always come in handy. You need to be able to do this with one hand, with one continuous movement of the hand, in the dark, in two to three seconds. It is not at all difficult to learn this.
Let's take the root end of the cable in our left hand, encircle the running end with our right hand and, stepping back from its edge about 10 cm, hold it in our fist. Take the root end in your left hand and stretch it (the arm) forward. Now, when the root end of the cable is slightly tense, with the right hand with the running end clamped in it, we will go around the root end of the cable from top to bottom towards ourselves and up from ourselves. We try to make such a movement with the brush so that it does not completely fall into the loop. Next, we wrap the running end around the stretched root end to the left and intercept it with the thumb and forefinger of the right hand. While pulling your right hand out of the loop, we simultaneously insert the running end into the small loop. Holding the running end with your right hand, pull the root end with your left hand. After doing this several times in a row, you will learn how to tie a bower knot on yourself - in the dark, with your eyes closed. Let's imagine the following situation: you find yourself overboard a ship in the water, they give you an end from the side that you cannot climb up because it is wet and slippery.
By tying a bow knot around your waist and moving the resulting loop under your arms, you can be sure that you will be safely pulled out of the water onto the deck. This knot has saved the lives of sailors more than once. To untie the gazebo knot, it is enough to slightly move the loop of the running end along the weakened root part.
In the picture: double arbor knot.
DOUBLE GATEWAY UNIT. This knot, which has two non-tightening loops, is used instead of a gazebo for lifting a person to a height, lowering overboard, for lifting or lowering a person who has lost consciousness, in a number of other cases. When tying a knot, one of the loops is made almost half the size of the other. A person sits in one loop, and the second covers his torso under the arms. This allows a person, having risen to a height, to work with both hands.
In maritime practice, there are several ways to tie a double bower knot. Here's the simplest one. The knot is tied with a rope folded in half. After inserting the running end (in the form of a loop) into the small loop of the knot, it needs to be pulled out a little and, wrapped around the large loop, placed in the upper part of the knot. Holding the main part of the cable with one hand, pull down the right side of the large double loop with the other hand. After this, the knot is tightened and it is completely ready for use.
In the picture: boatswain's knot.
BOATSWAIN'S Knot. This ancient sea knot is sometimes called the “Spanish bower knot.” Like the double gazebo, it serves to lift a person or lower him from a height. Using a boatswain's knot, insert a foot into each of its two loops and hold the cable with your hand. This knot can be used to lift (or lower from a height) a person who has lost consciousness. To prevent him from falling out of the two loops, one or two half-bayonets are additionally tied on his chest with the running end of the cable.
In the picture: French top knot. FRENCH TOP KNOT. The loops of this knot on the tops of the masts of sailing ships served for fastening backstays, which were tied into them with a clew knot. The free ends of the knot were tied with a straight knot and thus a third loop was obtained, which was used to attach the forestay. One knot simultaneously secured three standing rigging tackles.
In the picture: top knot. TOP UNIT. It was used on the tops of masts of sailing ships instead of yokes with butts (forged rings with brackets) for attaching backstays and forestays. This unit was used to attach temporary guy wires when installing masts. The knot can be used on shore for attaching flagpoles, antenna masts, etc. Once upon a time, it was used on military sailing ships to carry cannonballs. Of the four known methods of tying a top knot, the one shown in the diagram is considered the best.
In the picture: Southern Cross knot. SOUTH CROSS. Such a romantic name was given to this knot by sailors in very distant times. Sometimes it is called the “Naval Cross”, in a number of manuals on maritime practice published in our country - the “Mast Knot”. In fact, this is also a top knot, but of a different tying method and principle. If you pull out three of its loops, it will be shaped like a cross (hence the name). It was used previously for the same purposes as the top unit.
Where is it used?
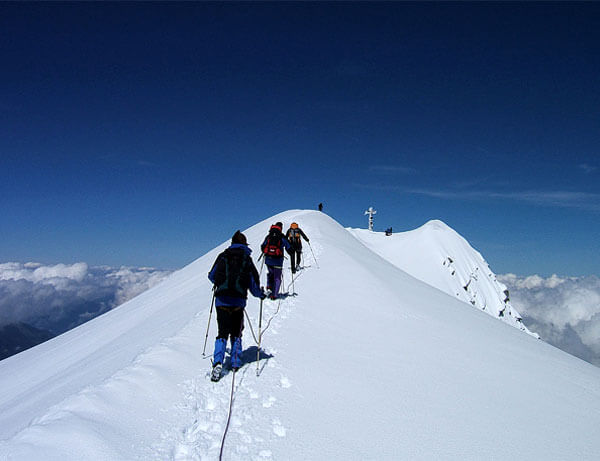
The knot is indispensable in mountaineering or sailing whenever you need to secure a loop in the middle of a rope. For example, the need for it arises to secure the middle member of a climbing team on the route. This is one of the most popular options due to the fact that the knot does not tighten or change position, and also practically does not reduce the overall strength of the rope.
Another use case is to create a rope ladder. Several sequentially tied riding loops make it possible for even an inexperienced climber to climb up or down. The disadvantage of this option is the relatively high consumption of rope.
The Austrian grasping knot is widely used to exclude the damaged part of the twine from work. If the rope in some place has split into fibers or become wet, the damaged area can be placed in the loop part of the Austrian guide. A properly tightened knot will hold the connection securely. In this way, you can also connect two different ropes, including different types.
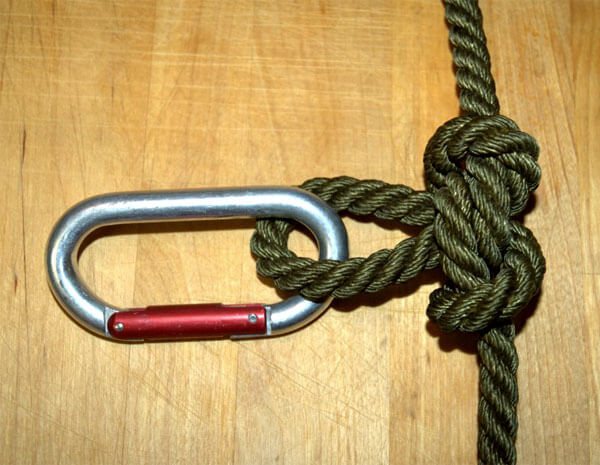
The Austrian guide is ideal for fixing any element or attachment points in the middle of the rope - a hook, ring, carabiner, or other rope. It should be taken into account that if the part is solid, then it must be threaded through the twine in advance.
In tourism, the knot is indispensable for attaching a rope to a support or even several supports, connecting to a lower system, and tensioning the rope when working on a pulley system.
You can also place a rope horizontally with several loops and hang different objects from them.
Appointment of an Austrian guide
In mountaineering, the main purpose of an Austrian guide is to create additional attachment points on the main rope. It is also needed to secure the middle participant in a group of climbers. By the way, this is why the Austrian conductor received the name of the middle and median conductor node.
In this connection, intermediate participants are included with the help of Austrian guides.
Using this knot you can make a rope ladder. The loops are tied relatively close to each other on the rope. When climbing a vertically fixed rope, a person inserts his legs into these loops and clings to them with his hands. But from my experience I can say that using such a ladder requires a lot of rope and considerable physical effort. It’s better to use the free end of the rope for climbing instead of a rope ladder, which is used to tie a harness and a Blake’s grasping knot.
An Austrian guide can also be used to isolate an unreliable section of the rope. For example, if the rope has been damaged or even torn in any place, this fragment must be placed in the center of the loop of the Austrian guide. From here, by the way, it becomes clear that you can connect two ropes using the diagram of this knot. I have even tied two ropes of different diameters with this knot - the knot held securely and did not unravel. But this option is only permissible if human life does not depend on the reliability of the node.
Based on this knot, you can make a stretcher out of rope. To do this, a series of loops of an Austrian guide are tied to the middle of the rope, the free end of the rope is passed through these loops with a blind loop tied, and four more loops are added along the edges of the resulting rectangular structure, by which it is supposed to carry a person lying or sitting in a rope stretcher. However, this design takes quite a long time to knit and is therefore suitable only in cases where other stretcher options are not available.
By passing the root end of the rope into a small loop of an Austrian guide, you can get a tightening loop, which is convenient to use, for example, in homemade traps.
In fact, there are many more options for using this knot: it can be connected almost anywhere where a reliable, non-tightening loop is required.
Variations of the Austrian conductor knot
- a simple loop in the middle of the rope;
- a loop at the end of a rope;
- connection of two ropes, incl. different thickness;
- an option with the end of the rope stretched inside the conductor - a tightening ring.
See also: Review of tourist nodes from professionals
Scheme 1
The first method is good for those who find it easier to remember visually. It is not as fast, requires attention, but is less likely to make mistakes.
- Place the rope horizontally.
- Rotate the middle 360 degrees, creating a figure eight below the main rope.
- Break the lower part of the figure eight upward and overlap it onto the upper one.
- Next, raise this lower loop even higher and lead it behind the main rope, thread it into the upper ring of the “figure eight”.
- Remove the loop and tighten the knot. It should be noted that when tightened, the knot may absorb a little shock, although this method of knitting is not prone to shock absorption.
Scheme 2
The following scheme for creating an Austrian conductor knot is more mobile; it is well suited for working with a long rope, including heavy weights.
- Place your left hand with your palm facing you.
- Wrap three turns of rope around it.
- Pass the central loop under the far right one and pull it out.
- Pass it from above the palm and, grabbing both loops, thread it from below.
- Pull the loop, remove the ropes from your hand and tighten the knot.
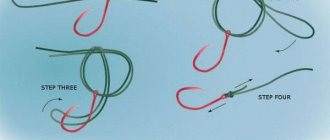
Scheme 3
If the first two methods are suitable for working in the center of the rope, then the third will show how to tie a knot at the end. This option can be convenient for attaching twine to a fixed support if it is impossible to throw a finished loop, for example, on a tree or a car bumper for towing.
- One end of the rope is draped clockwise and forms a ring.
- It is pushed into the ring, wrapped around the main rope and threaded into the ring from the same side that it entered.
- The knot is tightened.
How to tie this knot?
I know five ways to tie this knot. I suggest you consider them.
Method number 1 (classic):
- The rope is positioned horizontally.
- The middle of it is rotated 360 degrees - a pattern in the form of the number “8” is obtained, located at the bottom of the rope.
- The lower loop of the “figure eight” covers the upper one - the resulting “figure eight” seems to break at the point of overlap approximately in the middle.
- The lower loop is pulled up a little more, wound through the main rope and threaded into the double loop formed by the lower and upper loops of the figure eight.
- The loop is removed and the knot is tightened.
This method is convenient for visual memorization. It is quite slow, but simple, so it can be used when faster options cannot be remembered. The video shows the implementation of this method:
Method No. 2 (for quick knitting):
- The right hand is placed in front of you, fingers pointing to the left, palm facing you.
- The running end of the rope is thrown over the index finger.
- The running end is circled behind the hand, brought out to the left of the root end and again thrown onto the hand between the index and thumb - an overlap is obtained on the palm.
- The running end makes one more turn around the brush and pounces on the brush to the right of the second turn - two overlaps are obtained.
- The middle of the second turn located on the palm (the one to the left) is moved to the right and pushed from right to left under all the turns.
- The loop is removed and the knot is tightened.
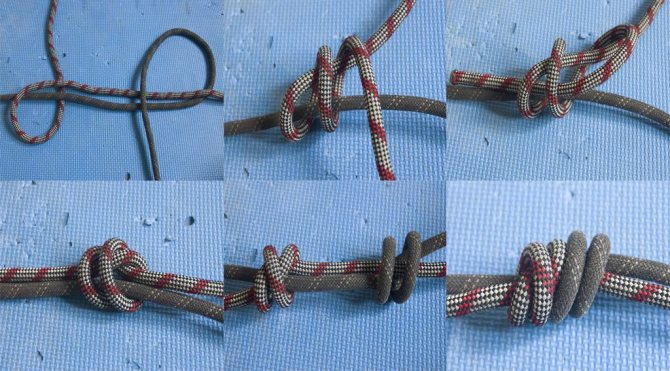
The photo shows the order of this knitting method:
This method, compared to the previous one, allows you to tie an Austrian wire much faster.
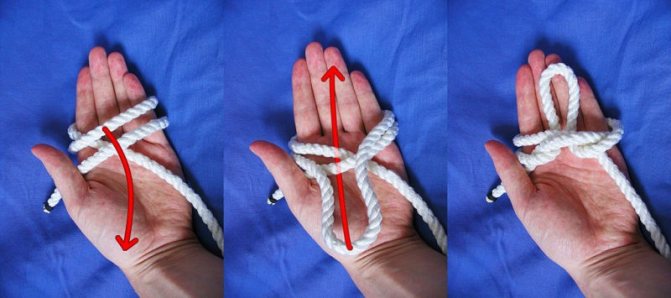
Method number 3 (another option for quick knitting):
- The right hand is placed in front of you, fingers pointing to the left, palm facing you.
- With the running end of the rope, throwing it over the palm, two turns are made around the hand from right to left.
- The left hand is placed behind the running end hanging below the right hand so that it ends up in the palm of the left hand.
- The left hand, together with the running end, is brought towards itself so that the root end is behind the left hand.
- From under the right turn, the fingers of the left hand grasp the middle of the left turn of the rope lying on the right hand.
- The captured middle in the form of a loop is pulled to the left, while the running end of the rope is dropped from the left hand.
- The loop is intercepted with the right hand and pinched between the index and middle fingers.
- The coils from the right hand are thrown to the left, the knot is tightened.
This method, despite the larger number of points in the knitting algorithm, is actually faster than the previous one. This is my favorite way to tie an Austrian wire in just 3 seconds.
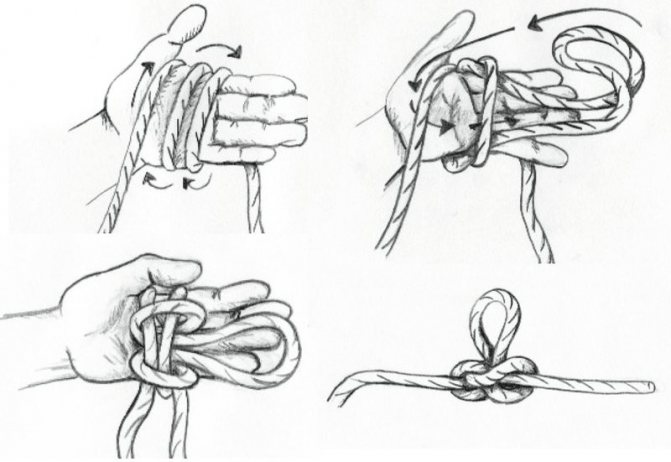
Method number 4 (for a long rope):
- The right hand is placed in front of you, fingers pointing to the left, palm facing you.
- Throwing the running end of the rope over the palm makes three turns around the hand from right to left.
- The middle of the middle coil lying on the palm is pushed under the leftmost coil, then taken out, wound to the right and pushed from right to left between the palm and all the coils.
- The loop is removed and the knot is tightened.
This option is slower than the previous one, but makes it easy to tie a knot, even if you have to work with a long rope that has a lot of mass.
We considered options when the Austrian guide is tied in the middle of the rope. Now consider an option that will allow you to tie this knot with one end of the rope.
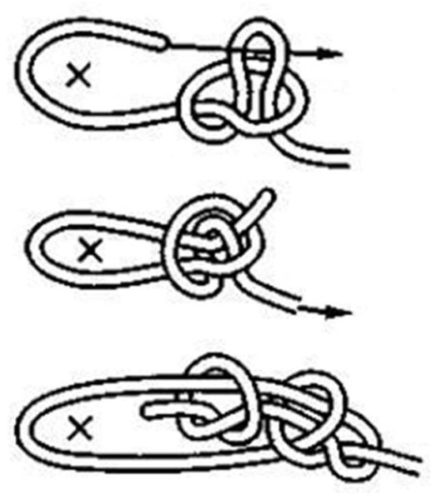
Method No. 5 (one end):
- The rope is positioned horizontally, the running end of the rope is on the right.
- The running end turns clockwise and is placed on top of the main end - it turns out to be a peg.
- The running end is pushed from the bottom up into the resulting peg - a simple knot is obtained.
- A loop is formed with the running end from below the main rope, after which the running end is pushed back into the simple knot a little to the right of the place where it entered the peg - a running simple knot is obtained.
- The running end is passed behind the loop from right to left - a double loop is formed to the right of the loop.
- The running end is thrown through the previously formed loop and pushed from top to bottom into the double loop.
- The knot is tightened.
This option takes longer to knit than all the others, but, as mentioned earlier, it allows you to tie an Austrian conductor at one end, which is very convenient, for example, for attaching a rope to a closed support on which it is not possible to throw a finished loop.
Errors when knitting the Austrian wire are mainly associated with fast knitting methods: in the “classic” version it is difficult to make a mistake due to its simplicity.
In fast tying methods, errors can arise due to inattention and ignorance of the correct way to tie a knot, which will lead to the formation of a knot that resembles an Austrian wire, but is not one. I don’t see any point in listing all the errors: due to the variety of tying methods, there can be quite a lot of such errors. I can only say that to quickly tie a knot, you need to strictly follow the instructions and, when learning for self-control, compare the resulting knot with a knot tied according to the classical pattern.
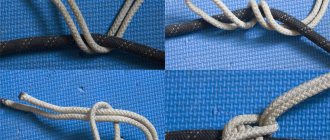
Single, double and with control unit
For additional fixation, a double Austrian conductor is used. To knit it, you will need a second rope with a free end; it can be of a different type, stiffness, or weave. A classic “Austrian guide” knot is fixed on the main rope, but is not tightened. Then the duplicate rope repeats all the bends of the main knot. It is necessary to ensure that parallel ropes do not cross. When the backup rope is threaded and pulled to the desired length, the knot can be tightened.
You can also additionally fix the Austrian conductor with a control unit. It is knitted on the resulting loop and helps increase the strength of the knitting.
It should be noted that such a knot will be much more difficult to untie.
Conductor knot knitting pattern
To overcome obstacles (descents, ascents, crossings, traverses, etc.) during travel, especially mountain travel, ropes, carabiners, safety systems and various components are used.
It is important for every tourist to know how this or that knot is knitted and where it is used. Nodes can be classified according to their purpose. 1. Knots for tying ropes of the same diameter: “straight”, “weaving”, “counter”, “grapevine”.
2. Knots for tying ropes of different diameters: “academic”, “bracket”.
3. Knots for belaying (non-tightening loops): “simple conductor”, “figure eight”, “middle Austrian conductor”, “double conductor”.
4. Knots for tying ropes to a support: “noose”, “bowline”, “stirrup”.
5. Auxiliary nodes: “grasping”, “stirrup”.
The stirrup knot can be used in two cases, but the tying methods will be different.
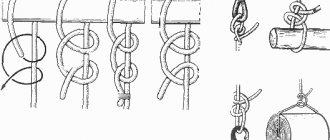
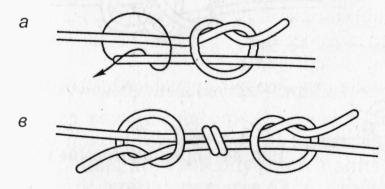
The knot can be knitted in two ways: 1. A loop is made with one rope (Fig. 1, a), and with the second rope the necessary turns are made to obtain a knot, as in Fig. 1, b. The running ends should be 15-20 cm long so that control knots can be tied (Fig. 7, e). If one running end is on top and the other is on bottom, or vice versa, then the knot is tied incorrectly. The running ends should come out either only from the top or only from the bottom.
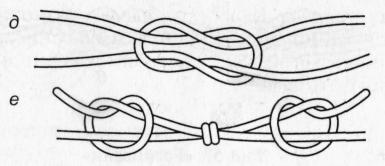
Two ropes are placed on top of each other and two simple knots are tied in different directions (Fig. 1, c, d). If the knots are tied in one direction, then the result is a “woman’s knot” (Fig. 1, e). Next, control knots are tied at the ends (Fig. 1, f).
Two ropes of the same diameter are taken, overlapped, then a control knot is knitted first on one side (Fig. 2, a), then on the other (Fig. 2, b). Next, the knots are pulled together and control knots are tied at the ends (Fig. 2, c).
Rice. 2. “Weaving” knot
We take two ropes of the same diameter, at the end of one we knit a simple knot (Fig. 3, a), then with the second rope towards the running end of the first rope we completely repeat the knot so that it turns out double and the running ends come out in different directions (Fig. 3, b) . After this, the knot is tightened; control knots are usually not knitted (Fig. 3, c).
Rice. 3. “Counter knot”
Two ropes of the same diameter are placed on top of each other, a double control knot is tied on one side (Fig. 4, a), then the same on the other (Fig. 4, b). The nodes are tightened (Fig. 4, c). The control nodes are not knitted. The correct knot pattern is shown in Figure 4, d.
Rice. 4. Grapevine
We take two ropes of different diameters, make a loop from the thicker rope, and wrap it with the running end of the thin one as shown in Figure 5, a, b. Then the knot is tightened, straightened, and control knots are knitted at both ends (Fig. 5, c).
Rice. 5. "Bramshkotovy"
We take two ropes of different diameters, make a thicker loop, and use the running end of a thin rope to twist the loop as shown in Figure 6, a, b. The knot is tightened, straightened, and control knots are tied at both ends (Fig. 6, c).
Rice. 6. "Academic"
Simple conductor node:
It is knitted with one rope, which is folded in half and a simple knot is tied at the end of it (Fig. 7, a, b) to form a loop. A control knot is tied below (Fig. 7, c).
Rice. 7. “Simple Explorer”
Knitted with one rope. It is folded in half and a knot is tied at the end, reminiscent of the number eight (Fig. 8, a, b). The knot straightens and tightens. The control knot is not knitted (Fig. 8, c).
Rice. 8. "Eight"
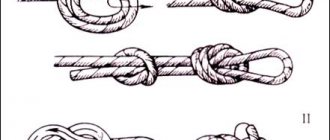
Knot “middle Austrian conductor”:
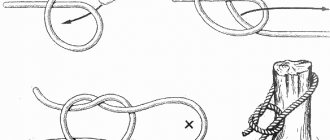
The knot is tied on one rope. The rope is taken by the middle, then by turning 360° it is folded into a figure eight (Fig. 9, a), the top of which is lowered down and pulled, as shown by the arrow in Fig. 9, b, so that a loop comes out. In order to get the correct knot (Fig. 9, c), you need to stretch the ends of the rope in different directions. The control knot does not fit.
Rice. 9. “Middle Austrian Guide”
Knot “double conductor”, or “rabbit ears”:
Knitted on one rope. The rope is folded in half, a “dummy” is knitted on it (Fig. 10, a), tightened (Fig. 10, c) and tied so that it comes undone if you pull it by the loop. In the case when the “dummy” is tied in reverse, the “double conductor” knot will not work. Then the lower loop is carried through, as shown by the arrow in Figure 10, b, so that the two upper loops pass through it, and is pulled together by the upper loops to the knot (Figure 10, c).
Possible problems and nuances
Problems with knitting can only arise due to inattention or violation of technology. During training, you should definitely compare the connected node with the control one, especially if you are mastering fast methods.
See also: Grapevine knot
The Austrian conductor and the butterfly knot should not be confused. They are similar in appearance, but differ in characteristics and manufacturing method. The “butterfly” can absorb shock; when the fixing loop is broken and removed, it turns into a regular running knot. The Austrian guide is more rigid and can only be opened entirely.
Austrian guide and Alpine butterfly - how not to confuse these knots?
These two nodes could be called twins for their similarity: an uninitiated person is unlikely to be able to see the difference unless it is hinted to him that there are two different nodes in front of him. It’s not for nothing that the Austrian guide is often called a butterfly.
But, like any twins, these nodes have their own small differences both in “appearance” and “character”. So, for example, an Alpine butterfly can be used for shock absorption during a jerk, but an Austrian guide is absolutely not suitable for this.
If you place the Alpine butterfly and the Austrian guide with the loops up, then in the Alpine butterfly the upper loop, which clamps the large loop in the knot, can be removed from this loop, resulting in a running simple knot. This trick will not work with an Austrian guide, since the upper loop is held in place by the lower loop.
Alpine butterfly - it is clearly visible that the two sections of the rope between the vertical sections do not intersect.
As you can see, the Austrian guide can still be distinguished from a butterfly, but in case of doubt it is much easier to re-bandage it instead of looking for minor differences and doubting the correctness of the tied knot: they are too similar.
Personally, I really like the Austrian guide. I use it in almost any situation where it is necessary to obtain a non-tightening loop, for example for:
- attaching the rope to one reliable support or several unreliable ones;
- tying a rope into the lower system, which in turn is connected from the same rope;
- rope tension when using the pulley system;
- the formation of several loops on a horizontally located rope for hanging various objects on them.
Also, more often than with other knots, I use an Austrian guide to tie ropes, including those of different diameters.
This knot is reliable, does not creep, knits faster than the Flemish loop and bowline, and is no worse in efficiency than these two knots. At the same time, the Austrian guide is easier to untie than the mentioned figure eight, and even more so the oak knot, which is often used to tie two ropes by people who have nothing to do with tourism or maritime affairs. As for me, this knot is too good to be ignored and not implemented into tourist and everyday life.
FAQ
Does the conductor knot significantly weaken the rope ? According to research, a knot reduces the strength of the rope by no more than 30-40%. This is a good indicator compared to other types of nodes.
Is it possible to tie two twines with such a knot ? It’s possible, but not in cases where someone’s life is at stake.
How to tie an Austrian guide knot at the end of a rope ? You must use the above pattern or tie it in the classic way, making a fixation at the end of the rope.
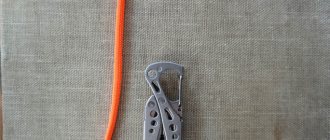
How to tie a conductor with gloves ? The easiest way is to use the knitting pattern through the palm, because... It’s easier to control the position of the loops.
How to tie a conductor knot
There are several ways to tie a knot.
Simple Explorer
| The cable must be folded into a loop of the required radius. |
| The moving part rotates half a circle from the loop. |
| Then it is pushed through the resulting loop (hare's ear). |
The resulting noose is tightened with little effort. Some people confuse it with the bowline, Austrian or figure eight knot.
How to knit a double fisherman's knot, see the link.
Conductor with control node
The guide is used by climbers and is usually used in bundles. You need to knit it together with a fixing knot.
| When the loop is completed and one running end remains, the main cable is wrapped around it in a circle. |
| Then they put it in a loop. |
| They are tightened close to the main unit, which allows you to make a durable system. |
Advantages and disadvantages
Among the important advantages of an Austrian guide:
- Reliable
- Does not “crawl” along the rope, does not slip and does not absorb shock
- After loading, the tension in the loops is easily relieved
- Traction can work in any direction
- Reduces equipment durability less than other nodes
- Doesn't tighten
The disadvantages include:
- Difficulty knitting, especially with gloves
- It is difficult to assess the correctness of the grasping knot
- You cannot change the size of a loop once it is already tied.
The most reliable node
As experienced tourists and climbers say, the most reliable knot, if you have to tie two ropes into one, is a grapevine. You won’t be able to tie it right away - it is difficult to perform, but it also ensures the highest level of security. Such a knot, if a load was applied to the rope, becomes very tight. It is suitable for tying ropes of both the same thickness and different ones. In addition to mountaineering, the knot is widely used in fishing, where it is used on a fishing line.
Guys, loops - it makes sense to knit all this with grapevine. But you should understand that if such a knot is already tightened, there is no chance to untie it. Among all related knots, it has the maximum level of strength - 56%, which means that the rope practically does not suffer.
By the way, if in some part it has lost strength due to damage, it is cut, and then the ends are tied using grapevine - this is the safest and most reliable option. However, it must be admitted that the Austrian conductor is a knot that is almost as reliable as grapevine.
Grapevine (double fisherman)
Grapevine
A very strong and reliable knot, used for tying ropes of both the same and different diameters. Plus, grapevine is quite beautiful. It is used simply everywhere, on ships and on land, in the mountains, in everyday life, in general, wherever you are lazy. It is knitted relatively simply: first, a double loop is tied on one rope, then the same one is tied on the second and tightened. This knot is similar to a weaving knot, but not one, but two turns of the rope are made.
Pros: a very powerful and reliable knot, does not require additional “controls”, you can tie ropes of different diameters. Cons: takes a lot of time.
It is with this knot that I recommend tying the cord for grasping knots such as Prusik, Marchard, Bachman, etc. It can be successfully used as a control knot. To do this, only one double loop is knitted on one rope; such a “control” will be more reliable than a regular one.