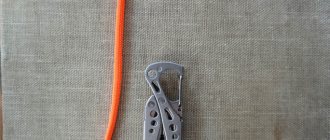
How to tie a noose on a rope
6. Tightening loops.
Running simple knot (Fig. 82). This is the simplest knot that forms a tightening loop. When pulling on the root end, the loop is tightened, but it can be increased in size by pulling the running end away from the loop. A knot can be tied in any part of the rope. With its help, you can tighten a bag, tie a bale, attach a cable to something, moor a boat to a pile.
Rice. 82. Running simple knot
Sliding eight
(Fig. 83).
Based on the figure eight principle, this knot belongs to the category of reliable, tightly tightened loops. It has the property of being tightened smoothly and evenly when pulled at the root end. Rice.
83. Sliding figure eight Sliding blind loop
(Fig. 84). This simple and durable knot can be used in everyday life to tighten various bales and packages when packing them. Tying the knot is extremely simple and does not require any comments.
Rice.
84. Sliding blind loop Running bowline
(Fig. 85).
A running bowline is the same as a bower knot with a small loop into which the root end is passed. It is based on the lasso principle. The running bowline works flawlessly. In maritime affairs, it is used to catch floating logs and driftwood; it is used to search for and raise Admiralty anchors left at the bottom. Rice.
85. Running bowline Silk
knot
(Fig. 86). This knot is borrowed from the simple technique of bird catchers. Snares made from horsehair or the thinnest nylon fishing line using such a knot work flawlessly. The snare knot is considered one of the smoothest and easiest knots to tighten.

Rice.
86. Silk knot Scaffold knot
(Fig. 87).
The name of the node indicates its purpose. This is one of the ancient knots developed by the centuries-old practice of the death penalty by hanging. However, despite its gloomy purpose, it can be successfully used for many other purposes, for example, for temporarily attaching a cable to various objects. Rice.
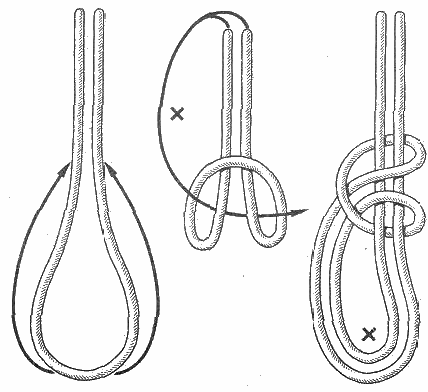
87. Scaffold knot Tightening
noose
(Fig. 88).
Like the previous one, this knot is also called the scaffold
, or
“hanging”
knot. But despite this, it also finds other uses in maritime affairs.
It is used when temporarily attaching a cable to objects floating in the water or when throwing and securing a cable to an object on the shore.
This knot has an advantage even over such a good knot as a noose with half bayonets (see Fig. 65), in that the running end of the cable cannot slip out of the loop, and therefore a tightening noose is considered more reliable.
On sailing ships, this knot was used to fasten the main ends of topsail sheets, topsail sheets and other gear in cases where it was necessary to have these ends ready for release.
To tie this knot, the cable is laid in the form of two loops of equal size. Both loops are surrounded several times with the running end of the cable, after which this end is passed into the loop facing the root part of the cable and, pulling out the outer loop, is clamped in it. A tightening noose can always be easily untied by pulling the main part of the cable.
Self-tightening knot
This knot is the most original of all types. This type of knot is tightened under the influence of loads, therefore, the greater the load on it, the stronger it becomes.
There are many tightening sea knots. But among fishermen, the one that can be used for bottom fishing using a capacious reel is more popular. A large diameter reel with a fishing line wound around it will help you make a big cast.
How to tie this type of knot
- To begin, wrap a rope around the spool. To make this material comfortable to hold, you need to leave the tip a little longer.
- Next, the tip of the fishing line needs to be turned into a loop. To do this, wrap the pre-leading line and turn the tip in the opposite direction.
- Guide the free end into the loop that is at the base of the twist. Next, moisten the fishing line with any liquid and tighten the knot. Place the self-tightening loop on the spool and tighten. You need to pull on the main line.
- The rope will tighten on its own . The ends that stick out must be removed using scissors or a knife.
- Such a loop turns out to be sliding. Therefore, if the need arises, you can easily untie it and free the spool from it.
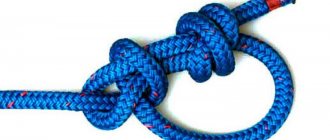
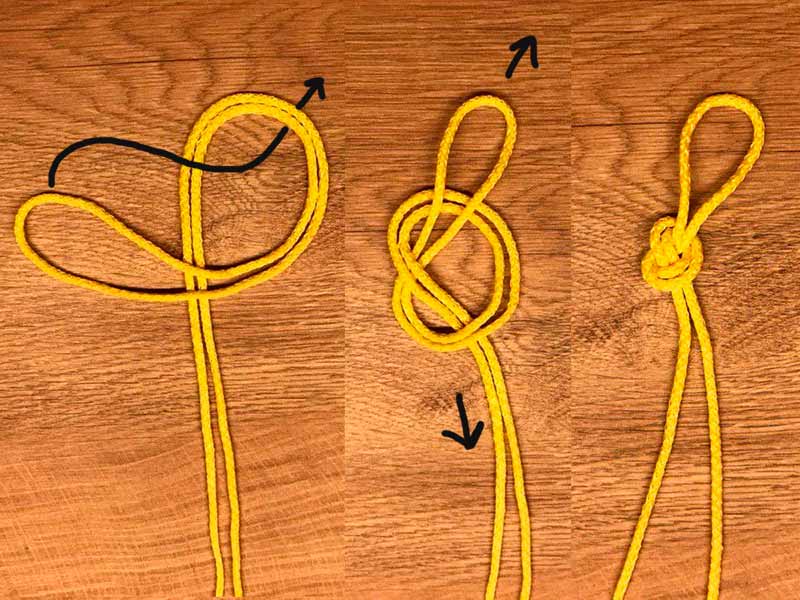
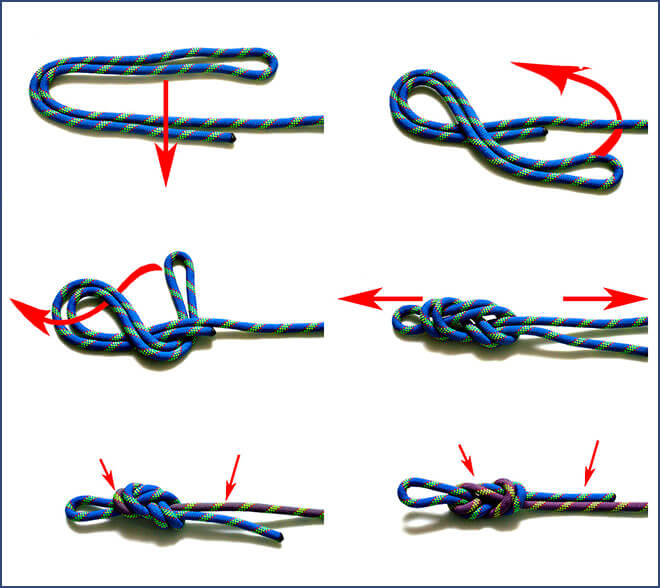
Correct and reliable noose knot
Let's learn how to properly use the noose knot. Answers to frequently asked questions and step-by-step steps from experts.
The “Noose” knot is a reliable fastening that can be knitted in a few seconds.
The ability to knit fastenings will be useful for a fisherman, tourist or hunter. They are also needed when running a household. Mastering knitting the simplest designs will take little time if you do it according to patterns.
A noose is a whole series of fastenings for different purposes. The difference between this type of knot is that it slides easily.
We tie the ropes with a flat knot
An option for tying two ropes together is also offered by a flat knot. Its scheme is as simple as possible. To tie a flat knot you need:
A loop is made and the damaged part of the rope is inserted inside as if it were a simple knot. The handle and knot are scratched, leaving a damaged part in the gauze that has been formed so that it will not work when pulled. "Margarita" is a sailor's knot par excellence and shows. features of other marine knots as it does not get hot and has superior tightening while being easy to undo. It's easy to do and works great under any effort. It does not change its appearance even if it has been left in place for a long time and has not damaged the rope.
- cross two ropes;
- tie one of the ropes around the other;
- repeat the previous step with the remaining ends of the rope (so that the ends of the first come out of the loop formed by the second rope).
- tighten the knot by pulling the ends of the ropes and then the warps.
There are many options for tying loops and fastening two ropes together. Each of them offers a similar result, but using its own features. High complexity of a node indicates greater reliability. Simple ones have their advantage in terms of speed, but cannot provide reliable fastening on all materials. You can read about other types of tourist nodes.
Margarita can be used to cut string to the desired length without cutting it. The number of loops or turns made on the rope can vary from three to five; they specify both the node's binding and the length of the string to be shortened. In marine shipping, this unit is used for towing or maneuvering equipment, but has many other uses. It can be used to eliminate drooping or loose lines, reduce winds, and is well known among Boy Scouts.
It is used by bell workers to clean ropes. When using a daisy to cut a piece of damaged rope, make sure the broken piece of rope is inside two turns or loops. Development: make the first half of the cat by turning the rope clockwise, the second and third half of the cats are formed, slightly overlapping the first and the same diameter. The company on the right should be lower. The middle bone is stretched as it passes through the two sides; By tightening these two side loops, the knot takes shape.
Interesting video about knots for the curious:
Every day, each of us is faced with such a concept as a knot. This word is associated with the process of tying a man's tie or a woman's scarf, or sports laces. In everyday life, in nature, in the country, as well as during hunting and fishing, this concept is simply irreplaceable.
Check the exact position of the cat medium and then tighten the knot, making sure the end loops are the same size. Tied knots are used to attach a rope to any object or to another rope that is not part of the current knot. They are widely used in hiking and climbing, as well as in marine vessels for towing, securing ropes and moorings. They must be able to hold and resist parallel forces without slipping.
It can be used to attach a rope to a pole to a rod or to another rope that is not part of the knot. With some practice this can be done with one hand. As another name goes by, "boatman's knot", it is especially useful for sailors who need to moor a support boat to port. on one side while holding the bar on the other. It should only be used temporarily and replaced later with a more stable unit. This can be made safer by adding "two halves of a cat" to the whip.
There are a huge variety of types and forms of how you can tie a knot, for example in nature, connecting logs or when strengthening a tent. All types of knots have their own names and their practical purposes.
The technique of knitting special knots, which received the name nautical knots, became important during the formation of the navy. In those days, the navy needed units that were strong for work and not difficult to manufacture, where bulky and unnecessary parts and elements were completely eliminated.
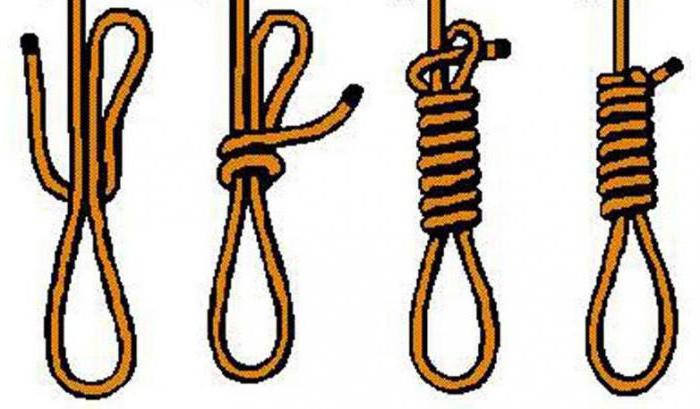
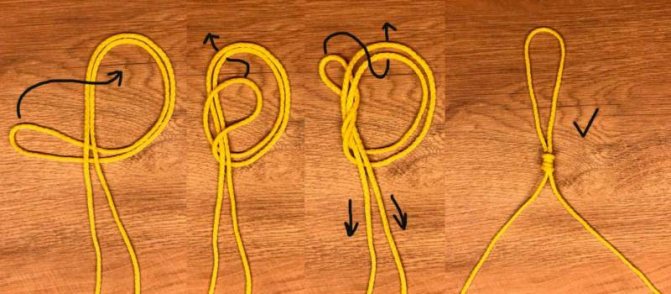
Types of noose knot
Simple types of nooses are given, which are very easy to learn to tie using patterns.
On a support
- It is performed with one rope, which is wrapped around a support, and then wound three to five turns along the resulting loop.
- The loop is easy to tighten and also easy to loosen.
To master a knitting pattern, you only need to try it once; the technology is as simple as possible.
Addictive
A tightening noose loop is a reliable option for mooring a boat and securing a net. It will not come undone without human intervention.
A piece of rope is folded in three, so that you get a loop on each side (using the knitting pattern, you can quickly figure out how to make a knot).
One of the ends is wound onto a folded segment of several turns. The remaining end is threaded through one of the loops. The second remains free, it is tightened or loosened due to the sliding of the main rope.
The knot is easily unraveled if you pull the main rope to the end - that is, completely pull out the sliding loop.
Carbine
A type of fastening that even a car can withstand is a carabiner noose. Used more often in mountaineering than in households.
The carabiner is inserted into a figure eight, tied at the end, and thrown onto a support or object for transportation. The main part is inserted into the carbine.
Other types
A regular noose is another fastening with two loops, one of which is sliding. The knot of such a noose consists of two loops. From the photo, even without a diagram, it’s clear how to knit.
A loop is formed at the end of the cable through which the main rope is threaded. It is made with a regular figure eight, which is slightly moistened before tightening. The resulting second loop is tightened on a support or object.
Alternative nodes
Oak loop.
Despite such an unpopular name, this is the same knot that is familiar to all of us since childhood. By looking at the step-by-step knitting instructions in the photo below, you will be convinced of this. It cannot replace the figure eight, since such a loop, with strong tension in the lines in different directions, will definitely pull together to one point. However, on thick cords and ropes this effect is much less noticeable.
Knitting pattern for oak loop
Vein loop. This is simply an improvement on the oak loop with just one extra turn in the same direction. Like the simplified form, it is more suitable for ropes and cords. But if you don’t need a non-tightening connection, then this is a good, reliable option.
Vein loop knitting pattern
Sliding loop. It is a tourist knot for creating a tightly tightened loop. The harder you pull, the stronger it tightens.
Sliding loop knitting pattern
Let me remind you that the above alternative nodes are of much lower quality than the figure eight. The knots and loops on them can move up and down the line, if this suits you, then no problem. For hooks, I recommend any of the other popular ones: bloody, palomar, spindle. For tying two lines - carrot and bloody.
Write in the comments if you know other varieties of figure eight. In what cases do you knit this particular knot, and how does it help you in fishing and tourism.
Similar nodes
The principle of knitting is the same for all nooses - the loop slides and tightens when pulled.
There are many options that have different names, but tie the same way.
Scaffold
They do it according to the general principle, but with turns around the loop.
The name has unpleasant associations, but the node itself is reliable.
Knits easily. A loop of the required size is formed, secured with several turns. The short end is passed into the last turn for strength.

Despite its simplicity, the knot connected according to this pattern is strong. Fixed on a support and used during transportation.
Node improvements
People tend to experiment, and tying knots is no exception. Why not figure out how to tie a figure eight knot for purposes other than connecting the fishing line, the fishermen thought. And we decided to adapt it for other, no less useful purposes:
- A figure eight knot above the ring
is used by fishermen to tie a hook. The end of the fishing line is pulled through the ring on the hook, thereby forming a blind loop, after which it is cut off. - Fisherman's eight
- also used for tying a hook, but the knot is not located above the ring, but below it, covering the fore-end. The end of the fishing line is threaded into the eye of the hook, then 5-6 turns are made on the shank, and then pulled back into the ring. Then knit a figure eight on top of the hook. - The Canadian figure eight fisherman's knot
is also used for mounting a hook, but is only tied on the fore-end. - A knot for tying a hook with a spatula
instead of a ring. It is knitted in exactly the same way, only instead of the eye of the hook, a regular knot is used at the running end.

Areas of application
Construction of a crossing using a knot
Mastering the technique of tying nooses is enough to make a relatively safe crossing on a hike. The only thing that is important is the dependence of the strength of nodes belonging to this type on the presence of load or tension. When free, they weaken and bloom. Therefore, to stabilize the connection, the following techniques are used:
The first consists of additional turns secured to the last one, the second is an additional loop that is placed on the support at a short distance from the main structure.
When constructing a crossing, carabiner nooses are used for cargo and people, but rope knots, properly secured, will be no less reliable.
Use for fishing
Using a noose for fishing is not always convenient. Self-tightening knots are strong only under constant load without jerking. Tying the ends of the fishing line or attaching hooks and sinkers to it will lead to their loss due to the smoothness and slipperiness of the material - the structure will quickly unravel. For tying gear, a regular or double eight (Flemish eight or Swiss guide) is often used. The loop on the leash is made with a crochet hook.
Other options
- Transporting long objects - the knot will not weaken or slip.
- Catching animals, as well as tying up luggage or parcels.
We tie the ropes with a grapevine knot
In order to understand how to knit a grapevine knot, just read the previous instructions. Grepwein is the same weaving machine for fastening two ropes, but without safety knots.
This is very useful for hanging objects with strings of different diameters: the weight of the object creates enough tension to tighten the knot. Development: Form a loop towards the end of the rope and then make a turn by moving the top edge of the loop from right to left. The whip that is higher is inserted through the turn. Following the same direction, pass the eyelash under the eye loop and insert it again into the twist. Tighten the loop by pulling the eyelash and the left side of the loop, then check that the mark slides easily over the eye.
This is one of the slip knots that are made by making a closed gauze at the end of the rope. It forms a very strong sliding knot that is supported even when shocked by unexpected loads. It glides without cancellation, but is not always easy, so it should be adjusted to the required size. The name reveals its infamous use, and another name, the Jack Ketch Knot, comes from a remarkable executioner and performer. There are legends and superstitions around it. It was a forbidden knot on the ships of the English Royal Navy.
The Tightening Noose: The Darkest Knot in History
The name alone makes it clear what the unit is used for and what it is. I want to pay special attention to the tightening noose and dispel the myth of its bloody history.
The tightening noose refers to self-tightening loops and is considered the most reliable of them. In Ashley's book the loop is listed as ABOOK
#1119
The noose does not have any fancy name, maybe that’s why it is so valued in knotting? But sometimes you can find names: scaffold knot and hanging knot
. By the way, I have already disassembled the scaffold assembly and it has differences.
We tie the loop with a conductor knot
A conductor knot is tied to form loops that act as attachment points. To create such a loop you need:
Its main disadvantage is that it is difficult to do; and the use of the "Italian Revolution" meant that the "butterfly gas" lost some of its popularity. This safe and secure knot is used by campers to hang food and items and can be used as a decorative knot to hang anything. It is hardly used at sea as it is difficult to undo once it has been stretched.
"Seam gases", that is, gauze made from a weave of various cape threads, is the safest way to make a loop or eye secured to the end of a cable. They have a huge number of applications. It is commonly used for fixed berths, at the ends of halyards, amantillas, minuses and escots, provided they consist of a cable of several cords. If it's well made, it's very durable, never cancelled, and if it's protected by a thimble, it has one. long term. Development: Cable disconnected.
- fold the rope in half;
- tie a simple knot from a rope folded in half;
- tighten and tie a simple control knot using the remaining end.
Where is a tightening noose used?
- Of course, the noose finds its true use on ships, this is the number one area of application. A garrote is an excellent temporary attachment for objects in the water.
- Some sailors use this knot to throw a rope over any object located on the shore.
- The noose is also excellently used in sailing. The root ends of topsail sheets, topsail sheets and other gear can be secured with this particular knot.
- The knot is great for tying a length of rope into a coil.
- Some fishermen use a knot to connect fishing line or cord to other gear.
- Of course, I cannot help but mention the dark past and present of this node. It was with the help of it that people were executed by hanging in the past.
- The noose became especially widespread during the lynchings that broke out in the United States. At that time, the noose was hung in public places to intimidate black people.
How to tie knots on a fishing line, what are they for?
Fishing knots for hooks are distinguished by the method of knitting and the percentage of strength. They are chosen according to the type of equipment, gear and are used for tying a load to a cord, fixing torn leashes and baits. A good, strong, durable tie will help you reach prey that is already hooked.
Knitting a figure eight knot
General recommendations for tying:
- Wet the connection before tightening. Moisture will reduce thread deformation. The material will remain smooth, without damage, and will not break when bent or tightened.
- Make sure that the turns do not overlap or overlap. They should lie next to each other. Tighten in this position. Observe the number of revolutions.
- Tightening requires force, but without excessive pressure. A leash that is tightened too tightly becomes loose.
- Remove the protruding ends of the fishing line at the knot joints. Trim the excess to 1 mm and burn. But a tip that is too short is also unreliable - the equipment can come undone.
- Practice the fishing knot in advance (carrot, figure eight, guide, triple, palomar, fender and others). The learned technique will save time on fishing, especially in cold weather.
- Re-tie connections before each trip. It is better to collect gear directly on the shore. This is correct - this reduces the risk of drying out and losing parts.
Knitting methods have different uses. Some are used for baits, hooks, others - for attaching fishing line to a reel, tying cords or when fishing with a float. Special knots can be used to tie spinning baits and use them for overlap and in other situations.
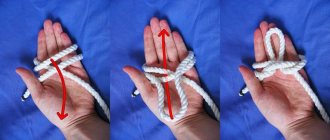
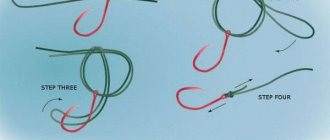
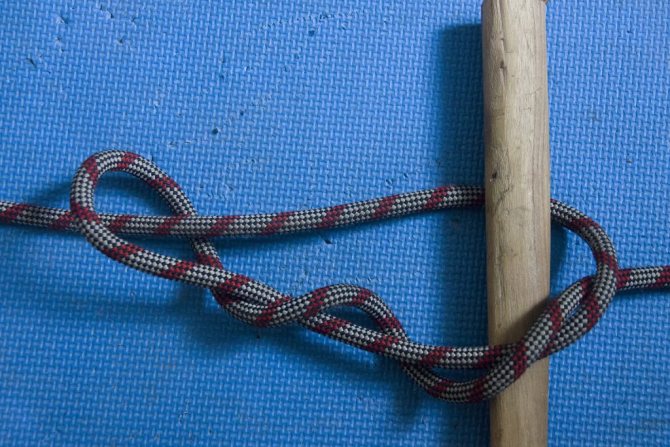
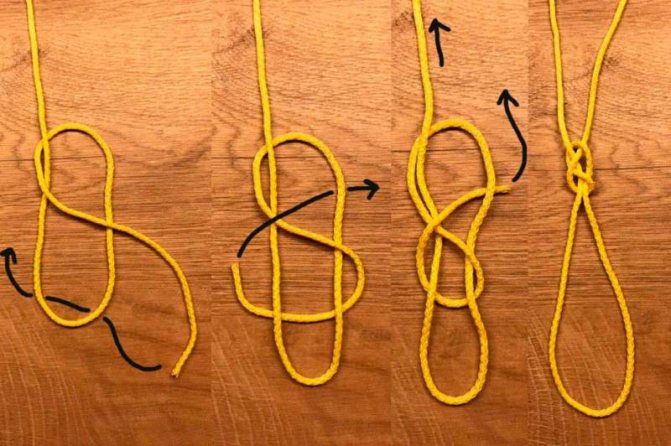
How to knit a tightening noose?
1.
We'll need some rope. Fold it in three.
2.
We form a loop, and with the running end we begin to encircle the doubled rope.
3.
The photo shows the first run-out.
4.
In this photo I have already made 4 runs and a lot of rope has been lost. That is why this knot is excellent for coiling rope.
5.
In the photo below I have already done 6 runs. The double part of the knot is almost invisible, only a small loop sticks out from above.
6.
We thread our running end into this loop for fixation.
7.
Tighten the knot by pulling the loop.
Every like❤ and subscription to
the channel . Thank you for staying with us!
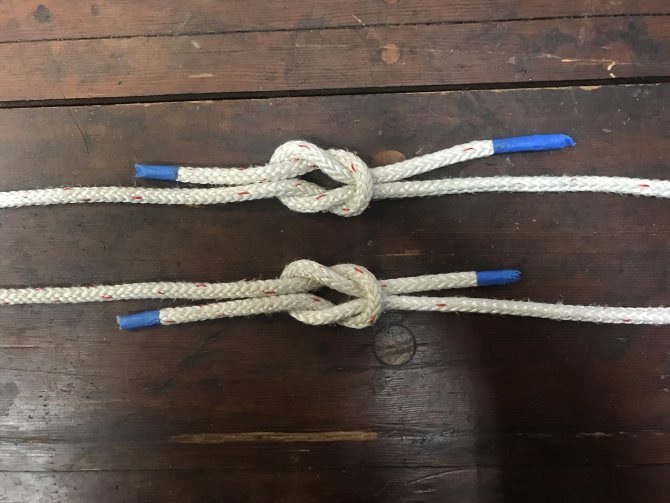
Tying the ropes with a snake knot
The snake knot is another option used to connect two ends. It is used for nylon threads and has high reliability. The second name is bloody. It is justified by the fact that in the past the knot was used to tie a noose on the gallows.
This should be done with at least a few turns from seven to thirteen. The "Tarbuck Knot" belongs to the same group of sliding knots as the "Hangman's Knot"; made by forming a closed gauze at the end of a line or rope. It was developed by climbers when the line was subjected to extreme tension or sudden shock, as the turns that form it absorb the force. Since stranded ropes came into use, they became unusable. These new strings have enough elasticity that the slip and pressure that the Tarbuk knot can create can damage the outer shell of the strings.
To tie a knot you need:
- arrange the ropes parallel;
- loop the end of one rope around the other through the top three times;
- do the same for the other rope, except that here you need to circle through the bottom;
- thread the ends into the ring formed between the ropes;
- Pull the base of the ropes, after which the knot will be easily tightened.
Eight
This is a traditional knot used whenever you need to attach something to a rope. It is easy to knit, it can withstand heavy loads, and later such a knot can be quite easily untied to free the rope.

The Figure Eight knot has two options. The first is used in cases where you have one free end. It looks quite complicated, but once you figure out the sequence of actions just once, everything will work out by itself.
The second option can be used when both ends of the rope are free. This knot is so simple that you can tie it with your eyes closed, and at the same time it is completely secure.
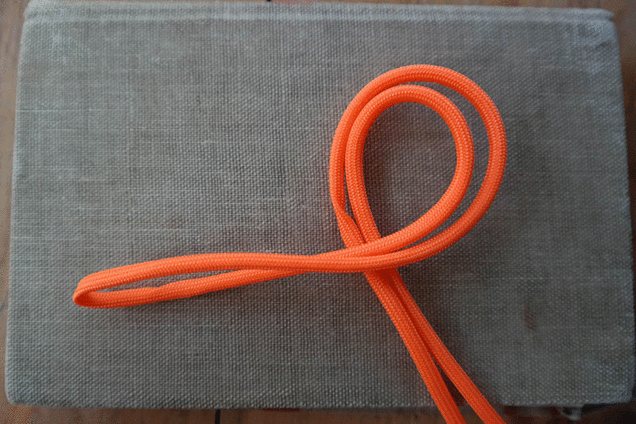
Figure eight knot - knitting pattern
- The first step is to make a common loop, connecting the two ends of the fishing line.
- Near the base, both ends are overlapped on top. The lower line is placed behind the upper one, thus creating the figure “eight”.
- After the end of the fishing line falls into the loop, the required knot is obtained.
- The resulting loop is tightly tightened.
Eight is ready. After completing all the steps, a strong connection is obtained that can withstand heavy loads.
Don't despair if the knot doesn't work out on the first try. It is enough just to practice in order to understand the scheme and the essence of the implementation, and in the future difficulties will not arise.
Let's celebrate! With practice comes the ability to create a strong mount. The acquired ability to knit loops will be useful not only when fishing, but also in everyday life. In the fishing industry, it is recommended to use this weave for monofilament and braid.
Driver node
A truly legendary knot that has many different names and even more practical applications. This knot is used in construction work, during transportation, in tourism and other cases when you need to secure something tightly and tightly.
For those readers who find it difficult to navigate the animated drawings, there are additional instructions containing static photos of each step. You can find it at this link.
What other nodes do you consider practically useful and necessary to master?
Advantages and disadvantages of the Loop knot
There are many more advantages in this list than disadvantages, which is immediately clear. The loop is probably one of the top 10 knots of every fisherman who often faces the need to tie something.
Pros of the Loop Knot
- looks thin even when pulled tight;
- durable in both fresh and salt water;
- allows you to conveniently and quickly change the main loop and connection loop;
- easily tied by hand;
- the size can be adjusted to make a microloop;
- one of the few knots that holds a banjo cord well;
- reliable on any ropes, even slippery ones;
- can be tied with one hand;
- can be additionally tightened for good stability;
- can be quickly tied up in case of danger;
- possibility of knitting through a ring.
Flaws
- does not tighten well;
- not suitable for situations where the knot needs to be untied later.
A variety of sea knots
Straight
Used for fastening and connecting cables of equal diameter.
When sufficiently strong loads are applied to the connected cables, this type of knot is capable of tightening tightly. To prevent such contraction, a wooden plank is used.
Reef
It is necessary when attaching the pins of ship covers.
, as well as when connecting the running ends of the cables.
Eight
Used at the ends of tackles
to prevent them from falling out of the blocks.
Flat knot
Used when connecting cables
of different diameters.
Simple bayonet
The knot is necessary for securing mooring ropes
to the berths.
Used in situations where it is necessary to tie ropes
, where one of them contains a thimble.
Kalmyk
This type of fastening is widely used when it is necessary to supply the necessary tools
, buckets and various items on the mast, overboard, at the time of carrying out the necessary work.
This method is used to secure the safety cable
, clasping the belt of a person who is performing work on the mast or overboard.
Stevedoring knot
It got its name thanks to , which first published a guide to tying knots. It usually performs stopping tasks and is similar in shape to the figure eight. But once the load is released, the stevedoring knot is much easier to untie.
Sequence of tying a stevedoring knot:
- The running end of the rope is folded into a closed loop and wrapped three times around the root end.
- The running end is turned 180° and a loop is threaded through the back side.
- The knot is tightened.
Dagger knot
Widely used for joining thick ropes due to its easy tying and untying, compact size and low rope abrasion.
So, to tie a dagger knot, you need to do the following:
- One end of the rope forms a figure eight (with the condition that the root end is located under its running end).
- The running end of the second rope is passed through two figure-of-eight loops and the root end of the first is drawn around.
- Afterwards, the running end of the second rope is threaded into the second upper half ring of the figure eight.
- The knot is tightened.
Only when the running ends of the ropes are directed in different directions from the axis of the knot is it tied correctly.
Regular noose
The standard version is quite easy to knit. It is actually a sliding modification with an open loop performed on the long end of the rope. It is knitted according to the following pattern:
- We form a loop at the end of the cable;
- We pass the loop made on the root part there;
- We throw it on the desired object to tighten it.
Such simple options are very often used by hunters when catching animals. They are also very convenient for bandaging various parcels. A type of such a noose is considered to be a scaffold modification, the difference of which is the number of turns created.
Library
Author:
Antropov D.M.
Moscow. The science. Fizmatlit. 1995
(scanning: Andrey Dementyev, processing: Victor Evlyukhin)
Introduction
The knot is one of the oldest inventions of mankind. Since ancient times, a person cannot do without ropes and the ability to tie knots. But is it really so important in our time to know how to tie knots, since metal and synthetics provide us with reliable fastening of a wide variety of objects? It turns out to be important. In our life we need to be able to tie knots on shoes, tie stacks of books, tie bags, tie things to the trunk of a car, pull and securely tie ropes, securely tie hooks to fishing line. But the vast majority of people have a very primitive idea of how to tie knots.
In this small book you will find 38 knots that can be useful in a variety of situations. All these knots have been thoroughly tested, tying patterns and explanations for the patterns are provided, areas of application, existing limitations and disadvantages are indicated. If you want to learn more about knots, I advise you to refer to the wonderful book by L.K. Skryagin “Sea Knots” (Moscow, Transport, 1982).
Learning knots takes time and patience. Take a thin soft rope and sit with it and a book at the table. Start studying the diagram, moving from the root end of the rope to its running end, and then tie a knot with the rope exactly according to the diagram. The running end of the rope is its loose free end, which moves when tying a knot, while the root end of the rope is either fixed motionless or remains motionless when tying a knot. In the book, the running and root ends are designated as follows:
Once you understand the pattern, tie the knot several times, choosing the tying method that is most convenient for you. After all, different people tie the same knot in different ways.
Inexperienced people surprisingly easily forget how to tie a knot. Therefore, if you want to constantly use a knot, you need to tie it many times, bringing the tying process to complete automation. And then you need to periodically repeat the tying training.
Of the 38 nodes, the reader will choose the ones he needs. But everyone should know the simplest knots, for example, any reader should master the woman’s and reef (straight) knots and clearly understand the difference between them.
A few words about the names of nodes. Only some of the nodes have established names. If you look, for example, at English literature, you will find out that the same node can have different names. Often the name of the knot changes depending on the method of tying it. Therefore, some of the names adopted in the book are to some extent arbitrary, for example, the name of the “grinner” knot is not a translation from English, but conveys the sound of the English word.
At the end of the book you will find general recommendations. But you should always remember one recommendation. If you need to use a rope or fishing line made of an unknown material, then test the knot you want to use on it. After all, the properties of the knots change even for a rope (fishing line) with the same material, but with different thicknesses.
And let us remind you once again that only numerous training and repetitions lead to the successful use of knots.
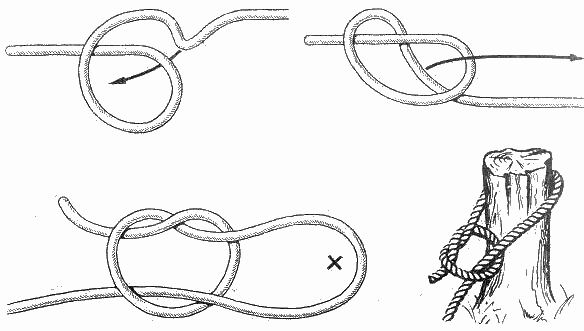
Simple knot
This is the most famous knot, the tying diagram of which is shown in Figures 1 and 2. Once tightened on the rope, a small knot is obtained that is difficult to untie. A simple knot greatly bends the rope, so its strength is significantly reduced. If you accidentally form a simple knot on your fishing line, you should remove it and tie the line with another knot (for example, a snake knot, see p. 24).
In everyday life, a simple knot can be used as a locking knot to prevent the rope from slipping out of the hole. It is also used at the end of the thread to prevent it from slipping out of the fabric, as well as to prevent the end of the rope from unraveling.
A simple knot can very easily and quickly tie two ropes (Fig. 3), but then the knot is difficult to untie. In addition, the rope weakens at the junction. Do not use a simple knot to tie synthetic ropes and fishing lines, it creeps on them.
Eight
The pattern for tying a figure eight is quite simple (Figures 1 and 2). Unlike a simple knot, it does not weaken the rope much and is relatively easy to untie. This knot is used as a locking knot and as an element of other knots.
Bloody Knot
The name of the node has a long origin. It was tied at the end of whips, which in the past were used to punish naval sailors.
To tie a blood knot, make a loop, wrap the running end around the root end several times (Figures 1 and 2), and then tighten the knot. This creates a neat knot that thickens the rope and is used as a stop knot. The bloody node is included as a component element in a number of other nodes.
Babi knot
Almost every person knows and uses this node. Loop the running end of the right rope around the running end of the left rope (Fig. 1), then repeat this operation (Fig. 2) and finally tighten the resulting knot (Fig. 3). This is how many people tie knots.
This knot can be used on rough ropes with high friction. Since ancient times, women have tied the ends of their headscarves with this knot.
However, you need to remember that this is an unreliable knot; when tensioning the ropes, this knot easily slides. That is why sailors treat the woman’s knot with disdain.
However, this knot can also be made durable. First tie a simple knot or figure eight at the running ends of the ropes, and then tie the ropes with a woman’s knot. Such a knot will not be untied.
Reef (straight) knot
Look at the diagram for tying this knot (Figures 1, 2, 3). At first glance, it seems that we are getting a woman's knot again. However, take a closer look at Figures 2 and 3 and you will see the difference. It would seem that such a small change allows you to get a completely different, much stronger, straight knot than a woman’s.
However, it is necessary to point out the disadvantages of the direct knot. When the tension of the tied ropes is high, especially when they are wet, it becomes very tight. A straight knot is not very reliable on synthetic ropes, and when you pull one of the running ends towards the root end, it easily unties.
If you want to be sure of the strength of a straight knot, then tie, as in the case of a woman’s knot, a simple knot or a figure eight at the running ends.
Surgical knot
The natural development of a straight knot with the aim of strengthening it is to increase the number of runs around the running ends. This results in a stronger surgical knot than a straight one. In this case, you need to monitor the direction of the drifts.
In Fig. 1, the runs are made against the direction of movement of the clock hand, when viewed from the root part of the left rope, and in Fig. 2, the runs are made clockwise, when viewed in the same direction. If we do not change the direction of the pulls in Figures 1 and 2, then we will get an improved woman’s knot, which is not as strong as a surgical one.
A surgical knot is easier to tie than a straight one if the rope is under tension, since after completing those indicated in Fig. 1, the running ends do not slip, and the actions indicated in Fig. 1 can be completed. 2.
Quick-release reef knot
Essentially, this is the same reef knot (see p. 9), one of the running ends of which is folded in half. When you pull on the end of the folded running end, the knot is instantly untied. This knot is widely used in everyday life; it is often called a knot with one bow. However, we must remember that it is not very reliable.
Pay attention to the technique of doubling the running end (see pictures). Using this technique, a number of knots can be made quickly untied.
A reef knot can be used to tie a rope to an object (such as a pole). The reader can easily do this if he understands the diagrams in Figures 1 - 3.
Double reef knot
Here, unlike the previous unit, during the second series of revolutions, both running ends are folded in half (Fig. 2). The double reef also comes undone instantly when one running end is pulled (Figure 3). It is widely used for tying shoe laces, ropes, and tying bows, packages, and boxes. However, it is not always reliable, so it is better not to use it in serious situations.
weaving knot
If you want to securely tie two ropes, even if they differ in thickness, then use a weaver's knot (see pictures). This is a classic knot that can be easily untied by simply sliding the loop of the left rope along the root of the right rope. However, it slides on the fishing line, so the weaving knot cannot be used to tie the fishing line.
Water node
Fold the two ropes with the running ends facing each other and begin tying a simple knot (see p. 6). However, make not one turn, but two (see picture). Once tightened, a very strong knot is obtained, even if the ropes have different diameters. This knot is very difficult to untie, so it is used to permanently connect ropes. Unfortunately, when tying this knot through a loop, you have to pull the short running end of one rope and the long root end of another rope, so it is inconvenient to tie long ropes with it.
This knot is widely used by fishermen to attach a leash to the main fishing line. If you want to strengthen the fastening, then increase the number of revolutions from two to four. An important feature of the water knot: it practically does not weaken the fishing line and ties fishing lines of different diameters well.
Simple half bayonet
A simple half bayonet is a widely used knot. Its circuit (see pictures) is simple. By itself, this knot is fragile, but it is included as an element in many knots.
Simple bayonet
A simple bayonet consists of two identical half-bayonets (Fig. 1). Pay attention to the fact that the direction of wear in both half-bayonets is preserved (in Fig. 1, the running end is carried against the direction of the clock hand, when viewed from the root part), since then a more durable knot is obtained. It makes no sense to use more than three half-bayonets, since a larger number of half-bayonets usually does not strengthen the knot. A simple bayonet is used very often, for example, for securing cargo to the trunk of a car. If the running end of a simple bayonet is attached to the root end (Fig. 2), then such a knot will not be tightened. Then it can be used in the presence of strong traction, for example, for attaching anchors.
Cow knot
Reliable, widely used unit (Fig. 1). If you need to properly tighten the rope, then such a knot is a great way to do it. It usually holds traction well. But if you want to be completely sure of the strength of the cow knot, then add a half bayonet (Fig. 2). The cow knot is indispensable for motorists: when tying things to the trunk, this knot with a half-bayonet reliably completes the fastening process. True, a cow's knot that gets wet in the rain is not always easy to untie. To prevent this from happening, when tying a half-bayonet, fold the running end in half (Fig. 3). This knot is reliable and can be easily and quickly untied in any conditions.
Embossed knot
One of the well-known nodes. There are two ways to tie it. The first method is shown in Fig. 1.
In the second method, two loops are formed (Fig. 2), after which the right loop is brought behind the left loop and both loops are put on the object. Then the embossed knot is tightened. This is exactly how fishermen sometimes attach a float, after wetting the fishing line. It must be remembered that the rope knot is reliable only with a constant pull on the rope.
Constrictor
The constrictor is one of the most tightly tightened knots. It is quite difficult to untie. Therefore, the constrictor is often used once. The pattern for tying a constrictor is easy to understand as follows (see picture). Start tying a knot, then pass the running end on the right under the right loop and tighten the resulting knot.
The constrictor can be made into a quickly untied knot by placing a double folded running end under the loops.
Remember that after tightening the constrictor, both the running and root ends of the rope go perpendicular to the axis of the object to which the rope is attached.
Double constrictor
This knot is more complex than the described single constrictor; it tightens even more. Using a single or double constrictor, you can tie a bag very tightly, tighten a rubber hose, tighten a rolled-up carpet, or apply a tourniquet to a wounded arm.
Python knot
A reliable and durable knot, somewhat reminiscent of a constrictor. However, after tightening it, the running and main ends are located parallel to the axis of the object being tied, while in the constrictor they are perpendicular.
The python knot can be used to tie hooks to fishing line, although for this purpose it is better to use more reliable knots (see pp. 23, 26).
Blind loop
Let a fixed (non-tightening) loop be tied at the end of the rope (see, for example, p. 20). Then with the help of this loop you can form a so-called blind loop.
Anglers use a blind loop to quickly tie a spoon. To do this, you need to insert a fixed loop into the eye of the spinner and pull its front part to the side of the spinner closest to us (Fig. 1). Then the front part needs to be lowered down (Figures 2 and 3). This loop can be easily untied in reverse order.
It is sometimes called a tag loop because it is used for tying and storing items with a hole.
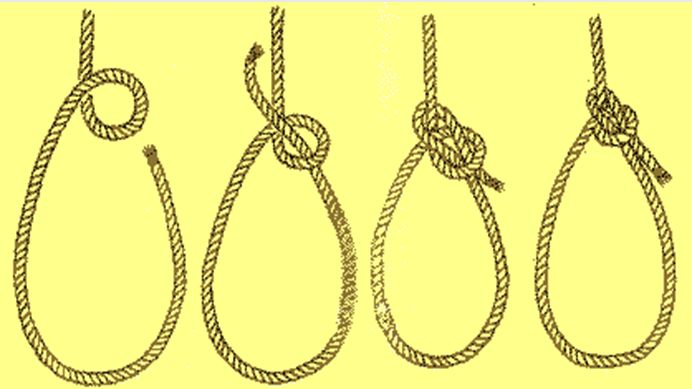
Gazebo (booline) knot
The arbor knot shown in the picture is a famous classical knot known to the Egyptians and Phoenicians as early as 3000 BC. In English literature he is sometimes called the king of knots. The gazebo knot is easy to tie, does not damage the rope, does not slip and, if necessary, can be easily untied. Its only drawback is that it somewhat weakens the line. However, some anglers use it to tie a fixed (non-tightening) loop.
The gazebo unit is indispensable for motorists when towing or pulling a car out of a ditch. Motorists can use it to tie things to the trunk as follows. First, tie a small loop at one end of the rope using a bower knot. Then loop this loop around the trunk rod and pass the other end of the rope through it. This creates a reliable fastening of the rope to the trunk, which can then be easily untied. You should complete tying things to the trunk using a cow knot (see p. 15).
Simple loop
This is the simplest of the non-tightening loops: fold the running end of the rope in half, as shown in the figure, and tie a simple knot with it. A simple loop can also be used on synthetic rope; it is durable and does not change its size. However, she weakens the rope greatly. If you try to use it on a fishing line, the fishing line, even with a relatively low tension, will break at the knot of a simple loop. Therefore, anglers should use a fishing loop. In addition, it should be remembered that a simple loop is very difficult to untie.
Fisherman's Loop
Fold the running end of the fishing line in half and begin tying a simple knot. However, make not one turn, but two (see picture). This creates a very strong, dimensionally stable loop. This loop is very difficult to untie, so it is usually used by anglers to tie a permanent loop at the end of the fishing line. A loop with two turns still weakens the line somewhat. If you want to avoid such weakening, then make more turns (four or five).
English loop (fisherman's fire)
An English loop can be tied either at the end or in the middle of the rope. When tightening, you need to bring the resulting nodes closer together.
This loop can be used on a fishing line, but it is not as reliable as a fishing loop and weakens the fishing line somewhat.
Simple running knot
A simple running knot creates a tight loop. To do this, make a loop and pull the root part of the rope through it (Fig. 1). The resulting loop (Fig. 2) is tightened if you pull the root part. A knot can be tied in any part of the rope. You can use it to tighten a bag or tie a rope to an object.
Untied simple running knot
A simple running knot can be turned into a quick release knot. To do this, you need to fold the running end in half and insert it into the resulting loop (Fig. 1). The resulting loop is tightened by pulling the root end of the rope. It comes undone easily by pulling the running end. This is a very common knot; it can be used to tie, for example, a boat. To prevent the knot from accidentally coming undone, insert the running end into the loop (Fig. 2). This knot creeps on the fishing line, so it cannot be used.
Grinner knot
One of the most suitable knots if you need to firmly tie a rope or fishing line to an object. The pattern for tying this knot is clear from the figure. Anglers often tie the lure to the fishing line with this knot. They can also be used to tie a hook and eye to a fishing line. With this knot you can securely tie the fishing line to the spinning reel. The Grinner knot is very difficult to untie.
Improved gripping unit
A simple, strong knot for tying a rope or fishing line to an object. The pattern for tying this knot is clear from the figure. To tie the fishing line, it is necessary, as shown in the figure, to pass the running end through a large loop, otherwise the knot will turn out to be fragile. Anglers use this knot to tie spinners and to tie fishing line to a spinning reel. The improved gripper knot is very difficult to untie. Since it practically does not weaken the fishing line, it can be used to tie an eye hook to the fishing line.
Palomar Knot
This secure knot can be used to tie eye hooks or spinners to any type of fishing line. From the picture you can see that it is easy to tie. This knot is convenient for tying fishing line to a spinning reel.
Snake knot
One of the best knots for tying fishing lines of the same diameter. The pattern for tying it is clear from Figures 1 and 2. After tightening, a symmetrical compact knot is obtained.
It can also be used to tie ropes, but you must remember that a snake knot is difficult to untie.
Do not use this knot to tie fishing lines of different diameters; such a connection is unreliable.
Albright node
A good reliable knot for tying fishing lines of different and equal diameters. When winding thin fishing line onto the folded running end of thick fishing line, make sure that the turns do not intersect and lie neatly next to each other. The Albright knot is difficult to untie.
Double Grinner Knot
To securely tie two lines of different or the same diameter, use a double-grinner knot. First tie the greener with the right fishing line on the left fishing line (Fig. 1), then tie the greenner with the left fishing line on the right fishing line (Fig. 2). Tighten the resulting knots and bring them closer together.
Step knot
A strong knot for tying a hook without an eye to a fishing line. However, often anglers simplify this knot by not making the first two turns around the hook shown in the figure. This option for tying a hook is also quite reliable.
Knot
A widely used reliable knot for tying a hook without an eye to a fishing line. You can also use it for a hook with an eye, then before tying a knot you need to pass the running end of the fishing line through the eye. This knot is widely used by fishermen at sea.
Figure 8 leash
A reliable way to attach a leash to the main line. First, form a figure eight on the main line. Then pass the leader through the figure eight and tie it to the main line and tighten the figure eight. Strictly follow the pattern shown in the figure, then the tied leash will deviate from the main fishing line.
Improved locking unit
A good stopper for stopping the float during long casts. Attach the needle to the main line and wind the stop line around the main line and the needle according to the pattern shown in the figure. Then insert the end of the stop line into the eye of the needle and pull the needle from the stop line towards the needle point. Remove the needle and pull the knot tightly over the ends of the stop line. After this, cut off the excess ends.
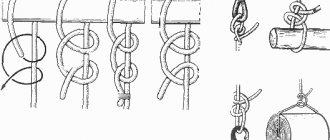
Noose with half bayonets
A noose with half bayonets is used to lift and move logs and other cylindrical objects. The method of tying a noose without half bayonets is shown in Fig. 1 and 2, with half bayonets - in Fig. 3. This knot is used by loggers, so it is also called a log knot.
A noose with half bayonets is a strong and reliable knot that is tightly tightened and easily untied after use. First, two half-bayonets are made, shown on the left side of the figure. 3, and then they tie a noose, which needs to be tied a little away from the middle of the log. Before moving, the slack between the half bayonets and the noose must be taken out. The location of the half-bayonets is also important; they should be on the side of the noose in which the thrust is directed. Lifting heavy objects with a noose without half bayonets is dangerous.
Eskimo loop
When stringing a bow, you need to change the size of the loop; an Eskimo loop is used for this purpose. First, a loop is tied (Fig. 1), reminiscent of a simple running knot (see p. 21). However, unlike a simple running knot, when the size of the loop changes, the running end of the rope moves, not the root end. Next, the string is pulled with the running end and the half-bayonet is tied with it (Fig. 2). The Eskimo loop can be used in a variety of situations to tighten rope.
Fishing bayonet (anchor knot)
Tying a knot to an anchor is one of the most important operations in maritime affairs. The knot shown in Figures 1 and 2 has been tested by maritime practice; it is recognized by sailors as the most reliable knot for fastening the rope to the anchor.
The fisherman's bayonet (anchor knot) is very similar to a simple bayonet (see p. 14). When using it, you need to attach the running end to the root end. Then the fishing bayonet does not tighten and holds firmly even with very strong traction.
Success node
In Japan, this knot symbolizes success. Fold the rope on the table according to the pattern shown in the figure. Then begin to slowly pull the rope in the directions indicated by the arrows. Make sure that the running end, which will turn down, does not slip out of the loop. Gently help tighten the knot with both hands. The result is an original knot, forming a cross on one side and a square on the other.
General recommendations
- Many knots can be made quick-release if the running end is folded in half at the end of the knot.
- Many knots can be made more reliable if you tie either a simple knot or a figure eight knot at the running end, which prevents the running end from slipping out.
- In new conditions or when using a rope (line) made of an unfamiliar material, the knot should be thoroughly tested before use.
- Good knots have a neat and tidy appearance.
- The more revolutions a unit has, the more reliable it is.
- If the knot looks dubious, then it needs to be tied and cut out on the fishing line.
- Knots need to be tightened slowly and carefully; sharp jerks loosen the knots.
- The knots on the fishing line must be wetted before tightening.
- The ends of the knots on the fishing line should be carefully trimmed. Do not use a dull knife or fire, which will weaken the knot.
- Practice tying knots constantly. The results of the training will be reflected when the knot needs to be applied in a real situation.
Crossing with a noose
When hiking, you often have to deal with the need to cross various water obstacles, as well as transporting sick or injured group members. One way to do this is to install a simple crossover. To do this you will need to do the following:
- The main cargo sling is 10 millimeters in diameter, along which the participant or cargo will move through the obstacle. The length should be 5 meters greater than the distance between the supports;
- Cable for additional insurance. It must be 10 meters longer than the double obstacle;
- Devices for reducing wear of the cargo rope.
After this, you should choose a place for crossing, taking into account the terrain. It is necessary to cross at an angle, with reliable supports, and a minimum width of the obstacle. Also, one of the group members must be able to cross close to the intended crossing point.