Since ancient times, people have used different units for household needs. Today this craft has not lost its relevance - tying knots is successfully used in fishing and mountaineering. One of the most famous types is the bowline knot. The arbor connection used by climbers is knitted very simply, but is reliable, durable and highly functional. Depending on the purpose of the knot, different knitting patterns are used.

Node characteristics
Archaeological finds indicate the use of the first knots by the Egyptians and Phoenicians more than 3,000 years ago. John Smith's textbook Seamanship, published in 1629, contains patterns for knitting a bowline knot. The resulting non-tightening loop at the end of the rope made it possible to use this device in shipping on small sailing ships.
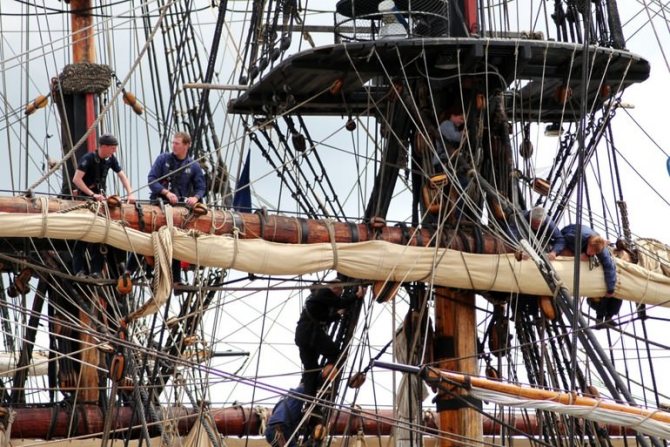
With this connection, sailors attached ropes to sails . Several decades later, this option became famous among mountaineers, rock climbers and speleologists. Athletes use a bowline knot to attach ropes to a support, even one on which it is impossible to put a ready-made loop.
Sometimes this knot is used for belaying - the athlete thus ties himself to the rope. Experienced climbers are able to tie a bowline with one hand. This property is indispensable when carrying out rescue operations, where you can throw one end of the rope to a person. This knot will hold firmly even when tying ropes of different diameters.
A variety, the running bowline, is often used to construct traps in wild survival situations. Despite its small size, the bowline combines several types of fasteners: simple, weaving, straight, half-bayonet. This combination makes it universal and allows you to get a product that:
- It ties naturally.
- It will not drag on even if excessive physical effort is applied.
- Will not bloom spontaneously.
- Protects cables from premature wear.
- Will not slide on the sling during operation.
- If necessary, you can quickly dissolve it.
The main purpose of the gazebo in mountaineering is to secure the human body for the purpose of insurance during ascent or descent. But it can also be used during rescue operations on a ship or during repair work.
Node properties
A bowline with a control knot tied at the end is considered one of the most reliable. That is why it is recommended to use it, for example, for attaching a rope to a support when descending from a height.
However, it should be remembered that under variable loads without a tied control knot, the bowline can crawl, that is, it can unravel on its own. Hence the conclusion - when using a regular bowline in situations where life may depend on it, you should knit a control knot. This is the main climbing rule.
The bowline is also very effective. Thus, each knot tied in a rope weakens it due to bending and the resulting uneven distribution of load. That is, a rope with a knot tied will break faster than one without a single knot.
The effectiveness of a knot shows at what load, expressed as a % of the breaking load of a straight rope, it will break if this knot is tied to it.
Bowline efficiency is 60–75%. This means that the rope on which this knot is tied will break at 60% to 70% of the maximum load. That is, a completely new rope with a declared breaking load of, for example, 22 kN, tied to a support with a bowline, will break at a load of 13.2 kN to 16.5 kN. In other words, the bowline reduces the strength of the rope at the point where it is located by slightly less than half.
Compared to the figure-of-eight and Austrian guide loops popular among climbers, the bowline is a faster and simpler knot, but it is easier to untie even after strong tightening. The “King” requires tying a control knot; without it, it can crawl until it is completely untied. In addition, it cannot be tied in the middle of the rope, unlike the mentioned loops.
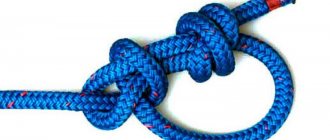
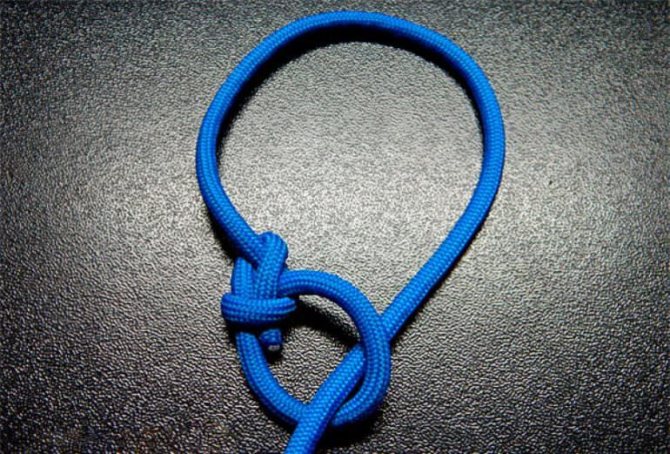
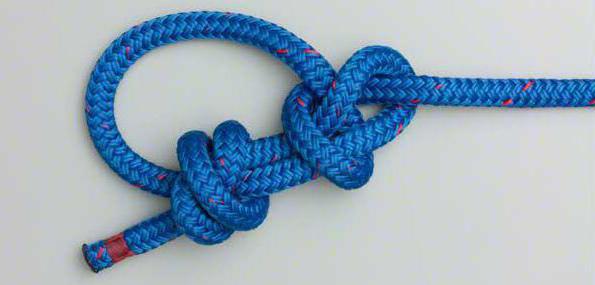
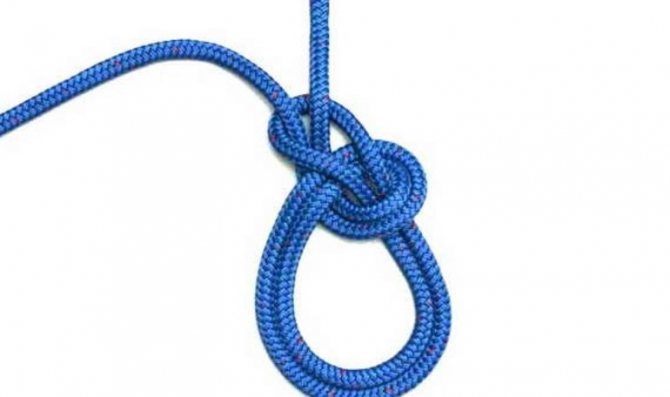
The photo below shows a classic bowline with a control knot:
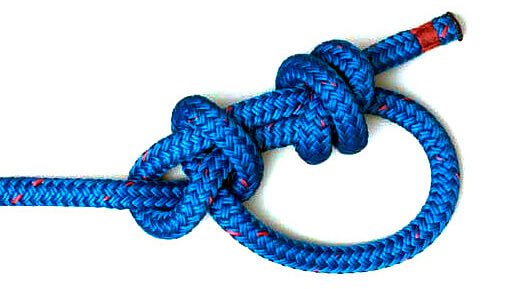
In any case, despite its shortcomings in comparison with other knots, the bowline was and remains one of the best for some tasks.
Varieties of gazebo bowline
Today you can find many options for knitting this product. For the strength of the knot, it is important to determine its purpose. The analogues have a slight difference from the knitting technology of the classic version, but in many cases they are able to prevent the rope from unraveling. The most famous options are:
- classical;
- back;
- double;
- water.
When tying wet ropes, it is recommended to use the water method of joining raw materials. This option involves passing the running end not into one peg, but into two at once. The result is a “stirrup” that prevents the loops from spreading on a wet product.
Classic way
The classic connection is a loop at the end of a rope. It is able to withstand impressive loads and not come undone. It is important for a novice climber to know how to tie a bowline knot. It is a fairly simple and at the same time very reliable type of connection.
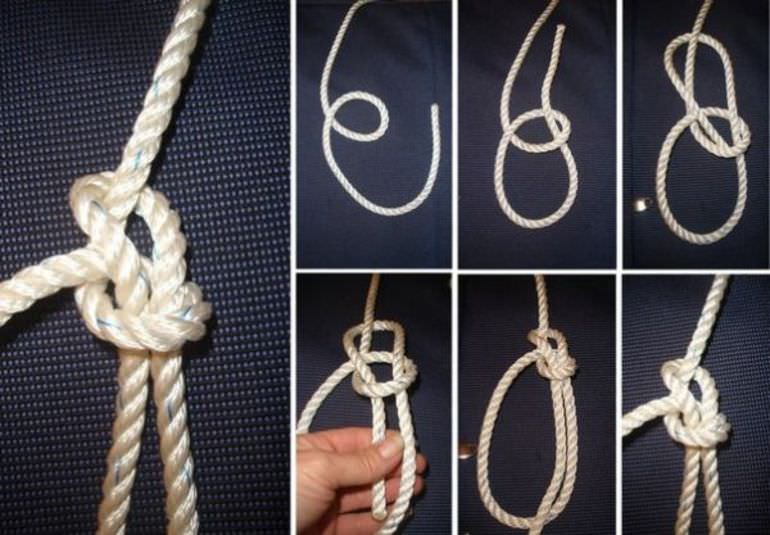
Practicing climbers often supplement this option with a control knot in case of variable loads to be on the safe side. This is explained by the possibility of spontaneous unraveling of the connection under such conditions . It’s not at all difficult to learn how to knit a classic bowline knot according to the pattern:
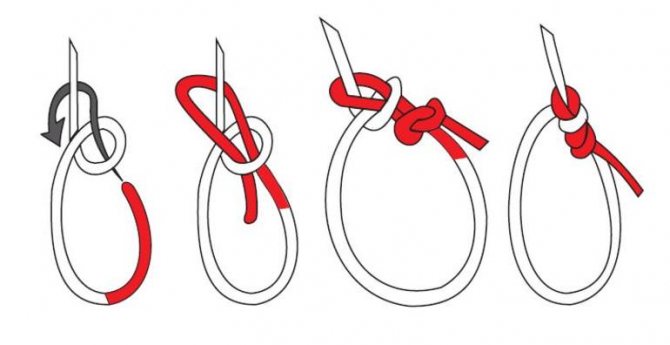
- Take a rope with one free end with your hands and make a simple loop without additional turns. If possible, it can be wrapped around the support to which the connection will be fixed.
- The free end of the rope is pulled through the loop, holding it with your fingers. The running end is wrapped around the free part of the rope and threaded through the loop again. The result is a large and small loop.
- Next, tighten the connection by the large loop on one side and the free part of the rope on the other. The free end that remains after work is used to adjust the size of the large loop.
After fully tightening the connection, a free loop is obtained that can not be tightened or unknotted under the influence of load. To obtain the correct node, you must follow all rules and recommendations.
Reverse method
If the weight of the load exceeds 80 kilograms, then it is recommended to use the reverse method of connecting the rope. This method is a variation of the classic version, but is recognized as more reliable.
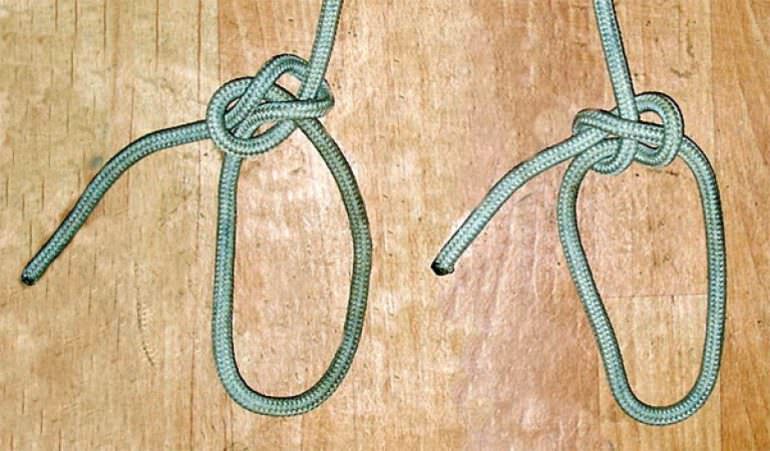
Knitting a reverse bowline is somewhat more difficult than the classic version, but the possibility of spontaneous untying is reduced to zero. This pattern is explained by the process of tying a knot, where first one loop is created, and then a second one is inserted into it from the opposite side of the loaded end of the rope.
As a result, it is not pinched by the loop, which reduces the load at the inflection point. This approach minimizes the likelihood of breaking the connection or the rope itself. In this case, one of the loops creates two points of application of force and distributes the weight more evenly.
Double way knitting
The double bowline is, by and large, intended for rescue operations or work at high altitudes. When carrying out rescue operations, the climber must know how to tie a double bowline to safely lift a person to the desired level . Knit a double arbor knot according to the pattern:
- One loop is performed less than the second. This allows a person to fit into a loop of a larger diameter, and use a smaller one to secure the body in the armpit area.
- The working end is passed around the person's body, but is led in the opposite direction until the second loop is obtained.
- Pass the end of the working rope along the body, but using the opposite direction. The result is a double knot.
Another method allows you to tie a knot in the middle of the rope, which is folded in half. Next, a straight knot is performed by creating a peg. Then the end of the working peg is passed from bottom to top. A loop is pulled out from the resulting loop of the running end of the double rope. At the same time he is being pulled in the opposite direction. The resulting loop is stretched in such a way that the running end passes along the root until a double bowline is formed.
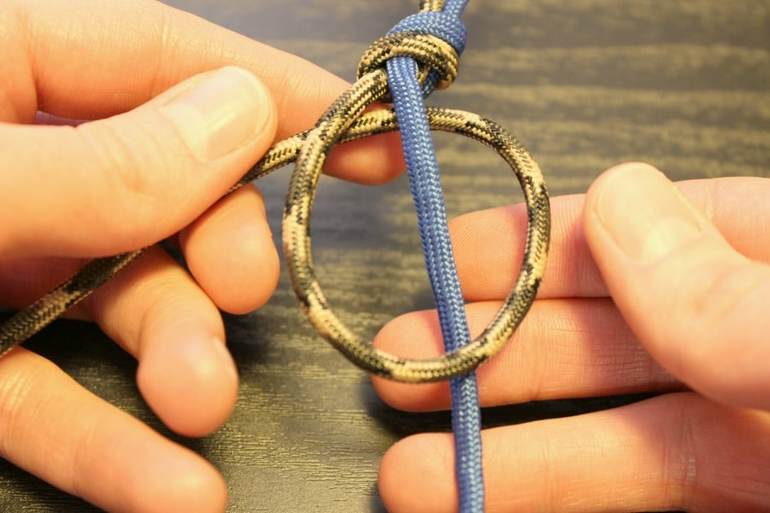
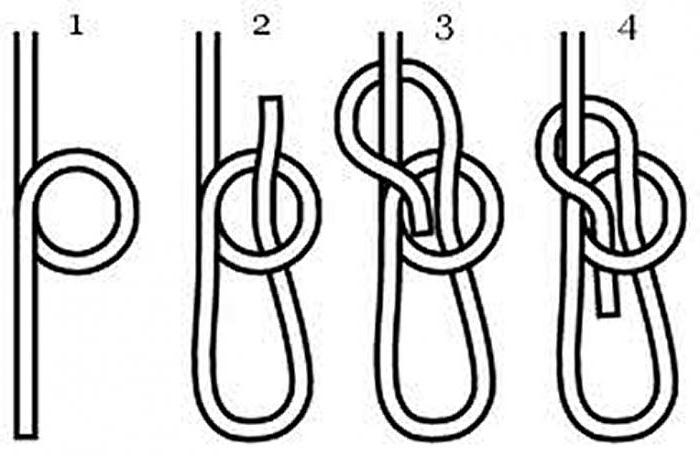
How to tie a bowline knot?
Many people are interested in: “How to knit bowline knots?” Most of our readers do not even suspect that making such a loop is much easier than it seems.

- To begin, make a loop with a crossing in the center.
- After this, grab the intersection of the ropes with the fingers of your right hand.
- Turn the palm with the loop downwards away from you.
- Thread the running end of the rope into the small hole in the center, located above the large loop.
- We pull the running end over the loop, pass the rope from behind and insert it into the hole of the small loop.
- The free part of the thread should be in a position parallel to itself in the loop.
Important! To make the knot more reliable, sometimes another safety loop is formed above it.
Knowing how to tie bowline knots and applying this knowledge in practice, do not forget that an incorrectly formed knot can stretch or come undone at any time. Therefore, carefully monitor the progress of the mating. Remember that the more practice you have, the better and faster you will be able to create a strong and reliable connection called the double bowline knot.
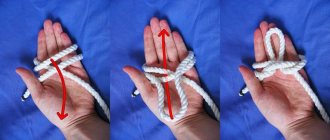
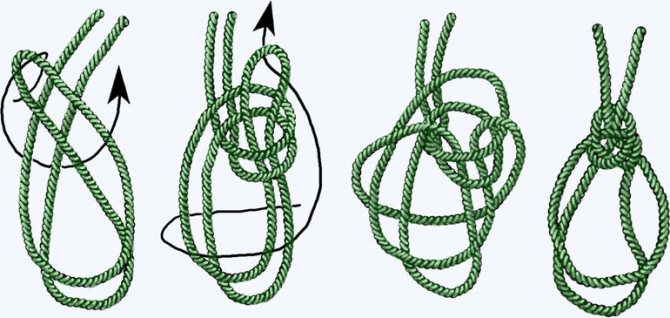
Making the device with one hand
Professionals can quite easily tie a bow knot with one hand. This method is often used during rescue operations. Schematically, the sequence of work looks like this:
- Take the end of the working rope with the palm of one hand. The main cable is wrapped around the thumb.
- Make a turn with a brush to create a loop on the main cable.
- The end of the working rope is clamped into a fist and passed into the resulting hole.
- The running end of the rope is wrapped around the main rope from the reverse side.
- At the end of the work, intercept the end of the working rope and pass it back into the loop.
Then tighten the knot by pulling the running end and the root part of the rope. This results in a reliable and durable connection.
Steps to tie a knot around the waist
Every tourist should know how to tie a bowline knot. Therefore, use the instructions if you have to go hiking.
- Take the root end of the rope in your left hand.
- Wrap your right hand around the running part of the rope around its axis.
- Stepping back about 10 cm from the edge, pinch the right, running end of the rope with your hand.
- Stretch your left hand with the rope forward in front of you.
- Using your right hand with the running end of the rope clamped in it, wrap the stretched root end from top to bottom towards you and up from you. Make sure that the loop does not wrap around the hand and does not completely capture it, otherwise the knot will be tied incorrectly.
- Place the running end of the rope around the tensioned main end to the left, then grab it with the fingers of your right hand.
- Pull the right hand out of the loop, while at the same time inserting the running end of the rope into the base of the small loop.
- Holding the running end with your right hand, pull the main end of the rope with your left to tighten and secure the loop.
The design of the knot consists of two non-tightening loops. Using such a scheme allows the climber to sit in one loop, while the second one covers the person’s torso under the arms. It is easy to climb rocks, cross obstacles using a rope for belaying, and simply work at heights using a structure such as a bowline (knot). The diagram clearly illustrates the sequence of knitting a compound.
Such a knot is knitted on a rope or cable folded in half.
Loop tightening requirements
Special requirements are placed on tightening the rope when tying it with one hand, especially in the case of measures to save the life of another person.
To create a stronger connection, insert the end of the working rope into a small loop. Afterwards, it is pulled out, passed around a large loop and threaded into the upper part of the resulting knot.
To tighten the loop to the desired size, you need to pull the right side of the double large loop, holding the root part of the cable with your palm. Such connections serve as an alternative to a control unit, but during operation it is necessary to ensure that the loop does not fall apart.
Summarize
- Bowline does not tighten
- It's great for tying around trees and large ledges.
- Always tie a control knot on the bowline
- Do not lanyard yourself in the resulting loop.
- Don't tie a bowline to the end of a rope (unless you have a good reason to do so)
Kirill Belotserkovsky, instructor of the Tuyuk-Su alpine camp
Here's another:
- Abseiling on a rope at the UIAA node How to descend on a rope without a descender and not fly into Ginnungagap.
- The reverse side of the stirrup You can hang two people on one stirrup lanyard. One is at the end of the rope, the second is on the back of the stirrup.
- How to tie yourself to the middle one in a bunch You need to tie yourself to the rope, we figured that out. What about the middle one in the group? Read the article, it says.
- Knots for mountaineering: Austrian guide Use it when you are fastening to the middle of the rope, or isolating a broken area.
The most common mistakes made by newbies
Very often, beginning climbers place one of the loops incorrectly when tying. The correct version of the classic bowline looks like this: the small loop is located at the root end of the rope, and is not located on one of the branches of the fastener loop.
Frequent deviations from the technology of performing a node can cost a human life. For this reason, novice climbers are advised to strictly follow all the requirements of the instructions and the sequence of tying a bowline. If the knot is used to secure a load on a support, then the technology for its implementation does not play a special role.
If a classic bowline is knitted for rescue work or climbing a mountain, then you should not leave the end of the working rope very short.
Due to its reliability and ease of execution, the bowline is often called the royal knot. People involved in tourism or mountaineering need to know how it is tied. At the same time, it is not necessary to memorize all the analogues unless there is a special need for this.
Portuguese bowline (double bower?).
Gazebo node. Bowline, Good Knot, King of Knots. People unfamiliar with nautical terminology may think that the name "gazebo" comes from the verb "to chat" or from the noun "gazebo." In our maritime language, the name of this unit comes from the “gazebo”, but not from the usual one, but from a sea gazebo, which is a small wooden board - a platform used to lift a person onto the mast or lower it over the side of the vessel during painting or other work. This board is attached with the help of cables to the lifting cable with a special knot, which is called the gazebo knot. Its second name is bowline. It comes from the English term “bowline,” which refers to the tackle used to pull the windward side luff of the lower straight sail. This tackle is tied to the luff of the sail with a “bowline knot”, or simply “bowline”. It makes sense to dwell on this point in more detail. Indeed, it is admired by everyone who deals with cables and knot tying. This is one of the oldest and most amazing knots ever invented by man. Archaeologists testify that the gazebo knot was known to the ancient Egyptians and Phoenicians 3000 years BC. Not every sea knot can compare with it in the number of positive properties it possesses. Considering the scope of its application and excellent qualities, the arbor knot is rightfully awarded the royal title in the huge dynasty of maritime and non-marine knots. In appearance, it is similar to a weaving knot, but its running end does not go into the loop of the other end, but into the loop of its root end. The gazebo knot, despite its amazing compactness, simultaneously contains elements of a simple knot, half-bayonet, weaving and straight knots. The elements of all these knots in a certain combination give the gazebo knot the right to be called universal. It is surprisingly easy to knit, even with strong traction it never tightens “tightly”, does not spoil the cable, never slides along the cable, does not unravel itself and is easily untied when needed. The main purpose of the gazebo knot is to tie a rope around a person under the arms as a means of insurance when climbing to a height, lowering overboard or in a smoky room during a fire on board a ship. A gazebo can be inserted into the non-tightening loop of this knot. A loop tied with a gazebo knot on the mooring line reliably serves as a firelight. This knot can be successfully used for tying two cables of any diameter or for tying a thick plant cable with a steel one (in this case, the cables are connected with loops, and the knots are tied at their root ends). Of all the ways to connect two cables made of different materials (for example, hemp and steel, Dacron and manila), connecting using two arbor knots with loops will be the most reliable. It can be used for mooring and for attaching the cable to the hook. The reader is offered the most rational and simplest method of knitting. Always in life. Knowing how to quickly tie a bower knot around your waist can come in handy. You need to be able to do this with one hand, with one continuous movement of the hand, in the dark, in 2 - 3 seconds. It is not at all difficult to learn this. Take the main end of the cable in your left hand, and with your right hand, wrap the running end around your waist behind you. Take the running end in your right hand and, stepping back about 10 centimeters from its end, hold it in your fist. Take the root end in your left hand and extend your left arm forward. Now, with the root end of the cable slightly stretched, with your right hand with the running end clamped in it, bend the root end of the cable from top to bottom towards you and up from you. Try to make such a movement with the brush that it does not completely fall into the loop. Next, wrap the running end around the stretched root end to the left and intercept it with the thumb and forefinger of your right hand. While pulling the right hand out of the loop, simultaneously insert the running end into the small loop. Holding the running end with your right hand, pull the root end with a ribbon. After doing this several times in a row, you will learn how to tie a bower knot on yourself, in the dark or with your eyes closed. Imagine this situation: you find yourself over the side of a ship in the water, they throw you an end from the deck, along which you cannot climb up because it is slippery. By tying a bow knot around your waist and moving the resulting loop under your armpit, you can ensure that you are pulled safely out of the water and onto the deck. This magnificent knot has saved the lives of sailors more than once. To untie the gazebo knot, it is enough to slightly move the loop of the running end along the weakened root part of the cable.
Portuguese bowline (double bower?).
Works the same as a simple bowline. It is used in cases where it is necessary to tie two loops at one end at once. For example, lifting a wounded person. Then the victim’s legs are threaded into loops, and a half-bayonet is tied around the chest under the armpits with the root end. then the person will not fall out anywhere, even if he is unconscious.
Eight.
This knot is considered classic. It forms the basis of one and a half dozen other, more complex units for various purposes. In the form in which it is depicted here, this knot in maritime affairs serves as an excellent stopper at the end of the cable so that the latter does not whip out of the pulley of the block. Unlike a simple knot, it does not damage the cable even with strong traction and can always be easily untied. To tie a figure eight, you need to wrap the running end of the cable around the main one and then pass it into the resulting loop, but not immediately, as in a simple knot, but by first bringing it behind you. This knot can be used for rope handles of a wooden bucket or tub, if the rope passes through two holes on the protruding ends of the wooden staves. In this case, having threaded the rope through both holes, the rivets are tied in a figure eight at its ends on the outer sides. Using two figure eights you can securely attach the rope to a children's sled. To prevent your hand from slipping off the end of the dog leash, we recommend tying a figure eight. In addition, it serves well for attaching strings to the pegs of violins, guitars, mandolins, balalaikas and other musical instruments.
Improved Dagger Knot.
In foreign rigging practice, this knot is considered one of the best knots for connecting two large diameter cables. It is not very complex in its design and is quite compact when tightened. It is most convenient to tie it if you first lay the running end of the cable in the form of a figure 8 on top of the main one. After this, thread the extended running end of the second cable into the loops, pass it under the middle intersection of the figure eight and bring it above the second intersection of the first cable. Next, the running end of the second cable must be passed under the root end of the first cable and inserted into the figure eight loop, as the arrow indicates. When the knot is tightened, the two running ends of both cables stick out in different directions. The dagger knot is easy to untie if you loosen one of the outer loops.
Straight knot.
Archaeological finds indicate that the Egyptians used it approximately three thousand years BC. The ancient Greeks and Romans called it Nodus Hercules - the Hercules or Hercules knot, because the mythical hero Hercules tied the skin of the lion he killed on his chest with it. The Romans used the straight knot to stitch wounds and heal broken bones. It consists of two half-knots, sequentially tied one on top of the other in different directions. This is the usual easiest way to knit it. Sailors, who have been using this knot since ancient times to tie cables, use a different tying method. Weavers who use a straight knot to tie up broken threads of yarn tie it in their own, special way, convenient for them. When there are large loads on the connected cables, as well as when the cables get wet, the straight knot is greatly tightened. How can a straight (reef) knot be untied, which “is so tightened that it cannot be untied and will have to be cut.” A straight knot, even if wet and tightly tightened, can be untied very simply, in 1 - 2 seconds. Tie a straight knot. Take ends A and B in your left hand, and ends C and D in your right hand. Pull them strongly in different directions and tighten the knot as tightly as possible. After this, take the root end of A in your left hand (to prevent it from slipping out of your hand, make a couple of slings around your palm). Take running end B in your right hand (it can also be wound around your palm.). Pull the ends sharply and firmly in different directions. Without releasing end A from your left hand, clench the remaining part of the knot into your fist with your right hand, holding it with your thumb and forefinger. Pull the root end A to the left - the knot is untied. The whole secret is that when ends A and B are pulled in different directions, the straight knot turns into two half-bayonets and completely loses all its properties. It also comes undone easily if you take the root end G in your right hand and pull the running end B strongly to the left. Only in this case, the end of G must then be pulled to the right, and the remaining part of the knot (half bayonets) - to the left. When untying a straight knot in this way, remember that if you pulled the running end to the right, pull the main end to the left and vice versa. When untying a straight knot, one should not forget that with the same force it was tightened, one of its running ends must be pulled with the same force.
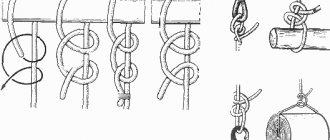
Flat knot.
It has long been considered one of the most reliable knots for tying cables of different thicknesses. They even tied anchor hemp ropes and mooring lines. Having eight weaves, the flat knot never gets too tight, does not creep or spoil the cable, since it does not have sharp bends, and the load on the cables is distributed evenly over the knot. After removing the load on the cable, this knot is easy to untie. The principle of a flat knot lies in its shape: it is really flat, and this makes it possible to select the cables connected with it on the drums of capstans and windlass, on the welps of which its shape does not interfere with the even placement of subsequent hoses. In maritime practice, there are two options for tying this knot: a loose knot with its free running ends tacked to the main or half-bayonets at their ends, and without such a tack when the knot is tightened. A flat knot tied in the first way (in this form it is called a Josephine knot) on two cables of different thicknesses almost does not change its shape even with very high traction and is easily untied when the load is removed. The second tying method is used for tying thinner cables than anchor and mooring ropes, and of the same or almost the same thickness. In this case, it is recommended to first tighten the tied flat knot by hand so that it does not twist during a sharp pull. After this, when a load is applied to the connected cable, the knot creeps and twists for some time, but when it stops, it holds firmly. It unties without much effort by shifting the loops covering the root ends. As already mentioned, a flat knot has eight intersections of cables and it would seem that it can be tied in different ways; there are 256 different options for tying it. But practice shows that not every knot from this number, tied according to the principle of a flat knot (alternating intersection of opposite ends with under and over), will hold securely. Ninety percent of them are unreliable, and some are even dangerous for tying ropes designed for strong traction. Its principle depends on changing the sequence of intersection of connected cables in a flat knot, and it is enough to change this order a little, and the knot acquires other negative qualities. Before using this knot in practice for any important task, you must first remember its diagram exactly and connect the cables exactly according to it without any, even the most insignificant deviations. Only in this case will the flat knot serve you faithfully and not let you down. This marine knot is indispensable for tying two cables (even steel ones, on which significant force will be applied, for example, when pulling out a heavy truck stuck in the mud half a wheel with a tractor).
Flemish loop (figure eight).
Knitted in a figure eight on a doubled rope, it is a strong and easy to untie loop at the end of the rope. The Flemish loop is suitable for tying on both thick and thin cables. It almost does not weaken the strength of the cable. Used for fastening strings of musical instruments and other purposes.
Flemish knot ( counting figure eight).
This is one of the oldest maritime knots, which was used on ships to connect two cables, both thin and thick. In fact, this is the same figure eight, tied at both ends. There are two ways to tie this knot. First, make a figure eight at the end of one of the cables tied together. Towards the exit of the running end, insert the running end of the second cable and repeat figure 8, tied on the first cable. After this, grab each two ends, left and right, and begin to tighten the knot evenly, trying to maintain its shape. To final tighten the knot, pull the root ends of the cables (see figure). To connect two cables with a Flemish knot using the second method, place the running ends of the cables being connected parallel to each other so that they touch each other approximately along the length of one meter. At this point, tie a figure eight with two cables folded together. In this case, you will have to carry it around and thread it into the loop along with the short running end of one of the cables and the long main one. This is precisely the inconvenience of the second method of tying the Flemish knot. The connection of two cables with a Flemish knot is considered very strong. This knot, even if tightly tightened, does not damage the cable, and it is relatively easy to untie. In addition, it has excellent quality - it does not slip and holds securely on synthetic fishing line.
False knot.
On a sailing ship, straight sails, which were placed between the topsail and the lower yard, were called topsails. Depending on which mast the sail belonged to, it took the name “main-topsail” on the mainmast, or “fore-topsail” on the foremast. The gear used to raise the yards of these sails was called the main-marsa-halyard and fore-marsa-halyard. These tackles were attached to the yard with a halyard knot. Like the fox knot, the halyard knot is considered a reliable sea knot. It can serve quite well in our everyday life.