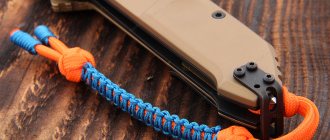
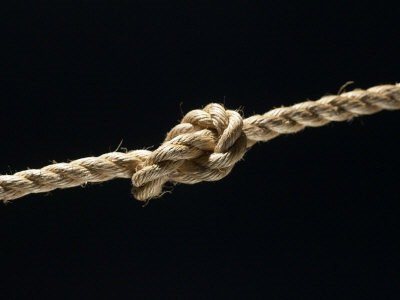
Knitting pattern for the gazebo knot
Thanks to its distribution and thousand-year history, the “gazebo knot” has received several methods of knitting. They differ only in the order and features of the actions when tying and do not in any way affect its strength or effectiveness. For better understanding, the most common, classic method is proposed below.
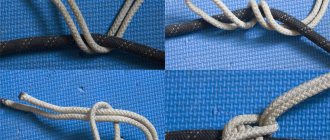
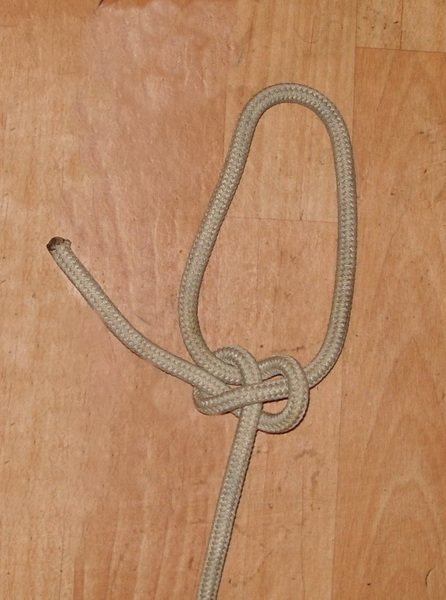
Classic way
| We take a rope with one free end, you can wrap it through a support to which the rope will be tied; We make a simple small loop, without turns; |
| Now we pull the free end through a small loop, which needs to be supported with your fingers; We wrap the running end behind the free part of the rope and insert it again into the small loop; |
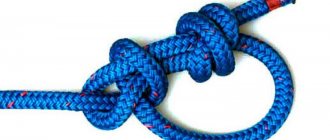
| Now we tighten the knot by the large loop on one side and the free part on the other (using the free end you can adjust the width of the large loop); We managed to tie a “bowline” or “arbor knot” in our classic version! |
The “Bouline Knot” is unique in its characteristics. Externally, it may resemble a weaving knot, but everything differs in the way it is tied. Such a knot never gets pulled into a dead center under the weight, it does not damage the rope or cable under the weight, it is quite easy to tie and never unties itself. Basically, it plays the role of securing the safety rope on a person who is sitting on the gazebo.
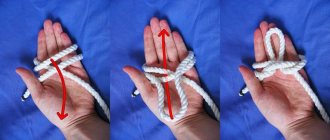
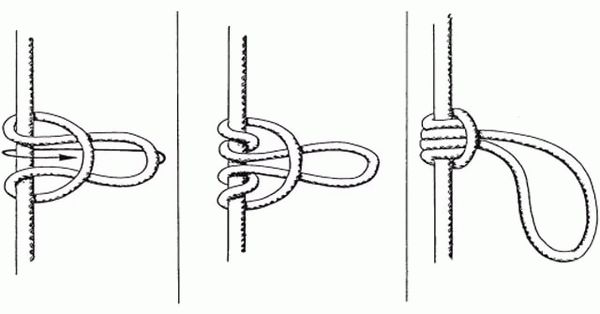
Knitting with one hand
| Take the running end in your fist |
| Stick your thumb out and wrap the main cable |
| Turn the brush to create a loop on the main cable |
| Push your hand into the loop along with the running end |
| Wrap the running end around the main cable on the reverse side |
| Intercept the running end and pull it back into the loop |
| Tighten the knot by pulling the running end and the main part of the rope |
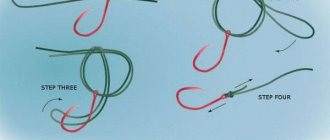
It’s so easy to tie a Bowline knot with one hand, you can see it more clearly in the video:
“Bowline” is applicable to all main types of cables and ropes, regardless of the quality and characteristics of the fiber. It helps out when you need to temporarily tie and shorten the length of a rope or cable, as well as when you need to play it safe and release the frayed part of the rope or cable from tension. The “Gazebo Knot” enjoys great respect among sailors, since over its centuries-old history it has saved many lives of sailors.
Simple bayonet
If you tie 2 half bayonets, they form one simple bayonet. It has always been used to secure the rope to various mooring bollards, bits, guns and bollards. Many beginners may tie the second half bayonet incorrectly, and as a result, the knot tends to tighten.
To determine whether you have tied the rope correctly, you need to bring the half bayonets together. If you did everything correctly, they form a bleached knot, otherwise - a cow knot. If you want to increase the strength, you can use another half bayonet. This is the maximum number that can be rationally used for fastening reliability, and increasing their number will not increase efficiency.
Very often, two such knots are used for short-term connection of two mooring lines or ropes.
It is also rational to use this unit when it is necessary to secure a rope during strong traction, for example, when a car is being towed or to secure a safety rope.
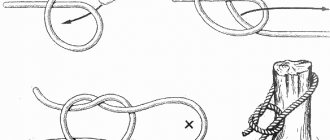
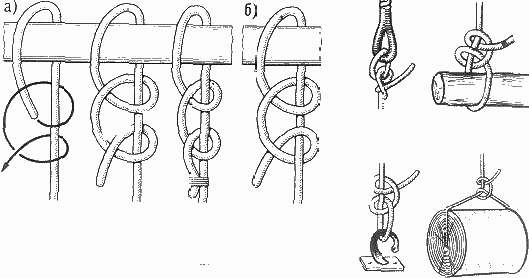
Knitting pattern
- We make a loop around the fulcrum.
- We pass the rope through the formed loop. It makes no difference whether you pass the free end over or under the rope. It is important that all subsequent ones are tied in the same way as the first.
- Make a loop around the rope.
- We pass the free end through the formed loop, just like the first time.
- We secure the end with a control knot.
Application
A simple bayonet is used in maritime navigation to fasten the rope ends of a sea vessel to special protrusions on the pier for mooring the vessel.
This knot is so reliable and easy to untie that even the ships of the royal fleet used it to secure their ships to the piers.
A simple bayonet is also used in carrying out loading and unloading operations on a ship. It is used to secure large loads to the hook of a crane or winch.
Tying the “Running Bowline” knot and its application
This type belongs to the simple type of sliding rope knots; it is used in maritime affairs for searching for sunken objects, catching driftwood, boards, logs, and lifting anchors.
To tie it, you need to follow these steps:
- Take a rope (it is necessary that it has a slippery surface, since the operation of the knot involves changing the size of the loop). A small loop is made 50-60 cm from the end.
- The end is wrapped around the main rope, forming a large loop.
- Next, the end is threaded into a small loop.
- Wrap around the root end of the large loop and pass back into the small loop (similar to a classic bowline)
- The resulting knot fixes the formed main loop. The size of the large loop can be changed in diameter.
This knot is very strong; it can be tied in a few seconds and quickly untied.
Direct sea knot: advantages, disadvantages, nuances
The main advantage is the simple knitting process. There are two negative points here:
- creep under variable loads;
- strong fixation under significant loads.
Be sure to consider the following nuances:
- A direct marine knot is used to tie together ropes that have the same diameter.
- A prerequisite is the presence of control nodes.
- This technique can be used for knitting fishing lines.
What is a "Reverse Bowline"?
Despite its high reliability, the classic Bowline knot often breaks and drops a load whose weight exceeds 80 kg, especially if the tying was done by an inexperienced person. The “Reverse Bowline” modification has greater strength: in this case, after creating the first loop, the second one is inserted into it not from the side of the loaded rope end, but from the reverse side.
The peculiarity of such a knot is that the loaded end will not be pinched by the loop, and the load at the inflection point leading to rupture is much less. One of the loops creates two points of application of force, due to which the weight is applied more evenly to the rope. Thanks to this principle, the “Reverse Bowline” is considered more tensile.
Functional classification of existing nodes
The connections under consideration began to be made on fundamentally new materials (from the point of view of their properties), and therefore previously unknown modifications of the units arose. This led to the identification of their functional variety:
- Splicing of 2 or more flexible materials in different variations.
- Fastening the knot carrier (a rope connects 2 or more objects to each other, 1 of which can act as a rope support).
- Stopper of the assembly carrier in various kinds of holes, including those that relate to the designs of the connections in question.
How to knit a Double Bowline?
Such a knot, which involves the formation of two non-tightening loops, is used when it is necessary to lift a person to a certain height, and it is also used as part of compliance with safety regulations when working at height.
For knitting, one loop is made half the size of the second: in the larger loop a person can sit, and the second serves to grab the body under the arms. This design makes it possible to use both hands for work, which is why this knot is especially popular among industrial climbers.
In addition, the “Double Bowline” can be used to knit a safety rope: in this case, the length of both loops is the same.
Method of knitting Double Bowline:
| When knitting, you must use a cord or rope folded in half; after inserting the large loop into the small one, the end is slightly pulled out. |
| With the end, circle the large loop and pass it to the upper segment of the knot. |
| Hold the main rope with one hand and pull the left side of the large loop with the other to tighten the Double Bowline. |
It is important to know!
- While moving along the rope, the knot is in the hand. When a climber falls, the knot reflexively clasps in the hand and does not grab the rope. In this case, the braking process is carried out only due to the force of the hand, which leads to severe burns, falling and complete rubbing of the gripping unit. That is why it is necessary to move the knot along the rope by pushing it in one direction or another, and in no case by squeezing it in the palm of your hand.
- Make sure that the second turn of the knot goes in the opposite direction to the first knot.
- As a rule, the prusik is tied from ropes of different or the same diameter than the diameter of the supporting rope (railing).
- One turn on the grasping knot is knitted when making an ascent or descent, as well as for lifting a large load. Remember, one turn on a climbing knot, and in other applications of the prusik, always means “etching”, and in the case where the main rope has too rigid a structure, icing or high tension, a small number of turns can lead to a breakdown, fall or uncontrollable the descent of man. Therefore, more than two turns are made on the node.
- During Prusik ascent, the gripping knot rises along the rope as it is pulled up by the free ends, this leads to the formation of overlaps, which contribute to the weakening of the gripping knot after loading. In addition, the knot is pushed along the rope, rather than pulled or grasped by the palm of your hand.
- When using the cord for a long period, make sure that it is intact and not frayed. Inspect equipment carefully before and after use.
- Ideally, the grasping knot should be as long as your outstretched arm. In the event of a breakdown, frostbite or injury, it is extremely difficult or almost impossible to reach a node located at a higher altitude!
This is interesting: How to tie an Albright knot: diagram
Application of the Gazebo Knot
This knot is used to tie a rope or cable to a board in a ship's gazebo. Another name “bowline” comes from the English “The Bowline Knol” where “bowline” means a device for pulling the luff of the lower sail. This device is attached to the luff using a marine bowline knot.
The gazebo unit is very actively used in the navy. Due to its versatility and characteristics, it can be used for a wide variety of purposes on a ship. In addition, its use can often be found in construction, extreme tourism and mountaineering, and household activities.
The gazebo knot migrated from the fleet to other spheres of human activity in ancient times. Through thousands of years of its history, it has not lost its relevance to this day. Its big advantage is that it is excellent for knitting on absolutely any type of rope. The bowline can be knitted on a support, in a tense or relaxed state. Thanks to this feature, it has received quite a wide application, unlike an ordinary sea knot.
Anchor knot or fishing bayonet
It has been used for thousands of years to attach a rope to an anchor. This knot is also used to tie the ends of the cable to any mounting hole. It is a reliable and easy to untie knot.
How to tie an anchor knot:
- We pass the end of the rope two times through the loop of the anchor or other fastening hole.
- We throw the free end of the rope over the fixed end and pass it through the resulting loop.
- We tighten both loops.
- We make a regular knot on top for reliability.
Marine knots... what exactly do a diver need them for?
There seems to be a fairly wide selection of carabiners that allow you to attach anything to anything. But then the need arises to urgently attach something underwater, a suitable carabiner is not at hand - and the fun begins! It suddenly turns out that despite the fact that some divers theoretically know how to tie a bowline or figure of eight, practically no one uses them underwater. At best, a straight knot is tied, and at worst, the structures created by divers are beyond description! But there is nothing simpler, cheaper and more reliable than a correctly tied sea knot. This article provides basic patterns for tying sea knots that may be useful to a diver. Of course, this is also just a theory - tying sea knots requires regular practice - then, if necessary, you will be able to use them automatically.
Reef double knot
As mentioned earlier, in ancient times the use of the straight knot by sailors was limited to taking reefs. It is for this reason that its second name is reef knot. As for the double straight knot, it is also called a tether knot. The sailors practically did not use it: to temporarily connect the rods and other ends, they used a reef knot.
According to Dahl, a straight double knot is also called a “loop knot”, “burdock (bow)”. You can often hear it referred to as a byte node. The technique of knitting it is the same as a straight knot, with the exception of the first moment, when in the 2nd half-knot the running ends are first folded in half and only then tied. It is indispensable for lacing shoes, tying bows in the neck area, bows on hair, boxes, and packages.
Thus, before mastering the technique of tying a double reef knot, it is worth practicing how to make a straight knot.