Types of optical sights
Before you begin zeroing a rifled weapon, you will first have to select a suitable optical sight for it. It is important to understand that not all optics presented in gun stores are equally effective for hunting purposes. Typically, “body kit” is classified according to the following principles:
- Multiplicity. It can be fixed (the optics do not have the ability to zoom in and out) or adjustable (varies from 1.5x to 9x or more). Of course, the first option will cost almost 2 times less, but the second is considered universal, since it can be used at various distances.
- Line of sight. It represents the very region of space that the shooter sees in the eyepiece. This indicator is usually measured in degrees or meters. The larger the field of view, the easier it will be for the shooter to search and observe the target. So it’s better not to skimp on this parameter, especially if you plan to use the optics for hunting.
- Reticle (or reticle). An auxiliary image that the shooter uses to aim at a target. There are a huge variety of sighting reticles: cross with a dot, thin cross, German mark, duplex, circle, mild dot, PSO and so on. For hunting, it is recommended to use something simple that does not block your view.
- Diameter of the entrance lens. The characteristics of the sighting device depend on this parameter. The thicker the lens, the higher the aperture ratio and wide field of view the optics have. At the same time, this parameter greatly affects the weight of the accessory, and therefore the weight of the weapon too.
- Sight body. As a rule, optics are a monotube with several lenses. This oblong part can be made of plastic, metal or duralumin. The higher quality the material, the longer the service life the optics can boast. Plastic does not have the best tightness, and can also dry out in the sun.

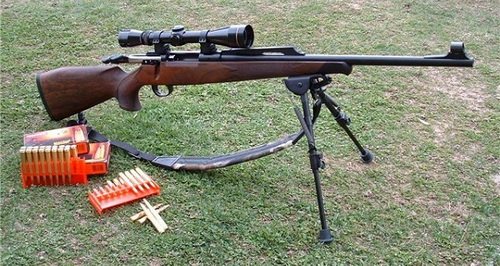
Sight KONUS KONUSFIRE 3-9×32 30/30
There are many types of optical sights, so it is quite difficult to classify them. Hunting enthusiasts should opt for inexpensive pankratic models (around 6,000 rubles) with adjustable magnification from 2x to 8x and an aiming mark in the form of a thin reticle or a reticle with a dot. This “body kit” is considered universal and is suitable for hunting most types of game from a distance of 80 to 600 meters.
About installing the aiming device
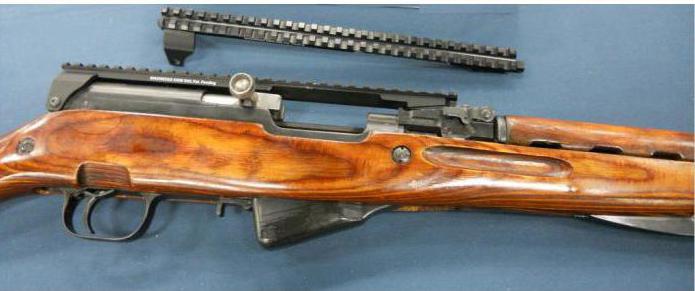
An optical sight for the SKS 7 62 x39 carbine is installed using special side mounts. They are equipped with many Russian-made carbines. Foreign-made weapons are equipped with a dovetail sighting system. It looks like a strip, which is located in the upper part of the body. It is structurally impossible to install optics on SCS in its pure form. It is recommended for this purpose to use a side rail attached to the receiver of the carbine. Additionally, monoblock brackets and rings can also be used.
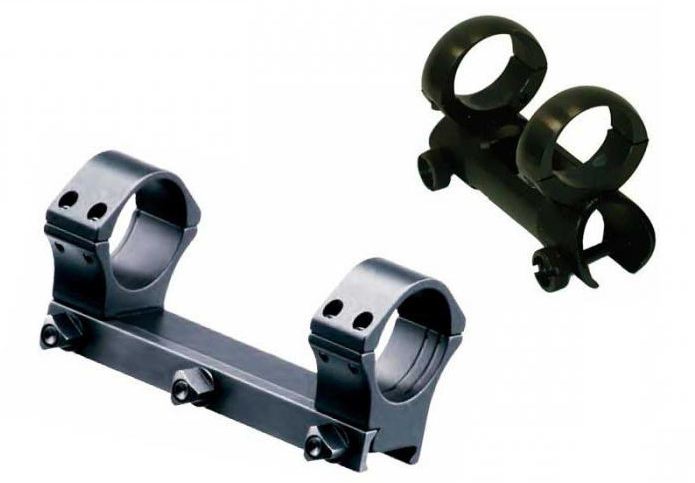
They are sold in hunting and fishing stores. According to gunsmiths, such mounting tools are not very effective. The best option for the Simonov carbine is to mount optics using a quick-release bracket. The place for its installation is the left side of the receiver in the SKS. It can also be equipped with a laser target designator, allowing shooting at dusk. If necessary, the bracket does not interfere with shooting from an open sight.
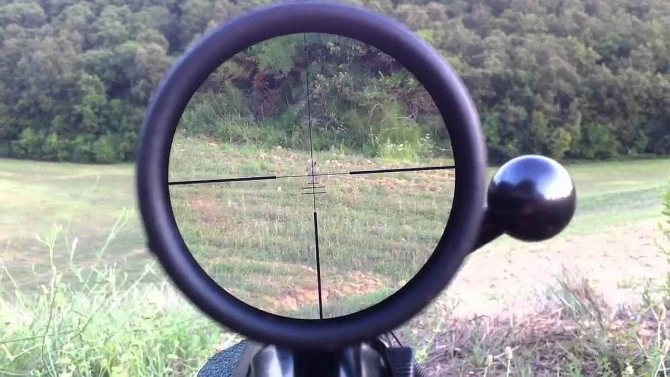
What is parallax
Before starting zeroing optics, it is recommended that the novice shooter familiarize himself with a phenomenon called parallax. In a nutshell, this is a displacement of the target by a certain distance relative to the eye. That is, if you try to aim at a small target using an optic, located at a distance of 500-1000 meters from it, the aiming reticle will not always be located exactly on the object - it all depends on what angle the eye is at.
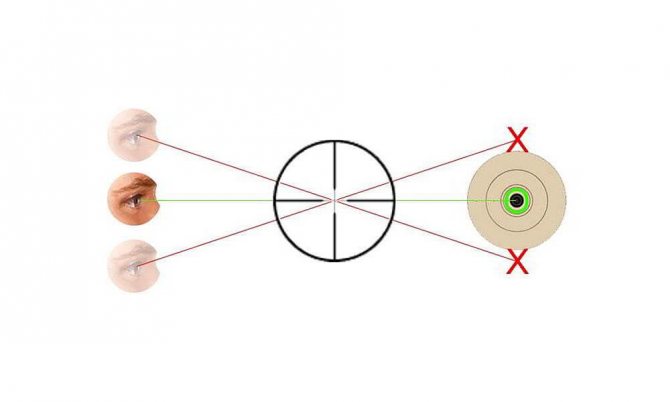
However, do not rush to get upset and refuse to install optics. As a rule, on most optical sights (even the cheapest ones), the parallax effect begins to appear only after increasing the distance to 100-150 meters. In this case, significant deviations (5 cm or more) will occur only at a distance of +500 meters. That is, if you do not plan to target your optics at sniper distances, then there is nothing to worry about.
Targets
To zero your optics you can use:
- a sheet of paper with a drawn target - it can be drawn with a marker;
- a target downloaded from the Internet and printed;
- military targets for shooting, which can be obtained from army units.
On the ground, colored targets are more visible than black and white ones. Colored self-adhesive sheets of notes placed in the center of white paper are well suited for zeroing.
There is a gradation of optimal target sizes depending on distance. If you select a target in accordance with it, shooting the optical sight will be as convenient as possible:
- at distances of 50 and 100 m, an A4 sheet is sufficient;
- for 200 m – A3 format;
- for 300 m – A1 format.
Preparation
Proper preparation of weapons, optics, targets, tools and other things for zeroing is the key to the success of the procedure. If the shooter neglects this step, then difficulties will almost certainly arise in the process, and the optical sight will have too great an error to use it for hunting. So, before you start shooting a weapon, you should follow 6 preparatory nuances described in the following sections.
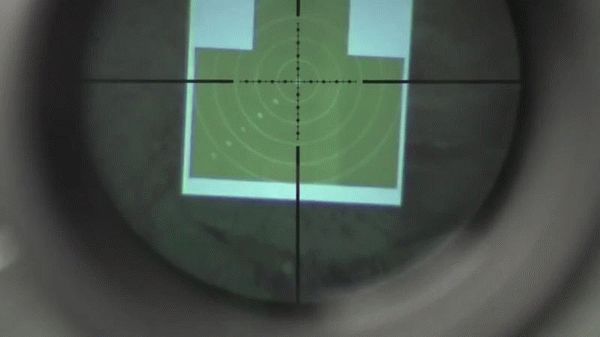
Reticle sharpness
After purchasing optics, the first thing you should pay attention to is the sharpness of the aiming mark. It should look as clear as possible in the scope's eyepiece. However, do not be upset if the image is blurry, because most modern sights allow you to adjust it - you just need to read the instructions to understand which of the drums is responsible for this.
The main feature of adjusting the sharpness of the reticle is that the longer the shooter peers at the mark, the sharper it will seem to him. The reason for this is the accommodation of the human eye. So it’s best to adjust sharpness the first time. Well, to do this as accurately as possible, it is recommended to point the optics at some low-contrast background, for example, a blue sky.
Zeroing distance
The next preparatory stage is to determine the optimal shooting distance. Most optical sights are adjusted to zero at a distance of 50 or even 100 meters - at this distance they hit the target exactly. However, do not forget that different bullets can have different ballistic characteristics even at this distance. So, if the optics are designed for a rifled carbine of 7.62x54R caliber, this does not mean that small rifles or pneumatics using this body kit will also hit the target.
After the shooting distance has been verified, you need to attach the target to a hard surface and then try to aim at it. There is no need to worry about the parallax effect at such a distance, but it is still recommended to select an aiming angle so that the mark is as clear as possible - this will become increasingly difficult in the future, so it is best to learn in advance. Well, as a point for shooting, it is best to choose not the center of the target, but the lower part of the black circle, since it is easier to aim at it.
Selection of target and magnification
You should not think that any target can be suitable for zeroing optics. It should be large enough so that the shooter can easily hit it even from a long distance. The optimal diameter of the circle is 50 centimeters. There should not be any holes on paper from previous shots, because they will constantly mislead the shooter. The outline of the target must be printed clearly enough. Ideally, the shooter should see not only the lines of the circles, but also easily recognize the numbers between them.
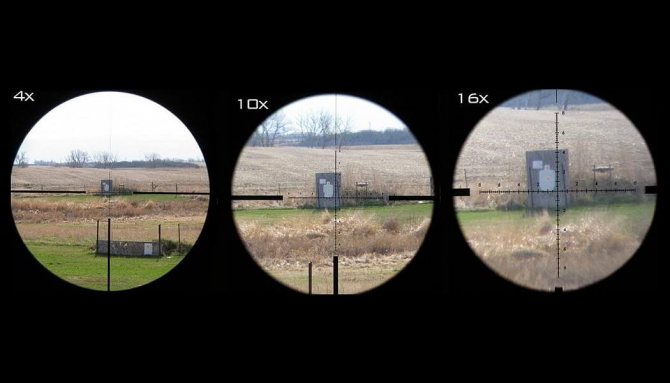
Now a few words about what magnification is best to zero in optics. Most experts will answer this question simply - at the maximum. However, a beginner should understand that the higher the magnification of the optics, the more noticeable the vibrations will become during aiming. So this advice only makes sense if the rifle is in a fixed position (for example, clamped in the vise of a sighting machine) or the shooter has a bipod (an alternative would be a sandbag).
Bullet selection
As for the cartridges that will be used for shooting. If you are going to hunt with expansion bullets, this does not mean that they should be used to adjust your optics. Such ammunition leaves huge holes after impact, so it is not always clear where the ballistic projectile hit and where it simply tore the paper. It is preferable to shoot with flat or rounded training bullets, which leave even marks behind them - there will be no problems with adjusting the optics.
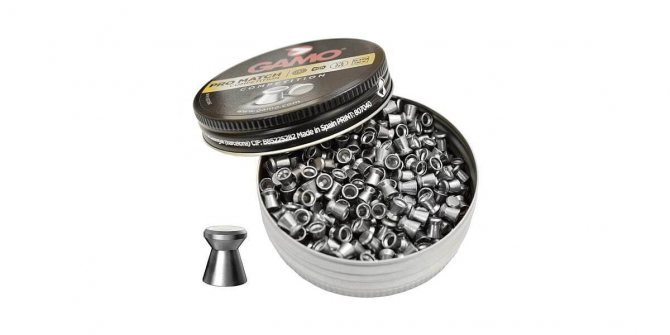
Flat bullets leave even marks
However, if we are talking about zeroing optics from sniper distances, then it is best to use the cartridge that will be used in real conditions. The weight and ergonomic characteristics of a bullet fired from a rifled rifle begin to appear already at around 300 meters. If you are using a heavy projectile, keep in mind that it will begin to lose altitude after a certain distance. When zeroing in optics, a bullet with a tracer tip performs quite well, since it glows green in flight.
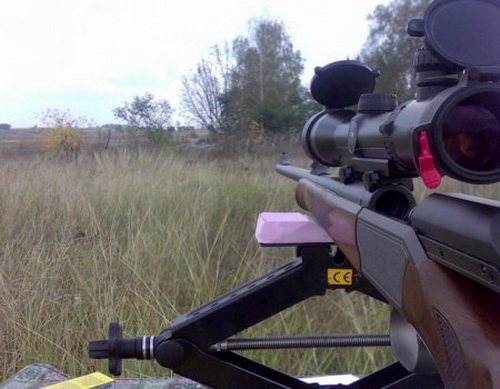
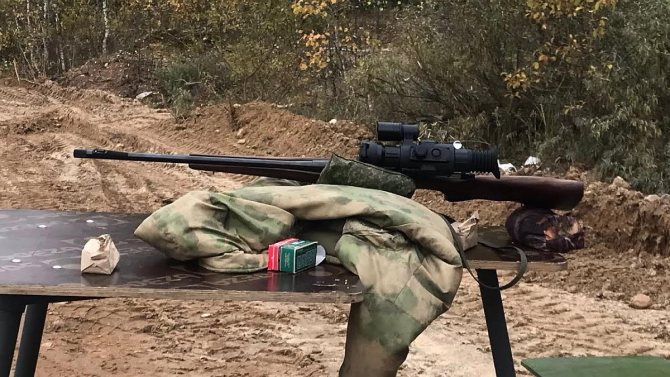
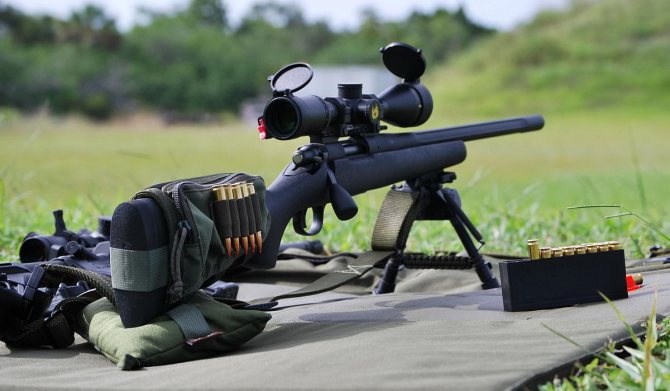
Installation of a sighting machine
Once the choice of ammunition and target is completed, it is necessary to install a sighting machine - a special device that allows you to fix the position of the rifle, preventing any vibration even when you press the trigger. Every professional hunter should have such a support. However, if it is not there, then you can always go to the nearest shooting range - it is definitely there.
It is important to install the sighting machine on a special support, which has the same height as the surface to which the target is attached. A regular table or wooden desk will serve this purpose very well. However, do not forget about the safety rules. If the machine is mounted on a wobbly or uneven surface, there is a high probability that it will topple over as a result of recoil after firing.

Link to target
Finally, we have come to the final preparatory stage - attaching the optics to the target. Don’t let the name of this procedure confuse you, because in fact it is a simple aiming at a target using optics. Although in reality this is not as simple as it might seem at first glance, especially considering that the carbine will be constantly clamped in a vice by the machine. Therefore, the more accurately the binding is carried out, the easier it will be for the shooter to adjust the optics later. This procedure is repeated after each time the distance to the target increases. In this case, you should always check the absolute anchor point, not forgetting to take into account the parallax effect.
Preparing for shooting
Firearms with Picatinny or Weaver rails are best suited for mounting an optical sight. Both of these types of mounts are quick to set up and stay in tune for a long time without being affected by the vibrations that occur when shooting. On other types of mounts, accordingly, the adjustment takes more time and gets lost faster, so it is better to abandon guns equipped with them. Picatinny and Weaver rails are considered the generally accepted world standard.
To zero an optical sight on a pneumatic weapon or firearm, you also need to select a suitable shooting environment. The best option would be a large indoor shooting range. If you zero the scope in it, wind and precipitation will not affect the flight of the bullet. To zero in on an outdoor shooting range, it is best to wait for a clear, windless day. If you adjust the scope in gusty winds, the process will take a long time. When sighting on a day with a constant wind in one direction, the adjustment will be slightly off.
Another important point is how to secure the gun while adjusting the scope. The best option is a special machine. The rifle is placed in such a device and tightened with screws, as a result it is securely fixed. Another option is a machine that only acts as a support for the rifle. In this case, reliable fixation will not work, but such a device can be made with your own hands. As a last resort, you can simply rest the rifle on a sandbag, but the shooting results will be worse.
Shooting
Now we come to the most interesting part - shooting from a rifle, as well as adjusting the optics. While performing this stage, be sure to follow the basic safety rules (more details in the last section), and also try not to rush - it is better to adjust the lens in one direction - horizontal or vertical - than to get confused trying to keep up with two birds with one stone at the same time. You should not neglect the cold zeroing procedure, because it allows you to minimize the cost of ammunition.
Cold shooting
Cold zeroing is usually carried out using a special laser target designator, which is shaped like a cartridge of the required caliber. The whole essence of the method is that the shooter places the switched-on pointer in the chamber (loads it like a regular cartridge), and then points the dot at the target. After that, you need to look at the difference between the point of impact and what the scope shows. Then the position of the aiming mark is adjusted so that its center coincides with the red pointer. However, such a procedure can only be carried out at relatively short distances (up to 100 meters) due to the scattering of light from the laser.
Center of impact
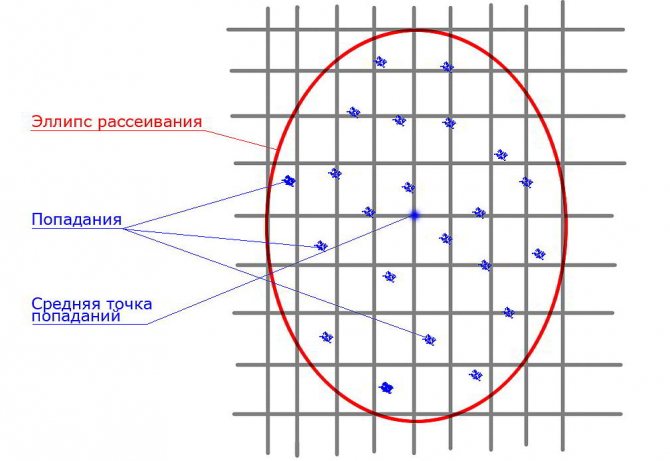
Even after cold zeroing (don't forget to remove the laser from the barrel!) it is necessary to fire several shots to determine the average point of impact and calculate the approximate dispersion of the bullets. To do this, you need to fire three to five shots at the same point on the target. It is important not to adjust the reels or change the flight path. If the distance between the farthest holes is no more than that indicated in the weapon’s performance characteristics (usually 3-5 cm at a distance of 100 meters), then there is no reason to worry. If the difference is too great, then this means that either the rifle has a malfunction, or the shooter jerked his hand during the shot.
In addition to shooting accuracy, it is also recommended to identify the average point of impact. To do this, you need to pick up a felt-tip pen and connect all the hit points together. The place where the lines intersect is the midpoint of impact - this is what you should strive for when adjusting the optics.
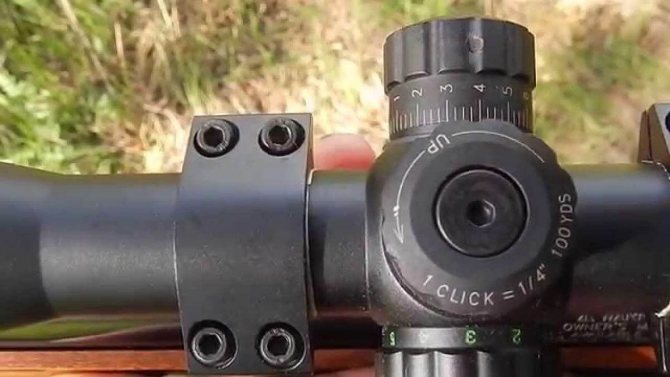
Drum calibration
After determining the average point of impact, the sighting device should be adjusted using the drums located on the optics. They are usually protected by special covers that will have to be removed using the key that comes with the scope. The drum located in the upper part adjusts the vertical position of the lenses, while the side one adjusts the horizontal. Also, each rotation of the mechanism is accompanied by a characteristic click, which is very useful for identifying the relationship between the number of clicks and changes in the point of impact.
The first calibration should be carried out exclusively for one position of the reticle - vertical or horizontal. If the deviation of the average point of impact from the aiming point is small, then 3-4 clicks will be enough. After this, we carry out three repeat shots and, if necessary, adjust the vertical. It is necessary to repeat the procedure until the difference between the average point of impact and aiming is minimal. After this, you can increase the distance to the target.
Second method of adjustment
There is an alternative way to adjust the optics, which does not require calibrating the center point of impact or counting the number of clicks of the drum. It is enough to simply adjust the position of the lenses so that the aiming mark is exactly in the middle of the test shots. The complexity of this method lies in the fact that the rifle should not twitch - that is, the use of a sighting machine is strictly necessary. But you won't have to waste ammo.
After the zeroing procedure is completed, you will see that the cylinders on the rifle have different numerical values. For ease of further operation, it is recommended to reset the mechanism. You can read about how to do this in the instructions that came with the optical sight. Also, setting the drums to zero will allow you to adjust the position of the aiming mark in the future depending on the strength and direction of the wind.
Begin
Now that the weapon is secured or stabilized, zeroing the optical sight on the carbine can begin. To do this, you can choose any shot distance from 50 to 100 meters; American manufacturers recommend a distance of one hundred yards (91 m).
The first shot is fired in this order. You need to set it to the highest magnification, prepare the rifle for shooting and aim exactly at the center of the target (in the usual way, if you are not using a machine with a rigid mounting of the rifle, or by adjusting such a machine if you use one). Then you should smoothly pull the trigger.
After this, inspect the target and assess where the bullet hit. If it has already reached the center, there is no need to configure it, everything works fine. But, most likely, the bullet will not hit the center of the target. If it does not hit the target at all, you should reduce the distance to the target by half and fire again.
Precautionary measures
Now a few words about what safety rules the shooter must follow when zeroing the optics. After all, cases where someone was injured or killed while working with optics are not uncommon. Here are just the basic precautions that must be observed:
- Shooting location. It is strictly forbidden to zero in optics in places where there is a chance of people appearing. If you live in the city, then you should go to a shooting range or go outside the populated area into a field or forest. In this case, it is worth choosing a place where there will be a minimum of vegetation that blocks the view. You should also remember that curious individuals may come to the sound of gunfire, so you should be vigilant.
- Cartridges and fuse. Let's start with the fact that during preparatory work and cold zeroing, the rifle should under no circumstances be loaded with cartridges (the magazine should be disconnected and the bolt put on hold). It is necessary to remove the weapon from the safety only immediately before firing. Also, don’t forget to put your rifle in safe mode before heading to the target.
Shooting requires increased vigilance
- Individual protection means. It is strongly recommended to use safety glasses and headphones when shooting (especially at short distances). This will protect the visual organ from recoil, and the auditory organ from deafening. Also, do not forget that the bullet can ricochet or even cause the barrel to rupture. It is impossible to foresee all situations, but glasses and headphones will protect you at least a little.
- Do not trust your rifle into the wrong hands. Remember that only you know the condition of your weapon. If a shooter, God forbid, forgets to put the rifle on safety and goes into the line of fire, and his comrade wants to “play a joke,” this could end badly. To avoid such situations, declare a strict ban on the use of your rifle if the shooting is carried out in a company.
- Pre-cleaning and lubrication. It often happens that after purchasing optics, a hunter immediately takes out a rifle from the safe, which has not seen service for a long time, installs a “body kit” on it and starts shooting. Well, shooting from a barrel that is full of lead coating sooner or later leads to a rupture of the channel. To prevent this from happening, be sure to clean and lubricate the rifle before zeroing.
- Don't forget to remove the laser after cold zeroing. Quite often, hunters leave a target designator in the chamber, designed to adjust the optics, and start shooting with live ammunition. This may result in the destruction of an expensive device. So before you move from cold to hot zeroing, first make sure that there is nothing left in the barrel channel.
- Ammunition. Use only ammo that matches your brand of weapon. Many Russian hunters neglect this rule, preferring to equip their carbine with cheap “roll-your-own” guns. Such a cartridge several times increases the likelihood that the barrel channel will rupture. Professionals recommend using only those ammunition that are specified in the instruction manual.
There is no shame in asking for help from professionals. Zeroing optics can be quite a challenging task for a novice hunter. It is not always possible to figure out how to install the body kit and how the drums work the first time. Well, in the shooting ranges this is not only explained in detail, but also shown in practice. So, if you wish, you can always go to a specialized establishment, where experts will adjust your optics with maximum precision.
Correctly zeroing an optical sight is an important step in setting up a hunting rifle. A rifle without a body kit will not be able to reveal its full potential, and a hunter with such a weapon is unlikely to be able to shoot anything worthwhile. However, once you understand this procedure, it will not cause difficulties in the future, and the weapon will be guaranteed to hit the target.
Adjustment
The next step required when zeroing an optical sight on a carbine is adjustment. To do this, you must first remove the caps on the drums to gain access to the locking screws. To work with the locking screws, you need a special wrench, which is supplied in the kit.
These screws do not rotate evenly, but click. Each click shifts the location where the bullet hits the target by a certain distance. The most common models have a click price of one quarter MOA and are rated at a shooting distance of 91 meters, or one hundred yards. Each click in this case shifts the point of impact of the bullet by 6.4 millimeters.
After you have adjusted the locking screws, you should close the drums and fire a new shot. Repeat the entire procedure you did for the first shot. Assess the location of the bullet impact. If it hits exactly the center of the target, the adjustment is complete. Otherwise, you should make repeated adjustments and take a third shot.
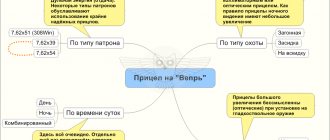
How to choose a scope
As mentioned above, Vepr carbines differ primarily in the type and caliber of the cartridge used. From the point of view of the sighting device, it is important to distinguish cartridges according to their properties and the type of targets they hit:
- range;
- target size;
- accuracy.
By type of weapon (taking into account the features of the “Boar”) you will get the following plate:
| Chuck type | Range | Target size | Accuracy | Aim |
| Smoothbore (shot) | small | small | Not important | Collimator |
| Smoothbore (bullet) | small and medium | large | Important | Collimator or Chaser |
| Small caliber | small and medium | small | Important | Optical (Mil Dot) |
| Intermediate and rifle cartridge | middle and long | medium and large | Important | — Enclosure, — small constant multiplicity, — large variable multiplicity |
Smoothbore "Vepr", hunting with shot
The shot is characterized by a large affected area and a short firing distance, the size of the target is usually small (even when shooting with buckshot), and the speed of the target is the opposite. Hunting is often carried out on a bird “flying” and a running hare. A wide field of view is important here, which allows you to quickly locate the target through the sight. This is why many hunters never use a scope, but instead aim along the line of the barrel. Still, a collimator sight will increase your chances of catching game. It is important to choose the correct size of the aiming point - depending on the accuracy and the likely distance to the target. For shotguns, the aiming point size usually starts at 3 MOA. But for greater versatility (with a bullet), we recommend considering sights with interchangeable reticles. More details about choosing a collimator for smooth-bore weapons can be found in this article.
Smoothbore "Vepr", hunting with a bullet
Even the most accurate bullet and a “conditionally smooth-bore” Lancaster allow a shot distance of no more than 150 meters, and in real hunting from a smooth-bore “Vepr” the distance does not exceed 70..100 meters. Hunting with a heavy 12-gauge bullet is usually carried out on large animals, such as wild boar or elk. Therefore, there is no need to chase a large increase. If a single red dot sight is not enough (for example, if you have poor eyesight and need diopter adjustment), then an optical sight up to 4 times will be enough with a margin. Classic PSO-1 sights, as well as their Novosibirsk analogues PO 4x24 (Vepr), do not have diopter adjustment; snipers have no need for it. But the Belarusian plant Belomo, one of the manufacturers of PSO-1, produces similar civilian POSP sights with diopter adjustment.
Optical sights, which combine the advantages of both collimators and optical sights, have a magnification of 1 to 4 times. Traditionally, they are called “drivers” and are used accordingly in driven hunts. You can read about choosing such a sight in this article, and a complete list of them has been collected in this section of the catalog. They are installed on the Weaver top or side bracket, as described above.
Small-caliber "Vepr"
The small bullet is distinguished by its low bullet weight, but its high accuracy. The target size is also small. And the deflection of the bullet greatly depends on the firing distance. If you are planning hunting or sporting and recreational shooting at targets at short distances, at which there is no need to take into account bullet drop, then you can opt for any optical sight up to 4x.
But often with small-caliber rifles they hunt a cautious bird that does not let the hunter get close. Then you should pay attention to high magnification scopes with a Mil Dot or similar reticle with the ability to make ballistic corrections.
Variable magnification sights will be a little more versatile. Here it is worth paying attention to the fact that the sight reticle is in the first focal plane, that is, it increases with increasing magnification. Otherwise, the ballistic reticle will only work at one magnification. A good example of such a scope is the PO 3-9x24. However, from other manufacturers (for example, Japanese Nikon) you can select more suitable models, but without a side bracket. We talk in detail about choosing a sight for small animals in this article.
"Vepr" caliber 7.62
The largest number of Vepr models were produced in 7.62 caliber, primarily due to the continuity of the Kalashnikov, as well as the variety of cartridges of this caliber. The variety of cartridge power and bullet accuracy entails a variety of game caught, but usually it is a medium or large-sized animal. If you know the type of hunting and the animal that you most often hunt (or will hunt), then it will not be difficult to select a suitable scope using the recommendations described above for other calibers. Here we just note once again that
- The classic military version of the optical sight on the AK is the PSO-1 sight adapted from the SVD (hunting with it is prohibited in Russia), and its civilian successor is the PO 4x24 (Vepr). Read more about this sight and its analogues in this article.
- The armed forces of many countries around the world are equipped with collimator sights from the Novosibirsk plant. Exactly the same sights are entering civilian use.
Let’s also pay attention to the versatility of driven sights with variable magnification.
Muzzle energy of cartridge
An important parameter of the sight is the shock resistance to the recoil of the weapon. This parameter directly depends on the power of the cartridge used. All side-mounted optical sights recommended above (civilian models PSO-1), such as POSP or NPZ-shniye PO, can withstand any weapon recoil - they were developed taking into account the experience of producing sights for combat operations. Most sights, including even inexpensive Chinese-made sights, can withstand the impact of any rifled Boar caliber. But if you are trying to install optics on a smooth-bore weapon, choose time-tested brands.
Due to the simplicity of their design, red dot sights can usually withstand powerful recoil. But you should avoid unknown Chinese brands, especially when ordering them from Chinese marketplaces, which are not subject to Russian consumer protection laws. We've seen scopes that literally shatter into parts after just a few shots.
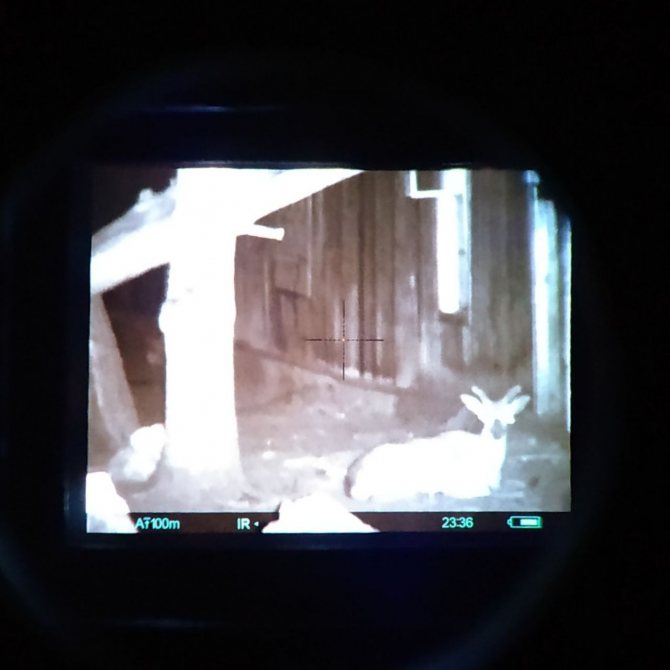
Until recently, it was especially important to take shock load into account when choosing a night vision scope: not all scopes with generation 1 and 1+ image intensifier tubes could withstand the recoil of powerful weapons. And since the Vepr, especially on the secondary market, is considered a fairly budget weapon, in this regard, the desire of its owner to install an inexpensive sight is understandable. Currently, digital sights have completely replaced sights of the 1st and 1+ generations of image intensifier tubes from the market, and their design, which eliminates the fragile bulb of the image intensifier tube, can withstand the recoil of any civilian caliber. They are the most modern night vision devices and you can safely choose any of them for any Vepr carbine, regardless of caliber. Most of these sights, when using IR illumination, allow you to hunt at distances of up to 150 meters. Read more about how to choose them here about a digital imager, and here about a thermal imager.
At the same time, sights with image intensifier tubes of older generations have their advantages: much longer operation on a single battery and a reliable design that eliminates complex microcircuits and software. The “Vepr” with a rifle cartridge (7.62x51 or 7.62x54 and their varieties) is not inferior in sighting distance to the sniper “SVD”, so it is more advisable to install on it a civilian analogue of the 1PN93 - PN23 “Saracen” sniper scope or one that is not inferior to it in quality, range and shock resistance Dedal-460-DK-3 BW. These scopes will allow you to hunt up to 300 meters.
What will you need for work?
Before starting work, the master needs to acquire the following tools:
- Abrasive paste.
- Lapping rod. Its diameter must correspond to the diameter of the optical sight channel.
- Rod for controlling the alignment of rings.
- Torque wrenches equipped with a scale.
- Torque screwdriver.
The main task of lapping is to achieve alignment of the brackets: the centers of their rings must be located on the same axis.
Rating of sights
Vepr carbines come in smoothbore 12 gauge and rifled 7.62x39 (old style), 7.62x51 (.308Win) is the main caliber, as well as 7.62x54 (rare). For these models, you must use sights that can withstand a muzzle energy of at least 4,000 J. For other calibers, the recoil requirement is not so significant.
Night sights
“Vepr” is an inexpensive weapon, so it is natural for hunters to want to save money on a night vision scope. The most budget option that can withstand the recoil of any cartridge at the moment is the Yukon Sightline N455S night vision scope. It provides visibility of up to 150 meters, which is suitable for night hunting - since in Russia only night hunting from a tower is currently allowed.
But, if your budget allows, we recommend considering installing a digital sight. The “diseases” of the first digital cameras, such as a small viewing angle and poor resistance to frost, have been overcome in new sights, for example, the Pulsar Digex N455 sight or the ATN X-Sight II HD 3-14x. At the same time, the image quality at short distances (up to 150 meters) is better than in night sights with third-generation image intensifier tubes. Additionally, the software of these sights allows you to sight it with one cartridge, change reticles and other additional options.
The Pulsar Digisight N455 LRF equipped with a laser rangefinder is also perfect. Knowing the maximum permissible distance of your gun and bullet, this digital sight will easily help you determine the distance to the target and make the necessary adjustments “on the fly.” For example:
- You can prevent an early shot by using a smoothbore weapon by letting the animal get closer.
- At a distance of up to 300 meters, using a rifled carbine, deliver an accurate shot.
Comparison of the image of a digital sight with a 3rd generation image intensifier sight
| |
| PN-23 "Saracen" with image intensifier of the 3rd generation. (B/W) | Yukon SightLine N455 |
Sights of the second and third generations are more reliable, unpretentious and have a longer battery life.
- Night sight PN23 "Saracen" with image intensifier 2+
- Night vision scope Dedal-460-DK-3 BW
they provide a greater shooting distance, and smooth barrels have a much shorter aimed shot distance, about six to eight times.
When hunting during daylight hours, optical and collimator sights are used.