Robert Valeev 04/05/2018 About hiking and travel
Pirates hunted for maps of treasures, sailors mapped new continents, for thousands of years humanity collected information about our planet, and today we have at our fingertips a huge number of tools for planning our own adventures. All that remains for us is to learn to read maps, just as each of us once learned to read books. In general, everything is simple, but there is a lot of information, so get ready to take another important step towards independent travel!
In this article:
- Card type
- Map legend
- Terrain on a topographic map
- Map scale
- Grid and geographic coordinates
- Geographic coordinate recording formats
- Orientation on the terrain using a topographic map
- Finding your location
- From theory to practice
- Useful resources and additional materials
Card type
First, let's decide what cards we need - tourists and travelers. There are many maps based on their content: political, socio-economic, botanical, etc. and so on. But we will consider mainly topographical ones.
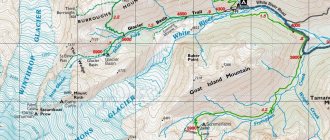
A topographic map is a universal-purpose geographic map that depicts the terrain in detail. A topographic map contains information about geodetic reference points, relief, hydrography, vegetation, soils, economic and cultural objects, roads, communications, boundaries and other terrain objects.
Topographic maps are perfect for hiking or cycling. When rafting on rivers, they will also be of great help, but the navigational guide for the section of the river where you plan to sail will also be no less useful.
topographic map
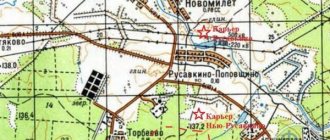
For road trips, road or schematic maps are more suitable. They have much less information about the relief and nature of the area, which speeds up reading the map, while roads, gas stations, overnight accommodations and other road infrastructure are shown more clearly.
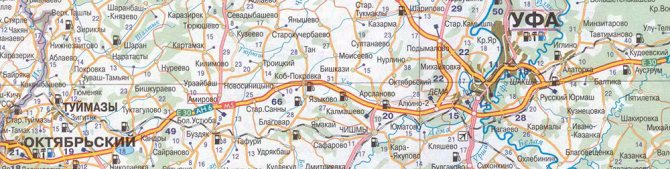
road map
Map legend
Map legend - a list or table of symbols with an explanation of their meaning. Map legends are generally not unified, but are standardized and mandatory for use on topographic maps. The legend is placed in free space (for example, in corners) so as not to hide the necessary objects on the map. In atlases it can be placed on separate pages.
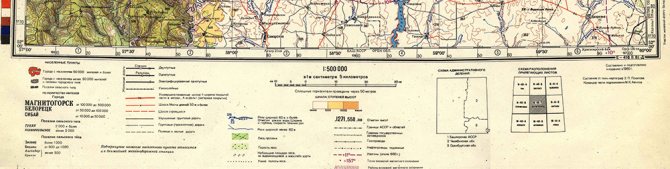
map legend
A legend is a kind of alphabet for reading maps, from it you will learn what the symbols, lines and text shown on your map mean. All terrain elements are divided into groups, each of which has its own system of symbols: settlements, local objects, road network, hydrography, relief, soil and vegetation cover and boundaries.
Before you go on your next hike, carefully study the symbols of elements that may come across your path. This way you will protect yourself from getting into a large swamp, will not plan to spend the night right under power lines, and will have a better idea of the nature of the terrain through which you will be moving.
Terrain on a topographic map
On topographic maps, the relief is depicted by curved closed lines - horizontal lines, which give a three-dimensional (volumetric) representation of the area.
Horizontal - a line on a map connecting terrain points with the same height above sea level. Relief elements that cannot be depicted with horizontal lines (cliffs, ravines, gullies, rocks, mounds, pits, etc.) are shown with special symbols.
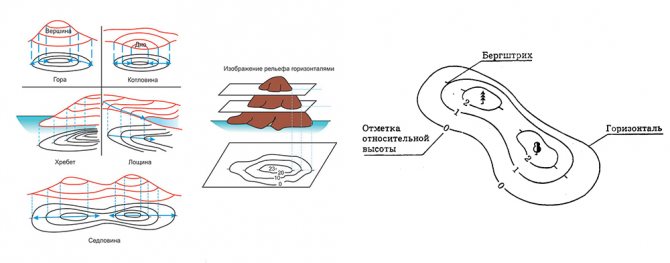
The contour lines on the map are drawn at equal height intervals (for example, every 10 meters of ascent, another line), so the number of contour lines allows you to determine the height and nature of the terrain: the more contour lines and the closer they are to each other, the steeper the rise. Additional elements, such as the berghstroke, allow you to understand whether a ravine or a mountain is shown on the map.
Berghstrich is a short perpendicular line on the contour lines of topographic maps, indicating the direction down the slope.
Digital signatures on some contour lines, indicating their height above sea level, also help determine the direction of the slope. These numbers always face the upper part in the upward direction of the slope. In certain places where relief details are needed, auxiliary lines are drawn between the main horizontal lines; they are drawn with broken lines with short links. For ease of reading, every fifth or every fourth horizontal line (depending on the height section) is drawn thick.
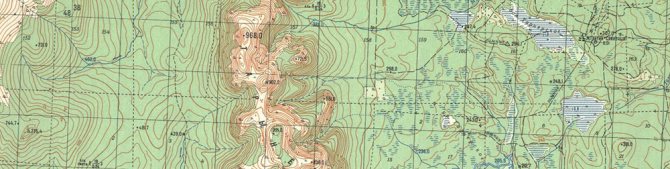
Sometimes, for greater clarity, the image is supplemented with so-called washing and layer-by-layer coloring in height steps.
Shading is the shading of mountain relief forms; it makes the image more visual, allowing you to visually perceive the three-dimensional contours of the area.
Thanks to washing, the main mountain ranges and massifs, their most important spurs and peaks, passes, highland ledges, deep valleys and canyons are clearly distinguished. The direction and comparative steepness of the slopes are clearly perceived. Therefore, for hiking in mountainous areas, finding a map with a hillshade will be very useful.
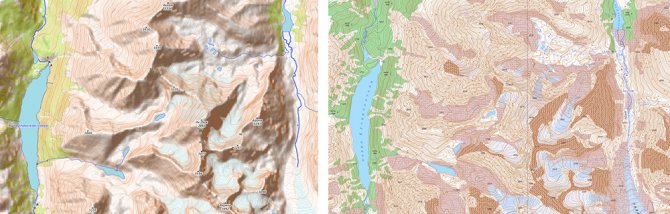
section of the map with and without washing
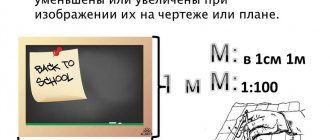
Map scale
If you try to read a map without knowing its scale, you will not understand how big objects actually are. The scale is indicated as a ratio, for example 1: 100,000. This designation makes it clear that 1 unit of distance on the map is equal to 100,000 units in the real world. We use the metric system, so in this case 1 centimeter on the map is equal to 100,000 centimeters in real life. It is more convenient to immediately convert to meters or kilometers; here, for one centimeter of the map we get one kilometer of terrain. By measuring sections of the map with a ruler, you can easily understand the distance to objects, how big the forest is, how wide the river is, and so on. The lower the ratio, the more detailed the map and, depending on your goals, you need to select a map of a suitable scale: if you are looking for a control point on the edge of a clearing during an orienteering competition, then you will need a map with a ratio of 1: 25,000 or less; and if you are driving a car along the highway, it is better to choose a scale of two or more kilometers per centimeter.
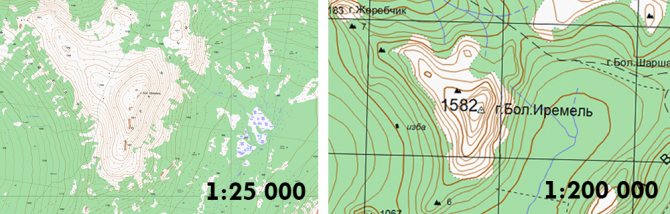
detailed maps with different scales
The main thing is not to forget that we are talking about paper maps, on which the image is static. On the Internet and on electronic devices, most often you can dynamically change the scale, for example, on Yandex or Google maps, the scale is displayed in the lower right corner.
In the image above I have purposely enlarged the 250m map to show the difference in detail, but in reality both maps will look different when printed at the correct scale.
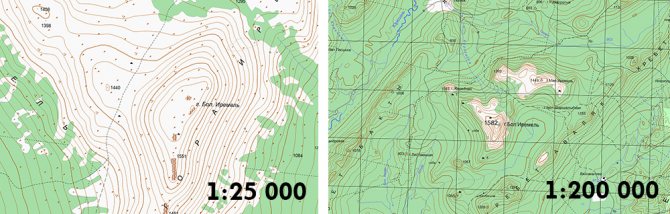
difference between maps in real scale
Grid and geographic coordinates
In addition to conventional images of the terrain, a coordinate system in the form of a grid of mutually perpendicular lines is applied to topographic maps. Grid lines are drawn at equal distances from one another and form a grid of squares, which is called a coordinate or kilometer grid. It is called kilometer because the sides of the squares are equal to an integer number of kilometers on the map scale. For each scale, the dimensions of the sides of the grid squares are set:
- on a 1:25,000 map, the lines forming the coordinate grid are drawn every 4 cm, that is, every 1 km on the ground
- on maps 1:50,000, 1:100,000 and 1:200,000 - every 2 cm (1 km, 2 km and 4 km, respectively)
- on a 1:500,000 map, only the outputs of the grid lines are plotted on the inner frame of each sheet every 2 cm (10 km on the ground)
To determine the location of objects on topographic maps, geographic coordinates ; they determine the position of a point relative to the earth's equator and prime meridian.
We will not delve into the terms and principles of constructing coordinates, since this is a rather voluminous topic and for our purposes this is not necessary. Let's go through only the basic concepts, remembering school geography lessons
The equator is an imaginary circular line that encircles the entire globe and passes through the center of the Earth. The equator line is perpendicular to the axis of rotation of our planet and is located at an equal distance from both poles.
Parallels are lines conventionally drawn along the surface of the Earth parallel to the equator.
Meridians are the shortest lines conventionally drawn on the surface of the Earth from one pole to another.
The prime or prime meridian is drawn at the Greenwich Observatory (London, UK).
Latitude is a value that determines the position of a point on Earth in the North-South direction from the equator. Latitude is counted from 0 to 90°, to the North with a plus sign, to the South with a minus sign.
Longitude is a value that determines the position of a point on Earth in the West-East direction from the Greenwich meridian. Longitudes are counted from 0 to 180°, to the east - with a plus sign, to the west - with a minus sign.

Knowing the latitude and longitude numbers of an object, you can determine its exact location on the map. In the age of technology, we trust all measuring processes to electronics, which greatly simplifies the route planning process. However, perhaps someday you will still have to look for a point by coordinates on a paper map using a ruler and compass. So don’t be lazy, pick up a map and practice before you find yourself in an awkward situation.
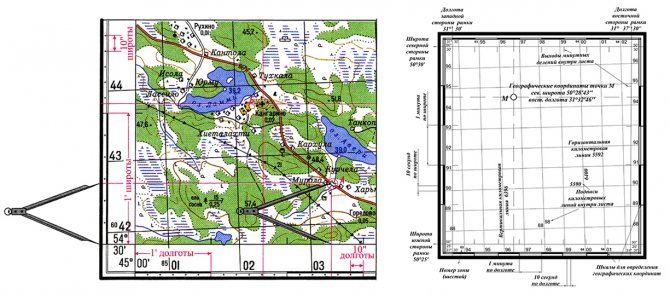
Geographic coordinates on the map are determined by the frames of the sheet, which are meridians and parallels. The frames are signed in the corners and filled with strokes - minute divisions (do not confuse with time, in this case minutes and seconds will indicate distance).
To determine the geographic coordinates of a point on the map, you need to use a compass or ruler to measure the shortest distance from the point to the southern frame of the map, then attach the meter to the western frame and determine the number of minutes and seconds in the measured segment, add the resulting value of minutes and seconds (0'27 "") with the latitude of the southwestern corner of the frame - 54°30′. The latitude of point A (left figure) on the map will be equal to: 54°30'+0'27" = 54°30'27"
Longitude is determined similarly. Measure the shortest distance from the point to the western frame of the map, apply the meter to the southern frame, determine the number of minutes and seconds (2'35"), add the resulting value to the longitude of the southwestern corner of the frame - 45°00′. The longitude of point A on the map will be equal to: 45°00'+2'35" = 45°02'35"
Geographic coordinate recording formats
- in degrees (°) as a decimal fraction - this is a modern version, in many cases it is indicated without a degree sign at all
- in degrees (°) and minutes (′) with decimal fraction
- in degrees (°), minutes (′) and seconds (″) with decimal
Positive coordinate signs are represented by letters: “N” is northern latitude and “E” is eastern longitude. Negative coordinate signs are represented either by the sign “−” or by the letters: “S” is south latitude and “W” is west longitude. Letters can be placed either in front or behind.
There are no uniform rules for recording coordinates. For example, search engine maps by default show coordinates in degrees with decimals and no letters. On Google maps and Yandex maps, latitude comes first, then longitude (until October 2012, the reverse order was adopted on Yandex maps: first longitude, then latitude). Example: 55.755831, 37.617673
Topographic maps often use the original method of notation with degrees, minutes and seconds. Currently, coordinates can be recorded in one of many ways or duplicated in two main ways. Example: 55°45′20.9916″N, 37°37′3.6228″E - degrees, minutes and seconds with letters.
If necessary, the formats can be recalculated independently: 1° (degree) = 60′ (minutes), 1′ (minute) = 60″ (seconds). Or use an online conversion service.
The essence of depicting relief on maps using contour lines
Relief is the most important element of the terrain, determining its tactical properties.
The image of the relief on topographic maps gives a complete and fairly detailed idea of the unevenness of the earth's surface, the shape and relative position, elevations and absolute heights of terrain points, the prevailing steepness and length of the slopes.
The relief on topographic maps is depicted by contour lines in combination with conventional signs of cliffs, rocks, ravines, gullies, stone rivers, etc. The relief image is supplemented by elevation marks of characteristic points of the area, signatures of contour lines, relative heights (depths) and directional indicators of slopes (berg strokes) . On all topographic maps, the relief is depicted in the Baltic height system, that is, in the system of calculating absolute heights from the average level of the Baltic Sea.
Orientation on the terrain using a topographic map
So, we have studied the alphabet and are already quite good at reading all the symbols and conventions. The next step is to learn how to navigate using the map we are reading.
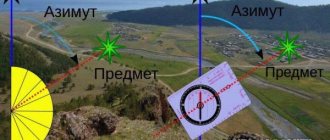
To navigate the area using a map means to find the direction of the cardinal points (north, south, west, east); determine your location (“ standing point ”) relative to surrounding objects and landforms; find the desired object or direction of movement and maintain this direction along the way.
The process of orienting on a map can be divided into three stages:
- map orientation
- determining your location using a map
- comparison of the map with the terrain
At the first stage, we give the map a position in which the northern side of the map frame will face north, and all directions on the map will be parallel to the corresponding directions on the ground. You can correctly orient the map using terrain lines, directions to a landmark, or using a compass.
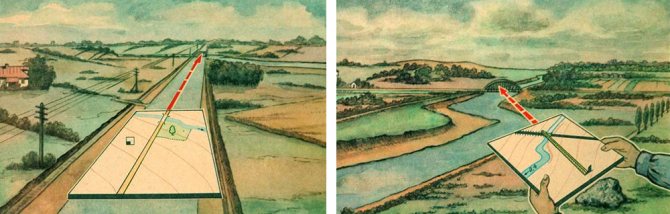
orienting the map along the terrain line/direction
If you are near any linear landmark, be it a power line, a road or a railroad, or something similar, then the easiest way to navigate is by the terrain line . Rotate the map so that the image of a linear object on the map coincides with the direction of the object on the ground, and all objects located to the right and left of the linear landmark on the map are located, respectively, to the right and left on the ground.
If there are no linear landmarks, you can position the map in the direction of a landmark , in the case when some obvious object marked on the map is visible (bridge, mountain, lonely tree, building, etc.).
When there are no good landmarks, for example, in a dense forest or on flat terrain without obvious landmarks, you will have to use a compass . The compass must be attached to one of the vertical lines of the map (to the kilometer grid line or to the map frame) so that the line connecting the o on the compass coincides with the selected vertical line on the map. In this case, the o on the compass should be directed towards the northern (upper) end of the map. Then the map together with the compass must be rotated in a horizontal plane so that the upper side of the map frame coincides with the north direction of the magnetic needle.
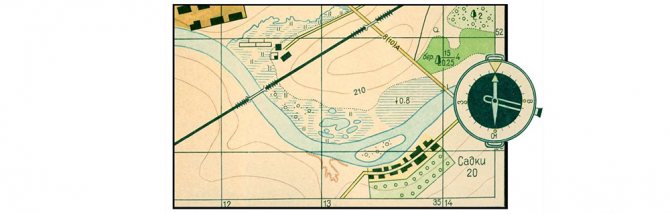
For accurate compass orientation, you need to take into account the difference between true and magnetic north, making an adjustment for the angle, which depends on your location and changes over time. Declination information can be printed in the map legend, but it becomes irrelevant on older maps. For approximate positioning of the map, this correction can be neglected.
Finding your location
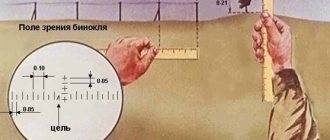
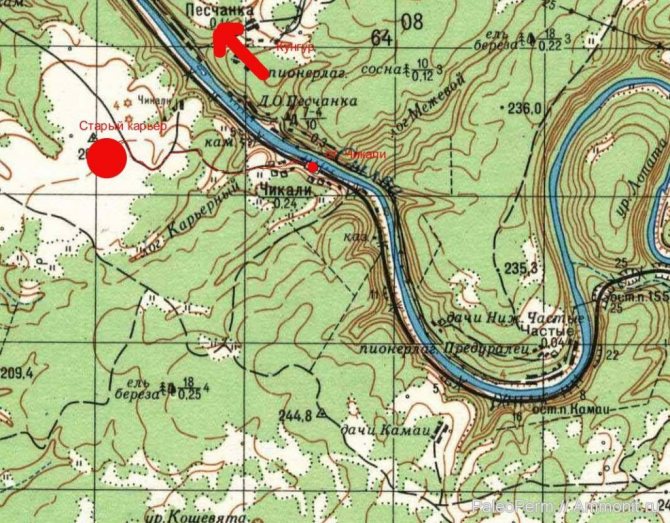
The easiest way to determine your location is by being near an obvious landmark shown on the map (road intersection, bridge, isolated tree, etc.). For example, you are standing on a bridge over a river, then find the corresponding bridge designation on the map; if there is only one, this is your standing point (i.e.), if there are several of them, then try to find additional landmarks to determine which bridge your. In other cases, the location can be approximately determined in the following ways: by measuring the distance traveled; according to the nearest landmarks by eye; serifing on local objects; back serif and so on. The basic principles of using some methods are shown in the figure below.
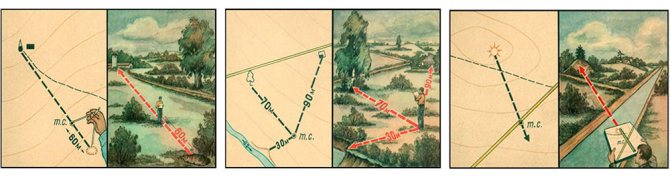
by measuring the distance traveled / by the nearest landmarks by eye / by notching by local objects
After you have correctly oriented the map, determined your location, found the objects you are interested in and set landmarks, you can start moving, periodically comparing the map with the real terrain or, as they say in science, comparing the map.
To compare a map with the terrain means to find on the map an image of surrounding local objects and relief elements and vice versa - to identify the objects on the ground indicated on the map.
As you move, you must regularly compare the map with the terrain. This allows you to quickly and completely study the surrounding area, clarify the location of observed targets, landmarks and other important objects, determine the distance to them, and so on.
Travel hacks
- Do not take an entire paper atlas or map of the entire mountain range; cut off or print separately the piece you plan to travel along, with a small margin. This will help you navigate faster and reduce the weight and volume of your equipment.
- Take a pencil and mark your path, stopping and parking points, as well as your intended goals directly on the map, you can even come up with your own signs and add them to the legend. It will be especially fun with children, they will feel like real pioneers
- Try to stick to the paths and roads marked on the map, even if they meander to your destination. The direct path may be shorter, but the nature of the terrain may turn out to be not only difficult to pass, but also dangerous, it’s not for nothing that the path was laid this way
From theory to practice
Theoretical knowledge is good and important at the first stage, but without practical training you are unlikely to get a complete picture of the process of navigating the terrain using topographic maps. I strongly recommend that you immediately go for a walk, even to the nearest city park, or better yet outside the city limits (unless, of course, the endless taiga immediately begins outside your area). All you need is a piece of topographical map, which you can download on the Internet or buy at the nearest newsstand, comfortable clothes and a couple of hours of free time, and then just walk, carefully look at the surrounding objects and how they are depicted on the map. Most of the questions remaining after reading the article will disappear, and those that remain, be sure to ask in the comments below, and together we will try to find the answer!
Useful resources and additional materials
- nakarte.me is a very convenient online service with various maps
- loadmap.net - topographic maps of the whole world with different scales and the ability to download
- topmap.su - topographic maps of the CIS countries
- satmaps.info/genshtab - archive of topographic maps of the General Staff
- maps.vlasenko.net - another large archive of various topographic maps
- topography.ltsu.org - encyclopedia site about topography and cartography with a huge amount of detailed information on the topic
- https://voenservice.ru/ - short and succinct articles about military topography
- artlebedev.ru/susha/ — On world maps, a spherical surface is projected onto a plane, so with their help it is not possible to objectively compare all territories at once. The globe does not allow this either. As a result, people perceive the size of territories incorrectly. The most striking example is the unrealistically huge size of Greenland; on maps it seems that it is four times larger than Australia, but in reality it is three times smaller (2,135,337 sq. km versus 7,592,594). A small tool on this site allows you to compare countries and continents without distortion.
PS
We have not considered all the nuances regarding maps for tourism, but this is quite enough to start independent travel. For those who seriously decide to take up orienteering or plan a complex expedition, it is necessary to delve into the study of the topic; The links to the resources presented above in this article will help you with this.
Next time we will talk about navigators, smartphones and other modern devices and online services that will help you explore our planet with even greater ease. Subscribe so you don't miss new articles. Enjoy your travels!