Making snowshoes from polypropylene pipes with your own hands is perhaps the easiest way, at least this is the most common manufacturing pattern. However, they have been done for centuries, and have influenced several variations that are applicable in practice at the present time. Snowshoes are relevant for residents of northern countries, especially those living in snowy regions of the Arctic. The technology for making snowshoes has not undergone fundamental changes during this time; the same methods are now used. Is it that modern materials are now more often used, more durable and convenient in the process of work, and technologically advanced tools that were unavailable just some 50-70 years ago.
How to make snowshoes yourself at home
Snowshoe making was practiced by indigenous peoples living in the circumpolar region from Canada to Eastern Siberia. These simple devices were intended for movement through deep and muddy snow cover, mainly during hunting. Snowshoes have not lost their relevance even now, being used by hunters and rangers for walking through snowy forests. They are used less often by people in extreme conditions, in most such cases, saving their lives. Having certain knowledge borrowed from primitive hunters, the simplest snowshoes can be built independently from available materials - branches and tree bark, in just a few minutes. At home, having the necessary materials and tools on hand, making durable snow walking equipment is even easier.
What is important about this is for what purposes and under what conditions homemade snowshoes will be used. During manufacturing, climatic conditions and terrain features must be taken into account; the shape of the structure and the types of materials for the model depend on this.
Selection of materials for snowshoes
When starting production, consider the terrain for movement and weather conditions. Study the geographical features of the area where you will go and only then model a certain shape of the product and choose the right material.
The main types of homemade snowshoes (Figure 3):
- Frame options - made of aluminum or plastic pipes, pieces of tarpaulin and leather;
- Quickly, right on the spot - woven from improvised means, cords and branches.
Separately, there are models for icy areas, although they have no fundamental differences, except for additional equipment - crampons, special claws that prevent slipping.
There are also more complex schemes. To make two-wheeled snowshoes with your own hands, you will have to take care of the availability of mounts for the wheels and the wheels themselves.
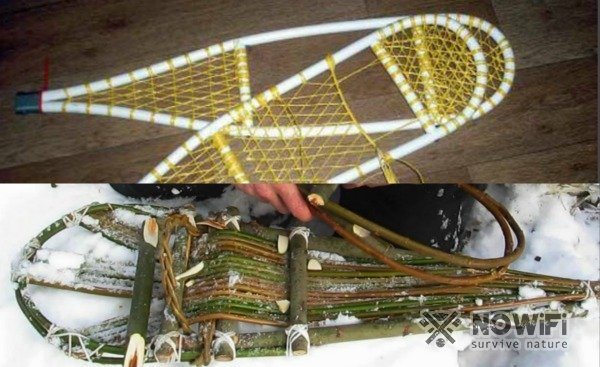
Figure 3. Frame and “quick-make” snowshoes
Characteristics of some options for homemade snowshoes
Regardless of the purpose and model of snowshoes, they all artificially increase the size of the human foot. Due to this, a person’s weight is distributed over a larger area, thereby reducing the pressure in ordinary shoes, which is concentrated at one point, preventing you from falling into the deepest snowdrifts. From the outside, snowshoes seem bulky and uncomfortable, but if the established design parameters are observed, you can not only walk in them, but also run. For convenient movement across snowy expanses, you should follow simple rules in their manufacture:
- Such devices must be durable and reliable in order to withstand a long transition. If they fall apart in an open area where there are no trees—available materials for repair—such a turn could cause death.
- They should not be too heavy (the maximum permissible weight is 1 kg for one snowshoe). Exceeding the weight of the structure will make it impossible to move - they will sink deeply into the snow, and their legs will quickly get tired when walking.
- Snowshoes should not exceed the size; too wide and long ones will only interfere with walking, causing you to fall. Ideally, the dimensions of the devices are calculated individually, taking into account body weight. The standard size is 25-30 cm wide and 50-80 cm long.
DIY snowshoes
What do you need to know before you start making this simple equipment? The first thing is to decide on what terrain you will be walking on. The second is to select materials and fastenings.
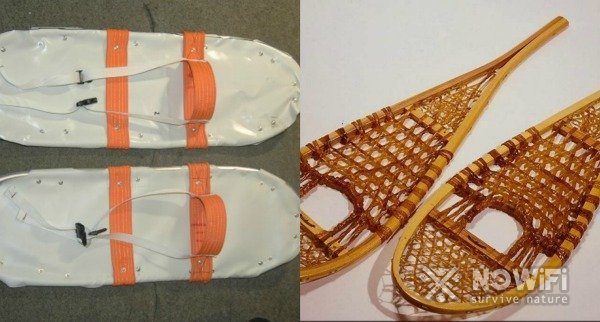
Figure 1. Two types of snowshoes: solid base and mesh frame
In total, it is customary to distinguish two types (Figure 1):
- On a dense base without holes - needed to move on slippery ice in the mountains, they are made of plywood, plastic or a wooden block;
- With a full or partial base on a mesh frame - for walking through a snowy forest, the main structure is made of plastic, aluminum, wood or bone, weaving - synthetic thread, rope.
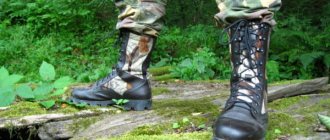
An important point is the fastening of the product; it should be selected to match the shoes on which it will be worn - boots with a welt or any other. Fasteners can be made of rope, woven rods or leather straps, which will be more reliable.
Let's take a closer look at why use snowshoe equipment (Figure 2):
- They are comfortable to use - lighter and smaller in size than wide ski tracks;
- They provide greater speed of movement, unlike hunting skis, although they have an almost identical design in terms of their base and method of fixation;
- Cover a larger area of the surface under your feet, evenly distributing and reducing pressure on it;
- They allow you to easily move on the crust without falling under it, increase stability due to the larger area of contact of the foot with the ground;
- Indispensable when crossing frozen ponds and mountain paths, for which special elements are provided in the design - hooks and crampons.
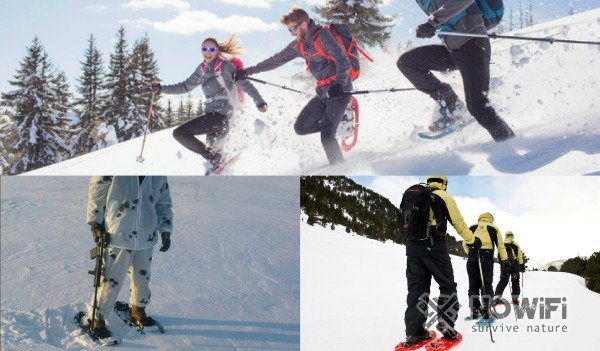
Figure 2. Using snowshoes
Common snowshoe models
Among homemade snowshoes, there are 4 most common models that are used in different situations and for predetermined conditions and purposes. The design of such devices is somewhat different, since their application involves their use in radically different natural terrain features. To create snowshoes with different purposes, for certain climatic and landscape zones, materials of different nature will be required.
Types of devices for moving on snow and the scope of their domestic use:
- With a wooden frame, called “Bear Paw”, they are used for walking or hunting in a snowy forest, where movement on them is most convenient. This is achieved by the springy properties of the structure, thanks to which you can walk quickly in them, and, if necessary, even run and jump.
- Plastic pipes are considered a universal option, used for quickly moving both through the forest and across rough, open terrain. One of their main materials is ropes, which add greater stability to the structure, and therefore are most often used for walking on crust.
- Made from plywood, they are most often used by climbers, skiers and snowboarders to climb snowy slopes, for which they are most suitable. This is due to the solid frame structure, which provides additional emphasis on the heel; for even greater convenience and to avoid arbitrary sliding, they are equipped with teeth.
- The classic version has a wide range of applications; you can equally comfortably wander through the forest, move along hilly terrain, or climb a not too steep slope. Actually, it was the design of the classic snowshoes that became the prototype of the three previous ones, containing all their positive features in one.
How to make snowshoes with a wooden frame
Making snowshoes designed for hunting with your own hands is not that difficult. For the frame, it is better to use ash, harvested in late autumn or winter, when there is no sap in the wood. The snowshoe production process is as follows:
- the trunk is medium in thickness, splits into 4 equal longitudinal parts;
- planed with a scraper to obtain workpieces with a cross-section of 40x40 mm;
- finished materials are placed in a steaming chamber for 3-4 hours;
- after, the blanks are bent, giving a teardrop shape, and kept for 7 days;
- after a week, the edges are split and spliced using epoxy glue;
- before it hardens, the splice area is tightly tied with fiberglass tape;
- for additional strength, crossbars are inserted into the frame;
- the structure is coated with polyurethane varnish and left to dry for 24 hours;
- a day later, the wooden hoop is braided with a nylon cord in the form of a mesh;
- in places with the greatest load, a tie is made from a steel cable;
- at the final stage, they make fastenings for the foot so that the butt stays longer.
How to make snowshoes from plastic pipes
To make such devices for walking on slushy snow, you will need 2 polypropylene pipes (PVC) 1.5 m long and at least 30 mm in diameter, 10 m of nylon cord, up to 6 mm thick and 2 elastic bands for fastenings. The following is the process of creating snowshoes by assembling the structure:
- plastic tubes are cut into 6 unequal parts - 2 x 1.1 m, 4 x 20 cm;
- the long ones are heated in the center and bent so that the ends touch each other;
- for 30 min. immersed in cold water to cool and give a finished shape;
- the surface of the frame is treated with sandpaper until the coating is completely removed;
- at the point of loading, 2 short tubes are inserted and fixed at a distance of 15 cm;
- the ends are tied together with a cord, and the rest of the structure is intertwined in the form of a mesh;
- Elastic bands are attached to the short transverse inserts to secure the legs.
How to make snowshoes from plywood
To make a plywood version, you don’t have to spend a lot of time and effort; this is the simplest and least expensive production. For production you only need: a sheet of plywood No. 10, a 0.8 m long board, screws and a cord for fastenings, and also a standard set of tools for working with wood. After this, you can proceed directly to making snowshoes:
- using a jigsaw, cut out a rectangular base 20x50 cm in size;
- for convenience when walking, the edges of the workpiece should be rounded;
- the board is sawn into 4 parts of 20 cm each;
- they strengthen the lower part in the place where the foot will be fixed;
- in the same place, holes for fastenings are drilled using a drill;
- cords are passed through them, fastened with screws from below;
- Finally, the holes with the threaded cords are filled with glue.
How to make classic snowshoes
As with the previous ones, classic snowshoes do not require too much time to make. You can make them using simple, available materials:
- take a wooden beam, 100-110 cm long, 7-8 mm thick, 30-40 mm wide;
- bends in the center so that the ends are connected and the frame takes on a teardrop shape;
- to strengthen the structure, 2 crossbars are installed 10 cm from the toe and heel;
- in the workpieces, 10-12 holes are drilled on each side with a drill;
- a rope is passed through them and intertwined in the form of a mesh, but without knots;
- All that remains is to attach the bindings and the snowshoe is ready to hike through the snow.
Attention should always be paid to the wooden part of the structure - it swells from moisture, and when it dries, it becomes covered with cracks. To avoid destruction of wood at the most inopportune moment, it requires care and impregnation with special oils or drying oil.
Requirements for snowshoes made of plastic pipes
The principle of their operation is quite simple - by increasing the area of the foot, the pressure on the snow embankment is reduced. This allows you to maintain optimal speed of movement and evens out small differences in terrain. But for manufacturing it is necessary to formulate requirements for design, technology and production at home.
Snowshoes must have the following qualities:
- withstand not only the weight of an adult, but also temporary overloads on certain components - the front or rear;
- have a minimum weight, since the hunt can drag on for several hours;
- Possibility of prompt repairs in the field.
Until recently, sheets of plywood were used to make snowshoes. But they quickly became unusable due to constant exposure to moisture. Therefore, the design option made of plastic pipes was chosen. They do not lose their properties in extreme cold and are characterized by mechanical strength. But the most important factor is ease of manufacture.
Dressing and snowshoeing techniques
Regardless of the model of snowshoes, when putting them on, they are all the same: the heel is placed first in the place where the fulcrum will be fixed, and the overlapping fastenings are tightly tightened on the ankle. The comfort of the leg and the entire movement depends on the reliability of fastening the device. The tightening should be tight, but not too tight on the leg, disrupting blood circulation.
Before covering significant distances, you need to get used to new snowshoes, and only after that master the technique of walking in them, which looks like this:
- The foot is placed on the entire foot, without rolling from heel to toe, so as not to “plow” the snow on the backs, this will slow down the pace of movement and add pointless load. A step with a roll is relevant if the snow cover is too dense or has an ice crust.
- When walking, your feet should be placed as wide as possible, given the dimensions of the snowshoes; a normal step will not work. So, the left toe will constantly hit the right foot, and vice versa. In addition, each of the snowshoes will step on the other, which threatens to fall.
- During ascents, you should not step on your heel, but, on the contrary, put all the emphasis on your toe, driving it as deep as possible into the snow. This technique allows you to create unique steps, which guarantees greater stability for your feet when walking.
- But when descending, the entire body weight is transferred to the heel and back of the snowshoe, this reduces the risk of arbitrary slipping and subsequent falling, which in such a situation is extremely traumatic.
Having chosen a model and knowing how to make snowshoes with your own hands, the process of making them will not seem so difficult, even without the proper experience. Yes, it is not important, the main thing is to adhere to the recommended dimensions established for such products.
Terms of use
In order to learn how to snowshoe, three hours of practice will be enough. At the same time, when moving, it is necessary to take into account general rules that will help speed up walking and reduce the load on the legs.
Rules for using homemade snowshoes:
- In order to put on devices for moving on snow or ice, you need to place your foot on the base and align the location of the heel with the fulcrum. After this, the fastenings are alternately tied or fastened. At the very end, the reliability of the fixation and comfort for the person’s feet are checked.
- When walking, you need to place your foot on your heel, and then smoothly move the center of gravity to the entire foot.
- The speed of movement should be approximately the same as without the use of useful devices.
- You should not raise your leg high with each step. Otherwise, the muscles will quickly get tired, which will lead to cramps.
- When moving on loose snow, you should lift only your toes above the surface, and then slide on your heel.
- When walking, it is better to use auxiliary devices - sticks. You can also make them yourself or break off branches from any tree. In this case, the length of the poles should be such that a person can comfortably move with a straight back.
- When moving uphill, you need to hit the snow surface with your toe forcefully. This action will make it possible to use snowshoes as a lever for lifting.
- When going down the slope, you need to walk narrowly and slowly. If you were unable to maintain your balance, then it is better not to run down the mountain, but to sit down and slide down.
- When moving along the slope, it is necessary to drive the side surface of the equipment into the snow. For greater stability, it is recommended to use sticks.
- Several hikers or snowshoe hunters should move in formation. This will help reduce the stress on the last team member. However, it will be necessary to change the leader periodically, since he will get tired much more than the others.
Snowshoes are an important piece of equipment to take with you on a long winter hike. Thanks to them, you can avoid various difficulties and easily overcome deep snowdrifts.
What models can you make yourself?
Products may vary based on the type of base. The main requirement is that the product must be light.
The devices should not be allowed to be heavy. There is a risk that due to the severity of the pressure on them under the dimensions of a person, they will simply fall into the snow.
The optimal weight of snowshoes is 2 kilograms. It is best to make the products slightly different in size, so they can be inserted into one another and are difficult to lose. There are several options on how to properly make snowshoes with your own hands.
Homemade accessories with wood frame
Plastic, wooden planks, and plywood sheets are suitable for making fixtures. For a wooden frame, it would be best to take a timber with a thickness of 7-9 mm.
Snowshoes made of plastic pipes
Made from wood, polypropylene, polyvinyl chloride (PVC).
Tools and materials for manufacturing
Polypropylene pipes are considered the best option for self-production of snowshoes. They have sufficient plasticity and mechanical rigidity. The elements are connected to each other thermally. However, they are subject to gradual destruction when exposed to direct sunlight. Therefore, after making snowshoes, it is necessary to consider a way to protect the structure.
You can make snowshoes from plastic pipes at home using the following materials and tools:
- two pipes with a diameter of 20 to 30 mm and a length of 1.5 m;
- connecting T-shaped elements from 8 to 16 pcs.;
- nylon cord or similar material for filling the frame;
- foot retainer - factory (from old skis) or a simple elastic band;
- scissors for cutting pipes, welding machine for polypropylene, ruler.
If the welding machine is not available, you can rent it. After this, you can begin independent production.
We use nylon thread for weaving
An important point is to braid the frame correctly so that with minimal braid costs you get the largest support area (Figure 6). Let's look at how to make snowshoes yourself, focusing on tying with nylon thread.
Figure 6. Example of “knitted” snowshoes
Snowshoes with nylon thread dressing:
- The weave pattern is somewhat similar to the fashionable direction of macrame needlework; it not only looks aesthetically pleasing, but also provides high reliability and density;
- All jumpers and dressings at support points should be as rigid as possible, since they bear all your weight and the main load;
- The braid or thread should be pulled tightly and evenly around the entire perimeter of the frame, avoiding sagging;
- To make the nylon stretch better, it should be slightly moistened with water;
- First, transverse cords are stretched on the frame, serving as the basis for further design, and the weaving itself begins from the toe;
- You can make your task easier by melting the ends of the nylon ribbon with a match or lighter - this way they will not break during work;
- The lace should be woven and laid in such a way that all the angles of its intersections are as straight as possible;
- From the second row two more braids are added to it, and from the third two more and so on until the first crossbar on the frame;
- On the other side, the ropes are woven in a similar way, and at the meeting point the ribbons are connected with classic knots;
- Also, don’t forget about the fastenings for your feet - they need to be woven into your macrame, choosing elastic bands or pieces of leather that will cover the booted foot as firmly as possible;
- Upon completion of the work, all ends of the weaving are secured with loops and small nails, and the finished product, together with the mesh, is covered with a layer of varnish.