Today we will talk about survival in the winter forest and in a treeless area without a tent.
Imagine the situation: you fell behind your group on a ski trip and got lost. You don't have a tent, you only have a sleeping bag and matches. Evening, snowstorm. You need to do something to stay warm.
Or you deliberately went into the forest without taking a tent with you (you decided to save weight).
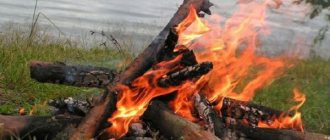
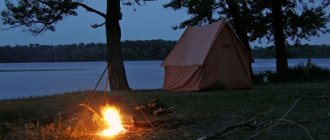
Overnight with a campfire
1.Choosing a place to stay overnight
- The bivouac must be protected from the wind (the slightest wind increases the frost)
- It is best to spend the night in dense forest or a small hollow
- Avoid clearings, forest edges, hills (the wind is strong there)
- If the snow is shallow, then dig a place for a fire to the ground; if it is deep, make a fire on a site made of damp logs, or use special types of fires (Evenki see below)
- Prepare more firewood (so you don’t have to run around looking for it at night) or, if you have an axe, make the sushina (dry standing tree) thicker
How to identify dry wood
- knock on it with an ax, the tree makes a characteristic ringing noise
- the bark of such trees often peels off in pieces, leaving the wood visible
- Pay attention to the top, it is “naked”
- Do not use trees lying on the ground (snow), their wood is wet
- Do not use sushin without a top; as a rule, such sushin is unsuitable
Harvesting firewood (how to properly fill up a dry land)
- From the side where you will cut the sushi, make a hem
- On the opposite side, about 15 cm above the first, a second cut or cut is made
- When the tree bends, rest your stick (slingshot) against it and start swinging
- The tree must fall
What to do in winter?
How to survive in a winter forest without anything during the winter season? Cold will become the main enemy for humans. Therefore, the main task will be to light a fire. If you find dry branches, you can dilute it using the method described above. You can make fire by hitting stones against each other. A spark from them will fall on a dry substrate of moss or grass, thus igniting a fire. There will be no problems with water in a snowy forest. But you can’t eat snow, there’s a high risk of getting sick. And heat and fever will immediately reduce the chances of salvation. Therefore, the snow will need to be melted.
The question arises of how to survive in the forest in winter without everything, because even in order to heat water or melt snow, you will need a container. If there is a river with clay banks in the area, you can consider yourself lucky. Then it becomes possible to fashion a vessel and burn it on fire. Otherwise, you need to hollow out a kind of container from a large log with a stone; you won’t be able to cook anything in it, but you can melt snow or heat the water a little.

Food will be more difficult in the winter forest. In deciduous trees, tree fungi may remain on the bark and acorns on the ground. Acorns can be shelled and crushed and used for food. In coniferous trees you will have to look for cones. You'll be lucky if you find cedar ones. Using a stick, you can dig out worms in the soil, and find larvae in rotten stumps under the bark. It is unlikely that it will be possible to hunt large game, but man is resourceful, so the option of catching a small artiodactyl is not excluded. But, most likely, an inexperienced hunter will have to be content with mice and gophers. The latter make their homes in open clearings in burrows. They can be recognized by their characteristic mounds of earth. In times of famine, our ancestors hunted for these animals using water or smoke. Water was poured into the hole, and the frightened animal jumped out of its hiding place. Smoke affects them in a similar way. A fire was lit in front of the hole and smoke was directed into it. Of course, the winter forest will be much harsher to humans. But on the other hand, in the snow or frost it will be easier to find your tracks along which you can return. It will also be easier to find animal paw prints and follow them to the trails.
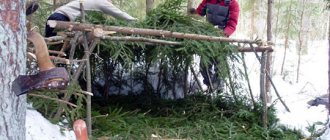
Option for large groups and for singles (Balagan)
You can have a good night in the forest, creating a kind of “booth booth”.
In a suitable place for camping, the snow is shoveled down to the ground. A snow bank is poured in a semicircle around the cleared area, 2 long poles are prepared, which are stuck into the snow bank. Their tops are moved crosswise and tied with twine.
Then skis are stuck along the entire shaft, the ends of which rest on the cross of connected poles. After this, the entire structure is covered with blankets, creating something like a “wigwam”, open at the front. Inside, the entire floor is covered with a thick layer of pine needles;
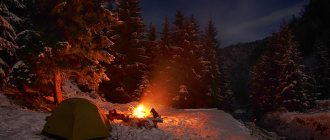
If there are no needles, then a flooring is made of poles, which are stuck at the bottom of the snow bank at some distance from the ground. The needles or flooring are covered with two blankets - and the “booth” is ready. Backpacks are brought inside and placed near the snow bank. In front of the booth, on a plot of land cleared of snow, a long taiga fire is made from thick trunks of cedar, fir, resinous spruce, dead wood, etc.
When a fire is burning, the inside of such a room, even in severe frosts, is very warm. The booth of the sizes shown in the picture can accommodate 8 people. Of these, 6-7 people. 1-2 people sleep covered with a blanket. They are on duty, adding wood to the fire. When camping for the night in a booth, you should place your feet towards the fire. This method is good for both large groups and one person.
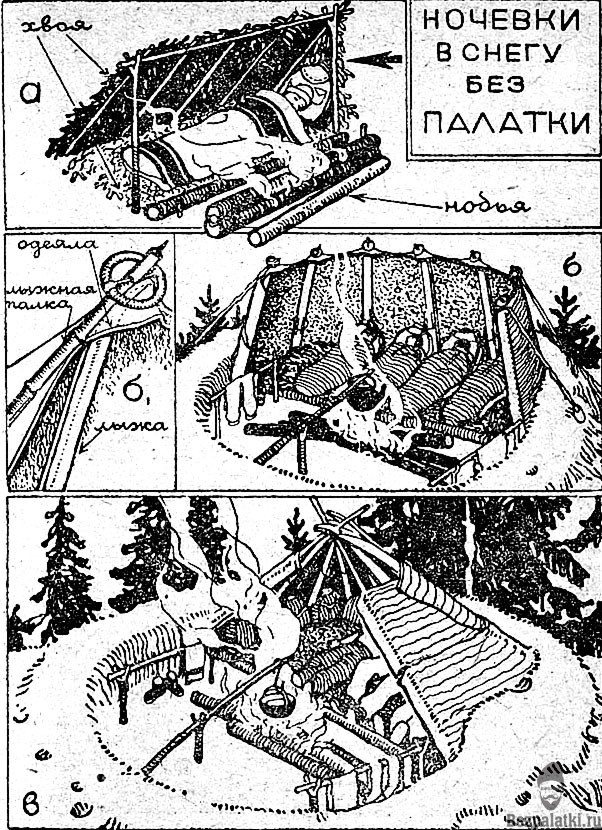
A “booth” (or rather, a barrier) can be made from sticks and covered with pine needles. A “nodya” (if there are 2-3 people in the group), or a large taiga-type fire, is lit in front of the barrier.
When building booths, the direction of the wind should be taken into account. It is impossible, for example, to cut down forest for a fire on the windward side of the bivouac, thereby destroying the protection from the wind. To regulate the thermal conditions in a “booth” of a simplified design, one side wall should be made of a blanket. By tilting the blanket to a greater or lesser angle, you can use the maximum amount of heat from the fire.
The floor of the booth should be covered with spruce branches; if spruce branches are not available, make a flooring of logs. To prevent sticking your feet into the fire, a damp log is placed near the entrance (the support log is placed at a distance of 1-1.5 meters from the fire) and reinforced with stakes or stones so that it does not roll off
Survival in the forest in summer
It happens that for some reason a person gets lost and does not have the necessary tourist kit with him, then, depending on the time of year, the following knowledge will come in handy. How to survive in the forest without anything in the summer? Finding himself alone with nature in the forest in the warm season, the lost person has a fairly high chance of waiting for help or remaining unharmed until he gets out of the current situation. If you can’t wait for help, then you need to find the way yourself. You should look around and try to find your tracks. And using them you can return to the starting point. If such actions do not bring the desired result, you need to calm down and think through your further actions.
This is interesting: How to survive in the desert
How to survive in the forest without anything? Now we'll tell you. The first thing a person needs is water. This means that you need to find a parking place near the source; if one is not found, you can use the collection of dew on the large foliage of plants.
Fire bed (controversial method)
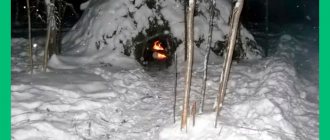
Industrialists of the Far East use the following method of spending the night in the taiga in winter. Having chosen a place protected from the wind, they shovel the snow to the ground, clear a small area, make a large fire from thick resinous or dry trunks and warm the ground for 2 hours (during this time food is cooked and people have dinner). Then the ashes are leveled, and, having spread the skin, they settle down in this place for the night, covered with a blanket. Almost all night, the warmth of the slowly cooling earth warms sleeping people. (I used this method, but only in the fall). It works in the fall, I don’t know about winter
Canopy reflector
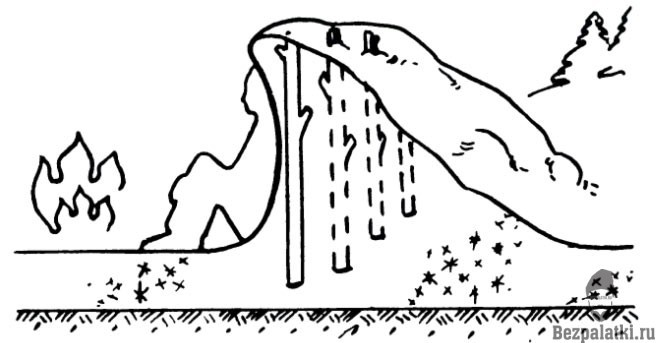
First option:
stick sticks into the snowdrift and shovel snow on them. The snow bank will gradually begin to thaw and will look like a canopy. It will be warm between the fire and this improvised canopy.
Second option:

Stick sticks into the snow at an angle of 50 or 60 degrees, and hang a piece of polyethylene (raincoat, tent, awning) or any other fabric on the sticks.
Such a screen will reflect the heat from the fire and a person will be warm both in front and behind. The disadvantage of a canopy is that you cannot fully relax near it, but you can in a booth.
However, it should be noted that these methods of spending the night are applicable only in wooded areas!!!
Snow caves, pits, snow huts
In a treeless area, having a sleeping bag, you can spend the night in a snow hole dug in a snow drift or in a place where there is a deep layer of more or less compacted snow. The hole of the pit is protected with snow bricks, a piece of tarpaulin, etc. Such a snow pit can be dug for 1-2 people. For a group with a large number of participants, you can dig, if the density of the snow allows, a depression like a wolf pit, which is covered on top with skis and a piece of tarpaulin.
In the mountains, you can successfully spend the night in a snow cave, dug in a snowdrift with dense snow or in a slope of hard firn. The ceiling in the cave is made dome-shaped, then when the primus is lit and the snow thaws, water does not drip from the ceiling.
If the depth of the snowdrift allows, it is advisable to make the entrance tunnel longer and communicating with the cave through a hole in the floor of the latter. With this design of the entrance, warm air, heated by the breath of people, accumulates in the cave.
It is very warm to sleep in a snow cave, having a kerosene stove and sleeping bags. Such caves are often used by climbers during difficult ascents. Snow caves were used with great success for overnight stays and housing during Wegener's polar expedition in Greenland.

General rules for constructing snow shelters and choosing a site for construction
- Do not dig a snow cave near a steep (snow-covered) slope; an avalanche may occur.
- Do not make a shelter at the base of loose rocks or overhanging snow cornices
- You cannot set up a bivouac near dry and rotten trees (the wind can knock them down)
- In a snow shelter, the warmer the temperature outside (at zero, the shelter may “leak”) Protect the ceiling inside with polyethylene
- The smaller the volume inside the cave, the warmer it is (heating a large volume with breathing is problematic)
- It is better to build a snow hole or den alone. At the same time, take off your outer clothing
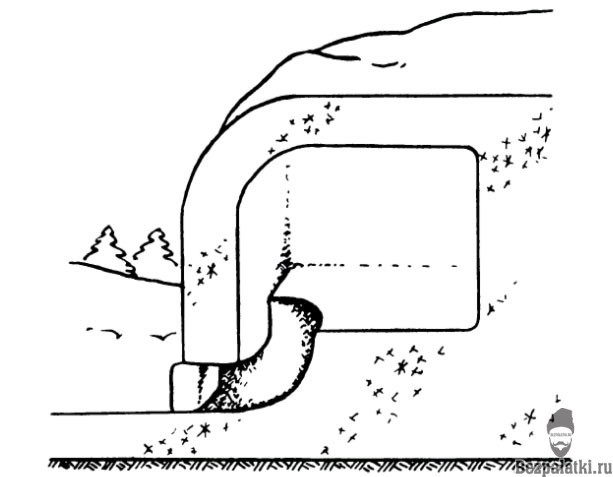
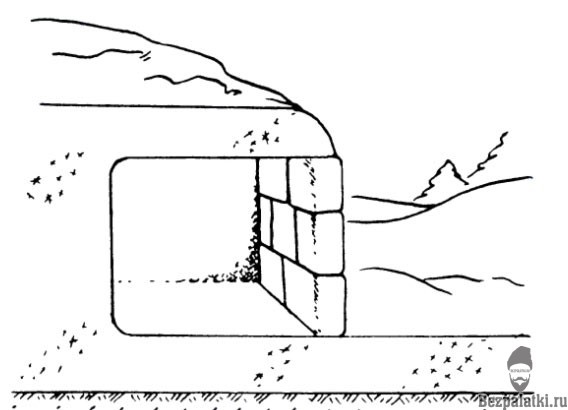
Open type shelter
1.Snow trench
Such a shelter is dug in the snow at least 1.5 meters deep. You can use skis, a bowl, or a piece of plywood as a shovel.
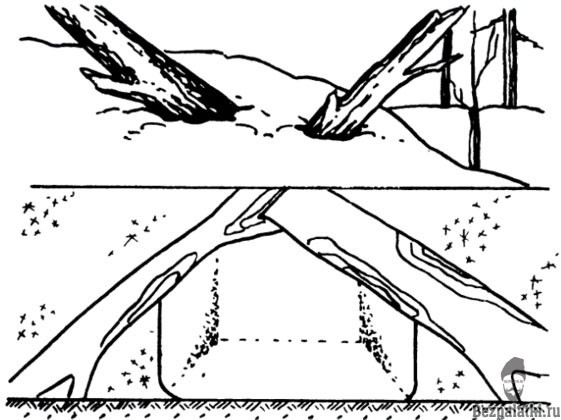
Very good shelter is obtained in ravines and hollows. In essence, it is just a slot-like hole one and a half or 2 meters deep and covered with fabric or polyethylene on top. The roof is made from tree trunks and branches or skis and sticks (if you are in a treeless area). The roof can be sprinkled with snow on top (additional thermal insulation).

In the taiga, you can build a similar cave near the trunk of a fluffy spruce or cedar. The paws of the spruce will be a kind of roof. Clear the area of snow around the trunk in a circle. In such an improvised hut you can even make a small fire
![]()
2.Snow pit
This structure is very reminiscent of a hole. As a rule, it consists of a pit tunnel and the hole itself. The minimum thickness of the ceiling should be 20-30 cm, otherwise it may collapse. If the snow is loose, then it is almost impossible to build a snow pit.

Closed shelters
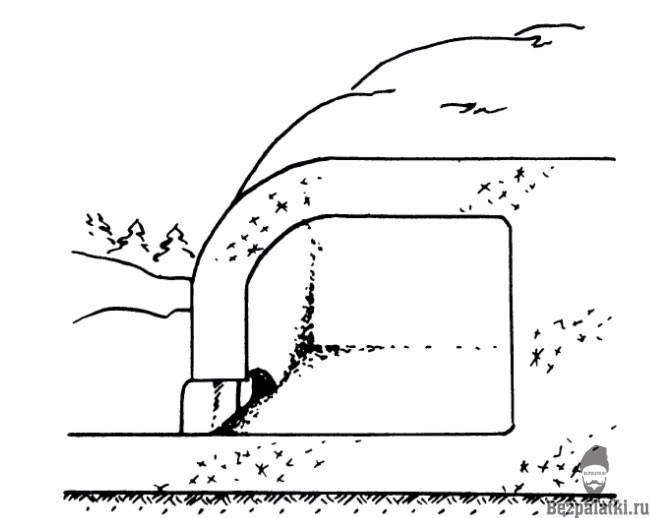
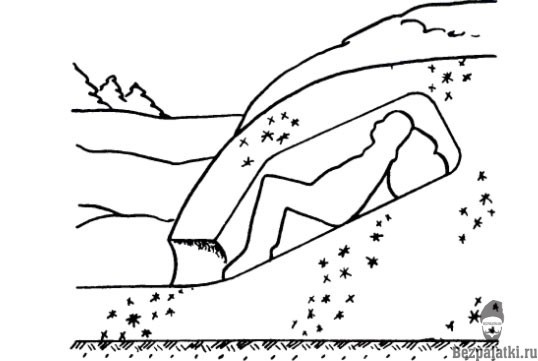
1.Snow cave
A snow cave digs into the slope. Remove excess clothing so that it does not get wet, fasten all cuffs, buttons, zippers.
Classic snow cave
Cave construction algorithm
- First a hole is made
- A narrow tunnel is being dug
- The end of the tunnel is expanded upward to the size you need
Recommendations
- The entrance should be no more than 60 cm (so that the cold does not pass through)
- The horizontal hole should go to a depth of up to one and a half meters
- The ceiling of the cave should be vaulted
- Caves can be classic version 1 and non-classical. Non-classical caves may not have a front wall and are closed with polyethylene or snow blocks
- If you light a fire in a cave, provide ventilation (mandatory), this also applies to snow trenches
Non-classical snow cave type 1
Non-classical snow cave type 2
2. Snow den
A snow den digs around windbreaks and rubble in the taiga; there are very large accumulations of snow there. A snow den is dug in the same way as a cave.
Single snow hole
In cases of extreme necessity, you can wait out the night in a single burrow of small thickness. You need to dig a hole so that the dead-end side is raised. In such a room it will be less comfortable than in an ordinary hole, but warmer than on the street. The point is that the person who spends the night in it should be above the entrance level and be in an air cushion, the bottom is lined with a layer spruce branches or sticks.
If your feet are frostbitten or you have lost your shoes, you can spend the night in such a hole with your feet inward, and cover your head with plastic or wrap it in fabric.
Single hole
Useful tips
Anyone who prepares for everything in advance will not be afraid if he does get lost in the forest. And it is quite possible to prepare in advance, you just need to follow a few rules:
On this topic ▼
Registration of tourist groups
- inform all relatives and friends about your plans, it’s even better to familiarize them with a map of the intended route and return time, arrange “control calls” with someone;
- recharge your cell phone and top up your balance; in addition to your mobile phone, it’s good to have a mechanical watch with you;
- put a whistle around your neck;
- dress brighter and take the same clothes in reserve;
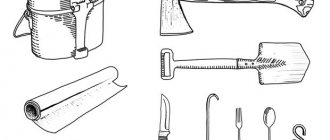
- all the essentials should be in your backpack: matches in a pencil case + wrapped in plastic, a compass, a supply of food (if canned food is hard, stock up on dried meat and fish, they are easy to buy now), water, a first aid kit, a hatchet, a kettle, insect repellent , dry alcohol tablets for ignition.

Snow hut
50 cm and 50-90 cm long. These snow “bricks” must be strong enough to support their own weight when carried and laid on edge.
It is recommended to build the hut on a flat snowdrift at least 1 m deep. Using 2 ski poles tied to the ends of the twine, a circle is drawn in the snow. The diameter of the circle depends on the number of inhabitants of the future hut and is determined in each specific case by simple calculations. The first block is laid on its edge, slightly trimming its inner edge with a knife so that the block tilts inwards (if a large snow hut is being built, the angle of inclination should be small; for a small hut a rather significant inclination is required).
The remaining blocks are placed next to the first block, close to one another, along the line of the circle. Once the first tier is laid, the second can be started in several ways.
The simplest of them is to make a diagonal cut from the top edge of one of the blocks of the first tier to the bottom edge of the same one. blocks or a second or third block of snow (Fig. construction of hut a1)
The first block of the second tier is placed in the resulting recess so that its end is adjacent to the block of the lower tier. Then, close to the first block of the second tier, the second block of the same tier is laid, etc., continuing the construction as if in a spiral. The blocks of each subsequent tier should be inclined inward at a large angle, i.e., a more or less regular dome should be obtained. When the dome is ready, a tunnel is dug through the snowdrift leading to the hut and ending with a kind of hatch in the floor of the latter. With this design of the entrance, the warm air accumulating in the hut (people's breath, primus stove) does not allow cold air from the tunnel hatch to penetrate inside the hut (Fig. construction of hut-d).
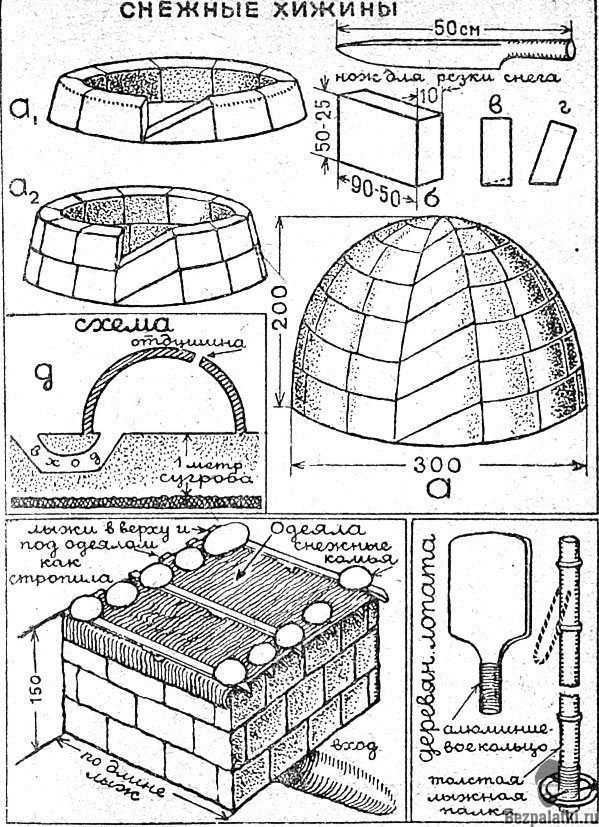
Drawing "building a hut"
I find building a hut in the middle zone very labor-intensive.
If a snow hut is being built by 4 people, then usually one cuts out the blocks, the 2nd carries and serves them, the 3rd builds the hut from the inside, and the 4th follows the builder outside and fills the gaps left between the blocks with snow.
After building the hut, it is recommended to light a primus stove inside, heat the air to +20-21° and, having made a hole in the dome, freeze the hut for several minutes. After such an operation, the walls of the hut inside are covered with a shiny crust of ice, as a result of which, in case of accidental contact with the walls, snow does not fall onto the floor of the hut. The hole in the dome is sealed with snow (only a small hole is left for ventilation).
Villamur Stefanson and his two comrades built their first hut within 3 hours. After some training to build a snow hut for 3-4 people. (hut diameter 3 m, height 2 m) took 45 minutes.
In a snow hut you can sleep in a sleeping bag without waking up from the cold when the outside temperature is very low. If you light a primus or fat lamp inside the igloo, it becomes very warm here, and you can sleep covered only with a blanket. Such a hut is indispensable when setting up a long-term bivouac (especially in treeless areas and in the mountains). If during a winter hike it is planned to build a snow hut at each bivouac, then the group should practice building it long before the hike.
You can make a snow hut of a simple design, but it will be colder than an igloo. Snow “bricks” for this hut are prepared in the same way as for the “igloo”; then they are made into a square-shaped structure, which is covered on top with a piece of tarpaulin or blankets (see building a hut). You can also put skis on top and pile snow bricks on them. All cracks between the blocks are sealed with snow. It is warmer to sleep in such a hut than in a tent.
When spending the night in the snow, it is always very important to thoroughly dry your equipment (socks, ski suit, boots) before going to bed. At night, boots should be taken off and hidden in a sleeping bag, and warm (fur) sleeping socks should be put on your feet, which every member of the group should have on a long ski trip in winter.
If you have to spend the night without sleeping bags and you can’t make a fire due to lack of fuel, you need to build a snow hut or dig a snow hole, cave, etc., take off your frozen boots, put on dry woolen socks or fur socks and put your feet in a backpack. You can't sleep in this position.
To set up a winter bivouac you should have a snow shovel
How to survive in the forest if you get lost? Top 7 basic tips.
Have you ever been alone in the forest? Imagine admiring wild flowers or treetops? And suddenly you suddenly realized that you don’t know where you are and there’s no one around.
What might happen if you can't find your way back before nightfall? Spending the night in the woods can be a deadly experience in your life, so it is important to have at least basic knowledge and common sense when we find ourselves in such a situation. You must remember that all we need to survive for several days in the forest is shelter, warmth, water, food and the help of the forest itself.
1. Don't panic.
Panic is the worst thing that can happen to you because it prevents you from thinking intelligently about what to do in a given situation. As soon as you realize that you are lost in the forest, before you do anything, stop. Take a deep breath and try to remain calm. Even if you are hanging by one hand on the side of a mountain with a broken leg, repeat to yourself that there are people who have come out of this situation.
2. Look around carefully.
Wherever you are now is your “zero point”. Find a way to mark it, such as a piece of material, rocks, a piece of paper, or anything you have on hand that is easy to see from a distance. This simple technique will allow you to navigate the area and give you psychological confidence.

3. Stay in one place.
If you know that they will be looking for you, staying where you are will greatly increase your chances of being found, and also save on wasted energy, which your body will mercilessly use if you start wandering through the forest in search of a way home. You will also reduce your need for water and food. Mark the place where you are. This will increase the chances of them finding you. If possible, mark your location so that it can be seen from the air. If you are in a clearing, arrange dark branches or triangular leaves. Create a triangle in the sand. Triangles made from different things are a signal to search teams that you are in their center.
4. Explore the area around you.
The forest contains many gifts, and it was the forest that helped to survive those who were lost in the forest and were still able to escape. Remember, however, not to stray too far from the “zero point” so that you can always return to it and not get even more lost.
5. Find or create a shelter.
Without this, you will be directly exposed to external factors that can cause, depending on the weather, hypothermia or sunstroke. If you are not properly dressed, seeking shelter is your priority. Luckily, the forest is a place where you can find many useful things for creating a shelter , such as:
- A fallen tree can be useful in creating something like a makeshift tent, using the tree as a base and the collected branches as a roof.
— Use bushes or tree branches to protect yourself from rain, wind, snow or sun.
— A heap of fallen leaves, if you cover your head with them (to do this, you need to lie between two piles of leaves and use sticks to rake them onto yourself from both sides), after covering the ground with spruce branches, can help you survive even in a slight frost.
— A spreading tree can give you shelter among its crown, the main thing is to provide yourself with a reliable fastening that prevents you from falling from a height (you can use a belt or improvised ropes from your clothes)
6. Find a source of drinking water.
Is your search dragging on? Don't wait idly by. It is generally believed that you can go without water for up to three days. But you must remember that at the end of the second day you will not be in good shape, to put it mildly.
— The best sources of water are springs, but the chances of finding them, unfortunately, are not too great. Streams are another good source of water. Be aware, however, that drinking water from streams can be hazardous to your health . However, when you're lost in the woods and have no water, the risk of disease fades into the background.
-You can also use the sleeves of a jacket or shirt, wrap them around your wrist and collect dew from the grass in the morning.
Before drinking, it is advisable to boil the water, to be sure that the bacteria have died, let the water boil for 3 minutes.
7. Find something to eat.
You should know that most adults can survive up to three weeks without food if the summer temperature is comfortable. It's better to be hungry and healthy than to be sick. Make sure that the food you are about to eat is not harmful to your health.
— Don't be afraid to eat worms and other insects. The same grasshopper or larva may be disgusting food for you, but it will provide you with many nutrients. However, all insects should be cooked because they can carry various diseases. Avoid eating caterpillars and brightly colored insects as they can be deadly poisonous. Avoid eating wasps and other insects that might sting you. Be sure to remove the insect's head, legs, and wings before eating.
— If you are lucky and you get lost in the forest near a pond, you can try to catch a fish . Fish should also be cooked before eating.
— Berries are a good solution if you can distinguish poisonous ones from edible ones. The color of ripe berries will, with a certain degree of probability, tell you whether the berry can be eaten or not. It is believed that in central Russia, white and yellow berries are poisonous in 90% of cases. Blue and black are mostly (about 90%) good for eating (but don't forget about the poisonous berries: crow's eye and wolfberry, which are black in color and blue in color, respectively). The red ones, in turn, give us a 50% chance that they are not poisonous. In general, drupe berries, like raspberries and blackberries, are 100% safe.
— Edible plants. You need to know them in advance because the risk of getting poisoned when eating an unfamiliar plant is too great. Among the well-known plants, burdock (root), nettle (too much is dangerous) and dandelion (bitter, but entirely edible) are edible.
Article Rating
Post Views: 2,338
Related posts:
pluvo27 04/10/2019 Instructions for Survival, survival in the forest, the forest helped to survive, a reminder on how to survive in the forest, what to do if you get lost in the forest, what to do if you get lost in the forest No comment
Long-burning fires (winter fires, overnight fires)
I have previously written an article about the types of fires and their purposes, if anyone is interested, take a look.
Making a fire requires a lot of skill and dexterity; This is a kind of skill that needs to be learned so that even in winter you can breed it without problems.
In winter, before making a fire, they use a shovel or skis to rake the snow to the ground, otherwise the fire will sink deeper and deeper into the snow, eventually forming a deep snow hole. Or they make a fire on a base of logs.
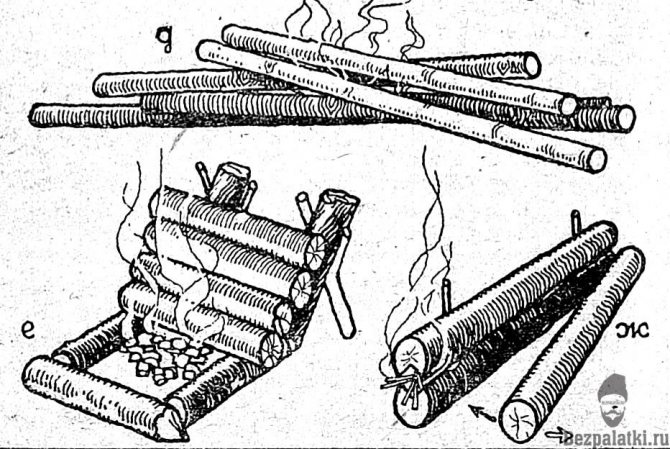
A taiga fire (Fig. fires—d ) is made up of whole or cut into two pieces of wood 2.5-3 m long (cedar, resinous spruce, dead wood, etc.). The firewood is stacked either lengthwise (long fire) or in an irregular well. The fire produces a large hot flame and a lot of coals; used for cooking food, drying clothes, and for overnight stays for a large group in summer and winter around the fire. The taiga fire is a long-lasting fire.
"American Fireplace" . This type of fire is a very long lasting fire. Thick short logs with chopped off branches and small twigs are stacked as shown in ( Fig. Bonfires - e .) The fire is lit below, at the base of the “slide”. As it burns, the lower log gradually crumbles into coals, the next log slides into its place, etc. The “American Bonfire” is used by Canadian trappers when spending the night near a campfire in summer and winter. It is inconvenient to cook food over such a fire. Only 1-2 people can spend the night near such a fire.
Nodya (fig. bonfires—g ) is a very long-lasting bonfire (the Finnish rakotum bonfire belongs to the same type). It is necessary to find suitable fuel for the node, otherwise it will burn very poorly. The best fuel for it is dead spruce or pine, resinous spruce, cedar, and in the Ussuri region - elm. Fir, which an inexperienced tourist can mix with spruce, is not suitable for Nodi. The spruce must be cut into logs 2.5 - 3 m long, 2. of them are stacked on top of each other and secured with pegs, and the third, serving as a regulator, is applied to the side. The node is ignited by placing kindling between the logs of the node regulator, or gutters are cut down along the entire length of both logs, which form a kind of tunnel when the logs are laid on top of each other. Here! along the entire length of the trench, place kindling from birch bark, dry moss, incendiary sticks (see below) and make a fire.
Nodya gradually flares up and burns evenly for several hours, giving great heat. If you need to reduce the heat, the regulator log moves back a little. Nodya is used for overnight accommodation by taiga hunters of Karelia, the Kola Peninsula, Siberia, etc. Near the Nodya you can spend the night well for 2-3 people by building a reflective barrier of branches or skis and an awning, so that sleeping people are between the barrier and the Nodya
A node can be made up of 3-4 logs. In this case, it must be kindled with a fire built at the base of the log wall of the node.
Surviving in winter without a tent
Plants and protein foods
Plant roots are suitable for food under extreme conditions. For example, burdock or dandelion are quite suitable, but the latter will have to be soaked in water. Young shoots of reeds and its roots will also help to satisfy your hunger at least a little. But you won’t last long on such a plant-based diet. Therefore, the favorite delicacy of many animals will come to the rescue - larvae, which abound in the forest.
This is interesting: Yossi Ginsberg. Survival story
You can find them under the bark of rotten trees. Earthworms will become a supplier of necessary protein and microelements. Of course, the food is not rich, but it will help you survive. The collected worms need to be kept in water and washed well, and then eaten. You can build a kind of fort from a branch and try to get yourself a fish or, at worst, a frog for lunch. When there is fire, you can cook your catch. For example, a frog cooked over a fire can be quite tasty and nutritious. After all, its meat is similar to chicken; you just need to remove the skin and remove the insides.
A stream or river will help in finding a way out to people; if you walk along their bed, you can get to their homes. Trails made by animals will help you find a river or stream. When searching, you should arm yourself with a long stick. The trails may pass through marshy areas. Therefore, you first need to check the ground under your feet with a stick.