A hunter definitely needs a gun and a knife. If there are no questions about the application of the first, then there are different opinions regarding the second. Some believe that a knife is necessary for finishing and cutting up a shot animal, as well as for protecting against an attack by an animal.
Others use this item, first of all, to chop branches, cut bread, open cans of canned food and perform various household work, but cutting up game is an occasional task. Thus, it turns out that there is no universal blade. Any man can create hunting knives with his own hands.
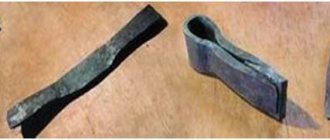
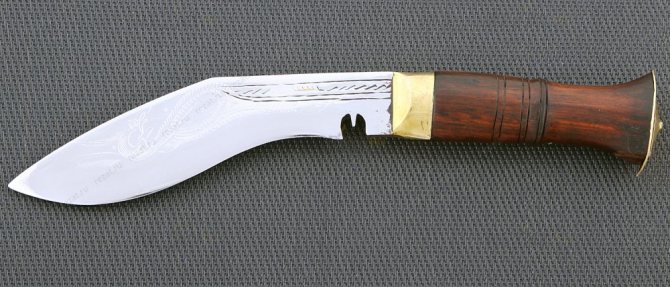
Main characteristics of kukri
Kukri is a Nepalese fighting knife, more often found among the highlanders of the Gurhi tribe. It is a massive curved blade; it is used by police and military personnel of the state. Until 2006, the coat of arms of Nepal featured an image of two crossed kukris.
| Characteristic | Brief Explanation |
| Blade shape | Curved inwards, looks like a sickle |
| Blade sharpening | Done only on the concave side |
| Handle material | Wood or buffalo horn |
| Center of gravity location | At the tip of the blade |
| Weapon weight | 600 g |
| Length | 200-400 mm |
| Butt thickness | 8-12 mm |
Features of the Kurki knife from Nepal:
- zone hardening of the blade - hard on the blade, softer on the spine;
- the blade has valleys (lobes) - longitudinal grooves on both sides of the butt;
- the blade has a triangular cross-section;
- the metal is sharpened at different angles, which makes it possible to use it not only for combat purposes, but also for housework;
- There is a recess near the handle, it reduces the stress of the steel and prevents the formation of chips on the blade;
- the handle has a pommel made of steel or brass; it is used for chopping nuts, hammering nails and performing any blows.
We recommend reading the article about file knives. From it you will learn about the features of knives, their pros and cons, steel for production, how to make it yourself, harden and temper it at home. And here is more information about sharpening options at home.
History of kukri
The history of the kukri knife began about 1500 years ago, so this weapon is considered the most ancient in the world - there are accurate records about it from the 15th century. It is believed that the kukri is a modification of the sword from Ancient Egypt and Greece. Representatives of the Gurkha tribe believe that their knife is alive and categorically do not accept its improper use (for example, if it is actively twirled with a brush, used as a fencing weapon or for stabbing).
Historically, boys are taught to own kukri from a young age. The basic rule: a knife that has already been removed from its sheath must definitely “taste” the taste of blood before it goes back. Kukri is not taken out without a reason, and if this happens, the man must cut his own finger and “extract” at least a drop of blood from it.
It is interesting that Gurkhas never use their knives for fighting unnecessarily, but if necessary, he can deliver a fatal blow quickly, literally with lightning speed.
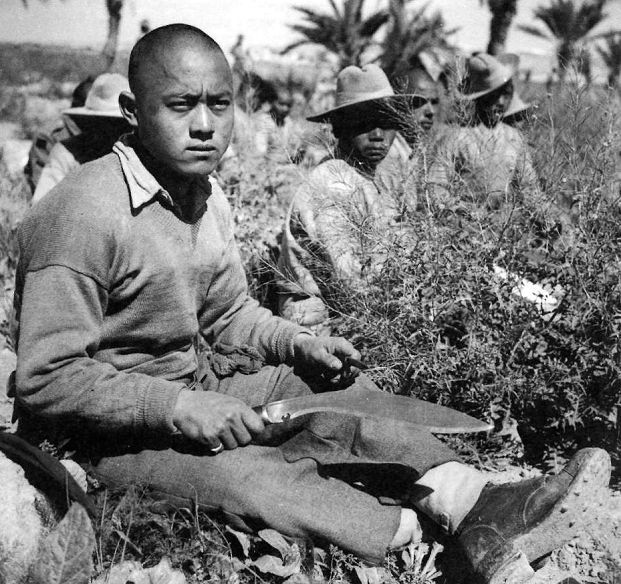
The Gurkha tribe are born warriors
What is it needed for
Residents of Nepal use a kukri knife not only for fighting, it is also needed for:
- sugar cane cutting;
- preparing vine stems for the construction of huts;
- clearing paths in the impenetrable jungle.
But kukri is absolutely not suitable for working with tree branches, even if they are thin. It is also impossible to use Nepalese weapons for cleaning or cutting meat, fish, vegetables, and baked goods.
Is it a cold weapon or not?
A kukri knife is not a bladed weapon, because the deflection parameters of the butt are more than 15 mm, and the sharpening angle of the blade tip is more than 70 degrees . According to the legislation of the Russian Federation, cutting tools of this type belong to the household category; they cannot be pierced.
In this case, the length of the blade or the entire weapon, the presence of a guard and fullers are completely unimportant - the sharpening and bending angle of the butt are taken into account. If the kukri is not altered or made strictly according to standards, then there is no need to worry about legislation and prohibitions on storage/carrying.
Watch the video review of the Gurkha knife-sword:
Gift option
According to experienced craftsmen, a beautiful and durable wooden product can be made from linden, cherry and ash. You need to start with a sketch. The master must calculate the dimensions of the blade, handle, guard and crossbar - one of the important elements in the design of a hunting knife, separating the cutting part and the handle.
After the sketch is ready, a blank is cut out of the solid wood using a circular saw. The product is shaped by hand. A regular or special knife is suitable for this purpose. The second option is preferable, since such a blade is an oblique blade, which is very convenient to work with.
The central part of the blunt end of the blade must be equipped with a special hole. The mounting pin will be inserted into it. Using the sketch, the master makes the guard. The material for this element will be a separate board.
The guard is cut using a jigsaw. A hole is also drilled in it for the mounting pin. After this, the guard should be put on the blade. For the handle of a hunting knife, any type of wood is suitable. If the master plans to make a round-shaped handle, then it is advisable to use a lathe for the work.
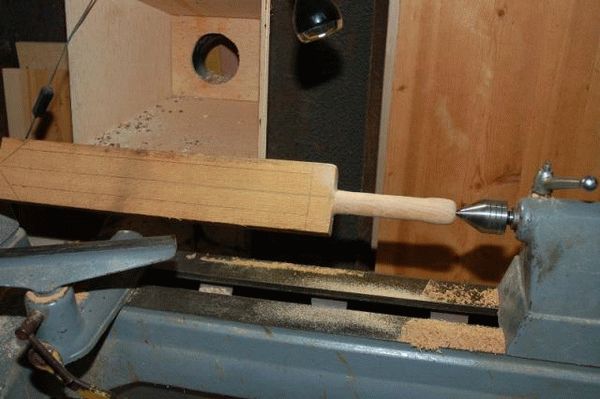
According to some owners of such products, a homemade wooden knife will be much more comfortable to hold in your hand if its handle is made flat. After processing on a lathe or using a chisel, a hole is drilled in the handle for the mounting pin. Its diameter should correspond to the hole in the blade itself.
This is interesting: Actions according to commands when firing from a PM
The knife is now ready for assembly. At this stage, craftsmen use a pin and wood glue. When it dries, the product is carefully sanded using sandpaper. This knife will look much more impressive if it is varnished.

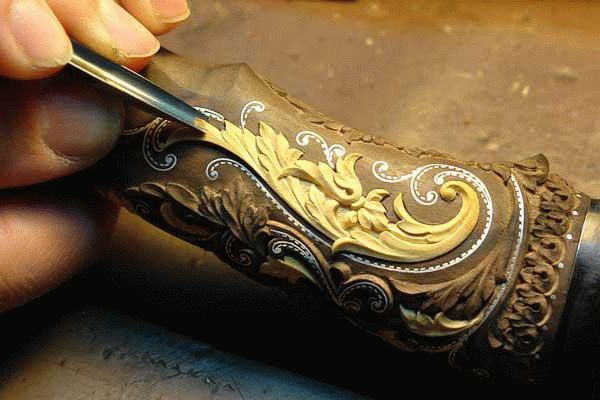
Many craftsmen apply beautiful designs and monograms to the handles of their products. In addition, some people stick leather appliqués on their handles. For comfortable carrying, real hunting knives made of steel are equipped with sheaths. You can take advantage of this and sew a similar device for a prop product. When placed in a case, a wooden knife will look like a real one.
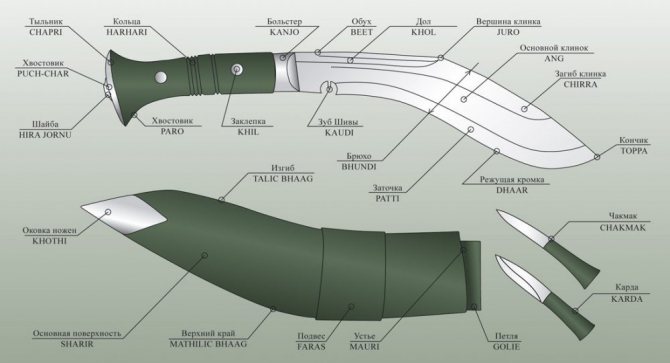
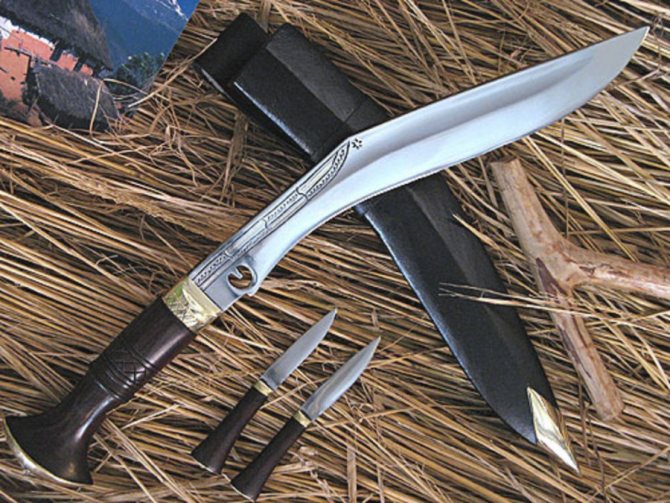
Elements of a kukri knife
The kukri knife has individual elements that are closely related to the legends and history of the Nepalese:
- The dol on the blade is considered to belong to God; Nepalese call it the sword of Shiva. It is he who endows the weapon with divine power and allows you to destroy all enemies.
- The rings on the handle symbolize the levels of the universe. Tourists believe that they make the position of the weapon in the hand as comfortable as possible, but in fact they rub the skin until it bleeds.
- The variable-angle blade symbolizes the Sun and Moon, which are considered traditional symbols of Nepal.
- The notch on the blade as close as possible to the handle is called “cho”. Its true purpose is unknown, but it is assumed that it was used to protect the blade from cracks and chips in the metal. This notch can have different shapes, often called the trident (tooth) of Shiva or the symbol of the goddess Kali.
- The pommel on the handle is perceived by Nepalese as the all-seeing eye of God.
Why is Shiva's tooth on a knife?
The Shiva tooth on the kukri knife is needed to honor the historical use of the weapon: Nepalese men pierce their finger with it to anoint the blade before sheathing it. The second purpose is to inhibit the formation of chips at the base of the blade, which is often noted after chopping blows.
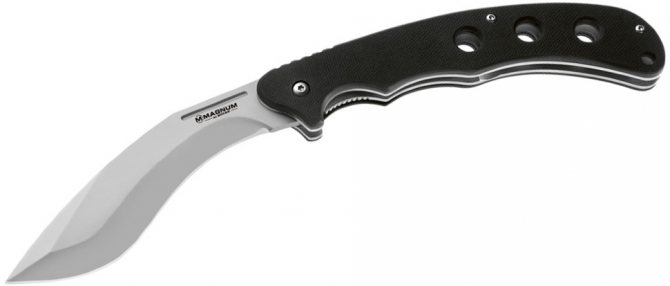
Is it foldable?
Kukri folding knives are sold in souvenir shops in Nepal; they are not used as military weapons and are modern modifications of ancient weapons. It can be used for hiking and fishing. The blade is made of high carbon steel, is considered universal and can be used to perform even rough work, for example, cutting nets and ropes/cables.
The total length of the folding kukri is 250 mm, the same parameter for the blade is 110 mm.
Possession technique
The technique of wielding kukri is individual; the Nepalese did not specifically develop it and used their combat knives to attack the enemy. In this case, the knife is in the hand, which is pulled back/retracted and slightly raised upward. The palm is placed on the handle with an overhand grip, the hands are positioned as close as possible to the blade.
Kukri deliver chopping blows; if you turn the knife with the handle forward, you can also deliver blows similar to hammering nails. There is no point in rotating the weapon with a brush or trying to make a cutting movement - nothing will work, and the Nepalese will be completely offended by such an attitude towards the most ancient knife in the world.
Watch the video to practice the technique of stabbing with a kukri knife:
Varieties of kukri-machete
The Kukri is often called the Nepalese machete because the weapon comes in several types and most often has the shape of a large chopping instrument. The most famous types are:
- Hanshi - refers exclusively to utility knives, used as a sickle;
- Catrimoras - richly decorated weapons, used as souvenirs;
- Bhojpuri/Ang Khola - intended for farming, has an average blade thickness of 10 mm;
- Janavar katne - the blade is thin and long, very similar to a traditional sword;
- Sirupati - produced only in the south of Nepal, considered the narrowest knife;
- Badhum - characterized by a thick and short blade with a large width;
- Bunspati is a true combat weapon with a narrow blade.
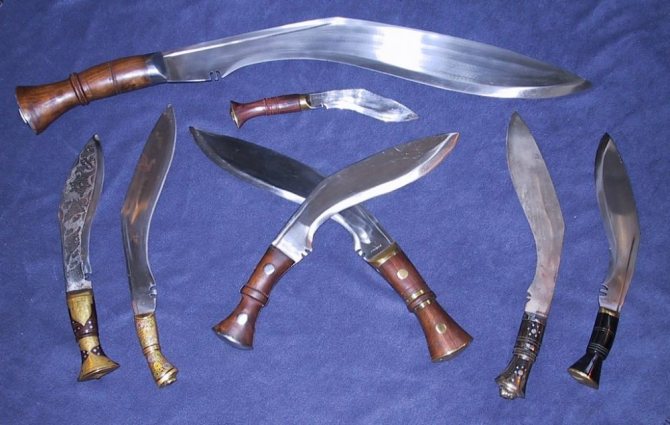
Varieties of kukri
Tools and materials
@ibuildit.ca
In fact, you don't need much:
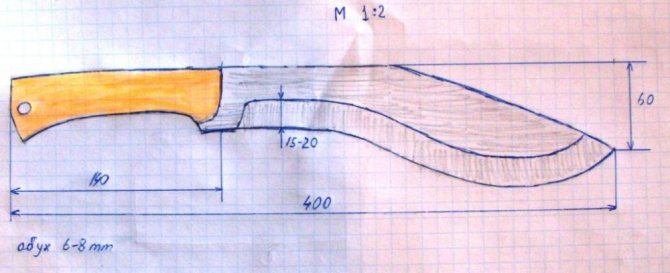
- oak or ash board with a thickness of at least 6-8 mm;
- jigsaw;
- belt sander with coarse sandpaper;
- a drill with drills, if you plan to drill holes in the product;
- several files or needle files for fine work;
- sandpaper with various grains;
- mineral oil or other impregnation;
- paper, cardboard, pencil, scissors or a stationery knife for making a template.
Advantages and disadvantages of Nepalese kukri
Nepalese kukri has the following advantages:
- heavy blade;
- delivers perfect slashes;
- can also be used for some household work;
- Suitable for striking with a pommel.
But this type of knife also has its disadvantages:
- centering located closer to the tip - the knife is uncomfortable to hold in the hand;
- the presence of notches/rings on the handle – the palm rubs until it bleeds, subsequently the skin becomes rough;
- it is impossible to apply cutting blows;
- You can’t use kukri in the kitchen - you won’t even be able to cut meat, fish, or peel vegetables.
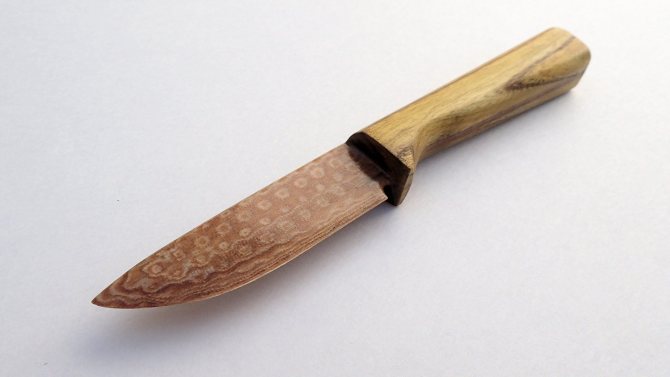
Areas of application of wooden knives
If someone starts to argue that in the wild it is possible to make a wooden knife , in the absence of a steel one, you are probably looking at Baron Munghausen. Let's figure it out - harder material is used to process wood. For example, steel. It turns out that you have something to use to process wood, but you don’t have a knife?
If we talk about the souvenir version of the product, this is closer to the truth. You can make a truly exclusive thing from wood, and the manufacturing process is simpler and faster than metalworking.
What about practical applications? I have good news - yes, with the proper choice of material and good sharpening, you can use this knife for slicing cheese, boiled vegetables or minced meat . It is clear that they cannot cut up a carcass.
The guys who do hand-to-hand combat know best what a wooden knife is for: it’s a model of a weapon for practicing techniques. Now let's talk about making this “toy”.
Kukri knife: drawings with dimensions, materials
To make a kukri knife yourself according to drawings, you will need the following materials for work:
- high-carbon steel - springs, wood saw blades;
- furnace for heating metal;
- hammer weighing at least 3 kg;
- metal cutter;
- a hammer weighing 1.5 kg for finishing the blade;
- metal rod;
- file with a fine abrasive surface;
- a strip of leather for polishing the blade;
- wood glue.
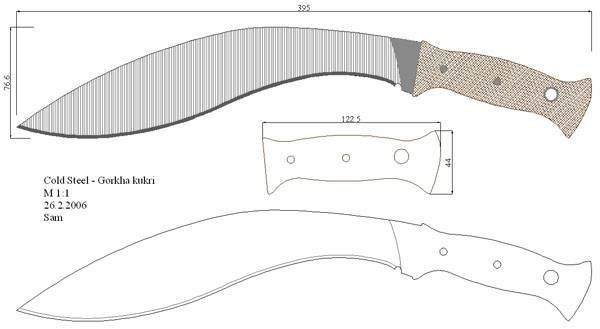
Kukri drawing with dimensions
How to sketch
The sketch is made on thick cardboard, the drawing is simply redrawn on a sheet of paper with strict adherence to all parameters. Then a pattern is cut out along the contours. It is imperative to make 0.5-1 cm overlaps along the contour - this will make it possible to process the edges of the weapon with a file.
DIY making
Making a kukri knife with your own hands is carried out according to the following algorithm:
- A pattern is applied to a piece of steel, then the contours with laps are drawn with an awl with an ebonite tip (or any other tool).
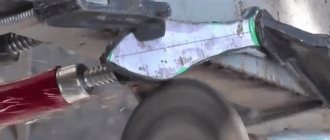
- A blade blank is cut out using a grinder.
- The metal workpiece is heated red-hot in a furnace or over an open fire.
- Forging is performed, during which both the blade and the handle are formed. This stage is performed with a three-kilogram hammer. Time - 30 minutes, you need to work together, constantly hitting the metal.
- As soon as the metal changes color from red to dark, it is heated again in the furnace. Then they continue to beat the steel with a 1.5 kg hammer. They work together, constantly changing surfaces and at the same time forming the bend of the blade.
- A groove is made on the “belly” of the blade - a metal rod is pressed against the edge of the blade and beaten with a slightly light hammer. Then the steel is heated, the rod cuts off part of the metal - you get an even groove (full).
- Zone hardening is carried out - a thin stream of cold water is poured onto the blade. Only that part of the blade that is located closer to the tip is processed.
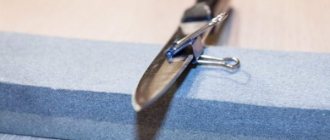
- Sharpening is done with a file. 2 sides of the blade are processed at once. Final sanding requires the use of fine sandpaper.
- Polishing work is carried out with a strip of genuine leather, ideally buffalo.
Watch the video on how to make kukri with your own hands from a spring:
While working on a knife, you need to periodically pour cold water over the metal workpiece, then heat it until red-hot - this is how the steel is hardened.
The kukri handle is made from a wooden block, with a hole drilled inside for the shank. The specified part of the knife is attached to the handle using wood glue. Next, the selected shape of the handle is given using grinding tools and regular sandpaper.
Basic operations for making knives
The manufacturing process includes several stages. Let's look at how to make hunting knives with your own hands (photos will help you evaluate the labor intensity of the process).
- A general drawing of a knife with a handle and a separate diagram of a blade with a shank are drawn up.
- According to the second drawing, a stencil is made from cardboard or thick paper, with its help a contour is drawn on a strip of metal with a pencil. Use a sharp object to scratch the metal of the workpiece along the pencil mark, in case it is erased.
- Using coarse-grained sandpaper, the metal is ground along the contour and a workpiece is obtained. To prevent the metal structure from being damaged due to overheating, it is lowered into a container of water to cool.
- The shank is preparing to seat the handle. If it extends beyond its limits, then a thread is cut at the end for a nut. If fastening with rivets is planned, then holes are drilled.
- Using fine-grained sandpaper, smooth out the slopes evenly from the blunt part of the blade to the sharp one. The workpiece is regularly cooled in water to prevent overheating.
- The surface of the blade is processed with a grinding wheel and then polished. To do this, you can use a felt disc and a special paste.
- A bushing is made from a thick brass plate and placed on the shank. The handle will rest against it. The sleeve can be made together with the limiter. For better fixation, it is soldered to the blade.
- A handle is made and placed on the shank or secured with rivets. DIY hunting knives can be made without it. Simply wrap the workpiece with cord or twine.
The knife is ready. All that remains is to place it in a reliable sheath. Making hunting knives can be a good business.
Kukri sheath
Kukri sheaths are made of genuine leather. It is pre-soaked in water, then it is fixed on the weapon strictly according to the shape of the blade. Do not remove the material until it is completely dry under natural conditions.
The final stage is to fasten the two parts of the sheath with rivets, the excess is cut off with a sharp knife. You can make a pattern on the surface of the sheath or make decorative stitches around the perimeter using thick nylon threads or thinly sliced leather.
Furniture and interior items
Any hunter, fisherman, mushroom picker or tourist, when asked which item is one of the most important, will answer – a knife. This is an indispensable attribute of any outing into nature. To prevent the accessory from causing injury, and to prevent damage to the blade, it is necessary to securely fix and protect the tool. There are different types of knives. They are worn in different ways: on the neck, belt or leg. To protect the product and the owner, a sheath is used. They are also made from a wide variety of materials. Let's look at the most popular ones, their advantages and disadvantages, and also learn how to make a sheath with your own hands.
Table of contents:
Variety of sheath materials
Among the variety of available materials, we will focus on the most popular ones. Among them, the most commonly used are:
Each material has a lot of advantages.
| Material | Advantages |
| Leather | The most popular material for sheaths. Leather has many advantages: it looks beautiful, is pleasant to the touch, has a pleasant smell, and does not make unpleasant sounds when used. But over time, the material becomes unusable, dries out and cracks. To prevent this from happening, the product needs care. With regular oiling, the service life of the sheath will be unlimited. |
| Tree | The advantages of using wood are obvious: the product is cheaper and reliably protects the blade from damage. Wood is easy to process, so the pattern on the scabbard can be made the most intricate and interesting. The product does not require any additional clamps, as it is made in the shape of a knife. The disadvantage of using wood is the weight of the structure and the risk of splitting under mechanical stress. |
| Thermoplastic Kydex | The main advantage of modern new material is durability. Thermoplastic is not afraid of moisture, it is impact-resistant and fire-resistant. The disadvantage of using it is its external unattractiveness, in contrast to the mentioned materials. It is also impossible to remove the knife quietly from the sheath: it makes a loud sound. |
| Nylon | The material is low in cost; nylon can be used in different stylistic directions. The downside is that the nylon sheath wears out quite quickly. |
| Plastic | The cheapest option. May not always be used: for “serious” use, plastic sheaths are not suitable. |
Which material to choose depends on your preferences and goals. For example, some like to use leather because it is very pleasant to the touch, while others like the “cold” thermoplastic. You also need to consider the environment in which the product will be used. If the sheath will mostly be in a damp environment, it is best not to use leather. If the emphasis is on the cheapness of the product, preference is given to nylon.
This is interesting: How a collimator sight works: what it is and how it works
General recommendations for making sheaths
A knife case is indispensable. Basic requirements for the product: durability, ease of use and reliability. Before you move on to making a sheath, you need to decide what material is best to use for this. The product must be resistant to temperature changes, not afraid of contact with water, and reliably protect the blade.
Having decided on the material, proceed to choosing a design. For beginners, it is recommended to stick to the standard form.
The algorithm for making a knife sheath consists of certain stages:
- Template preparation. Thick cardboard is bent in half and a knife is placed on it. The contours should be outlined with a seam allowance on the blade side. If the material is leather, the margin is ten to fifteen millimeters. The mount is made separately. This is done so that a new one can be made at any time (it wears out faster).
- Preparation. Material is cut out of paper using the finished template. Don't forget to take into account the seam allowance. This nuance does not apply only to wooden material. When a scabbard is made from wood, the halves are most often glued to size with a special glue. The blade should fit into the sheath without effort or friction, but at the same time, not “walk” too much.
- Insert. This element is located on the inside, on the side of the sharp blade. It is made from soft wood or felt. This is intended to prevent negative effects on the blade.
- Wearing method. Depending on how the knife will be positioned - horizontally or suspended - a mounting option and the required number of loops are made.
Almost each of the selected materials requires additional processing with special compounds. This helps protect the material from moisture. But when performing this type of work, make sure in advance that the solution will not have a negative effect on the blade or cause rust.
Making a leather sheath
Leather is most often used to make a knife sheath. Working with this material is much easier; even a novice craftsman can carry out the work of cutting and sewing the product without difficulty. Fitting it to a specific knife is not difficult; you can simply ensure a secure fit.
You can start working only when all the necessary material has been collected:
- A4 size paper or cardboard sheet.
- A piece of quality leather.
- Strong threads.
- An adhesive that is used for gluing leather products and does not lose its flexibility after drying.
- A sharp knife or large scissors.
- Scotch.
- Awl and hook.
- Ruler.
- Pencil, marker.
- Sandpaper.
- A piece of thick felt for making an insert.
- A pair of half rings for making fastenings to clothing.
When all the tools and materials are ready, the process begins. The order of actions is as follows:
- Trace the knife blade on paper.
- The knife is applied to the paper and its contours are traced with a margin of several millimeters. The paper should be folded in half.
- Both templates must be cut out and glued with tape. This blank is intended for trying on the knife to see if there is any play or if it is too tight. If the workpiece does not fit well on the knife, perform the above procedure again.
- When you are sure that the workpiece fits, you can proceed directly to the pattern.
- The pattern on the leather is drawn from the wrong side. If possible, leave some margin along the length of the knife; if necessary, you can always cut off the excess.
- You need to make two holes on the inner corners. This is done to prevent the product from rupturing during operation.
- The pattern is cut with a sharp knife, such as a scalpel. This will help avoid unevenness and create perfectly smooth edges.
- The finished form should be kept in hot water for about five to seven minutes so that the skin becomes soft and pliable. To get the knife's full shape, the leather should be tied to the product with twine or secured with large paper clips. You should leave the cutter in this form overnight.
Let's take a closer look at this procedure.
- Cling film is wound in several layers over the entire surface of the knife. There should be enough layers to maintain the shape of the product.
- Place the leather sheath blank in hot water, but not boiling water. When bubbles begin to appear from the skin, the workpiece can be carefully removed.
- Lay out the future sheath on the fabric, when the excess water comes out, insert a knife into the workpiece, secure with clothespins, closer to each other.
- After the structure has dried, the clamps must be removed.
This is interesting: Illegal survivalist weapons
Sewing leather sheath parts
Before you start stitching the sides, you need to prepare the skin for the process. Let’s make a reservation right away – this is quite difficult. You will have to cut off a couple of layers of already dry and rough skin.
To begin, trim the edges clean if necessary. The easiest way to do this is with a rotary knife. Sand uneven areas with sandpaper. It is necessary to make a groove for subsequent stitching. For these purposes, you will need a semicircular chisel or a chisel made with your own hands from a syringe. The line is marked manually, the optimal interval is a step of half a centimeter. It is best to knock out holes on a wooden surface using an awl. The holes of the two parts of the sheath must match, so be careful when doing this job. Do not try to simplify your task and punch holes in two parts at the same time: they can turn out to be very large.
Connecting the parts of the cover by stitching will ensure a tighter fit to the product. The connection is made using an awl or overlocker. If you are not making products for production, it is enough to prepare an awl. The thread for stitching should be up to 0.7 millimeters thick. In order for the thread to glide well, it must be treated with paraffin. To ensure maximum tightness of the cover, the seams are treated with a special composition of glue and thinner. For the sheath, you should prepare an insert; in addition to those mentioned, you can use the option of installing a plastic insert.
After sewing, it is important to check the product for strength. The sheath should be comfortable and also have a lock to prevent the knife from falling out. For this purpose, a rubber insert is made that presses the blade.
How to make a sheath insert
Making a cover requires a lot of attention, perseverance and time. To ensure that the result of your work is an ideal product, listen to all the recommendations of specialists.
For example, if a leather sheath seems somewhat shapeless, you need to insert plastic inside, made to the shape of the blade with some margin for ease of inserting the knife. Ideally, this is done before sewing the cover.
Another option for the liner is regular cotton fabric impregnated with wax.
But among all the possible options, felt remains the leader. Making an insert out of it is easier and faster.
- A fragment is cut out of felt, which will be used to make the liner and is impregnated with epoxy glue.
- At this time, the knife is wrapped with cling film and masking tape for protection.
- The blade is covered with felt and allowed to dry.
- When the material hardens, the liner is removed.
How to choose kukri knives
When buying a kukri knife, you need to make a choice taking into account the following recommendations from experts:
- the thickness of the butt should be 5 mm and above;
- the handle is made of wood and does not have rings (the palm will not be rubbed);
- there must be a notch on the blade in front of the handle (“Shiva’s tooth”);
- the total length of the knife is within 200-300 mm;
- steel – high-carbon (according to the manufacturer’s request).
We recommend reading the article about the best switchblades. From it you will learn about the main characteristics of switchblades, their types, and handmade switchblades. And here is more information on how to make a knife yourself.
Kukri is an original, historical knife that is rarely used for household needs, but is of interest to collectors and lovers of hiking and fishing. If you buy a really high-quality weapon, it will serve “faithfully” for many years.
Knife hardness and length
To give the blade rigidity, special grooves are made in the metal part of the product. Such depressions are called valleys. They also reduce the weight of the item. The widespread belief that the lobes are intended to drain blood is deeply erroneous.
The blade length ranges from 12 to 15 cm, width – from 2.5 to 3 cm. It is better to make hunting knives with your own hands according to the drawings. But some hunters prefer to carry two types of bladed weapons. One blade is used for cutting prey, and the other for household needs. Not everyone knows how to make a hunting knife.