There are many known methods by which the sun's shadow can be used to determine cardinal directions and time. They are based on an understanding of how the Sun moves across the sky during the day and what direction the shadows of objects show at different times of the day, including at noon, morning and evening. Next, we will look at the most famous of them, which will allow the traveler to navigate in case of loss of navigation aids or breakdown of the watch.
In the northern hemisphere, such a shadow at noon points north.
It is necessary not only to remember the methods, but also to understand the mechanisms on which they are built. It is in this case that you can always adjust the method to the conditions in which the person finds himself. If this is not done, then in some cases such ignorance can lead to mistakes and an emergency situation.
For example, many Internet articles and textbooks provide a method for orienting using the hands of a mechanical watch and the Sun, which we will discuss in more detail later. However, almost nowhere is it said that in this particular version it only works in the northern hemisphere, and even then above the tropical zone. If a person does not understand where this method “grows” from, he can easily make a mistake and, finding himself in the southern hemisphere, incorrectly determine the cardinal directions, as a result of which he will get lost.
So, what kind of basic knowledge is this, without which it will not be possible to determine the cardinal directions from the shadow?
Theoretical basis
All working methods of orienting by the shadow of the Sun are based on proven facts. Let's look at them in more detail.
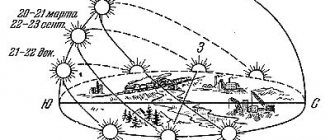
Fact No. 1. The sun always rises in the east and sets in the west. However, in high latitudes during the polar day it does not set below the horizon for several weeks at all, and during the polar night it does not rise above the horizon.
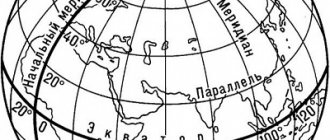
Fact No. 2. In the middle and high latitudes of the northern hemisphere at noon, the Sun is in a southerly direction or, as they also say, in the south. In the southern hemisphere, at the same distance from the equator line, the solar disk crosses the northern direction at noon. At noon at the equator, the Sun is in the north for six months, in the south for six months, and passes directly overhead for two days a year. We talked about this in detail in a separate article.
Fact No. 3. At astronomical noon, the shadow cast by vertically located objects on a flat horizontal surface will be the shortest, since at this moment the Sun is at its zenith, that is, at the highest point of the trajectory of its movement along the celestial sphere.
Fact No. 4. The sun moves across the sky at an angular speed of approximately 15 degrees per hour.
Fact No. 5. If you face north, you will see south behind you, east to your right, and west to your left.
This particular scheme will only work in the northern hemisphere at mid and high latitudes.
Of course, you need to understand that it is not the Sun itself that rises in the east and moves across the sky, but such apparent movement is associated with the rotation of the Earth and the presence of the observer on its surface. But for simplicity, we will not talk about the rotation of the Earth, but about the movement of the Sun.
And now I propose to move directly to methods of orientation by the shadow of the Sun.
Separate light and shadow

This is the basis of any shadow work. First, separate the “light family” and the “shadow family”. A light family consists of all areas that directly touch the light source. A good way to test this is to look at your subject from the direction of the light and see how the light “touches” it.
The shadow family consists of everything that is hidden from the light source. This includes all shadows and areas of reflected light.
How to determine cardinal directions by shadow
So, as promised, let's look at some of the most popular methods.
Method No. 1. Along the shortest shadow from the pole. This method is based on the fact that at noon the shadows of objects are shortest. So:
- A pole is stuck vertically into a horizontal, flat area.
- Before noon, the end of the shadow cast by a pole is marked on the site.
- Such notes are made at short intervals.
- When the shadow begins to lengthen in the afternoon, all marks are connected by a smooth curve.
- On the curve, find the point closest to the pole and mark it.
- Draw a line from the pole to this point. This line corresponds to the north-south direction.
- They stand on this line so that it is parallel to the feet joined together, and the morning marks are to the left. Now the north is in front of the person, the south is behind him, the east is on the right, and the west is on the left.
If, from the moment the first point was marked, the shadow began to lengthen, this means that noon has already passed, and you need to wait until the next morning to repeat everything again.
Most solar orientation methods will require additional constructions.
Method No. 2. Using the shadow of the pole in the center of the segment. This method is based on the fact that the Sun rises in the east and sets in the west, and the right side of its trajectory across the sky is a reflection of the left. For this method:
- As in the previous method, a pole is stuck vertically into the platform.
- In the morning, a mark is made on the site, corresponding to the end of the shadow from the pole.
- The length is measured from the pole to this mark.
- Closer to lunchtime, the length of the shadow decreases, and then begins to grow again. The shadow is measured periodically. As soon as it becomes the same length as the morning one, make a second mark corresponding to the end of the shadow.
- A straight line is drawn between the first mark and the second. This line corresponds to the east-west direction.
- The person stands so that the first mark is to his left, and the second to his right. Now we can say that in front of him is north, behind him is south, on the right is east, and on the left is west.
You can read about other variations of these methods in the article about where the sun is at noon...
These two methods make it possible to relatively accurately navigate by the shadow of the Sun anywhere on the planet (except for regions near the poles and at the poles themselves) during daylight hours, but they require a lot of time, which makes them of little use for a person who needs to navigate along the way.
Method No. 3. Using the shadow of a pole at two points. This method is based on the knowledge that the sun rises in the east and sets in the west, and the shadows of objects move from west to east, although not always in a straight line. To navigate this way:
- As before, a pole is stuck vertically into a flat horizontal area.
- On the site, the end of the shadow from the pole is marked with a stone, peg or any other convenient method.
- Wait about 15 minutes and make a second mark corresponding to the end of the shadow from the pole.
- Now, if you stand on the first mark with your left foot, and on the second with your right foot, north will be in front of us, south behind us, east will be on the right, and west on the left.
This method, like the previous ones, can be used anywhere in the world during daylight hours, but differs from them in its speed. However, this method has problems with accuracy.
The fact is that the shadow of a pole in most cases during the day draws not a straight line, but a curved one, and in relation to the position of the pole, this line can be either concave or curved, depending on the latitude and time of year. If you do not take these points into account, you can get a colossal mistake, so I will give my recommendations that will allow you to use this method with maximum efficiency. There are only two such recommendations.
Recommendation #1. It is better to use this method in March and September. It gives maximum accuracy throughout the day on the days of the spring and autumn equinoxes, since it is on these days that the shadow “draws” a straight line. The further you move away from these days on the calendar, the greater the error will be.
Recommendation #2. It is better to navigate using this method in the middle of the day. On any day of the year, this method shows the best results at lunchtime. The further from solar noon, the greater the error of the method. Moreover, the error can double if, for example, you take your bearings 3 hours before noon and then repeat the measurements 3 hours after noon.
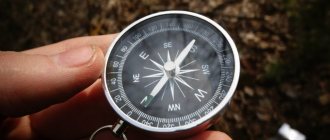
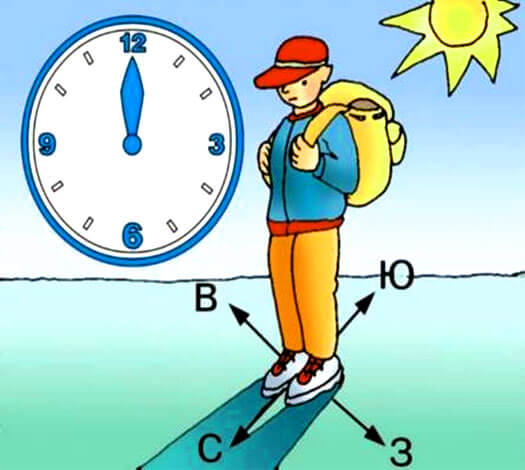
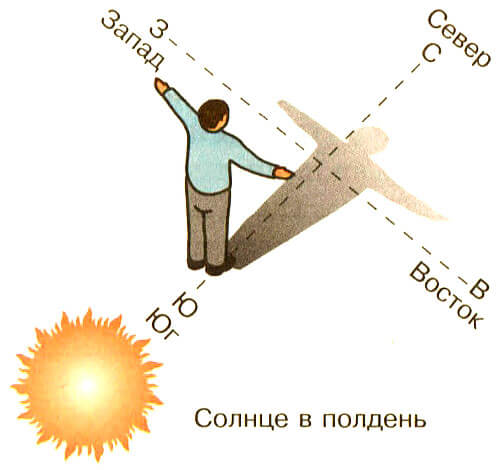
Method No. 4. Orientation by shadow and clock. This method is based on the fact that at 12 o'clock in the afternoon the Sun in the northern hemisphere is approximately in the south, and in the southern hemisphere - in the north, at 6:00 - approximately in the east, and at 18:00 - approximately in the west. Accordingly, the shadow cast by a person falls in the direction opposite to the Sun.
So, for example, if you stand with your back to the Sun at noon, then in the northern hemisphere the shadow will be directed to the north, in the southern hemisphere - to the south. If you turn your back to the Sun at 6 o’clock in the morning, the shadow will point to the west, and if you do the same at 6 o’clock in the evening, then the shadow will point to the east. Having determined one side of the world in this way, you can then find all the others.
A typical picture for the northern hemisphere.
If you have to navigate along the way, then there is no need to look for a flat area every time to stick a stick into it and then wait a quarter of an hour. Once you have your bearings, it is enough to understand which side the Sun is on and then choose the path relative to its position in the sky. For example, if, turning in the right direction, a person sees the Sun on the right, then during the transition, he must keep it on the right. In this case, over time, you can make corrections for the speed of the Sun, and during rest, you can clarify the direction using the described method.
When using this method, it is important to remember that in some countries the clocks are switched to daylight saving time and that the Sun at noon in the tropics and equator can be on both the northern and southern sides throughout the year, which we discussed in a separate article . In addition, in it we also talked about other effects that affect the position of the Sun at noon, and therefore negatively affect the accuracy of the described method.
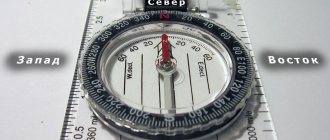
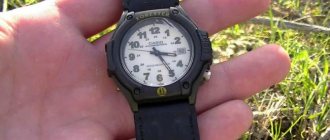
Method No. 5. Orientation by the shadow of a match and a mechanical clock with hands. This method is described in some military textbooks and is based on the understanding that in the northern hemisphere the Sun moves clockwise across the sky at an angular speed of 15 degrees per hour. To navigate this method in the northern hemisphere:
- The clock is placed horizontally with the dial up.
- A match is applied to the side of the clock, perpendicular to the dial. It is applied between the hour hand of the watch and the number “12” on the dial. So, for example, if the clock shows 8:00, the match is located near o, but if the clock shows 20:00, then near o.
- The watch and the match are turned until the shadow of the match crosses the center of the dial.
- When the shadow of the match coincides with the center of the dial, the number “12” will show the approximate direction to the south.
This method works well only in cases where the Sun, passing its highest point, is not high above the horizon. The higher it is at noon, the greater the error this method will produce.
The fact is that the speed of the Sun's projection onto the horizon not only does not coincide with the angular speed of the Sun, but also varies during the day. These differences are greater the higher the solar zenith.
That is why this method of orientation is best used at high latitudes. In mid-latitudes, it is better to use it in the winter season, when the Sun is at a low altitude above the horizon. In the tropics and at the equator, this method is usually not used, since here the Sun is high above the horizon at any time of the year, which means the errors will be very large.
In this method, as in the previous one, the clock change to daylight saving time should be taken into account. Other nuances are usually not taken into account, since the method still gives a fairly large error and is intended primarily for approximately finding the cardinal directions.
In principle, you can slightly reduce the error by raising the edge of the dial, on which the number “12” is marked, by an angle equal to the difference of 90 degrees and the latitude of the area in which the person is located. For example, for a latitude of 35 degrees, the watch needs to be raised to an angle of 55 degrees. But, as my practice has shown, such a tilt in some situations not only does not reduce the error, but also increases it, since it is already difficult to position the match exactly perpendicular to the dial, holding it with your fingers, let alone the option with the tilt of the dial. But the result of orientation will also depend on the accuracy of setting the match.
In the southern hemisphere, this method must be changed, otherwise it will show results that are far from the truth. Personally, in this case I imagine a dial with numbers located counterclockwise. Accordingly, if the clock says 10 o’clock in the morning, I imagine the hour hand pointing to the number “2”; if the clock says 16:00, then I imagine the hand pointing to “8”. Next, I proceed as described in the method, but focusing not on the real arrow, but on the imaginary one.
This method is good for approximating the cardinal directions and usually produces the largest errors compared to the previously discussed methods. But unlike them, it allows you to orient yourself within ten seconds, which is very practical and allows you to determine the cardinal directions almost on the go.
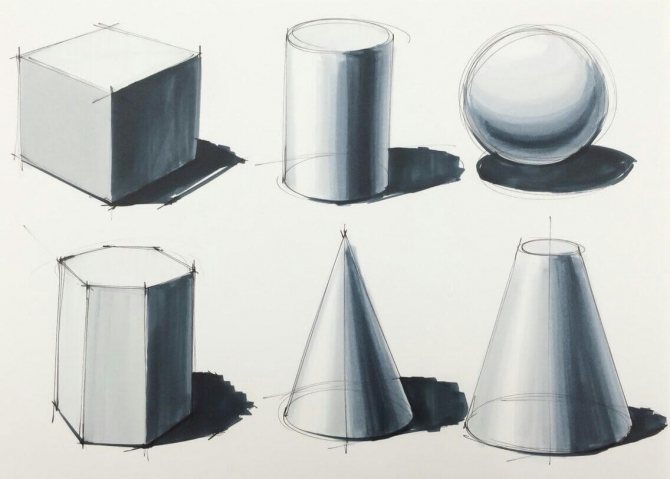
How to create a drop shadow?
We will find the answer to this question by considering the simplest geometric body. We will work with a cube; this is where the study of academic drawing begins due to its simple and understandable shapes.
To build the correct falling shadow, follow these steps.
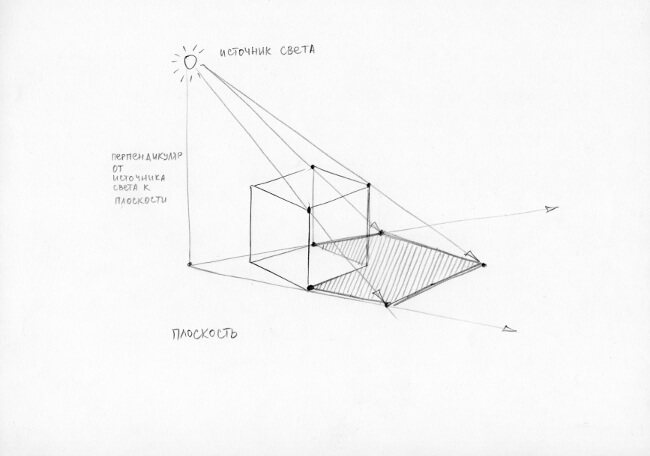
- Determine the light source. Often there can be several light sources (a lamp and daylight from a window). For now we are identifying one source.
- We draw a perpendicular line from the point of illumination to the plane on which the object is located.
- From this perpendicular we draw straight lines to the points of the object.
- We draw lines that extend from the point of light to the points on the cube.
- We mark the intersection points of all rays. The lines should be clear and even so that the point of intersection is clearly visible.
- Connecting the intersection points. The plane we have created will be a falling shadow.
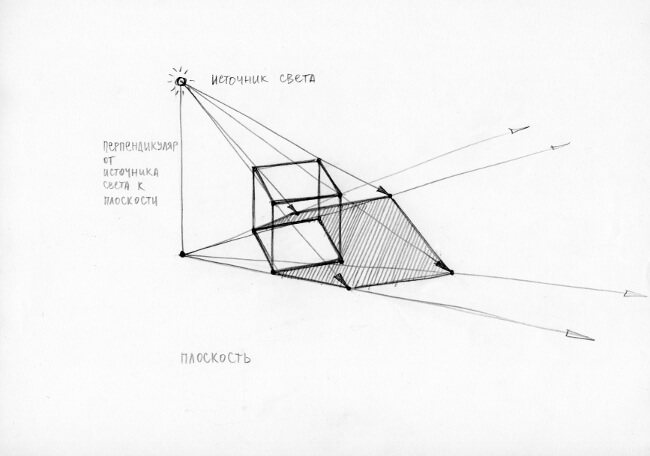
With practice, such stages are performed automatically even at the stage of constructing the object. It is worth remembering that the point of light will not always be on your sheet, so you need to develop spatial thinking. This will help to conduct the rays in the imagination.
This principle works with any objects, only the shape of the shadow can change.
How to tell time by shadow
Methods for determining time by shadow are based on the same knowledge as orientation methods.
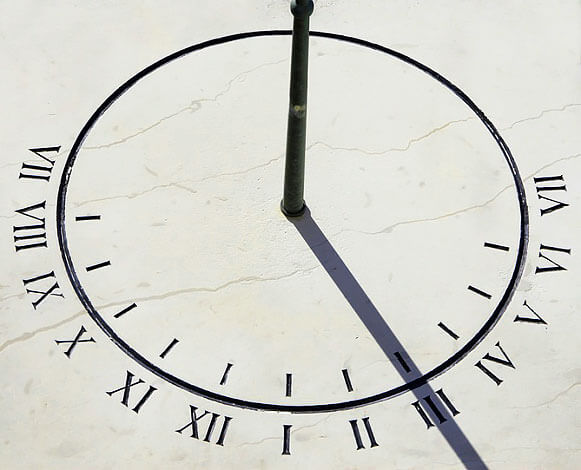
The sundial is one of the most ancient instruments that allows one to determine the time of day by the direction of the shadow.
There are many ways to determine time by the shadow cast by an object on which the Sun shines. Let's look at some of them, but before that we note that in these methods, in order to increase accuracy, it is necessary to take into account factors that influence the discrepancy between astronomical and “terrestrial” time.
Method No. 1. By the shortest shadow. On a flat, horizontal site, a vertically placed, level object, such as a buried pole, will cast its shortest shadow at 12 noon.
Method No. 2. East and west. The shadow will point west at about 6 a.m. and east at about 6 p.m. This method is more accurate the closer the day on which you are trying to determine the time is to the date of the spring or autumn equinox.
Method No. 3. North and south. The solar disk will cross the northern or southern direction (depending on the hemisphere, and in the tropics and on the equator - on the time of year) at 12 noon.
Separately, we need to talk about the Arctic. In the northern hemisphere, during the polar day, the Sun will cross the southern direction at 12 o'clock in the afternoon, but it can also cross the northern direction without falling below the horizon, which will correspond to 12 o'clock at night. In the southern hemisphere, the opposite is true: the Sun will pass through the north at noon, through the south at midnight.
Method No. 4. Along the shadow corner. This method determines the angle between the shortest shadow of a pole stuck into the ground, which corresponds to solar noon, and the shadow at a given moment in time. This angle is divided by the speed of the Sun's movement across the sky - time is obtained. If the shadow is to the west, that is, noon has not yet arrived, then the resulting time is subtracted from 12 noon; if it is to the east, then it is added to 12 noon.
For example, in the mid-latitudes of the northern hemisphere, the shadow at a given time points to the northwest, and the angle with the direction north (the direction of the shortest shadow) is 30 degrees. We know that the shadow of the Sun moves from west to east at an average speed of 15 degrees per hour, and also that at 12 noon the shadow should point north. From all this we calculate how long it will take for the shadow to point north: 30/15=2 hours. This means that there are still 2 hours left until 12 o’clock in the afternoon, which means that the clock at the current time shows 12–2 = 10 o’clock in the morning.
The latter method works well at high latitudes (best during the polar day near the poles), while near the equator it produces very large errors and is not recommended to be used. However, of all the previously described methods, this one allows you to determine the time not only at 6 am, 6 pm and noon, but also at any time in the middle of the day.
Of course, you can spend one sunny day making a primitive “disposable” sundial by sticking a stick in the ground and making marks on the end of the shadow every hour. Such a clock will show fairly accurate time for several weeks afterward, until the solar zenith moves vertically by a considerable distance. But this method will require an extra day and regular hours, which makes a little less sense. What's the point of making a sundial when there are regular ones?
In fact, there are many more ways to navigate and determine time by shadow, but there is no point in describing them all. Today I only tried to highlight the essence of these methods, the mechanisms underlying them, and demonstrate all this using popular methods. Understanding these mechanisms, everyone will be able not only to use the methods described and check the performance of the methods found in various sources, but also to come up with their own, convenient in a given situation.
If we talk about the mentioned methods, then it will not be possible to choose the best one: each method has its own advantages and disadvantages. That’s why it’s so important to use them all, choosing the best one for the current conditions.
Author: Maxim Chechetov
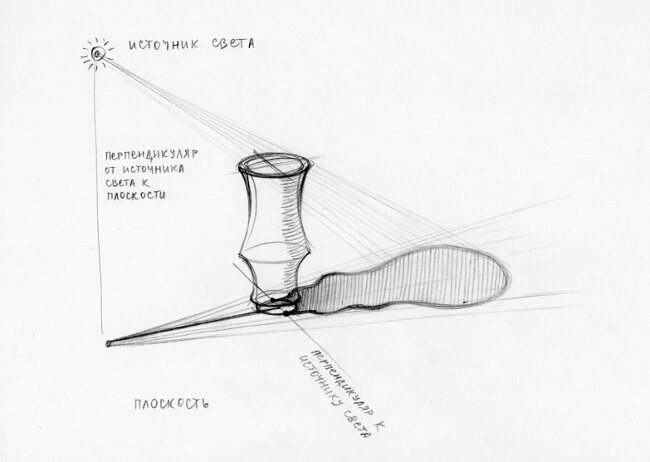
How to draw a falling (cast) shadow and its saturation?
The realism of a shadow is affected not only by its construction, but also by the clarity of the contour and saturation. The darkest part of the shadow will be near the object; as the shadow moves away from the object, it will become lighter. With a bright light source, the shadow will be more contrasting and bright, weeks in soft, daylight.
Did you find apk for android? You can find new Free Android Games and apps.
We recommend watching:
- How to draw a street
- 10 basic principles for constructing light and shadow in a drawing
- Types of drawings
- How to draw a polar bear
- Academic touch
- Learn to draw a ball with a pencil step by step