The essence and order of movement along azimuths on foot in open areas during the day
(Article: 1. The essence and order of movement along azimuths on foot in open areas during the day)
The essence of movement along azimuths is to find and maintain given directions and distances on the ground, and accurately reach the designated point.
The data necessary for movement along azimuths is prepared using topographic maps of the largest scale.
Rice. 1 Preparing data for azimuth movement
Preparation of data for azimuth movement includes:
- study of the area using a topographic map;
- choosing a route and intermediate landmarks along its sections;
- determination of magnetic azimuths of directions and distances between selected landmarks;
- registration of data on a map or drawing up a route diagram.
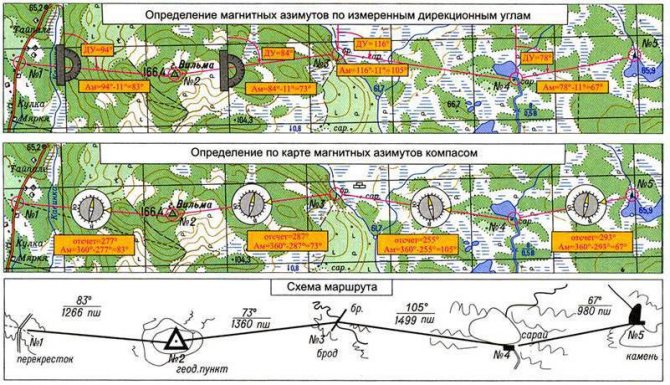
The route is marked on the map with clear landmarks at turns and the directional angle and length of each straight section of the route are measured. Directional angles are translated into magnetic azimuths, and distances when moving on foot are converted into pairs of steps, when marching in cars - in speedometer readings. Data for movement along azimuths is drawn up on a map, and in its absence, a route diagram with a table is drawn up.
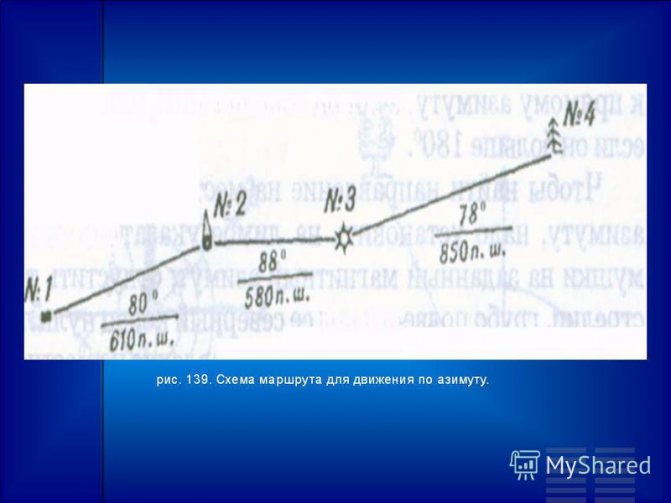
Movement along azimuths on foot according to a pre-designed route diagram is carried out in the following sequence:
- At the initial landmark (No. 1) (Fig. 1), using a compass, determine the azimuth of the direction of movement to landmark No. 2. In this direction, select some distant auxiliary landmark and begin moving;
- Having reached the landmark (No. 2), having specified their location, they again determine the direction of movement using the compass to the next landmark (No. 3), etc.
The accuracy of reaching route turning points when moving along azimuths depends on the nature of the terrain, visibility conditions, errors in determining the direction of movement and measuring distance.
Typically, the deviation from the turning point to which you need to go does not exceed 1/10 of the distance traveled, that is, 100 m for every kilometer of the distance traveled.
Therefore, if a given distance has been traveled and the intended landmark is not visible, it should be looked for within a circle whose radius is equal to 1/10 of the distance traveled from the previous turning point.
In some cases, for example, when moving along azimuths in winter on skis, distances are measured approximately in terms of time and speed of movement. To avoid loss of orientation due to inaccuracy in measuring distances, at turning points it is necessary to select auxiliary landmarks that are clearly visible from a distance.
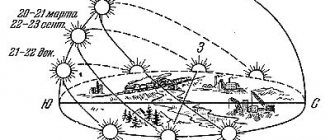
To make it easier to maintain the direction of movement, in addition to intermediate ones, auxiliary landmarks are often used. Such landmarks are usually the celestial bodies: the Sun, the Moon and bright stars. When using them, it is necessary to check the azimuth of the direction of movement after about 15 minutes, since the celestial bodies (except the North Star) move across the sky. If you move in their direction without control for a long time, you can significantly deviate from the route.
CHAPTER VII MILITARY TOPOGRAPHY LESSON:2 (§2) Movement along azimuths. - presentation

CHAPTER VII MILITARY TOPOGRAPHY LESSON:2 (§2) Movement along azimuths
PURPOSE: To give students the concept of azimuths. Teach the determination of magnetic azimuths using a compass to local objects. Cultivate resourcefulness and readiness for independent action.

STUDY QUESTIONS: 1) Concepts about azimuths. 2) Movement along azimuths.
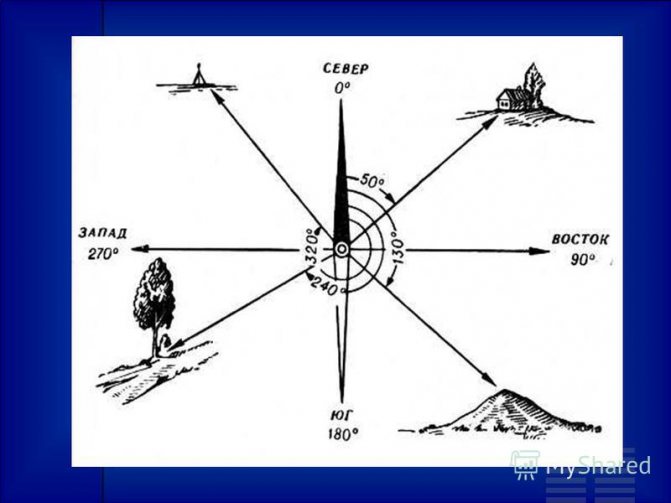
Concepts about azimuths Azimuth is the horizontal angle measured clockwise from the north direction of the meridian passing through a given point to the direction towards the object. If the measurement is carried out relative to the true meridian, then the true azimuth (A) is obtained, if the magnetic azimuth (Am) is relative to the magnetic meridian. The magnetic meridian is most easily determined on the ground, which is shown by a freely suspended magnetic needle. The magnetic and true meridians do not coincide. The angle between the north direction of the true and magnetic meridians is called magnetic declination (5).
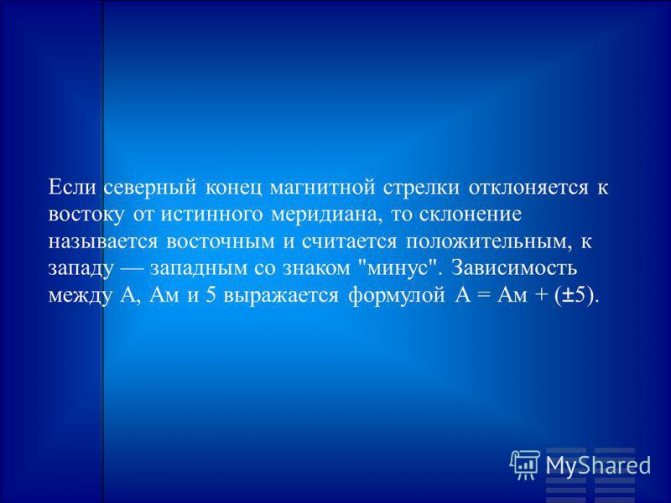
If the northern end of the magnetic needle deviates to the east from the true meridian, then the declination is called eastern and is considered positive, to the west - western with a minus sign. The relationship between A, Am and 5 is expressed by the formula A = Am + (±5).
The magnetic meridians, along which the magnetic compass needle is installed, do not go from one pole to the other along the shortest path, but form a complex system of winding lines. At any point on the earth's surface, the magnetic meridian generally makes a certain angle with the true (geographical) meridian, which is called magnetic declination. The values of magnetic declinations on the globe vary widely; range: from - 180° (western declination) to +180° (eastern declination).
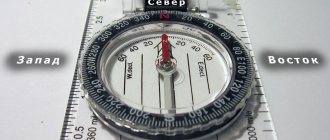
To determine the magnetic azimuth, you need to stand facing the object, release the needle brake and orient the compass (by turning the compass, align the northern end of the needle with the zero division of the dial). Holding the compass in an oriented position, turn the cover to direct the sighting line “front sight slot” in a given direction (the alignment of the compass sighting line with the direction of the object is achieved by repeatedly moving the gaze from the sighting line to the object and back). In this position, a reading on the dial opposite the pointer tip at the front sight will show the magnitude of the magnetic azimuth to the object.
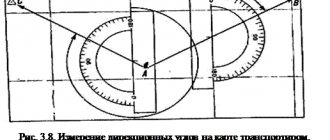
In Fig. 137 the measured magnetic azimuths to local objects are given. This is how direct azimuth is determined, i.e. the direction from one’s standing point to some other point in the area. Back azimuth is the direction from a local object to a standing point; it differs from direct azimuth by 180°. This value is added to the forward azimuth if it is less than 180°, or subtracted if it is greater than 180°.
To find the direction on the ground at a given azimuth, you need to set the reference pointer on the dial near the front sight to a given magnetic azimuth; release the needle brake, roughly move the zero dial under its northern end, determine approximately the given direction on the ground and stand facing it; accurately place the dial zero under the northern end of the arrow; at this position of the arrow, the direction of the line “front sight slot” will be the desired one.
Movement along azimuths When working with a compass, it is held 10 cm below eye level in the left hand, the elbow of which is pressed tightly to the side for stability. The essence of moving along azimuths is the ability to find the desired direction along a given azimuth using a compass on the ground, maintain this direction while moving and reach the intended point. The ability to move in azimuths is of great importance for confident movement on terrain, especially on unfamiliar and poor landmarks, as well as in conditions of limited visibility.
To move along azimuths, draw up a route diagram (Fig. 139) in an arbitrary scale on a small sheet of paper so that it is convenient to use on the road. Instead of a diagram, you can create a table using the same data (Table 2). The distance in meters is converted into pairs of steps because they are convenient to use when moving on foot. For a person of average height, each pair of steps is taken as 1.5 m.
More accurately, the length of your step from a measured or known distance can be determined on the ground. When moving along azimuths, they move sequentially from one point to another, maintaining the direction towards auxiliary or intermediate landmarks and counting pairs of steps. At the initial and all subsequent turning points (at landmarks), the direction of movement on the ground is found using a given azimuth using a compass. In this direction, in relation to specific conditions, either a more distant landmark (auxiliary) or a landmark located closer to the turning point of the route (intermediate) is selected and remembered. If the turning point is not visible from the intermediate landmark, then the next landmark is determined.
In open areas, poor in landmarks, the direction of movement is maintained along the target. At the starting point, the compass is used to determine the direction of movement to the next point. Moving in this direction, they leave some signs at some distance from each other. Then, periodically looking back at them, make sure that the direction of further movement coincides with a straight line mentally drawn through the signs left behind. On a snow field, your own tracks are used as a target.
To control, they periodically check the direction of movement using the reverse azimuth and celestial bodies, constantly compare the given landmarks with the achieved ones, and if there is a map (scheme), compare the terrain and route of movement with it. In cases where it is necessary to return along the same route, they use the same route diagram, but first convert the direct azimuths to the reverse ones.
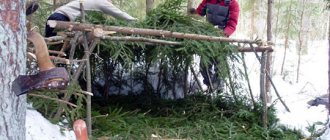
At night, silhouettes of local objects, points glowing in the distance, and bright stars are used as intermediate (auxiliary) landmarks; if this is not possible, then the direction is maintained according to the compass, that is, the compass with a freely lowered arrow is kept in front of you in an oriented position at all times, and the straight line passing through the slot and the front sight is taken as the direction of movement. In winter conditions, local objects that rise above the snow cover and are clearly visible from a distance (for example, a separate building, a separate tree) are chosen as landmarks at turning points of the route.
When you need to get around an obstacle, they do this: they notice a landmark in the direction of movement on the opposite side of the obstacle, determine the distance to it and add this value to the length of the path traveled; bypass the obstacle and continue moving from the chosen landmark, having previously determined the direction of the interrupted path using the compass.

The accuracy of azimuth movement is approximately 1/10 of the distance traveled. Therefore, if, after traveling the required distance, the specified landmark is not encountered, then a sign is left at the exit point, and the landmark is searched for, walking around this point in an area with a radius equal to 1/10 of the length of the path traveled from the previous landmark.
Questions and tasks: 1. What is called azimuth? 2. What is the difference between magnetic azimuth and true one? 3. Define forward and reverse azimuths. 4. What data is needed to move in azimuth? 5. How is the direction to an object determined at a given azimuth? 6. What do you know about moving along azimuths?
Avoiding obstacles. Finding the way back
(Article: 2. Avoiding obstacles. Finding a way back)
The order of bypass depends on the size and nature of the obstacle.
If the opposite side of the obstacle is visible
(Fig. 2), then at point A the number of pairs of steps completed is recorded. Then they notice a landmark (point B) on the opposite side of the obstacle in the direction of movement.
One of the methods is to determine the distance to the intended landmark, convert this distance into pairs of steps and add it to the distance to point A previously measured along the route.
After this, they go around the obstacle along its border. At point B, along a given azimuth, they find the desired direction and continue moving to the next turning point of the route.

Rice. 2. Bypass an obstacle if its opposite side is visible
If the opposite side of the obstacle is not visible
(Fig. 2), then when reaching point 1, they study the area and mark the side along which it is easier to get around the obstacle. After this, the azimuth of the direction along the obstacle boundary is determined using a compass (145°) and they begin to move, counting pairs of steps (180 psh.). In this case, it is necessary to strictly maintain straightness of movement.
On the right border of the obstacle at point 2 (any point on the ground), a stop is made and the direction of movement is determined in azimuth corresponding to the direction of the main route (65°). They move in this direction until they exit the obstacle (to point 3).
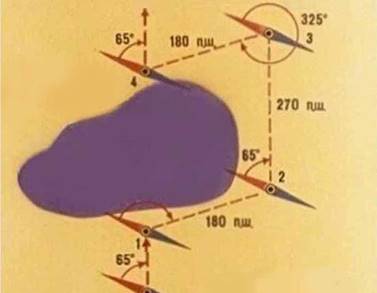
Rice. 3. Bypassing an obstacle using the parallelogram method
At point 3, the direction of movement is determined parallel to line 1-2, i.e. the reverse azimuth of direction 1-2 (325°).
Moving along line 3-4, count the number of pairs of steps equal to that measured along line 1-2, i.e. 180 pairs of steps.
At point 4, the direction of movement is determined by azimuth, corresponding to the direction of movement before reaching the obstacle (65°).
Then, to the number of pairs of steps measured to point 1, add a distance of 1-2 (270 pairs of steps) and continue moving to the previously designated turning point of the route.
In some cases, for example, to find the return path (return to the starting point), reverse magnetic azimuth
, which differs from the straight line by 180°.
To determine the reverse azimuth, you need to add 180° to the forward azimuth if it is less than 180°, or subtract 180° if it is greater than 180°.
To return from point No. 5 to point No. 1 (Fig. 1), the return azimuths will be as follows:
| Point number | Track section | Magnetic azimuth, degrees | Distance, pairs of steps | Reverse magnetic azimuth |
| 1 | Crossroads – geodetic point | 83 | 1266 | 88+180=268 |
| 2 | Geodetic point-ford | 73 | 1360 | 73+180=253 |
| 3 | Brod - barn | 105 | 1499 | 105+180=285 |
| 4 | Barn - stone | 67 | 980 | 67+180=247 |
How to move according to a plan drawn up in advance
The sequence of actions here is as follows: being at the initial landmark, they calculate the azimuth of the direction in which to move to the next one, using a compass. Having reached the second of the landmarks and having specified the location by coordinates, again using the same compass they correct the direction of the upcoming movement to the next, third landmark.
At all other points the actions are repeated in a similar way. The easier the visibility conditions and the simpler the terrain, the easier it is to determine the turning points of the route. Much, moreover, depends on the accuracy of the calculations. Normally, the deviation lies within 1/10 of the distance covered. This means that it is possible for 100 meters within each kilometer traveled. In case of loss of the intended landmark, therefore, the search for it should begin inside a circle with a radius of one tenth of the last traversed segment.
In certain cases, for example, when moving on snow on skis, sections of the path are measured approximately, focusing on the speed of the skiers and the time spent. To compensate for inaccuracy, you should use clearly visible auxiliary landmarks when turning. The moon or the sun may be suitable as such. The azimuth should be updated approximately every quarter of an hour. If such control is not carried out, there may be a significant divergence from the intended route.
Orientation at night
(Article: Orientation at night)
Navigating the terrain at night is more difficult than during the day. Many local objects become difficult to distinguish, distances to landmarks seem greater than during the day. View of the area is limited.
To confidently navigate a march at night, careful preliminary preparation is necessary. Control points along the route are marked more often (every 3–6 km). Local objects projected against the sky are chosen as landmarks (for example, tower-type buildings, chimneys of factories and factories, churches, repeaters), as well as local objects located directly along the route (bridges, overpasses, road intersections, railroad crossings, etc.). P.).
The entire route is divided into straight sections. At each such site, the magnetic azimuth of its direction is determined and recorded. In areas where there are many landmarks, magnetic azimuths are determined for areas where orientation is difficult. The sensitivity of the compass and the correctness of the speedometer readings are checked in advance, for which the car drives a flat section 2–3 km long. The compass is considered usable if two readings obtained at the same position differ from each other by no more than 3°. The planned route is carefully studied and remembered in order to refer to the map as little as possible.
Actions on the road when maintaining a route at night are similar to actions during daylight hours. The driver is warned in advance about landmarks ahead, turns and distances to them. It is recommended to illuminate the map while traveling with a flashlight with a blue filter. This lighting does not dazzle, so you can simultaneously work with the map and monitor the area.
The direction of movement off the road is maintained using a compass, and the distance traveled is determined by the speedometer. However, this greatly strains the eyesight, increases fatigue, and deteriorates the recognition of local objects along the route.
At night, the direction of movement can be maintained according to the celestial bodies. When orienting yourself by the Moon or a constellation, you should remember that all of them, with the exception of the North Star, move in the sky. For example, if the position of the Moon is taken as the general direction of the march, then after one hour the route will deviate from the planned one by 15° to the right, since the Moon moves by 15° clockwise in one hour.
How to navigate the terrain at night
This task is an order of magnitude more difficult than orientation during daylight hours. Vision in the dark is limited, objects are difficult to distinguish, all distances are seen in a distorted form. To confidently navigate at night, you should carefully prepare. The frequency of control landmarks along the route should be increased and range from 3 to 6 km.
Landmarks at night should be objects that are clearly visible against the sky background. These include tall towers, factory chimneys, church domes, etc., as well as landmarks lying directly on the route line - railroad crossings, bridges, etc. The route should also be divided into sections by straight segments. The magnetic azimuth is calculated for each one in turn, the suitability of the compass for work and the accuracy of the car speedometer data are preliminarily checked.
Orientation in conditions of limited visibility
(Article: Orientation in low visibility conditions)
Limited visibility is usually understood as the optical visibility of surrounding terrain objects in fog, smoke, rain, snowfall, blizzards and heavy dust in the air. Low visibility conditions are often equated with darkness at night, although there are specific differences between the two.
At night, illumination, night vision, and radio communication devices are used for orientation. However, masking smoke, clouds of dust, rain, and snow sharply reduce the capabilities of these devices. Various particles (dust, sand, snow, etc.) moving at high speed cause electrification of antennas, which creates major interference in radio communications. In modern combat, limited visibility can occur at any time of the year or day, especially when the enemy uses nuclear weapons, when thick and large clouds of dust arise, and fires create extensive smoke zones.
In anticipation of the occurrence of limited visibility, the route is prepared in the same way as for movement at night, if the march is made on paved roads. Off-road marches are carried out according to azimuths taken from the map in advance. The route is carefully studied and remembered. While moving, the map is oriented in the direction of travel and their location is continuously recorded graphically (with dots or cross lines) on the route.
Orienteering in the forest
(Article: Orienteering in the forest)
Orientation in the forest is difficult due to limited visibility and a small number of landmarks. The routes most often pass along dirt roads and clearings. Usually such roads are little traveled, some of them are not shown on the map because they are temporary.
When preparing a map, it is advisable to determine and write down the magnetic azimuths of the directions of each section of the route between control landmarks. When studying the route, you should pay special attention to the terrain and hydrography. Movement along the route is controlled by the distance traveled, read from the speedometer scale.
There are many local signs in the forest that can be used to determine directions to the sides of the horizon. The bark of most trees is coarser on the north side, thinner, more elastic (birch is lighter) on the south. With careful observation, you can quickly determine the direction to the north from trees, stumps, forest clearings, and intersections of clearings. Auxiliary landmarks for maintaining the general direction in the forest are the Sun during the day, and the Moon or some constellation at night.
Orientation in large populated areas
(Article: Orientation in large populated areas)
In a large populated area, orientation becomes more difficult due to limited visibility. Routes are laid out along main thoroughfares with a minimum number of turns, and turns are chosen in places where there are noticeable landmarks (bridges, overpasses, industrial enterprises, parks, tall buildings, churches, etc.). It is advisable to lay the route in the city along a linear landmark (canal, along a river embankment). Before entering the city, you need to accurately determine your location, and when moving through a populated area, graphically record your progress along the route on the map. When leaving a populated area, if the number of roads on the ground and the map does not match, and difficulties arise in determining the desired road, the direction of further movement is determined with a compass according to the magnetic azimuth of the road, determined from the map.
Orientation in the city
Movement in azimuth in a large populated area is complicated by limited visibility. The route is laid along the main roads, trying to reduce the number of turns to a minimum. They focus on prominent buildings, bridges, and industrial pipes.
If you find yourself in an area of destruction, the task of orientation becomes much more difficult. The reason is that the terrain does not correspond to the pre-drawn map. In this case, you should rely on the basic forms of relief, indicated as horizontal lines. It should be taken into account that the contours of cliffs, recesses and various gullies after the explosion will most likely be significantly changed, and it will be impossible to identify them by comparing them with a map.
River beds are practically not subject to change, but if a large hydraulic structure is destroyed, large areas of the area may be temporarily flooded. In these conditions, the most stable landmarks will be railways, as well as roads with a hard surface - even in conditions of partially destroyed road surfaces.
Orientation in areas of destruction
(Article: Orientation in areas of destruction)
In areas of destruction, orientation on the map becomes dramatically more difficult due to its inconsistency with the terrain. When choosing a route in anticipation of possible destruction on the ground, the orientation conditions are predicted. The most stable landmarks are the main forms of relief, depicted on maps as contour lines (peaks, saddles, hollows, ridges). Erosive landforms (ravines, cliffs, recesses, etc.) are easily destroyed during nuclear explosions and will be difficult to identify when comparing the map with the terrain. The position of rivers, streams, and lakes is related to the terrain. River beds practically do not change their outlines, however, when hydraulic structures are destroyed, temporary flooding of large areas of the area occurs. Paved roads and railways are also stable landmarks, although their surfaces can be destroyed.
In order to confidently maintain a given direction of movement in areas of massive destruction and fires, it is very important to be able to fluently read a topographic map and have keen powers of observation, recognizing your location on the map from the remains of destroyed objects.
When entering the destruction zone, the magnetic azimuth of the direction of movement and the speedometer reading should be measured and recorded. At all major turns when moving in the zone, this operation is repeated. If necessary, you can use this data to restore your location on the map.
Orientation in winter
(Article: Orienteering in winter)
In winter, as a result of snow drifts, the relief forms are smoothed out. Landmarks such as ravines, hollows, gullies, beams, ditches, holes, dirt roads, streams, small lakes under deep snow cover are almost invisible. Often in winter, new roads (winter roads) are built, which cover the shortest distances and are not displayed on maps. All this greatly complicates navigation.
In winter, routes are usually laid along well-worn roads or column tracks. When traveling without roads on skis, the direction is maintained according to the compass. During the day, in open areas, tracks from skis or cars are used to check whether the direction of movement is maintained. Good landmarks in winter, especially at night, are populated areas, railways and roads with hard surfaces, forest edges, individual groves, bridges over wide rivers and other areal and linear landmarks.