A dugout is not a temporary shelter, but a structure that allows you to spend several months in the forest. Dugouts are usually built by hunters, rangers, and foresters. This complex device requires materials, time and effort, but it can protect from rain, snow, and cold for a long period. How to build a dugout with your own hands to create a reliable shelter will be described in the information below.
General information about the structure of the dugout
What you need to know about the dugout:
- The most ancient type of housing created by man.
- This is not just temporary housing, it is universal housing, allowing you to live in it for up to several months.
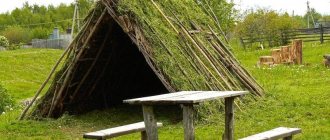
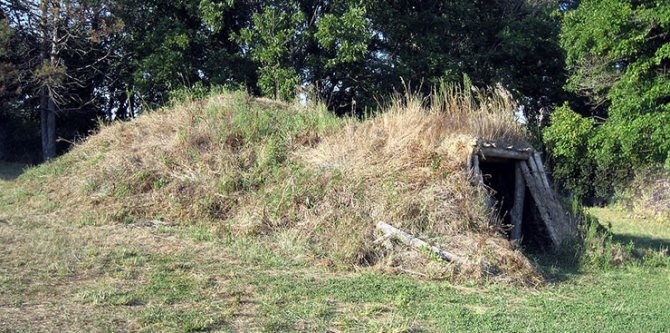
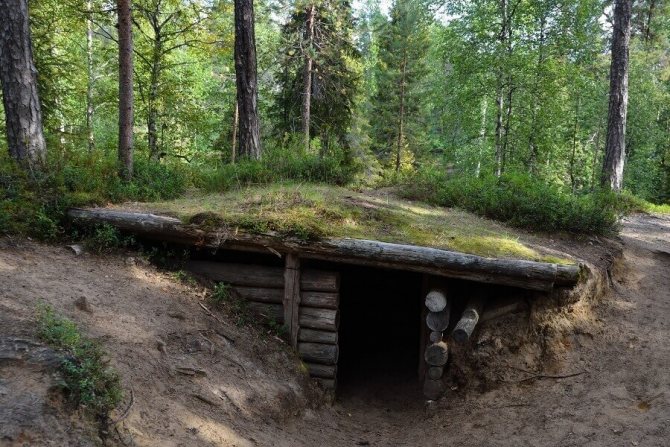
- A classic dugout is a hole dug in compliance with basic proportions, having a roof and a small part coming out of the ground (entrance).
This is a type of housing.
The term “dugout” itself is used for the category of housing, deepened into the ground under the roof. Even a dwelling with a recessed floor and buildings half buried in the ground (the so-called semi-dugouts) are often called a dugout.
It is advisable to use a dugout as housing if you are sure that all the rules during construction have been followed. After all, its construction is quite a difficult and expensive job. Hunters, fishermen, and gamekeepers most often choose this type of overnight stay. For them, practicality lies in having a permanent place to relax, close to where they live, as well as the inconspicuousness of the house itself.
Having studied the construction technology and the basic rules of arrangement, you can build a dugout in the forest, as a hunting (fishing) lodge, in your dacha, as a landscape highlight, a storage cellar, or it could be a modern dugout with all the amenities that has become your new hobby.
This is interesting: how to prepare a cellar for storing vegetables.
In this video you will learn how to build a dugout:
How to build a dugout in the forest with your own hands. Tools for building a dugout
Tools for construction. Under normal conditions, you will need tools such as:
- roofing felt;
- poles (120 pieces, 5.5 m each);
- wire (about 8 kg);
- iron (about 2 tin sheets);
- timber (about 5 cubes);
- window;
- bake;
- drive.
Step-by-step instruction:
- You need to prepare a drawing of the dugout and think about where the door, windows will be located, and what the layout will be. It is necessary to clear the construction site of branches, leaves and other debris. Next you need to dig a hole of 6-7 meters, the width should be about 50 cm.
- Then along one of the walls you need to dig another recess about 50 cm long. It is needed for the future floor. It is necessary to make a shallow depression of about a meter from the entrance and equip it with steps. The steps should be about 4-5, about 30 cm wide. To avoid falling from them in the dark, you can create a railing from leftover materials. The steps should also be insulated and made durable.
- Next you will need bars and poles. The bars must be placed around the perimeter of the dugout to create support for the future roof. The bars need to be dug into the ground and it is advisable to treat the area where the bar and the ground come into contact with antiseptic or anti-corrosion substances. When the roof support is ready, you need to lay the poles on it as close to each other as possible. To fasten the roof and beams you need to use wire and nails.
- Next, you need to insulate the roof and make sure that it does not leak. For this you can use moss, spruce branches, branches and foliage, grass. The walls and roof need to be treated with roofing felt. All these manipulations will retain heat, and also prevent leaks, flooding of the dugout and sprinkling of soil.
- It is better to install doors and windows at the stage of installing the frame and bars. If it is not possible to use good doors and windows, you can make any shutter, the main thing is to ensure a tight fit. The insulation of the roof and walls does not end there. The roof and walls on both sides need to be covered with several layers of clay, allowing each layer to dry.
- It is necessary to take care of drainage. A drainage channel needs to be built along the perimeter of the dugout. You can use clay for this. If possible, insulation of the roof and walls can be done using polystyrene foam. For the floor you can use wooden boards, chipboard sheets, plywood. All this needs to be placed tightly on the floor and also treated with roofing felt.
- The main manipulations end here and then you need to take care of heating the dugout. An oven will be used for this. So, how to build a dugout with a stove with your own hands. Due to the fact that the dugout retains heat well, when the stove goes out, the heat will remain for a long time. Provided the roof and walls are well insulated and sealed.
Rules for arranging a dugout
The work done should not only be protected and looked after, but also completed using small details. When constructing a building, you should not check everything experimentally if you already have ready-made information. Experienced users of dugouts not only give recommendations and an action plan for construction, but also share their little tricks. For example, for long-term stays, as well as for those who like comfort, you can lay the floor with tightly fitted logs or boards. This will also help insulate the home. The walls can also be finished according to your choice; using thermal insulation, you will again insulate the room. Walls sealed with clay and covered with turf will be suitable for wintering.
Build a dugout in the forest with your own hands. Preparing for the construction of a dugout
If you want to learn how to build a dugout, read the detailed instructions described below. Before starting construction, consider the future layout of the building. First you need to choose the right place. It is better to do this gradually so that the home lasts as long as possible.
Important! If you are digging a hole in an area with rich turf, remove it and save it. It can be used to insulate and camouflage buildings.
The construction of a dugout begins with a hole. On the ground you need to outline the dimensions of the shelter; most often they make a dugout 3 by 4 meters. The depth of the pit for the dugout is chosen depending on the height of the future resident, the average is one and a half meters.
Note! A dugout is a place to spend the night. Therefore, you should not make a high ceiling in it, this will significantly complicate the work.
When the hole is ready, start cutting the boards. Many people want to know how to build a dugout at minimal cost. To do this, you can enter into an agreement on the purchase and sale of wood in the territory where you are going to build a dugout. If this is not possible, it is better to order the construction material and bring it in advance. Remember that wood for the dugout is prepared in reserve. The percentage of rejection during work is inevitable.
Finding a place to install a dugout
Any construction project requires a serious approach from start to finish. So, having decided to build a dugout with your own hands, you first need to decide on the ideal place for its location. Such a unique home will not tolerate thoughtlessness and negligence. Follow simple rules:
- The best place is a hill, this will protect the home from transport water and melt water.
- Pay attention to the soil of the selected hill - it should be soft, crumbly, without stones and roots.
- The location of the door should be on the leeward side to retain heat.
- The roof of the dugout is pitched, at an angle of inclination of the hill, this will avoid flooding from melted snow.
- Avoid swampy and open areas.
- The best location is an inconspicuous place, but not far from water and food supplies.
- If the building is necessary for survival, then the choice of location should take into account the possibility of sending a distress signal.
Marking and excavation work
Before starting work, markings are applied to the area. The boundaries of the outer perimeter are marked on the ground, the corners of the future dugout are marked with driven stakes, and string is pulled between them.
Do-it-yourself dugout requires patience. You should be mentally prepared for excavation work. To make the future room comfortable for temporary living, its depth is made 170-180 cm. This option allows you to lay the roof with the greatest angle, allowing you to insulate it with turf and provide more reliable camouflage.
Layers of turf are carefully removed and laid aside, later they are used for lining the roof. It is advisable to place the soil from the pit at a distance of 50-100 cm from the edge. When building a roof, the nearby soil will greatly interfere with the work. A dugout in the forest can be dug with an excavator, but the final work of leveling and strengthening the walls is carried out with one’s own hands using a shovel.
The accuracy of the dimensions is checked with a tape measure; the length along the diagonals must be the same. The walls are made with a slight negative angle to facilitate the construction, insulation and strengthening of the walls. In place of the future door (window) a gentle descent is made. Drainage grooves are dug on the floor with a slight slope and outlet beyond the perimeter of the dugout. Brushwood is placed in the groove to prevent the edges from being washed away. This move allows you to make the dugout dry and protect it from excess moisture from the spring flood.
Preparatory work
Having chosen a place and decided on the ideal location, proceed to planning. This preparatory stage includes marking the area. The standard size is 3*4, making it much larger is impractical. The height of the dugout (the depth of the pit) is chosen according to the height of the resident, but it should not be made too high, the dugout is a place to sleep, and a high ceiling will only complicate the work and make it vulnerable to possible natural elements. Next, start preparing the logs. Wood must be available with a good supply, because rejection is inevitable. It is difficult to predict what will be needed during construction at the next moment. But the main supply of tools and materials for building a dugout should be as follows:
- shovel;
- roulette;
- screwdriver (or screwdriver and drill);
- hammer, sledgehammer, saw, crowbar, axe;
- building level;
- sandpaper;
- nails, screws and staples;
- logs and beams;
- plywood;
- insulation of your choice;
- door and window (if you planned it according to the project);
- roofing felt;
- flooring (according to your choice and desire).
Important! Preparing and checking that you have a set of tools and materials will save you time and allow you to focus on the job itself, so don't neglect this step.
Don’t forget to prepare the tools
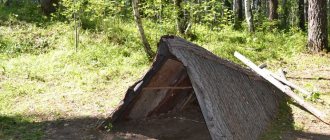
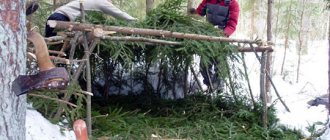
If the construction of such housing takes place in natural conditions, in the absence of all the necessary means at hand, or you want to make the dugout as close to nature as possible, then use an alternative to some materials: the wire can be replaced with willow twigs or the roots of young trees, as insulation Pre-dried moss is suitable; roofing material can easily be replaced by branches, leaves, tree bark, and grass.
How to build the dugout itself?
Creating a dugout with your own hands is done in stages. A beam (log) is driven into the corners with a sledgehammer or dug into the corners to a depth of 1-1.5 meters. The negative angle of the walls allows you to drive in the “edge” strictly at the angle, without making an indent to the width of the board. The posts are sawed off flush with the ground. Sheathing of boards is made on the pillars on the side of the earthen walls, and frames for the door and window are nailed. The boards are covered with roofing felt. The voids between the earthen and knocked together walls are filled with earth and carefully compacted.
The next stage is arranging the roof of the dugout. You will have to tinker with your own hands here - outside help will not hurt. In the middle, close to the back and front walls, a log is dug in and nailed to the common wall. Their height above ground level depends on the size of the designed roof, ideally no more than half a meter. A log is attached to them using brackets from above - this is the ridge of the roof.
A log is placed horizontally on the side walls and secured with staples. Floorboards are nailed to them and the ridge at a distance of 20-25 cm, installed on the edge - these are rafters. This arrangement greatly increases the durability of the roof. The heat in the dugout is well preserved due to the turf on the roof and its covering. The boards are screwed on top with self-tapping screws, and roofing felt or other waterproof material is laid on them.
It is advisable to lay the turf in two layers - with the roots up and down.
If the slope is large, then for better stability, a mesh is placed between the layers of turf. If the roof is insulated in one layer, the turf is placed with its roots facing up and sown. The inside is insulated with polystyrene foam, which is placed between the rafters, thermal insulation material and lined with plywood.
Dugout construction technology
How to build a dugout and where to start the construction itself? Having marked the area, decided on the dimensions, and collected all the necessary materials for the construction of the dugout, we move on to the main part:
- We compact the walls of the pit (from inside the dug hole). We tap and compact the walls and floor. This is necessary to provide thermal insulation and avoid soil shedding.
- We install supports around the perimeter (as reinforcement).
- Having determined which wall will have the entrance, we install two support pillars with a diameter of 15-20 cm there.
- We lay the rafters on the prepared supports (for the roof). Round logs with a diameter of about 10 cm are suitable for rafters. The rafters are attached to supports, dug into the ground, their ends should go under the slope of the roof, at an angle. Roofing felt can be laid along the walls as thermal and waterproofing. At the same stage, consider and provide for the presence of windows in the home.
- At the stage of laying the rafters, a stove should be installed. The most acceptable and budget option in this situation is a potbelly stove. Its pipe should be brought out at this stage.
- We cover the rafters with frequent lathing. To install it, you can use both nails and natural materials - branches, rhizomes.
- We cover the walls with lathing according to the same principle as the roof. We arrange the entrance to the home from the side of the supports, hanging prepared doors on them.
- The entire sheathing, the ends of the rafters and supports must be thoroughly coated with clay. The final thickness of the clay installation should be at least (or preferably more) 15 cm. Each new layer of clay should be smeared only when the previous one has dried.
- The last stage is the roof. We lay roofing material in several layers, covering it with dry branches, leaves, and grass. We insulate cracks and holes with moss or any other insulating agent.
An important point is safety precautions during construction. Its main components should be reliable fixation of all fasteners, a flat surface of the construction site, adherence to all rules for the use of electrical appliances and protective equipment, and high-quality tools. Do not forget about the mandatory presence of a first aid kit. Burns, scratches, cuts are an integral attribute of any construction site. Therefore, your work first aid kit must certainly include bandages, ointment for burns, bruises, disinfectants, and adhesive tape.
Construction will most likely take a lot of time; during this time it is best to arrange an overnight stay at this place. This will allow you not to delay the process and complete construction as soon as possible.
How to make a dugout with your own hands in the forest. Building a dugout with your own hands: general diagram
A dugout is the most ancient type of housing built by man. Most of it is in the ground. Essentially, this is a hole dug in compliance with the proportions, dimensions and roof.
This type of housing is ideal for hunters and fishermen whose fishing is seasonal. The dugout is perfect for short-term living in the forest.
Nowadays, the question of how to make a dugout has not lost its relevance.
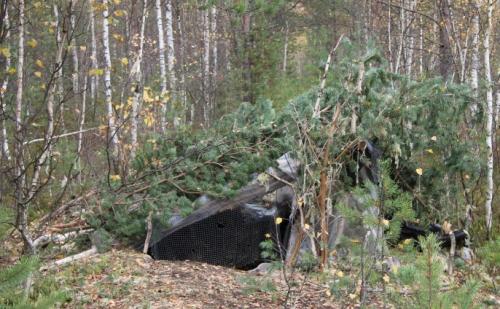
Its construction is more economically profitable than the construction of a small house. It does not attract attention and is easily disguised. This allows you to avoid the visit of uninvited guests in the absence of the owner.
For owners of country houses, such a structure will serve as a temporary shelter while the main house is being repaired or completed. The dugout construction technology is suitable for constructing a vegetable cellar.
Dugout construction project
You can build a dugout almost anywhere. When choosing a location for a future shelter, you should consider some preferences and restrictions:
- They are built in forests and fields, choosing more elevated places with low rockiness. A large number of stones significantly complicates the construction process.
- A dugout can be dug in hills, this reduces the amount of work and materials.
- Swampy soil and the option when groundwater is located close to the surface are not suitable for a dugout.
- When choosing a location, protection from winds is taken into account. The entrance and window are located on the leeward side for better heat retention.
Before you start building a dugout with your own hands, a plan is drawn up on paper to better represent the future “earth” house. All dimensions are indicated on the drawing:
- length and width of walls;
- ditch depth;
- height and slope of the roof (one-, two-slope, its angle of inclination).
If a hill is chosen for construction, then a long wall is dug across the slope. The roof is made pitched and follows the slope of the hill, this helps avoid flooding and retain heat in the dugout.
What to make a dugout from?
For excavation and construction, many tools are not required; such a minimum set can be found in almost every house or garage:
- Shovel and bayonet.
- Measuring ruler (roulette).
- A screwdriver with several charged batteries (can be replaced with a screwdriver and a hand drill).
- Axe, nail puller, saw, hammer, sledgehammer, crowbar.
- If good processing of lumber is preferred, then add a plane and coarse-grain sandpaper.
- Plumb line, building level.
A strong dugout, the construction of which can be done alone, will delight you with its comfort after a long walk in the forest, and will shelter and warm you on a cold, stormy day.
To build a dugout from building materials, the following are purchased:
- nails, screws and staples of various sizes;
- timber or logs;
- board (flooring, lining);
- Chipboard or plywood;
- insulation (foam plastic, mineral wool);
- door, window (if available);
- roofing felt, thermal insulation coating;
- linoleum for the floor (optional).
A dugout in the forest may be attacked by insects that can damage the integrity of the tree. Before construction, boards and timber must be treated with a solution to protect against insects, prevent rotting, and reduce fire danger.
Marking and excavation work
Before starting work, markings are applied to the area. The boundaries of the outer perimeter are marked on the ground, the corners of the future dugout are marked with driven stakes, and string is pulled between them.
Do-it-yourself dugout requires patience. You should be mentally prepared for excavation work. To make the future room comfortable for temporary living, its depth is made 170-180 cm. This option allows you to lay the roof with the greatest angle, allowing you to insulate it with turf and provide more reliable camouflage.
Layers of turf are carefully removed and laid aside, later they are used for lining the roof. It is advisable to place the soil from the pit at a distance of 50-100 cm from the edge. When building a roof, the nearby soil will greatly interfere with the work. A dugout in the forest can be dug with an excavator, but the final work of leveling and strengthening the walls is carried out with one’s own hands using a shovel.
The accuracy of the dimensions is checked with a tape measure; the length along the diagonals must be the same. The walls are made with a slight negative angle to facilitate the construction, insulation and strengthening of the walls.
In place of the future door (window) a gentle descent is made. Drainage grooves are dug on the floor with a slight slope and outlet beyond the perimeter of the dugout. Brushwood is placed in the groove to prevent the edges from being washed away.
This move allows you to make the dugout dry and protect it from excess moisture from the spring flood.
How to build the dugout itself?
Creating a dugout with your own hands is done in stages. A beam (log) is driven into the corners with a sledgehammer or dug into the corners to a depth of 1-1.5 meters. The negative angle of the walls allows you to drive in the “edge” strictly at the angle, without making an indent to the width of the board.
The posts are sawed off flush with the ground. Sheathing of boards is made on the pillars on the side of the earthen walls, and frames for the door and window are nailed. The boards are covered with roofing felt.
The voids between the earthen and knocked together walls are filled with earth and carefully compacted.
The next stage is arranging the roof of the dugout. You will have to tinker with your own hands here - outside help will not hurt. In the middle, close to the back and front walls, a log is dug in and nailed to the common wall. Their height above ground level depends on the size of the designed roof, ideally no more than half a meter. A log is attached to them using brackets from above - this is the ridge of the roof.
A log is placed horizontally on the side walls and secured with staples. Floorboards are nailed to them and the ridge at a distance of 20-25 cm, installed on the edge - these are rafters.
This arrangement greatly increases the durability of the roof. The heat in the dugout is well preserved due to the turf on the roof and its covering.
The boards are screwed on top with self-tapping screws, and roofing felt or other waterproof material is laid on them.
It is advisable to lay the turf in two layers - with the roots up and down.
If the slope is large, then for better stability, a mesh is placed between the layers of turf. If the roof is insulated in one layer, the turf is placed with its roots facing up and sown. The inside is insulated with polystyrene foam, which is placed between the rafters, thermal insulation material and lined with plywood.
Floor and stove in an earthen house
How to build a dugout, make a floor and a safe stove? When designing an “earth” house, you need to clearly know the answers to these questions.
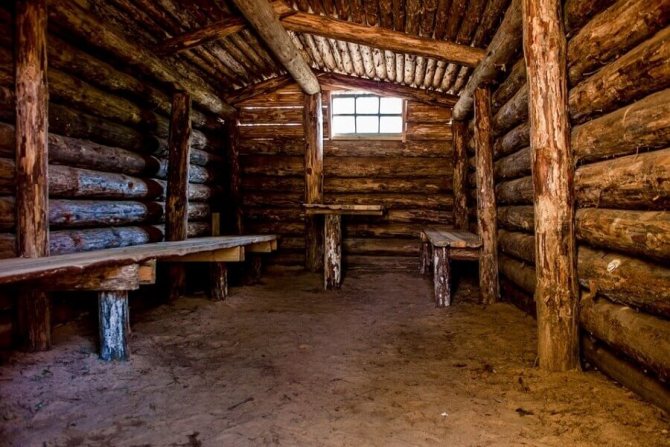
In some cases, the floor is left earthen, only compacted. For a more comfortable stay in the dugout, logs are made from the remains of logs (beams), which are leveled using a level. Boards or chipboards are nailed onto them. For insulation, heat-insulating material is used, on which plywood or linoleum is laid.
The stove is built from brick or a camp stove is installed on the ground, below floor level, so that moisture does not accumulate on the surface of the ground and the floor is warm. It is better to route the pipe, in a protective casing, into one of the end walls. A do-it-yourself dugout requires compliance with fire safety rules, so the stove is placed at least 50 cm from the wooden walls and covered with an asbestos slab.
Making a dugout from available materials is not so difficult. At the same time, it will be a reliable shelter from predators and bad weather, which will be suitable even in winter, since a stove or other heat source can be installed inside the dugout.
Interior decoration
For a comfortable stay, you should pay a lot of attention to the internal arrangement of the dugout. The home should be clean, comfortable, easy to use and equipped with everything necessary for living.
The first attribute is the oven. Its main purpose is to warm the room, but the presence of a stove will also give the home a homely feel. Before building a dugout with a stove, consider what type of stove will be acceptable and convenient for you. A potbelly stove would be an excellent option. In this case, you are only responsible for choosing a good place to place it. Other ovens require heat-resistant bricks or stones. The area around the stove itself should be separated with a sheet of iron or brickwork.
Also think about how to make the dugout comfortable and practical. It is better to place the lounger (bed) away from the exit and the stove. Usually the lowest area in the dugout is chosen. For a comfortable stay, do not forget about such types of furniture as chairs, a table, and a storage rack. Housing lighting also needs to be considered. There are several options for this: a classic candle is the most budget option, but it is enough to illuminate a small space, and supplies of candles should be made in advance.
A solar lamp replaces 2-3 candles, the lamp is charged to maximum within one day (provided it is sunny), this charge lasts for 10-12 hours. The rechargeable lamp takes 14 hours to charge from the mains; its charge lasts for 6 hours. As we can see, these options are practical, but not always reliable. In the summer, any of the lighting sources will be enough, but in the winter there will be little such lighting. Consider all options for lighting devices and stock up on various lighting sources, so you won’t be left without light.
Floor and stove in an earthen house
How to build a dugout, make a floor and a safe stove? When designing an “earth” house, you need to clearly know the answers to these questions.
In some cases, the floor is left earthen, only compacted. For a more comfortable stay in the dugout, logs are made from the remains of logs (beams), which are leveled using a level. Boards or chipboards are nailed onto them. For insulation, heat-insulating material is used, on which plywood or linoleum is laid.
The stove is built from brick or a camp stove is installed on the ground, below floor level, so that moisture does not accumulate on the surface of the ground and the floor is warm. It is better to route the pipe, in a protective casing, into one of the end walls. A do-it-yourself dugout requires compliance with fire safety rules, so the stove is placed at least 50 cm from the wooden walls and covered with an asbestos slab.
Making a dugout from available materials is not so difficult. At the same time, it will be a reliable shelter from predators and bad weather, which will be suitable even in winter, since a stove or other heat source can be installed inside the dugout.